Cold Pasta Salad Simple and Flavorful Recipe


Are you ready to impress your family and friends with a delicious Cold Pasta Salad? This simple and flavorful recipe is packed with fresh veggies and zesty dressing, perfect for any occasion. I’ll take you through easy steps to create a pasta salad that is both fun and satisfying. From choosing the right ingredients to serving tips, I guarantee you’ll have a dish that everyone loves. Let’s dive in!
Why I Love This Recipe
- Refreshing Flavor: This pasta salad is light and refreshing, perfect for warm days or gatherings.
- Easy to Make: With simple ingredients and straightforward steps, it’s a breeze to prepare.
- Customizable: You can easily add or substitute vegetables based on your preference or what’s in season.
- Make-Ahead Meal: This salad can be prepared in advance, making it ideal for meal prep or picnics.
Ingredients
Main Ingredients for Cold Pasta Salad
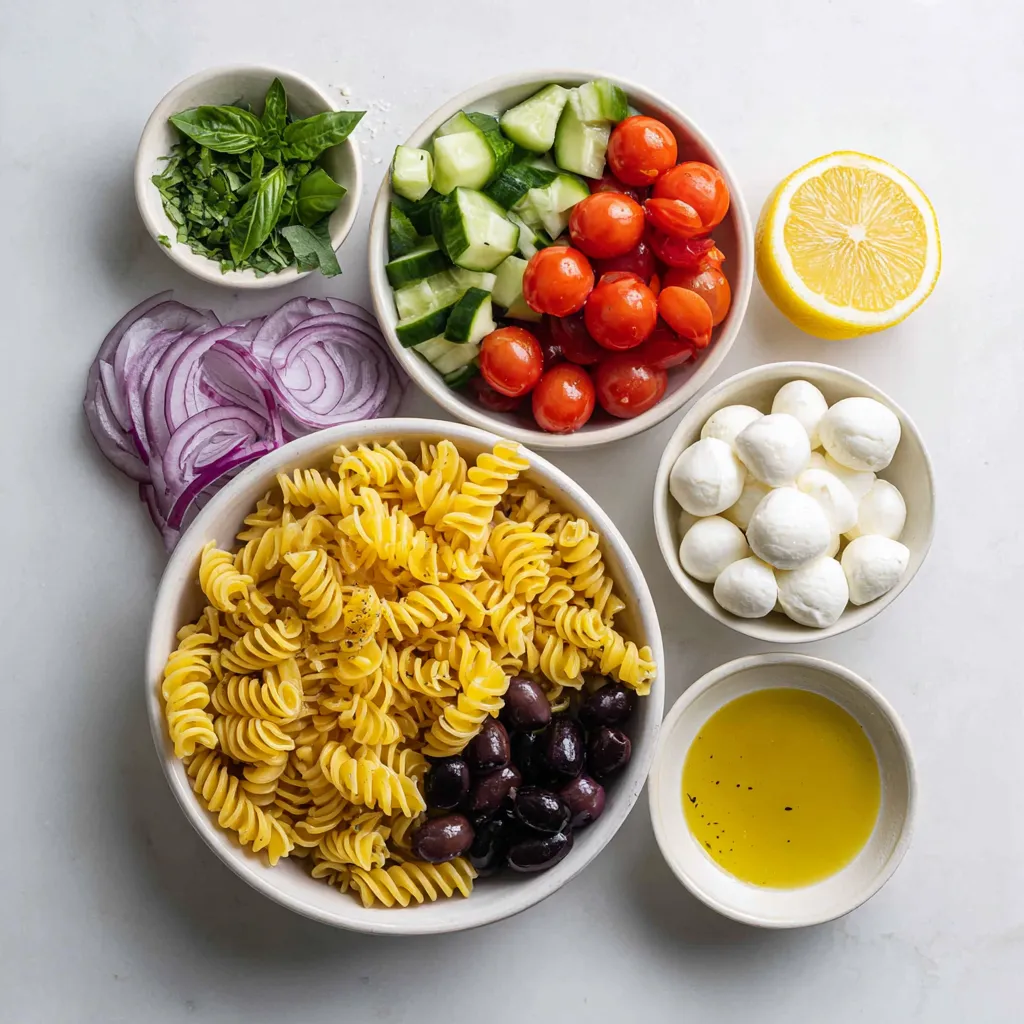
To make a tasty cold pasta salad, you need a few key items. Here’s what I use:
– 8 ounces fusilli or rotini pasta
– 1 cup cherry tomatoes, halved
– 1 cup cucumber, diced
– 1/2 cup red bell pepper, finely chopped
– 1/4 cup red onion, finely chopped
– 1/4 cup black olives, sliced
– 1/2 cup fresh mozzarella balls, halved
– 1/4 cup fresh basil leaves, chopped
Using these fresh ingredients makes the salad bright and colorful.
Vegetable Additions
Adding veggies gives your pasta salad a great crunch and taste. I love using:
– Cherry tomatoes for sweetness
– Cucumber for a refreshing bite
– Red bell pepper for color and crunch
– Red onion for a sharp flavor
– Black olives for a salty touch
Feel free to mix and match your favorite veggies. You can add spinach, zucchini, or even artichokes!
Dressings and Seasonings
The dressing brings everything together. I use a simple lemon vinaigrette. Here’s what you need:
– 1/4 cup extra virgin olive oil
– 2 tablespoons fresh lemon juice
– Zest of 1 lemon
– Salt and black pepper to taste
This dressing is light and bright. It enhances the flavors of the pasta and veggies without overpowering them. You can also try adding herbs or a splash of vinegar for a twist!
Step-by-Step Instructions
Cooking the Pasta
First, you need to boil a large pot of salted water. Use enough water to cover the pasta. Once the water is boiling, add the fusilli or rotini pasta. Cook it according to the package instructions. This usually takes about 8-10 minutes. You want the pasta to be al dente, which means it should be firm but not hard. After cooking, drain the pasta in a colander. Rinse it under cold water to stop the cooking. This keeps the pasta from getting mushy. Set it aside to cool completely.
Preparing the Vegetables
Now, grab a large mixing bowl. In this bowl, add the halved cherry tomatoes, diced cucumber, finely chopped red bell pepper, and red onion. Next, toss in the sliced black olives and halved mozzarella balls. Finally, add the chopped fresh basil leaves. Gently mix all the vegetables together. You want them evenly distributed for the best flavor.
Making the Lemon Vinaigrette
In a small bowl, whisk together the extra virgin olive oil, fresh lemon juice, and lemon zest. Add a pinch of salt and black pepper to taste. Whisk until the mixture is well combined. This creates a bright and zesty dressing for the salad. The lemon adds a nice fresh flavor.
Combining Ingredients
Now it’s time to bring everything together. Add the cooled pasta to the bowl of mixed vegetables. Gently toss all the ingredients together. You want to coat the pasta and vegetables with the dressing. Make sure everything is well blended. This ensures that every bite is flavorful.
Chilling and Serving Instructions
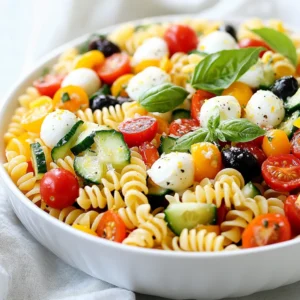
Cover the salad bowl with plastic wrap or transfer it to an airtight container. Place it in the refrigerator for at least 30 minutes. This chilling time helps the flavors meld together. When you are ready to serve, stir the salad gently again. You can garnish with more fresh basil leaves or a few halved cherry tomatoes for a pop of color. Enjoy your refreshing cold pasta salad!
Tips & Tricks
How to Ensure Perfect Pasta Texture
To get the best pasta, cook it al dente. This means it should be firm but not hard. Follow the cooking time on the package. After boiling, drain the pasta and rinse it with cold water. This stops the cooking and cools it down. Make sure to toss it with a little olive oil. This keeps the pasta from sticking together.
Ideas for Fresh Herb Substitutions
Basil shines in this salad, but many other herbs work too. Try parsley or cilantro for a fresh twist. Dill adds a nice flavor if you want something different. You can even mix herbs for a unique taste. Just chop them finely and add them to the salad.
Serving Suggestions for Optimal Freshness
Serve this pasta salad in a large bowl. It looks great and makes it easy to share. To keep it fresh, add a little olive oil just before serving. This gives it a nice shine. You can also top it with extra herbs or fresh veggies. This adds color and makes it even more appetizing. Enjoy your dish chilled for the best taste!
Pro Tips
- Perfect Pasta Texture: Make sure to cook the pasta al dente for the best texture. It should be firm to the bite, as it will continue to absorb the dressing while chilling.
- Fresh Ingredients Matter: Use the freshest vegetables and herbs you can find. Fresh basil and ripe tomatoes will elevate the flavor of your pasta salad immensely.
- Enhance the Vinaigrette: For a deeper flavor, consider adding a teaspoon of Dijon mustard or a pinch of red pepper flakes to the vinaigrette.
- Chill for Flavor: Allow the salad to chill for at least 30 minutes before serving. This resting time helps the flavors meld together beautifully.

Variations
Vegetarian Cold Pasta Salad Swaps
If you want to make a vegetarian pasta salad, you have many options. You can swap the mozzarella for vegan cheese. This keeps the creamy feel while being dairy-free. Instead of olives, try artichoke hearts for a different flavor. You can also add roasted red peppers for sweetness. For crunch, consider using sunflower seeds or nuts. These swaps keep your salad fresh and exciting.
Protein Additions for Heartiness
To make your pasta salad more filling, add protein. Grilled chicken is a popular choice. It brings a smoky flavor that pairs well with lemon. You can also use chickpeas for a plant-based protein. They add a nice texture and are very healthy. If you enjoy seafood, shrimp works great in this salad too. Toss in some tuna if you like a hearty bite.
Alternative Dressings for a Flavor Boost
Dressings can change the whole dish. Try adding pesto for a bold taste. It brings a rich, herby flavor that brightens the salad. A balsamic vinaigrette adds sweetness and tang. For something spicy, mix in some sriracha with the lemon vinaigrette. You can even try a yogurt-based dressing for creaminess without heavy oils. Each dressing option lets you enjoy a new twist on your cold pasta salad.
Storage Info
How to Store Leftovers Properly
To keep your cold pasta salad fresh, store it in an airtight container. This helps keep the flavors strong and the texture nice. Make sure to remove as much air as possible before sealing. If you have leftovers, eat them within three days for the best taste. Check for any signs of spoilage before serving.
Making Ahead of Time Tips
You can make this cold pasta salad a day ahead. This gives it time to chill and flavors to mix. Prepare the salad, then cover it tightly and put it in the fridge. Just remember to add fresh basil right before serving. This keeps it looking bright and tasting fresh.
Freezing Guidance for Cold Pasta Salad
Freezing this pasta salad is not recommended. The texture of the pasta and veggies may change when thawed. If you want to save some for later, try freezing just the pasta. Cook it, cool it, then freeze it in a single layer. You can then add fresh veggies and dressing when ready to eat.
FAQs
Can I use different types of pasta?
Yes, you can use many types of pasta. Fusilli and rotini are great, but any short pasta works. Penne or farfalle are good choices too. Just remember to cook the pasta until it is al dente. This keeps it firm and tasty in the salad.
What vegetables are best for cold pasta salad?
You can use many fresh vegetables in your salad. Cherry tomatoes, cucumbers, and bell peppers add color and crunch. Red onions give it a slight bite. Black olives add a nice salty flavor. Feel free to mix in your favorites. Fresh herbs like basil bring an extra layer of taste.
How long can I store cold pasta salad in the fridge?
You can store cold pasta salad for about three to five days. Keep it in an airtight container for best results. If it starts to look or smell odd, it is best to throw it away. Always check before eating leftovers!
You learned how to create a tasty cold pasta salad. I covered key ingredients, from pasta to veggies and dressings. The steps for cooking, making the vinaigrette, and combining all the parts make it easy. I also shared tips for texture and freshness and various fun swaps for your salad. Finally, I explained how to store leftovers. With this guide, you can enjoy your salad anytime. Dive in and make your own delicious versio
Chilled Lemon Basil Pasta Salad
Ingredients
- 8 ounces fusilli or rotini pasta
- 1 cup cherry tomatoes, halved
- 1 cup cucumber, diced
- 1 1/2 cup red bell pepper, finely chopped
- 1 1/4 cup red onion, finely chopped
- 1 1/4 cup black olives, sliced
- 1 1/2 cup fresh mozzarella balls, halved
- 1 1/4 cup fresh basil leaves, chopped
- 1 1/4 cup extra virgin olive oil
- 2 tablespoons fresh lemon juice
- 1 zest lemon
- to taste salt and black pepper
Instructions
- Begin by boiling a large pot of salted water. Add the fusilli or rotini pasta and cook according to the package instructions until al dente. Once cooked, drain the pasta and rinse it thoroughly under cold water to halt the cooking process. Set aside to cool completely.
- In a large mixing bowl, combine the halved cherry tomatoes, diced cucumber, finely chopped red bell pepper, finely chopped red onion, sliced black olives, halved mozzarella balls, and chopped fresh basil leaves. Mix gently to ensure an even distribution of ingredients.
- In a separate small bowl, whisk together the extra virgin olive oil, freshly squeezed lemon juice, lemon zest, and a pinch of salt and black pepper until the mixture emulsifies and is well combined.
- Add the cooled pasta to the bowl of mixed vegetables. Gently toss everything together until well blended, ensuring each ingredient is coated.
- Pour the lemon vinaigrette over the pasta salad. Mix gently yet thoroughly, ensuring the pasta and vegetables are well coated with the dressing.
- Cover the salad bowl with plastic wrap or transfer the mixture into an airtight container. Place it in the refrigerator for at least 30 minutes, allowing the flavors to meld and develop.
- Once chilled, stir the salad gently again before serving. Garnish with additional fresh basil leaves if desired for a vibrant touch.
![To make whipped feta dip, you need some key ingredients: - 1 cup crumbled feta cheese - 1/2 cup softened cream cheese - 1/4 cup creamy Greek yogurt - 2 tablespoons extra virgin olive oil - 1 tablespoon fresh lemon juice - 2 cloves garlic, minced finely - 1 teaspoon fresh thyme leaves (or 1/2 teaspoon dried thyme) - Salt and black pepper to taste These ingredients create a smooth and creamy base. The feta gives it a salty taste. The cream cheese and yogurt add richness. Olive oil adds a nice touch of flavor. Lemon juice brightens the dip, while garlic and thyme add depth. Toppings can elevate your dip and add color. Here are some great options: - Halved cherry tomatoes - Pitted olives - A sprinkle of fresh herbs Adding these toppings not only enhances the taste but also makes your dip look beautiful. Fresh herbs like parsley or basil pair well with feta's flavor. You can customize this dip with some easy swaps. If you want a lighter dip, use low-fat cream cheese or yogurt. For a vegan version, try using cashew cream instead of cream cheese. You can also use fresh herbs like oregano or dill in place of thyme. These changes let you enjoy the dip while fitting your taste or dietary needs. For the full recipe, you can refer to the recipe section above. Start by gathering your cheese ingredients. You need crumbled feta, cream cheese, and Greek yogurt. In a large bowl, mix them together. Make sure the cream cheese is soft. This helps it blend well. Use a spatula to combine them first. This step makes blending easier later. Next, grab your electric mixer or food processor. Blend the cheese mixture on medium speed. This should take about 2-3 minutes. You want it to be smooth and creamy. If you see lumps, keep blending. The goal is to make it fluffy. After blending, add olive oil, lemon juice, minced garlic, and thyme. Sprinkle in some salt and pepper. Blend again until everything is mixed well. Taste your dip and adjust seasoning if needed. When ready, transfer it to a nice bowl. Make a small well in the center and drizzle olive oil. For a pretty touch, add halved cherry tomatoes, olives, or fresh herbs on top. Serve it with pita chips or fresh veggies. Enjoy this creamy delight! For the full recipe, check out the Whipped Feta Delight Dip. To get the best texture, start with room-temperature cream cheese. It mixes better. Use a mixer or food processor for a smooth finish. Blend the cheeses for 2-3 minutes. This gives you a light and fluffy dip. If you want it creamier, add more yogurt or olive oil. The key to great flavor lies in your seasonings. Fresh garlic adds a strong kick. I love using fresh thyme. It brings a nice herbal touch. A squeeze of lemon juice brightens the dip. Taste as you go; adjust salt and pepper to your liking. If you want a little heat, add a pinch of red pepper flakes. Serve your whipped feta dip with crispy pita chips. Fresh veggies like carrots and cucumbers are great too. For a fun twist, use crusty bread. Garnish with cherry tomatoes or olives for color. This adds a nice pop to your dish. Explore different serving bowls to make it look fancy. You can find the Full Recipe above for more details. {{image_4}} To create a Mediterranean twist, add sun-dried tomatoes and black olives. These ingredients bring a burst of flavor that pairs perfectly with feta. You might also include fresh basil or mint for a refreshing note. Serve this dip with warm pita bread or crunchy veggies for a delightful snack. If you love heat, consider adding red pepper flakes or diced jalapeños. This will give your dip a fiery kick. You can also mix in a splash of hot sauce for an extra layer of flavor. Try serving with spicy tortilla chips or crispy celery sticks for a fun twist. For a vegan version, swap the feta and cream cheese for silken tofu and nutritional yeast. Blend them together with olive oil and lemon juice. This mix creates a creamy base that tastes great. Add your favorite herbs and spices for added flavor. Serve with fresh veggies for a healthy snack. Explore the [Full Recipe] to make your own whipped feta dip and customize it with these variations! To store whipped feta dip, place it in an airtight container. This keeps moisture out and flavors in. Make sure to press plastic wrap directly onto the dip before sealing the container. This extra layer helps prevent air from changing the dip's taste. You can enjoy whipped feta dip cold or warm. If you prefer it warm, gently heat it in the microwave. Start with 15 seconds, stir, and then heat in short bursts. Be careful not to overheat; you want it creamy, not hot. Whipped feta dip lasts about 4 to 5 days in the fridge. Check for any off odors or mold before using it. If it smells sour or looks different, toss it out. Freshness is key for this tasty dip! The best way to serve whipped feta dip is with a variety of dippers. I love using crispy pita chips, fresh veggies, or crusty bread. You can also pair it with crackers for added crunch. Place the dip in a nice bowl and drizzle some olive oil on top. Add colorful toppings like cherry tomatoes or olives for a pop of color. This makes the dip look great and taste even better. Yes, you can make whipped feta dip ahead of time. It stays fresh in the fridge for up to three days. Just store it in an airtight container. When you’re ready to serve, give it a quick stir. This keeps it creamy and smooth. If it thickens, add a little olive oil or yogurt to loosen it up. This way, you save time when guests arrive. If your dip is too salty, don't worry. You can fix it! Add a little more cream cheese or Greek yogurt to balance the salt. Blend it well to mix. You can also add a splash of lemon juice. This brings freshness and brightens the flavor. If you’re in a pinch, a pinch of sugar can help too. Taste as you go, so you get the flavor just right. We explored all about whipped feta dip, from essential ingredients to fun variations. You learned how to create a creamy dip that impresses friends. Remember, you can customize toppings and even make vegan options. Proper storage keeps your dip fresh and tasty. With these tips, whipping up this dish is easy and fun. Enjoy sharing your whipped feta dip at your next gathering. Trust me, it’s a crowd-pleaser!](https://joymealplan.com/wp-content/uploads/2025/07/35a48388-1c52-4076-af09-d3ade9d891c4-768x768.webp)


. Yes, you can prepare Classic Caprese Skewers in advance. Assemble the skewers up to a few hours ahead of time. Just keep them in the fridge. To keep them fresh, cover them with plastic wrap. Avoid adding olive oil or balsamic glaze until you are ready to serve. This keeps the skewers from getting soggy. Right before serving, drizzle the oils and season with salt and pepper. To serve Caprese Skewers, presentation matters. Arrange them upright in a jar or glass. This creates a lovely display. You can add extra basil leaves around them for color. A small bowl of balsamic glaze on the side is a great touch. It invites guests to dip the skewers. Make sure each skewer is easy to grab. This helps keep the party fun and relaxed. You now have all the steps to create delicious Caprese skewers. From gathering fresh ingredients to assembling and serving them, it’s simple and fun. Remember to choose quality produce and experiment with variations to keep things exciting. These skewers not only look great but taste amazing too. Serve them at your next gathering, and watch your guests enjoy every bite. Enjoy your kitchen adventure, and savor the delicious results!](https://joymealplan.com/wp-content/uploads/2025/06/97cab98c-e756-45a3-bf7b-ace4126d32cb-768x768.webp)