
Ground Turkey and Orzo Flavorful Family Meal
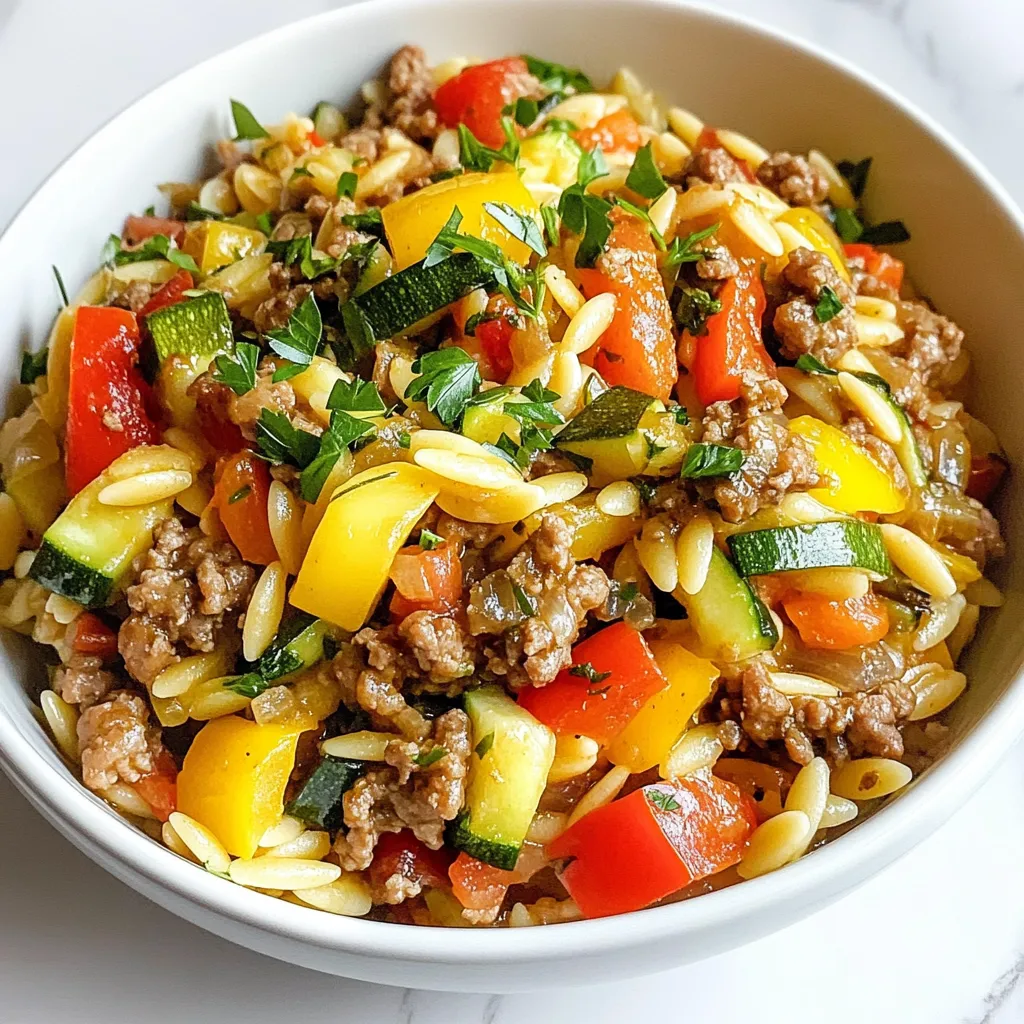

Looking for a tasty family meal? Try my Ground Turkey and Orzo recipe. This dish combines lean turkey, chewy orzo, and fresh veggies for a balanced feast. With simple ingredients and easy steps, you’ll have a warm dinner ready in no time. Plus, I’ll share extra tips to elevate flavor and ensure perfect cooking. Let’s make dinner fun and delicious together!
Why I Love This Recipe
- Healthy and Delicious: This dish combines lean ground turkey with a variety of colorful vegetables, making it both nutritious and flavorful.
- One-Pot Wonder: Cooking everything in a single skillet minimizes cleanup, making this recipe perfect for busy weeknights.
- Quick and Easy: With a total cooking time of just 30 minutes, this meal is perfect for those who want a homemade dinner without spending hours in the kitchen.
- Customizable: This recipe allows for easy substitutions; feel free to swap in your favorite veggies or protein for a personalized touch.
Ingredients
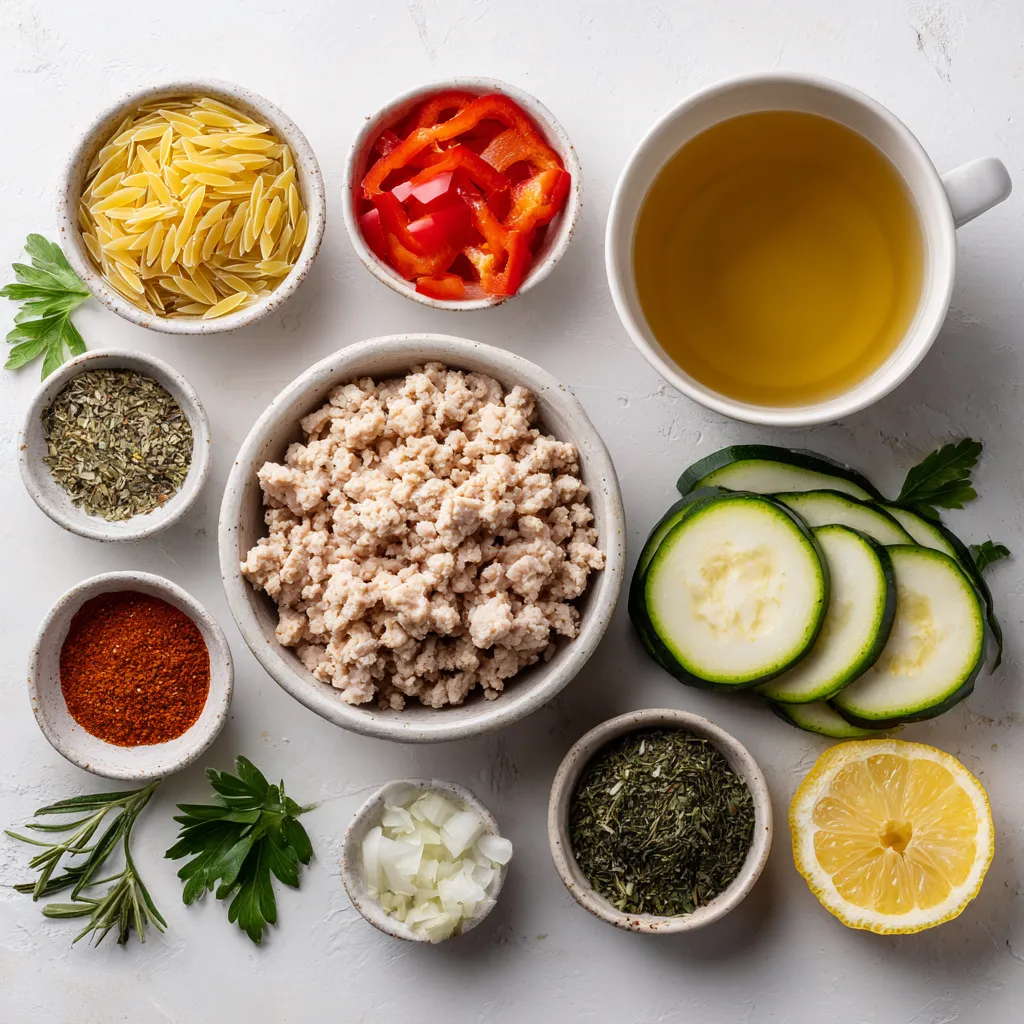
Main Ingredients
– 1 pound ground turkey
– 1 cup orzo pasta
– 1 medium onion, diced
– 2 cloves garlic, minced
– 1 red bell pepper, diced
– 1 zucchini, diced
Ground turkey is lean and flavorful. It cooks quickly and keeps your meal light. Orzo pasta is small and cooks fast, soaking up flavors well. The vegetables add color and nutrition. Onion gives a sweet base, while garlic adds depth. Red bell pepper brings crunch and sweetness. Zucchini provides moisture and a mild taste.
Seasonings and Broth
– 1 teaspoon dried oregano
– 1 teaspoon smoked paprika
– 2 cups chicken broth
Dried oregano adds a warm, earthy taste. Smoked paprika gives a nice, subtle smokiness. Chicken broth is key for rich flavor. It helps meld all the ingredients together. This broth keeps the dish moist and delicious.
Garnishes and Extras
– 1 tablespoon lemon juice
– Fresh parsley, chopped (for garnish)
– Salt and pepper, to taste
Lemon juice brightens the dish and balances flavors. Fresh parsley adds a touch of color and freshness. Salt and pepper elevate every bite. Adjust these to fit your taste.
Step-by-Step Instructions
Preparation Steps
– Sauté onion and garlic
Heat 2 tablespoons of olive oil in a large skillet over medium heat. When the oil shimmers, add the diced onion. Cook it for about 3-4 minutes until it softens and turns clear. Then, add 2 cloves of minced garlic. Stir for 2 more minutes until the garlic smells great.
– Brown ground turkey
Turn the heat to medium-high. Add 1 pound of ground turkey to the skillet. Use a spatula to break it apart as it cooks. Sauté for about 5-6 minutes until it’s browned and no longer pink. Make sure to stir it often for even cooking.
Cooking Instructions
– Incorporate vegetables and seasonings
Add 1 diced red bell pepper, 1 diced zucchini, 1 teaspoon of dried oregano, and 1 teaspoon of smoked paprika to the skillet. Season with salt and pepper to taste. Cook everything together for another 3 minutes. This helps the vegetables soften and blend flavors.
– Mix in orzo and broth
Stir in 1 cup of orzo pasta, making sure it mixes well with the turkey and veggies. Pour in 2 cups of chicken broth and bring the mixture to a gentle boil. Once it’s boiling, reduce the heat to low. Cover the skillet and let it simmer for about 10-12 minutes. This cooks the orzo and allows it to absorb most of the liquid.
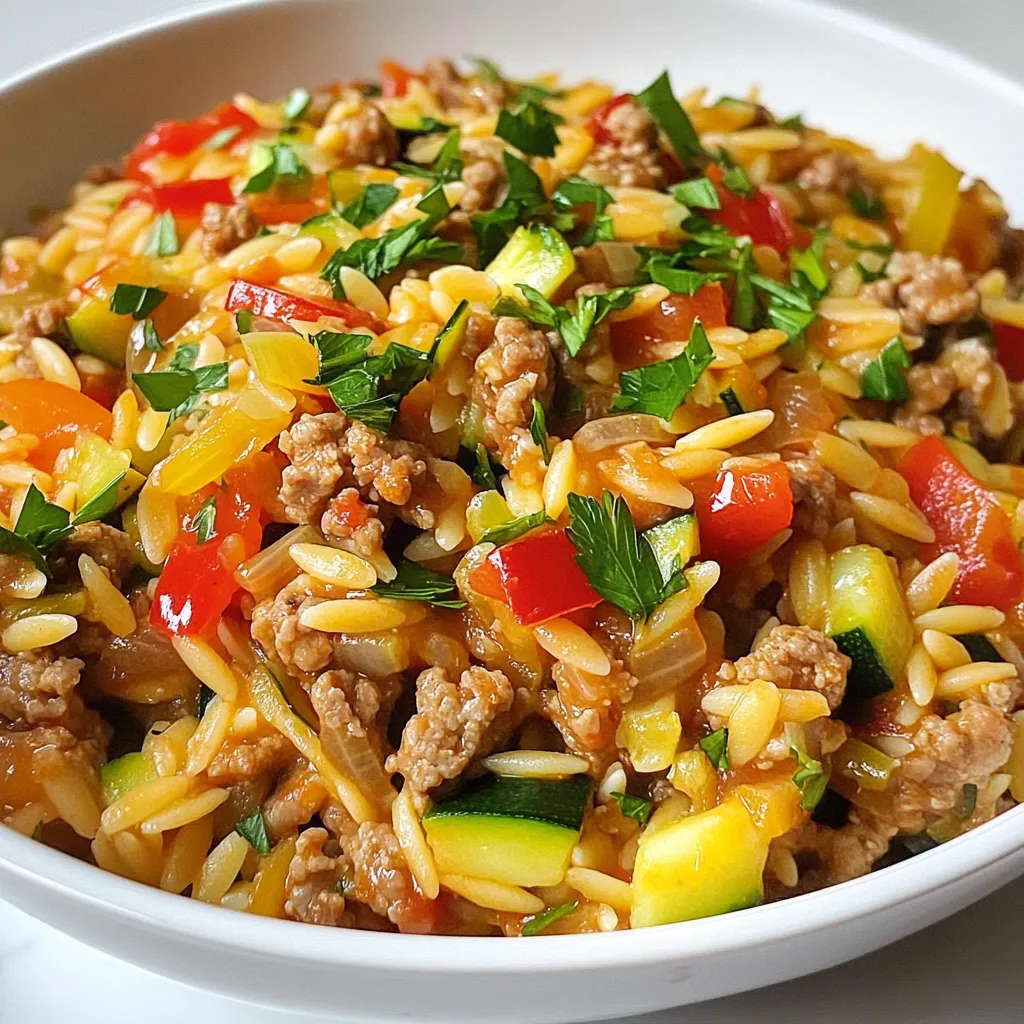
Final Touches
– Stir in lemon juice
After the orzo is tender, remove the skillet from the heat. Add 1 tablespoon of lemon juice for a fresh taste. Taste the dish and adjust the seasoning with more salt and pepper if you like.
– Garnish before serving
Let the dish rest for a few minutes before serving. For a nice touch, garnish with chopped parsley. This adds color and flavor to your meal.
Tips & Tricks
Cooking Tips
– Perfectly sautéing vegetables: Start with a hot skillet and olive oil. Add your onion first. Cook it until soft. Then, add garlic and bell pepper. Cook for a short time until fragrant. This builds a great base for flavor.
– Ensuring turkey is fully cooked: Cook ground turkey until it is brown and no longer pink. Use a spatula to break it up as it cooks. This ensures even cooking. Always check the center for doneness. The turkey should reach an internal temperature of 165°F.
Serving Suggestions
– Presentation ideas with garnishes: Serve your dish in shallow bowls. This way, the bright veggies stand out. Top with chopped parsley for color and a lemon wedge for zing. It makes the dish look fresh and inviting.
– Serving bowls and accompaniments: Use wide, shallow bowls to show off the dish. Pair it with crusty bread or a simple salad. These sides add texture and balance to the meal.
Timing Tips
– How to adjust cooking times for different stoves: Stoves vary in heat. If your stove runs hot, reduce cooking times slightly. If it runs cool, increase the cooking times. Always watch your dish closely.
– Best ways to check doneness of orzo: Taste a piece of orzo to check if it’s tender. It should be soft but not mushy. The orzo is done when it absorbs most of the broth but is still moist.
Pro Tips
- Keep It Moist: To ensure your orzo doesn’t get too dry, monitor the cooking time and add a splash more chicken broth if needed.
- Customize the Veggies: Feel free to swap in your favorite vegetables such as spinach, kale, or peas for added nutrition and flavor.
- Spice It Up: For an extra kick, add a pinch of red pepper flakes or cayenne pepper when cooking the ground turkey.
- Perfect Garnish: Fresh herbs like basil or mint can elevate the flavor; try them instead of parsley for a unique twist.
Variations
Ingredient Substitutions
You can swap out ground turkey for other meats. Ground chicken or beef works well. Each adds its own flavor. For pasta, try quinoa or whole wheat orzo. These options can change the meal’s texture and taste.
Flavor Enhancements
Boost the flavor by adding spices like cumin or chili powder. These spices add warmth and depth. You can also mix in more vegetables. Spinach and kale offer extra nutrients. They can brighten up your dish and add color.
Dietary Adaptations
If you need gluten-free options, use gluten-free pasta. This keeps the dish safe for those with gluten sensitivity. For a low-carb version, consider substituting orzo with cauliflower rice. This keeps the meal light and hearty without the carbs.
Storage Info
Storing Leftovers
To keep your ground turkey and orzo dish fresh, store leftovers in the fridge. Use an airtight container to prevent moisture loss. It’s best to refrigerate within two hours of cooking. This practice helps keep the flavors intact and reduces the risk of spoilage.
For freezing, let the dish cool completely. Then, transfer it to a freezer-safe container. Make sure to leave some space at the top, as the food will expand when frozen. Label the container with the date for easy tracking.
Reheating Instructions
You can reheat leftovers in several ways. The microwave is quick and easy. Place the dish in a microwave-safe bowl, cover it with a lid or a plate, and heat for one to two minutes. Stir halfway through for even heating.
If you prefer the stovetop, pour the leftovers into a skillet. Add a splash of chicken broth or water to keep it moist. Heat over medium-low, stirring occasionally. This method helps maintain the dish’s texture and flavor.
Shelf Life
In the refrigerator, your ground turkey and orzo will last for about three to four days. Always check for signs of spoilage before eating. If it smells off or looks discolored, it’s best to throw it away.
When frozen, the dish can last for up to three months. After this time, the quality may decline. To ensure freshness, use the dish within the recommended time frame.
FAQs
Common Questions About the Recipe
Can I make this dish ahead of time?
Yes, you can make this dish ahead of time. Cook it fully and let it cool. Store it in the fridge for up to three days. When you are ready to eat, reheat it on the stove or in the microwave.
Is it possible to make this recipe in one pot?
Yes, you can make this recipe in one pot. Use a large skillet or pot. Cook the veggies, turkey, and orzo all in the same pan. This saves time and makes cleanup easier.
Nutritional Information
How many calories are in a serving?
Each serving has about 350 calories. The exact number may vary based on your ingredients and portions.
What is the protein content of ground turkey and orzo?
Ground turkey is a great source of protein. A serving of this dish gives around 25 grams of protein. The orzo adds more nutrients too.
Cooking Techniques
How do I know when the turkey is fully cooked?
You know the turkey is fully cooked when it turns brown and is no longer pink inside. You can also use a meat thermometer. The safe internal temperature is 165°F.
Can I use leftover turkey in this recipe?
Yes, using leftover turkey is a smart idea. Just chop it up and add it when you cook the veggies. This saves time and adds flavor to the dish.
This blog post covered a flavorful turkey orzo dish. We explored key ingredients like ground turkey, orzo, and fresh veggies. I provided easy steps for cooking and tips for perfecting the dish. You can switch ingredients and find ways to enhance flavors. I also shared storage tips to keep your leftovers fresh. Remember, you can adapt this meal to suit your needs. Enjoy cooking and trying new flavors that make every bite count. Your kitchen adventures can lead to delicious meals for everyon

Ground Turkey & Orzo Delight
Ingredients
- 1 pound ground turkey
- 1 cup orzo pasta
- 1 medium onion, diced
- 2 cloves garlic, minced
- 1 unit red bell pepper, diced
- 1 unit zucchini, diced
- 1 teaspoon dried oregano
- 1 teaspoon smoked paprika
- 2 cups chicken broth
- 1 tablespoon lemon juice
- 1 unit Fresh parsley, chopped (for garnish)
- to taste unit Salt and pepper
- 2 tablespoons olive oil
Instructions
- Start by heating 2 tablespoons of olive oil in a large skillet over medium heat. Once the oil is shimmering, add the diced onion. Sauté for approximately 3-4 minutes, or until the onion becomes soft and translucent.
- Next, add the minced garlic and diced red bell pepper to the skillet. Cook this mixture for an additional 2 minutes, stirring frequently, until you can smell the fragrant aroma of the garlic.
- Increase the heat to medium-high. Add the ground turkey to the skillet, using a spatula to break it apart as it cooks. Sauté for about 5-6 minutes or until the turkey is browned and no longer pink. Make sure to stir occasionally for even cooking.
- Incorporate the diced zucchini, dried oregano, smoked paprika, and season with salt and pepper. Continue to cook everything together for another 3 minutes to allow the vegetables to soften.
- Once the vegetables are tender, stir in the orzo pasta, ensuring that it is well mixed with the turkey and vegetable medley.
- Pour in 2 cups of chicken broth, and bring the entire mixture to a gentle boil. Once boiling, reduce the heat to low, cover the skillet, and let it simmer for about 10-12 minutes, or until the orzo is cooked through and has absorbed most of the liquid.
- After the orzo is tender, remove the skillet from the heat and stir in the tablespoon of lemon juice. Taste and adjust seasoning with additional salt and pepper if desired.
- Allow the dish to rest for a few minutes before serving. To add a fresh touch, garnish with chopped parsley before plating.


![- 4 cups fresh spinach leaves, thoroughly washed and dried - 1 cup mixed berries (such as strawberries, blueberries, and raspberries) - 1/4 cup red onion, finely sliced I love using fresh spinach leaves as the base for this salad. They bring a bright green color and a crisp texture. The mixed berries add sweetness and a pop of color, making the salad look inviting. You can use any berries you have on hand. Strawberries, blueberries, and raspberries work well together. The red onion gives a nice sharpness that balances the sweetness of the berries. - 1/2 cup cooked quinoa, allowed to cool - 2 tablespoons chia seeds - 1/4 cup walnuts, chopped into small pieces - 1/4 cup feta cheese, crumbled Quinoa is a great superfood. It adds protein and makes the salad more filling. I always let it cool before adding it. Chia seeds are tiny but mighty. They boost nutrition and add a fun crunch. Walnuts provide a hearty bite and healthy fats. Feta cheese adds creaminess and a salty flavor. Together, these ingredients create a satisfying mix. - 3 tablespoons balsamic vinaigrette - Salt and pepper, to taste The balsamic vinaigrette ties everything together with its tangy flavor. I drizzle it over the salad just before serving. Always taste before you season. A pinch of salt and a dash of pepper can enhance the flavors. You can make your dressing or use store-bought for ease. For the full recipe, check out the Berry Spinach Superfood Salad section. 1. Start with a large salad bowl. Place 4 cups of fresh spinach leaves in it. This forms the base layer. The bright green color makes the salad inviting. 2. Next, take 1/2 cup of cooked quinoa that has cooled. Evenly spread it over the spinach. Quinoa adds a nutty flavor and protein to the mix. 3. Now, add 1 cup of mixed berries. Use strawberries, blueberries, and raspberries. Disperse them evenly. The berries bring sweetness and a pop of color. 4. Sprinkle 1/4 cup of chopped walnuts across the salad. They add a nice crunch. 5. Crumble 1/4 cup of feta cheese on top. This brings a creamy texture that balances the crunch of the walnuts. 6. Add 1/4 cup of finely sliced red onion. This adds a sharp flavor. 7. Finally, sprinkle 2 tablespoons of chia seeds over the salad. These are superfoods that boost nutrition. 8. Now, pour 3 tablespoons of balsamic vinaigrette all over the salad. Carefully toss the ingredients. Be gentle to avoid bruising the spinach. 9. Season with salt and pepper to taste. Adjust according to your preference. For serving, you can use a large bowl for a family-style meal. For individual servings, divide the salad into smaller bowls. Garnish each plate with extra berries and a sprinkle of chia seeds. This adds to the visual appeal. Use the [Full Recipe] for more details on making this delicious salad. If you want to switch things up, you can easily change the greens. Try kale or arugula for a new taste. They both add nice flavors and textures. For the berries, you have many options. You can use blackberries, cherries, or even diced mango. Each choice brings a unique twist to the salad. This salad pairs well with protein options. Grilled chicken, shrimp, or chickpeas make great additions. You’ll get a full meal with these proteins. Berry spinach superfood salad is perfect for many occasions. Serve it at picnics, potlucks, or family dinners. Its bright colors make it a hit at any gathering. To boost flavor, consider adding spices. A pinch of cinnamon or nutmeg can work wonders. They add warmth and depth to the salad. Toppings can add a fun crunch. Try sunflower seeds or roasted chickpeas for texture. You can even add crispy bacon for a savory kick. For the full recipe, check out the Berry Spinach Superfood Salad! {{image_4}} You can change the fruits in this salad with the seasons. In summer, use fruits like peaches or nectarines. These fruits add a juicy sweetness and a lovely texture. In the fall, swap in apples or pears. These fruits bring a crisp bite and complement the spinach well. If you follow a vegan diet, replace feta cheese with avocado. It adds creaminess without the dairy. You can also skip the cheese altogether for a lighter option. For those needing gluten-free options, this salad is naturally gluten-free. Just ensure the quinoa is certified gluten-free. To make this salad heartier, add proteins like grilled chicken or tofu. Both options boost the protein content and keep you full longer. You can also play with dressings. Try a honey mustard or a lemon-tahini dressing for a fresh twist. Each dressing changes the flavor and gives a new twist on the classic salad. For the complete recipe, check out the Full Recipe section. To keep your Berry Spinach Superfood Salad fresh, store the salad components separately. Place the spinach, quinoa, and berries in different containers. This method prevents sogginess and keeps flavors bright. You can add the nuts and feta just before serving. This way, you enjoy the crunch and creaminess every time. In the fridge, this salad lasts about three days. After that, the spinach may wilt, and the berries might spoil. Do not freeze the salad. Freezing changes the texture of spinach and berries. If you want to save quinoa, you can freeze it for later use. If you want to use leftover quinoa in a new salad, mix it with fresh ingredients. This adds a new flavor and keeps the dish exciting. For reheating quinoa, add a splash of water and microwave it for about one minute. This keeps it fluffy and tasty. Enjoy your leftovers with new twists! For the full recipe, refer back to the Berry Spinach Superfood Salad section. To keep your spinach salad fresh, store it in an airtight container. This helps lock in moisture and keeps the greens crisp. Place a paper towel inside to absorb excess moisture. If you want the best taste, eat the salad within two days. Yes, you can use other nuts in this salad. Almonds, pecans, or cashews work well. Each nut adds a unique flavor and crunch. Just chop them into small pieces before adding. This keeps the texture nice and even. To make the salad vegan, skip the feta cheese. You can replace it with avocado for creaminess. Another option is to use a dairy-free cheese. This keeps the flavors rich without animal products. Enjoy the same great taste while following a vegan diet! For the full recipe, check out the details above. In this blog post, we explored fresh ingredients for a vibrant salad. We used spinach, berries, quinoa, and topped it off with walnuts and feta. I shared easy steps for preparation and tips for serving and presentation. Variations, dietary options, and storage advice were also included. Remember, creativity makes cooking fun. Don't hesitate to add your own twists! Enjoy making this nutritious salad that fits any occasion.](https://joymealplan.com/wp-content/uploads/2025/06/ed68670f-61e3-4ee1-9cf1-77221924be16-768x768.webp)
![- 4 medium zucchinis - 1 pound ground turkey (or beef) - 1 small onion, finely diced - 2 cloves garlic, minced - 1 tablespoon taco seasoning - 1 can (14 oz) diced tomatoes, drained - 1 cup canned black beans, rinsed and drained - 1 cup corn kernels (fresh or frozen) - 1 cup shredded cheese (cheddar or Mexican blend) - 2 tablespoons olive oil - Fresh cilantro, chopped (for garnish) - Sour cream (optional) - Salt and pepper to taste When picking zucchinis, look for ones that are firm and bright. They should feel heavy for their size. Avoid any that are soft or have blemishes. For measuring, use a scale for the ground meat and a measuring cup for the beans and corn. When chopping onions and garlic, a sharp knife helps avoid tears. This ensures even cooking and great flavor in your dish. This taco stuffed zucchini boats recipe is full of fun and taste. You can find the full recipe above. Enjoy every bite! - Preheat your oven to 375°F (190°C). - Take 4 medium zucchinis and cut them in half lengthwise. Scoop out the seeds carefully. Leave enough flesh for support. - Brush the insides of the zucchini halves with 2 tablespoons of olive oil. Arrange them cut-side up on a baking sheet. - In a large skillet, heat 1 tablespoon of olive oil over medium heat. - Add 1 small onion, finely diced, and sauté until it is soft, about 3-4 minutes. - Next, add 2 minced cloves of garlic. Sauté for another minute until fragrant. - Add 1 pound of ground turkey (or beef) to the skillet. Break the meat apart with a spatula. Cook until it is browned, about 5-7 minutes. - Season with 1 tablespoon taco seasoning, salt, and pepper to taste. - Stir in 1 can of drained diced tomatoes, 1 cup of rinsed black beans, and 1 cup of corn kernels. Cook for another 2-3 minutes until everything is hot. - Remove from heat and fold in half of the 1 cup of shredded cheese until it melts slightly. - Carefully fill each zucchini boat with the taco mixture. Press down gently to pack it in. - Sprinkle the remaining cheese over the top of each stuffed zucchini. - Place the baking sheet in the oven and bake for 20-25 minutes. Check for tenderness and ensure the cheese is melted and golden. - Once cooked, remove from the oven and garnish each zucchini with chopped cilantro. - Serve warm with a dollop of sour cream, if desired. For the full recipe, check the Full Recipe section above. To make your zucchinis tender yet not mushy, follow these tips: - Choose medium zucchinis: They cook evenly and hold their shape well. - Scoop carefully: Leave enough flesh for support, but remove the seeds. - Preheat your oven: A hot oven helps the zucchinis cook just right. For sautéing your filling, use these methods: - Heat your skillet well: This helps to cook onions and garlic faster. - Add oil before ingredients: Olive oil prevents sticking and enhances flavor. - Stir often: This keeps your mixture from burning and ensures even cooking. Garnishing your taco stuffed zucchini boats adds a fresh touch. Here are some ideas: - Chop fresh cilantro: Sprinkle it on top for a pop of color and flavor. - Add a dollop of sour cream: It adds creaminess and balances the spice. Pair your zucchini boats with sides or salads. Some great options include: - Rice or quinoa: These grains add texture and heartiness. - A fresh garden salad: Crisp greens complement the warm, savory boats. For the full recipe, check out the [Full Recipe]. {{image_4}} You can change the meat in this dish easily. Ground chicken works great in place of turkey or beef. It gives a lighter flavor while still being filling. If you want a plant-based option, try using lentils or crumbled tofu. Both can soak up the tasty taco seasoning. You can also swap out the black beans. Try pinto beans or kidney beans for a new twist. They add different textures and flavors that make the dish fun. Adding spices can really change the taste. Try cumin or smoked paprika for an extra kick. You could also mix in some chili powder if you like it hot. Each spice brings its own personality to your zucchini boats. Cheese is another place to get creative. Instead of cheddar, use pepper jack for a spicy twist. Or, try a mix of different cheeses for depth. Condiments can also change the game. Consider adding salsa or guacamole on top. These add fresh flavors and make every bite exciting. You can find the full recipe for Taco Stuffed Zucchini Boats to explore all these variations! Store leftover zucchini boats in an airtight container. Use parchment paper to separate layers if stacking. This keeps them fresh for up to three days. Make sure to cool them down before sealing to avoid moisture buildup. To maximize freshness, place them in the fridge as soon as they cool. Reheat zucchini boats in the oven for the best results. Set your oven to 350°F (175°C) and bake for about 10-15 minutes. This method warms them evenly and keeps the texture nice. If you want a quicker option, use the microwave. Heat them for 1-2 minutes, but watch for sogginess. To avoid this, place a paper towel under the zucchini boats while reheating. This helps absorb extra moisture. For detailed cooking steps, check the Full Recipe. Enjoy your tasty leftovers! To make taco stuffed zucchini boats healthier, use low-fat ground turkey instead of beef. You can also choose low-fat cheese or skip it entirely for a lighter option. Adding more veggies boosts the nutrition. Consider mixing in diced bell peppers, spinach, or mushrooms. You can also serve them with a side salad for extra greens. This way, you enjoy a tasty dish while keeping it nutritious! Yes, you can freeze taco stuffed zucchini boats! Start by letting them cool completely. Wrap each boat in plastic wrap or foil. Place them in a freezer bag to save space. They can stay in the freezer for up to three months. When you’re ready to eat, let them thaw overnight in the fridge. Then, heat them in the oven until warm. Taco stuffed zucchini boats pair well with rice or quinoa. You can also serve them with tortilla chips and salsa for a fun crunch. For gatherings, consider adding some guacamole as a dip. Fresh fruit like watermelon or mango is a great side too. These options make your meal more exciting and flavorful! Taco stuffed zucchini boats offer a fun and tasty twist on dinner. You learned how to prepare fresh ingredients, cook a hearty filling, and assemble a dish that's sure to please. Remember, you can mix and match proteins and spices to fit your taste. Storing and reheating tips will help you enjoy leftovers without losing flavor. Dive into this dish for a healthy meal that’s easy to make and customize. Enjoy experimenting and sharing your tasty creations!](https://joymealplan.com/wp-content/uploads/2025/07/a6f85fbf-686b-42b4-a399-5784f990ec67-768x768.webp)