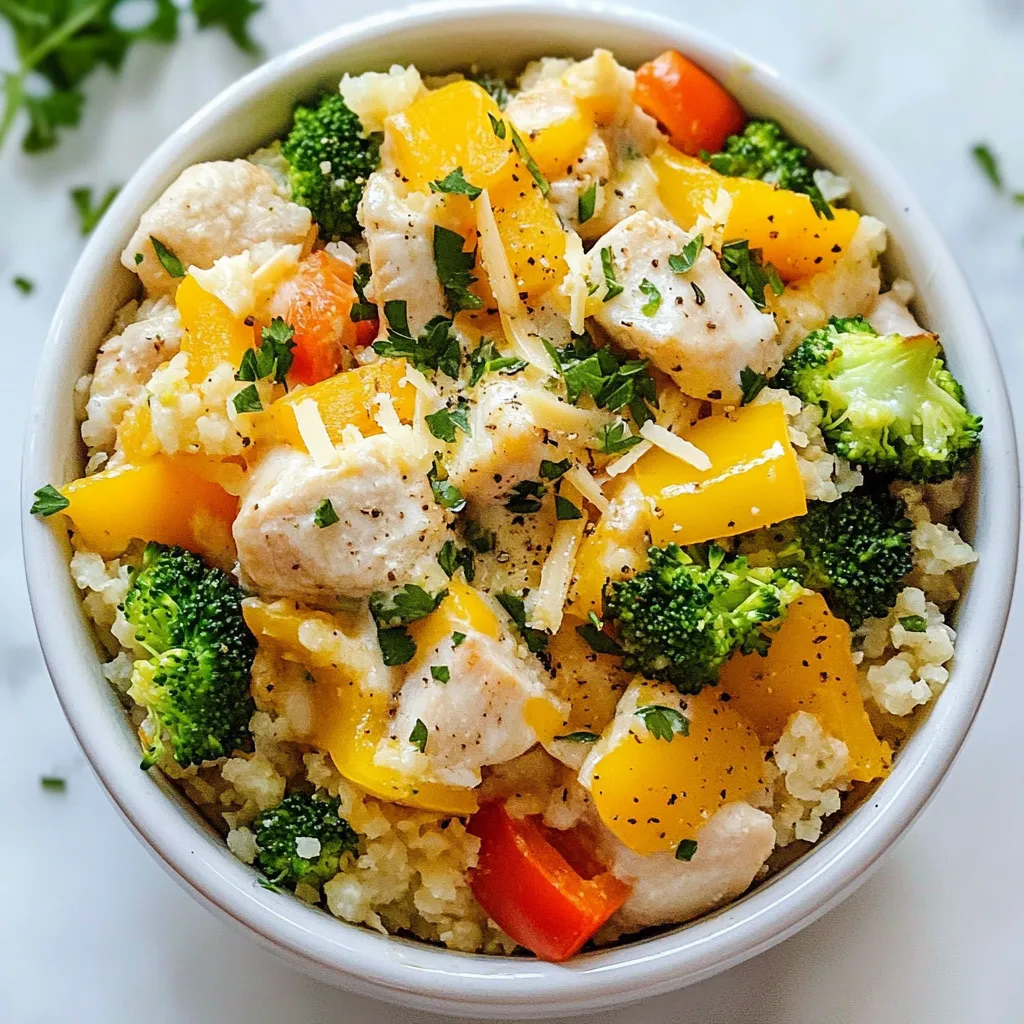
Healthy Chicken Cauliflower Rice Casserole Delight
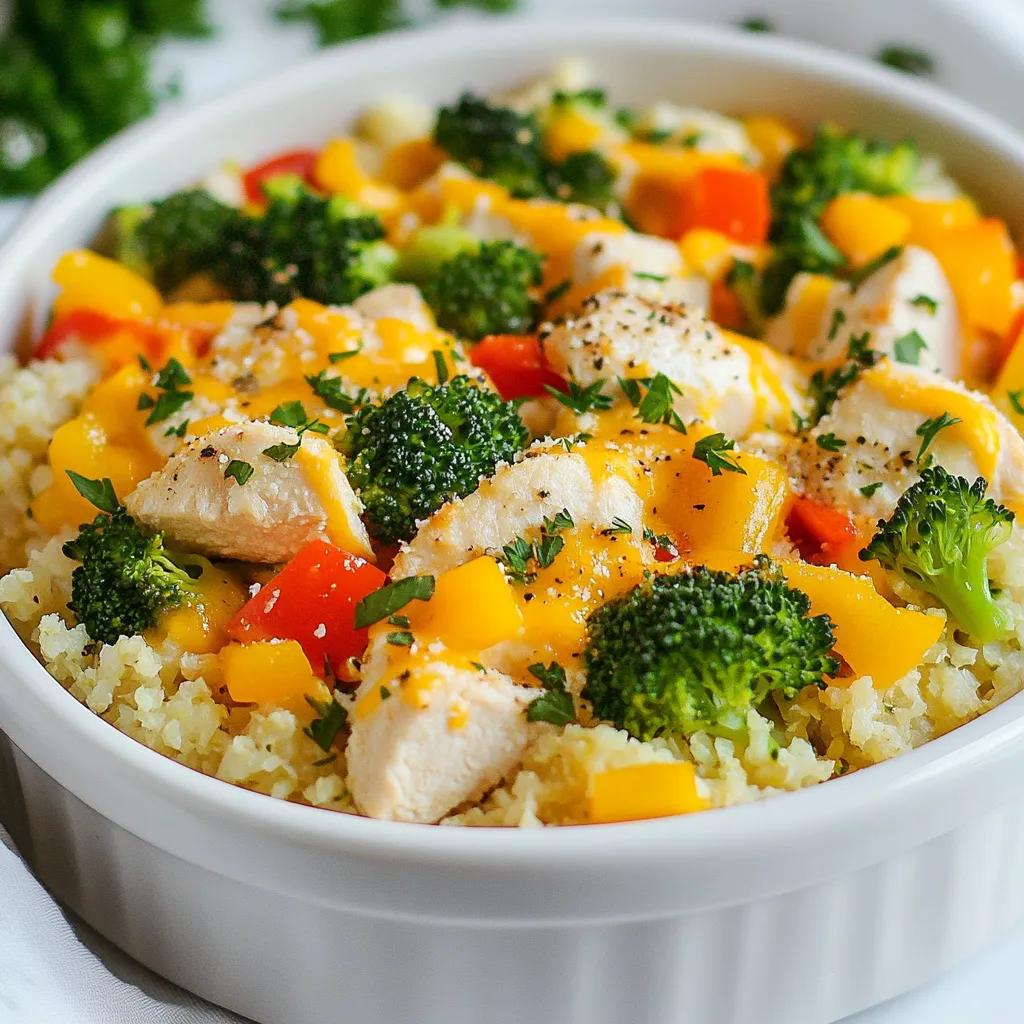

Looking for a cozy meal that’s both healthy and delicious? You’re in the right place! This Healthy Chicken Cauliflower Rice Casserole Delight combines tender chicken with tasty cauliflower rice for a dish you’ll love. It’s easy to make and perfect for any weeknight dinner. Plus, I’ll share tips to enhance the flavors and variations to suit everyone’s taste. Let’s dive into this simple and nutritious recipe!
Why I Love This Recipe
- Healthy Ingredients: This casserole is packed with nutritious vegetables and lean protein, making it a wholesome meal option for any day of the week.
- Easy to Make: With simple steps and quick preparation, this recipe is perfect for busy weeknights when you need a delicious meal without the fuss.
- Customizable: Feel free to swap in your favorite vegetables or adjust the spices to suit your taste, allowing you to make this dish your own.
- Comforting and Satisfying: This casserole offers a warm, hearty dish that is sure to please everyone at the table, making it an instant family favorite.
Ingredients
Complete Ingredient List
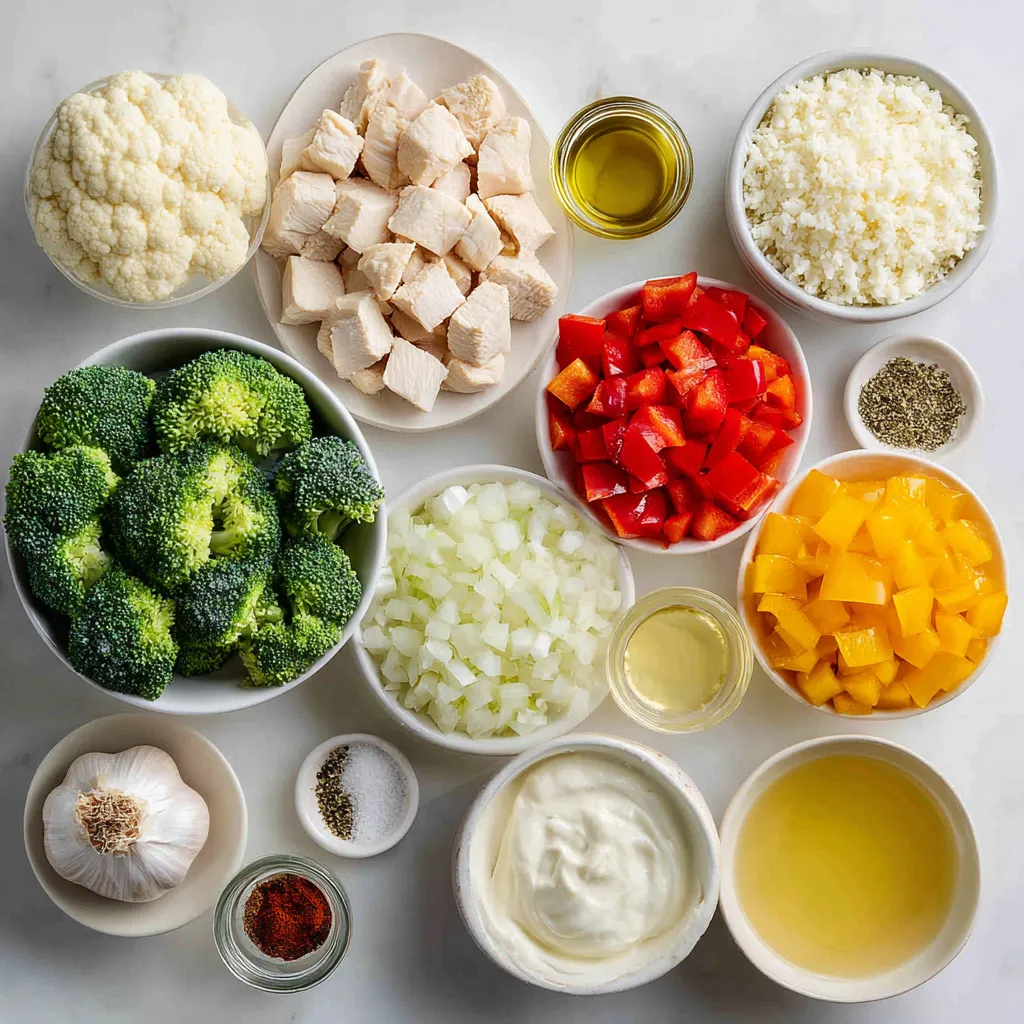
To make this healthy chicken cauliflower rice casserole, gather these ingredients:
– 2 cups cauliflower rice (fresh or frozen)
– 1 pound boneless, skinless chicken breast, cut into cubes
– 1 cup broccoli florets, chopped
– 1 cup diced bell peppers (mix colors for fun)
– 1 small onion, finely chopped
– 2 cloves garlic, minced
– 1 cup low-sodium chicken broth
– 1 cup plain Greek yogurt
– 1 teaspoon dried oregano
– 1 teaspoon paprika
– Salt and black pepper to taste
– 1 cup shredded low-fat cheese (optional)
– 2 tablespoons extra virgin olive oil
Options for Fresh vs. Frozen Cauliflower Rice
You can use either fresh or frozen cauliflower rice in this recipe. Fresh cauliflower rice has a bit more crunch and flavor. If you use frozen, just make sure to thaw and drain it well. This helps avoid extra moisture in the casserole. Both options work well and save time!
Substitutions for Other Ingredients
Feel free to swap some ingredients if needed. You can use turkey instead of chicken for a leaner option. If you don’t have Greek yogurt, sour cream can work too. For a dairy-free version, try a plant-based yogurt. You can also mix in other veggies, like zucchini or spinach, for added nutrition. Just remember to keep the flavors balanced!
Step-by-Step Instructions
Preparation and Preheating the Oven
First, you need to preheat your oven to 375°F (190°C). This step is key for a well-cooked casserole. While the oven heats up, gather all your ingredients. It helps to have everything ready before you start cooking.
Sautéing Aromatics and Cooking the Chicken
Next, grab a large skillet and heat 2 tablespoons of extra virgin olive oil over medium heat. Add 1 finely chopped onion and 2 minced garlic cloves to the pan. Sauté these for about 3-4 minutes. You want the onion to become soft and clear.
Once the onion is ready, add 1 pound of cubed boneless, skinless chicken breast. Season it with 1 teaspoon of dried oregano, 1 teaspoon of paprika, salt, and freshly ground black pepper. Cook the chicken for 5-7 minutes, stirring it often. The chicken should turn brown and be cooked all the way through.
Combining Ingredients and Baking the Casserole
Now it’s time to add the veggies. Mix 2 cups of cauliflower rice, 1 cup of chopped broccoli florets, and 1 cup of diced bell peppers into the skillet. Pour in 1 cup of low-sodium chicken broth and stir everything well. Let this cook for another 5 minutes. You want the vegetables to be tender but still a bit crisp.
In a separate bowl, take 1 cup of plain Greek yogurt and mix in a pinch of salt and pepper. Once your skillet mix is ready, remove it from the heat. Stir the yogurt into the chicken and veggie mix until blended.
Pour the mixture into a greased baking dish. If you love cheese, sprinkle 1 cup of shredded low-fat cheese on top. Then, place the dish in your preheated oven. Bake for 20-25 minutes. The casserole is done when it is heated through and the cheese is melted and bubbly.
After baking, let the casserole cool for a few minutes. This makes it easier to serve. Enjoy your meal!
Tips & Tricks
How to Make the Casserole Even Healthier
To boost the health factor of your casserole, try these tips:
– Use low-fat Greek yogurt instead of sour cream.
– Swap in more vegetables like spinach or zucchini.
– Choose skinless chicken breast for lower fat content.
– Add beans for fiber and protein.
These swaps keep the dish light and full of nutrients.
Flavor Enhancements and Seasoning Suggestions
A few simple tweaks can up the flavor of your casserole:
– Add fresh herbs like basil or thyme.
– Use lemon juice for a bright taste.
– Try different spices like cumin or coriander.
– Mix in a dash of hot sauce for heat.
These options bring new life to the dish while keeping it healthy.
Best Practices for Cooking Chicken in Casseroles
Cooking chicken right is key for a tasty casserole. Here’s how:
– Cut chicken into small, even pieces for quick cooking.
– Brown the chicken in a hot pan for flavor.
– Make sure it’s cooked through before adding to other ingredients.
– Avoid overcooking; it should be juicy but not pink.
Following these tips helps you achieve perfectly cooked chicken every time.
Pro Tips
- Use Fresh Ingredients: Whenever possible, opt for fresh vegetables and herbs to enhance the flavor and nutritional value of your casserole.
- Experiment with Spices: Feel free to add your favorite spices or herbs to the chicken mixture for an extra layer of flavor. Consider thyme or basil for a different twist.
- Customize Your Veggies: You can substitute or add other vegetables like zucchini, spinach, or carrots based on your preference and seasonal availability.
- Make Ahead: This casserole can be prepared in advance and stored in the refrigerator for up to 2 days. Just reheat in the oven before serving!
Variations
Vegetarian Version Using Chickpeas
You can easily change this casserole to a vegetarian dish. Just swap the chicken for chickpeas. Use one can of chickpeas, drained and rinsed. Chickpeas add protein and fiber. They also soak up the flavors well. This keeps the meal filling and healthy.
Additions for Extra Nutrients (e.g., Spinach, Kale)
Feel free to boost the nutrients in this dish. Adding spinach or kale works great. Simply toss in about 1 cup of fresh spinach or kale when you add the broccoli and bell peppers. These greens add vitamins and minerals. They also give a nice color to the dish.
Different Cheese and Dairy Variations
You can play with the cheese in this recipe too. If you want a stronger flavor, try sharp cheddar or feta. For a creamier taste, use ricotta or cream cheese. You can also use dairy-free options like almond or coconut yogurt. This way, everyone can enjoy the casserole!
Storage Info
How to Store Leftovers Properly
To store your leftover casserole, let it cool first. Place it in an airtight container. Make sure to cover it well to keep it fresh. You can keep it in the fridge for up to three days. If you want it to last longer, freezing is a great option.
Reheating Instructions for Optimal Flavor
When you are ready to eat the casserole again, you can reheat it. Preheat your oven to 350°F (175°C). Place the casserole in an oven-safe dish. Cover it with foil to keep moisture in. Bake for about 20 minutes, or until it’s hot all the way through. You can also microwave it if you are short on time. Just heat it in 1-minute intervals, stirring in between.
Freezing the Casserole for Future Meals
If you want to freeze the casserole, it’s best to do this before baking. Pour the mixture into a freezer-safe dish. Seal it well with plastic wrap and then foil. You can freeze it for up to three months. When you want to eat it, thaw it in the fridge overnight. After that, bake it as per the original recipe. This way, you can enjoy a healthy meal anytime!
FAQs
Can I use other types of meat in this casserole?
Yes, you can use other meats. Turkey or lean pork works well. You can also use ground meats. Just make sure to cook them through before adding to the dish. Each meat gives a unique flavor and texture.
Is this recipe suitable for meal prep?
Absolutely! This recipe is great for meal prep. You can make it ahead and store it in the fridge. Divide it into portions for easy meals during the week. Just reheat in the oven or microwave when ready to eat. This saves time and keeps you on track with healthy eating.
How can I serve this casserole for a crowd?
For a crowd, make a big batch in a larger dish. Use a 9×13 inch baking pan. Serve directly from the baking dish for easy serving. You can also set up a buffet style table. Add some fresh salad and bread on the side. This makes the meal more inviting and fun.
This blog post covered how to make a tasty casserole using cauliflower rice. You learned about the ingredients, step-by-step cooking, and tips to enhance flavor. I also shared variations for different diets and how to store leftovers. Cooking this dish is simple and satisfying. You can make it your own by adding your favorite veggies or proteins. Now, enjoy creating this comforting meal that fits your family’s needs. Dive in and let your kitchen be the heart of your hom

Healthy Chicken Cauliflower Rice Casserole
Ingredients
- 2 cups cauliflower rice
- 1 pound boneless, skinless chicken breast, cut into bite-sized cubes
- 1 cup broccoli florets, chopped
- 1 cup bell peppers, diced
- 1 small onion, finely chopped
- 2 cloves garlic, minced
- 1 cup low-sodium chicken broth
- 1 cup plain Greek yogurt
- 1 teaspoon dried oregano
- 1 teaspoon paprika
- to taste salt and freshly ground black pepper
- 1 cup shredded low-fat cheese (optional)
- 2 tablespoons extra virgin olive oil
Instructions
- Preheat your oven to 375°F (190°C).
- In a large skillet, heat the olive oil over medium heat. Add the finely chopped onion and minced garlic. Sauté for about 3-4 minutes, or until the onion becomes soft and translucent.
- Incorporate the cubed chicken breast into the skillet. Season with dried oregano, paprika, salt, and pepper. Cook the chicken for 5-7 minutes, stirring occasionally, until it is browned on the outside and no longer pink in the center.
- Mix in the cauliflower rice, broccoli florets, and diced bell peppers to the skillet. Pour in the low-sodium chicken broth and stir everything together. Let it cook for another 5 minutes, or until the vegetables are tender yet still crisp.
- In a separate mixing bowl, combine the Greek yogurt with a pinch of salt and freshly ground black pepper. Once the skillet mixture is done cooking, remove it from the heat and carefully stir the yogurt into the chicken and vegetable mix until well blended.
- Pour the chicken mixture into a greased baking dish, ensuring it's evenly distributed. If you’d like a cheesy topping, sprinkle the shredded low-fat cheese evenly over the top.
- Place the baking dish in the preheated oven and bake for 20-25 minutes, or until the casserole is heated through, and if cheese is added, it should be melted and bubbly.
- Once baked, remove the casserole from the oven and allow it to cool for a few minutes before serving.
![To make this savory sweet potato black bean chili, gather these main ingredients: - 2 medium sweet potatoes, peeled and cut into 1-inch cubes - 1 can (15 oz) black beans, thoroughly rinsed and drained - 1 can (14.5 oz) diced tomatoes - 1 medium onion, finely chopped - 2 cloves garlic, finely minced - 1 bell pepper, diced - 1 cup vegetable broth - 2 teaspoons ground cumin - 1 teaspoon smoked paprika - 1 teaspoon chili powder - ½ teaspoon dried oregano - Salt and freshly cracked pepper to taste - 2 tablespoons extra virgin olive oil - Fresh cilantro, chopped, for garnish - Lime wedges, for serving If you want to take your chili to the next level, you can add some optional ingredients: - 1-2 jalapeños, diced for heat - 1 cup corn, for sweetness and crunch - 1 teaspoon cayenne pepper, for extra spice - 1 tablespoon apple cider vinegar, to brighten flavors This chili is not just tasty; it’s also packed with nutrition. Here’s a quick breakdown: - Calories: About 250 per serving - Protein: 10 grams - Fat: 7 grams - Carbohydrates: 45 grams - Fiber: 12 grams - Sugars: 5 grams This dish is rich in fiber and protein, making it a filling meal. It also provides a good source of vitamins A and C from the sweet potatoes and peppers. For the full recipe, check out the provided link! Start by gathering your ingredients. You need sweet potatoes, black beans, diced tomatoes, onion, garlic, bell pepper, vegetable broth, spices, olive oil, salt, and pepper. Make sure to peel and cube the sweet potatoes into 1-inch pieces. Rinse the black beans well and drain them. Chop the onion and garlic finely. Dice the bell pepper. This will set you up for success! Heat olive oil in a large pot over medium heat. Add the chopped onion and bell pepper. Sauté them for about 5 minutes until they are soft. Then, add the minced garlic. Stir for 1 minute until you smell its great aroma. Next, add the sweet potatoes, diced tomatoes, and vegetable broth. Sprinkle in cumin, smoked paprika, chili powder, oregano, and season with salt and pepper. Mix everything together. Bring the mix to a gentle boil, then lower the heat. Cover the pot and let it simmer for 25-30 minutes. The sweet potatoes should be tender and easy to fork. Finally, fold in the black beans and let them warm for about 5 minutes. Taste it and adjust the seasoning if you want. Serve the chili hot in vibrant bowls. Top each bowl with fresh cilantro and a lime wedge. The lime adds a nice burst of flavor. For more richness, you can add a dollop of avocado or sour cream. This chili tastes great and looks beautiful on the table. For the full recipe, check out the [Full Recipe] link! To boost flavors in your sweet potato black bean chili, use a few easy tricks. Start by sautéing your onions and peppers in olive oil. This step builds a solid flavor base. Make sure they soften and release their natural sugars. Next, add garlic for aroma, stirring it briefly. This brings out the richness in your chili. Using smoked paprika adds depth. It gives a subtle, smoky taste that lifts the dish. Always taste as you go. Adjusting the seasoning lets you find the perfect balance. Many people rush when cooking chili. Give your sweet potatoes enough time to soften. If they are still hard, your chili will not taste great. Another mistake is ignoring the beans. Be sure to fold them in gently so they don’t break apart. Also, don’t skip the lime! It brightens the flavors. Lastly, avoid overcooking the chili. A gentle simmer is enough to meld the flavors without losing texture. If you like heat, there are simple ways to spice things up. Start with mild chili powder, then add cayenne or hot sauce for more warmth. You can also use diced jalapeños for a fresh kick. For less heat, choose milder peppers and skip the extra spices. Always taste before serving. This way, you can adjust the spice level to suit everyone’s palate. {{image_4}} This chili is already vegetarian and vegan. You can enhance it by adding more veggies. Try using zucchini, corn, or mushrooms. These add texture and flavor. You can also swap the vegetable broth for a homemade version. Just boil water with herbs and spices to boost taste. This chili is gluten-free as is. If you want, you can add gluten-free grains. Quinoa or brown rice make great additions. Cook them separately and mix them in before serving. This will give you a hearty meal without gluten. You can make this chili your own with fun add-ins. Try adding fresh spinach or kale for extra greens. A splash of lime juice brightens the flavors. For a smoky kick, add chipotle peppers in adobo sauce. You can also top it with avocado, cheese, or yogurt. These toppings add creaminess and contrast. Check out the Full Recipe for more ideas! To keep your sweet potato black bean chili fresh, first, let it cool down. Then, pour it into an airtight container. This helps prevent spills and keeps the flavor locked in. You can store it in the fridge for up to three days. Make sure to label the container with the date for easy tracking. If you want to save your chili for later, freezing is a great option. Use freezer-safe bags or containers. Pour the chili into the bags, leaving some space for expansion. Seal them tightly to avoid freezer burn. You can freeze your chili for up to three months. Remember to label the bags with the date so you know when to use them. When you're ready to enjoy your chili again, there are a few ways to reheat it. The best method is to use a pot on the stove. Heat it over medium-low heat, stirring often until it's hot. If you prefer the microwave, pour the chili into a microwave-safe bowl. Cover it loosely and heat for 2-3 minutes, stirring halfway through. Always check that it’s hot all the way through before serving. For added flavor, squeeze some fresh lime juice on top before you dig in! If you do not have sweet potatoes, you can use butternut squash or regular potatoes. Both options will add a nice texture and flavor to the chili. You may also try carrots for a slightly sweeter taste. Adjust the cooking time as needed, since these veggies may take different times to cook. To add heat to your chili, you can use fresh jalapeños or serrano peppers. Chop them up and add them with the onions. You can also increase the chili powder or smoked paprika. Adding a dash of hot sauce or cayenne pepper at the end can give it an extra kick too! Yes, canned black beans work great in this recipe. They save time and still taste delicious. Make sure to rinse and drain them well before adding to the chili. This helps remove excess sodium and keeps the flavor balanced. To serve more people, just double or triple the ingredients. Keep the same cooking steps, but watch the cooking time. You may need a larger pot to accommodate the extra chili. Always taste and adjust seasoning as you increase the amounts. For the full recipe, check out the earlier section. This article covered key ingredients and cooking steps for your dish. You learned about optional ingredients for added flavor and useful tips to improve taste. We explored variations, including vegetarian and gluten-free options. You also picked up on how to store leftovers and common questions. Remember, cooking is fun, and experimenting makes it even better. Enjoy your dish and feel proud of your culinary skills!](https://joymealplan.com/wp-content/uploads/2025/07/8c039768-80c3-4c1c-94c6-06aef8e7156d-768x768.webp)
![- 1 pound large shrimp, peeled and deveined - 2 cups broccoli florets - 1 cup cherry tomatoes, halved - 1 medium yellow bell pepper, sliced into strips - 3 tablespoons extra virgin olive oil - 4 cloves garlic, finely minced - Zest and juice of 1 large lemon - 1 teaspoon dried oregano - 1 teaspoon dried thyme - Salt and freshly cracked black pepper to taste - Fresh parsley for garnish The main ingredients in this recipe create a bright, fresh dish. The shrimp are the star. Their sweet flavor pairs well with the crunchy broccoli and juicy tomatoes. The yellow bell pepper adds color and sweetness. For the drizzle, I love using olive oil. It adds richness and helps the garlic blend well with the other flavors. The lemon brings a zesty kick. Its zest adds a fragrant aroma, while the juice brightens the dish. Dried oregano and thyme lend an earthy note. They balance the freshness of the lemon and shrimp. Finally, salt and pepper bring out all the flavors. Fresh parsley adds a splash of color and a hint of freshness when you serve. You can find the full recipe here: [Full Recipe]. Enjoy cooking! 1. First, preheat your oven to 400°F (200°C). 2. Line a large baking sheet with parchment paper. This makes cleanup simple. 3. In a big bowl, mix 1 pound of shrimp, 2 cups of broccoli, 1 cup of halved cherry tomatoes, and 1 sliced yellow bell pepper. Toss them gently to combine. 1. In a small bowl, whisk together 3 tablespoons of olive oil, 4 minced garlic cloves, the zest of 1 lemon, and its juice. 2. Then, add 1 teaspoon each of dried oregano and thyme, plus salt and pepper. Mix it well. 1. Pour the lemon herb mix over the shrimp and veggies. Toss everything together to coat well. 2. Spread the mixture evenly on the baking sheet. 3. Place it in the oven and bake for about 12-15 minutes. The shrimp should turn pink, and the veggies should soften. 4. After baking, sprinkle chopped parsley on top for a fresh look and taste. This recipe is quick and makes a colorful dish that bursts with flavor. For the full recipe, check the details above. To know when shrimp are done, look for a bright pink color. They should also be opaque. If you see these signs, they are ready to eat. Cooking time may change with different ovens. Start checking for doneness at around 12 minutes. Your oven may cook faster or slower, so keep an eye on them. Adding more flavors can make this dish even better. You might try a pinch of red pepper flakes for some heat. A dash of smoked paprika adds a nice smoky taste. Fresh herbs are key in this dish. They give a bright and fresh flavor that dried herbs can't match. Always use fresh parsley for a vibrant finish. You can serve the shrimp right from the baking sheet. This gives a fun, casual feel. If you want to impress, transfer them to a nice platter. Drizzle with extra lemon juice for zing. Pair this dish with a light salad or some rice to soak up the juices. These sides complement the shrimp beautifully. For the full recipe, check out the details above. {{image_4}} You can use many vegetables in this dish. Instead of broccoli and bell peppers, try zucchini or asparagus. These options add color and flavor. You can also use seasonal veggies. In summer, fresh corn or green beans work well. In fall, add butternut squash or Brussels sprouts. Mix and match to suit your taste. If you want to change the protein, scallops or chicken are great swaps. Scallops cook fast like shrimp. They need about 8-10 minutes in the oven. Chicken takes longer, around 20-25 minutes. Cut it into small pieces for even cooking. Adjust your bake time based on the protein you choose. This recipe is easy to adapt for different diets. For a gluten-free option, make sure your seasonings are gluten-free. You can also make it dairy-free. Just skip any dairy-based sides. Want a vegan version? Use chickpeas or tofu instead of shrimp. Season them the same way for a delicious meal. Store leftover shrimp and veggies in an airtight container. Keep it in the fridge for up to two days. If you want to save some for later, freezing is a good option. Place shrimp and vegetables in a freezer-safe bag. Remove as much air as you can before sealing. They can last up to three months in the freezer. When reheating, use the oven or stovetop for best results. Preheat your oven to 350°F (175°C) and place the shrimp and veggies on a baking sheet. Heat for about 10 minutes. This keeps everything warm and tasty. You can also use a skillet on low heat. Stir gently to warm the dish without overcooking the shrimp. Avoid the microwave if possible, as it can make shrimp tough. For the full recipe of Sheet Pan Lemon Herb Shrimp, check the earlier section! Shrimp cook quickly. The best time is 12 to 15 minutes at 400°F. They turn pink and opaque when done. Overcooking makes them tough, so watch closely. Each oven is different, so check them a little early. Yes, you can prep this dish in advance. Mix the shrimp and veggies, then store them in the fridge. You can also make the marinade ahead. Just keep the shrimp and marinade separate until you are ready to bake. This keeps the shrimp fresh. This shrimp pairs well with many sides. Here are some great options: - Quinoa salad for a healthy touch - Garlic bread for a filling option - Steamed rice for a classic choice - A fresh garden salad for crunch These sides balance the flavors and make a complete meal. In this post, I shared how to make a delicious sheet pan lemon herb shrimp dish. We covered main ingredients, step-by-step instructions, and tips for perfecting the recipe. I also included variations based on your taste. Cooking should be fun and easy. With quick steps and fresh ingredients, you can create a meal everyone will love. Enjoy experimenting with flavors and make this recipe your own!](https://joymealplan.com/wp-content/uploads/2025/06/8195c318-04ef-4784-9bf9-d5c1a8395797-768x768.webp)