Cheesy Ranch Potato Sausage Skillet Flavorful Delight


Welcome to the ultimate comfort food experience! Today, I’ll show you how to whip up a Cheesy Ranch Potato Sausage Skillet that brings smiles to the table. This easy dish combines crispy potatoes, savory sausage, and a cheesy ranch flavor that’s hard to resist. Get ready to learn the tricks for perfect potatoes, the best sausage choices, and fun variations that suit everyone. Let’s dive in and make some delicious memories!
Why I Love This Recipe
- Quick and Easy: This skillet recipe comes together in just 40 minutes, making it perfect for busy weeknights when you want a delicious meal without spending hours in the kitchen.
- One-Pan Wonder: With everything cooked in one skillet, cleanup is a breeze. You get to enjoy a hearty meal without the hassle of multiple dishes.
- Flavorful Combination: The mix of smoked sausage, tender potatoes, and creamy ranch dressing creates a deliciously satisfying dish that your whole family will love.
- Customizable: This recipe is versatile! You can easily swap in different vegetables or proteins based on what you have on hand, making it adaptable to your taste.
Ingredients
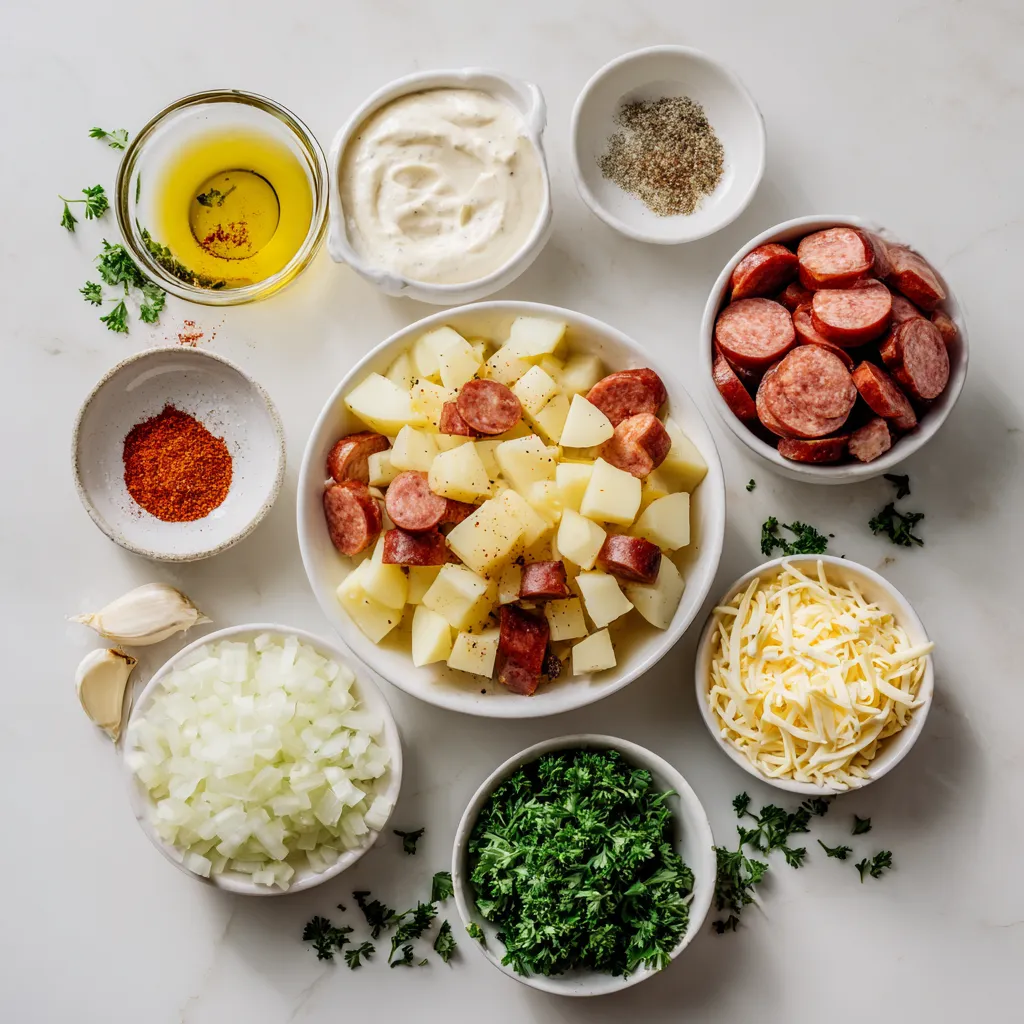
Essential Ingredients for Cheesy Ranch Potato Sausage Skillet
To make this tasty dish, you need:
– 1 pound smoked sausage, sliced into bite-sized pieces
– 4 medium potatoes, scrubbed and diced into small cubes
– 1 tablespoon olive oil
– 1 medium onion, finely chopped
– 2 cloves garlic, minced
– 1 cup shredded cheddar cheese (or your favorite cheese)
– 1/4 cup ranch dressing
– 1 teaspoon paprika
– 1/2 teaspoon freshly ground black pepper
– Salt, to taste
– Fresh parsley, chopped (for garnish)
Each ingredient adds its own flavor. The smoked sausage gives a nice, rich taste. The potatoes add heartiness. Cheddar cheese makes it creamy and delicious.
Recommended Tools and Equipment
You will need a few tools to make this skillet dish:
– Large skillet
– Sharp knife
– Cutting board
– Measuring spoons
– Wooden spoon
– Lid for the skillet
These tools help you cook the dish easily. A large skillet allows for even cooking. A lid helps melt the cheese quickly.
Notes on Ingredient Substitutions
If you’re missing an ingredient, don’t worry! Here are some swaps you can try:
– Use turkey or chicken sausage instead of smoked sausage for a leaner option.
– Swap ranch dressing with blue cheese dressing for a stronger flavor.
– Choose any cheese you love, like mozzarella or pepper jack, for a twist.
– You can replace potatoes with sweet potatoes for a different taste.
These substitutions keep the dish fun and flexible. You can make it your own with what you have at home!
Step-by-Step Instructions
Preparing the Potatoes
Start by heating a large skillet over medium-high heat. Pour in the olive oil and let it warm up. Once hot, add the diced potatoes. Sprinkle a pinch of salt and paprika on top. Stir them gently as they cook. You want them to turn golden brown and tender. This should take about 10 to 15 minutes. Stir occasionally to prevent sticking.
Adding Sausage and Onions
Next, add the sliced sausage and the chopped onion to the skillet. Mix everything well. Cook for about 5 to 7 minutes. Keep stirring often so the sausage browns and the onions soften. You will know it’s ready when the onions turn soft and clear.
Incorporating Garlic and Ranch Dressing
Now, lower the heat to medium. Add the minced garlic to the mixture. Stir it in and let it cook for 1 to 2 minutes. You want the garlic to smell great, but don’t let it burn. After that, drizzle the ranch dressing over the top. Mix everything again to coat the potatoes and sausage well. Let it simmer for another 2 to 3 minutes. This helps the flavors blend together.
Melting the Cheese
Time for the best part! Sprinkle the shredded cheddar cheese evenly over the skillet. Cover the skillet with a lid. Let it cook for about 3 to 5 minutes. This will melt the cheese and make it nice and bubbly.
Serving Suggestions
Once the cheese is melted, take the skillet off the heat. Garnish with fresh parsley for a nice touch. You can serve this dish hot. It pairs well with a fresh side salad or some warm crusty bread. Enjoy your meal!
Tips & Tricks
How to Achieve Perfectly Cooked Potatoes
To get the best potatoes, cut them into small, even cubes. This helps them cook evenly. Start with hot oil in your skillet. The oil should be hot enough to sizzle when you add the potatoes. Cook them for 10-15 minutes. Stir often to avoid burning. Look for a golden-brown color and a tender feel. This means they are perfect!
Tips for Choosing the Right Sausage
When picking sausage, go for smoked sausage for a rich taste. Look for high-quality brands that use real meat. Check the label for spices you love. You can try turkey or chicken sausage for a lighter option, too. Make sure the sausage is fresh. It will add great flavor to your dish.
Enhancing Flavor with Additional Seasonings
To boost the flavor, use spices like garlic powder or onion powder. A bit of cayenne pepper adds heat if you like it spicy. Fresh herbs like thyme or rosemary can give a nice twist. Sprinkle some more ranch dressing on top before serving for extra taste. Don’t be afraid to experiment! Each spice can change the dish in a fun way.
Pro Tips
- Choose the Right Sausage: Opt for a smoked sausage for a richer flavor, or try turkey sausage for a lighter version.
- Potato Prepping: Using waxy potatoes like Yukon Gold will give a creamier texture, while russets will be fluffier.
- Perfect Cheese Melt: Shredding your cheese fresh will help it melt better and create a smoother sauce.
- Flavor Boost: Add a splash of hot sauce to the ranch dressing for an extra kick of flavor and spice!

Variations
Vegetarian Option for Cheesy Ranch Skillet
You can make a tasty vegetarian version of this dish. Replace the smoked sausage with hearty vegetables. Good choices are mushrooms, bell peppers, or zucchini. These options add flavor and texture. You can also use plant-based sausage for a meaty taste. This way, you keep the dish filling and delicious.
Changing Up the Cheese Choices
While cheddar cheese is classic, feel free to switch it up. Try mozzarella for a gooey texture. Pepper jack gives a spicy kick. You can even mix different cheeses for depth. Go ahead and experiment to find your favorite combo. Each cheese brings its own charm to the dish.
Adding Vegetables for Extra Nutrients
Adding more veggies boosts the nutrition and flavor. Spinach, kale, or broccoli can add color and health benefits. Carrots or peas can also work well. Just chop them small so they cook evenly. Toss them in during the last few minutes of cooking. This way, you get a balanced meal that’s good for you.
Storage Info
How to Store Leftovers Properly
After enjoying your Cheesy Ranch Potato Sausage Skillet, let it cool first. Then transfer the leftovers to an airtight container. This helps keep the flavors fresh. Store it in the fridge for up to three days. Make sure to label the container with the date.
Reheating Instructions
To reheat, you can use a skillet or the microwave. If using a skillet, add a splash of water or broth. This keeps the dish moist. Heat over low to medium heat, stirring occasionally. For the microwave, use a microwave-safe dish. Heat in short bursts, stirring in between, until warm.
Freezing Tips
You can freeze this dish, too! Allow it to cool completely before freezing. Place it in a freezer-safe container or bag. Remove as much air as possible. It will stay good for up to three months. When ready to eat, thaw it overnight in the fridge before reheating.
FAQs
Can I make Cheesy Ranch Potato Sausage Skillet ahead of time?
Yes, you can make this dish ahead. Prepare it fully and let it cool. Then, store it in an airtight container in the fridge for up to three days. When ready to eat, reheat it on the stove over low heat until warm. This method keeps the flavors intact.
What can I serve with this dish?
I love serving this skillet with a fresh side salad or warm crusty bread. The salad adds crunch and freshness, while the bread helps soak up all the cheesy goodness. You can also try pairing it with steamed veggies for extra color and nutrients.
How to adjust the serving size for larger groups?
To serve more people, simply double the recipe. Use two pounds of sausage and eight potatoes. This way, you’ll have plenty to go around. Just ensure your skillet is large enough to hold all the ingredients without crowding.
Is it possible to use different types of cheese?
Absolutely! While cheddar cheese is a favorite, you can use any cheese you like. Try mozzarella for a stretchy texture, or pepper jack for a spicy kick. Mixing cheeses can also create fun flavor combinations.
Can I use raw sausage instead of smoked sausage?
Yes, you can use raw sausage. Just cook it first in the skillet before adding the potatoes. Make sure it reaches a safe internal temperature to enjoy your meal safely. The flavors will still blend well with the other ingredients.
You now know how to make a tasty Cheesy Ranch Potato Sausage Skillet. We covered the ingredients, cooking steps, and useful tips. I shared variations and storage info to make it easy for you. This dish is simple and fun to make. With a few changes, you can customize it to your liking. Try it out and make it your own! Enjoy your meal with family or friend

Cheesy Ranch Potato Sausage Skillet
Ingredients
- 1 pound smoked sausage, sliced into bite-sized pieces
- 4 medium potatoes, scrubbed and diced into small cubes
- 1 tablespoon olive oil
- 1 medium onion, finely chopped
- 2 cloves garlic, minced
- 1 cup shredded cheddar cheese
- 1 quarter cup ranch dressing
- 1 teaspoon paprika
- 1 half teaspoon freshly ground black pepper
- to taste salt
- for garnish fresh parsley, chopped
Instructions
- In a large skillet, pour in the olive oil and set over medium-high heat. Once the oil is hot, add the diced potatoes and season with a pinch of salt and paprika. Sauté the potatoes, stirring occasionally, for about 10-15 minutes until they turn golden brown and become tender.
- Incorporate the chopped onion and sliced sausage into the skillet with the potatoes. Continue to cook for an additional 5-7 minutes, stirring frequently, until the sausage is well-browned and the onions become soft and translucent.
- Reduce the heat to medium. Add the minced garlic to the skillet and stir well. Cook for about 1-2 minutes until the garlic is aromatic, being careful not to let it burn.
- Drizzle the ranch dressing evenly over the skillet mixture. Toss everything together thoroughly to ensure all ingredients are coated with the dressing. Allow it to simmer for another 2-3 minutes so that the flavors can blend beautifully.
- Evenly sprinkle the shredded cheddar cheese over the top of the mixture. Cover the skillet with a lid, letting it cook for 3-5 minutes or until the cheese melts completely and becomes bubbly and luscious.
- Remove the skillet from heat and finish by garnishing with freshly chopped parsley for a pop of color and flavor. Serve this delightful skillet hot, and enjoy!
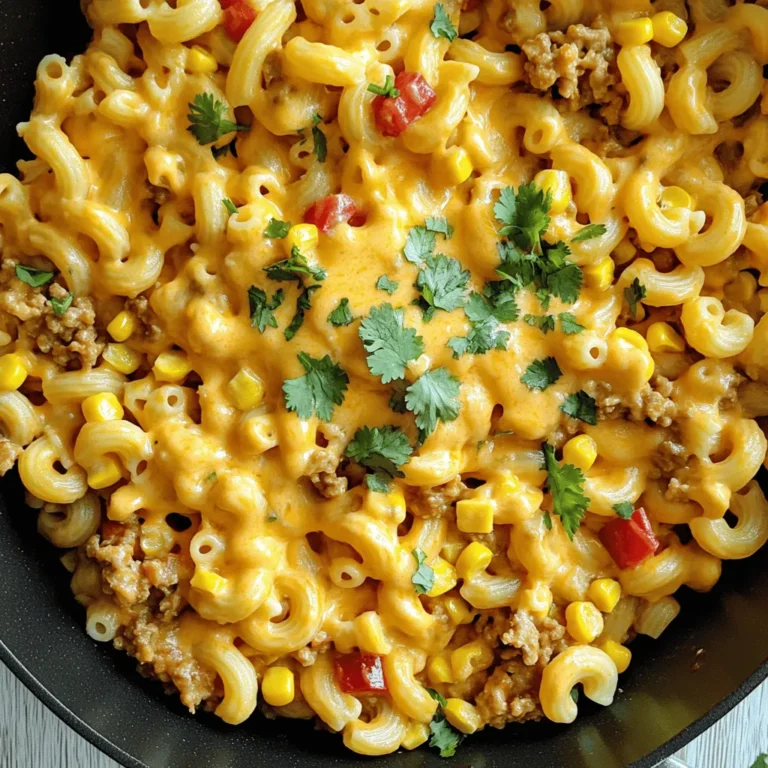

![- 1 lb boneless, skinless chicken breasts - 2 bell peppers (red and green) - 1 medium yellow onion - Olive oil and spices The main ingredients are simple yet flavorful. I use boneless, skinless chicken breasts because they cook evenly. Bell peppers add color and sweetness, while the onion provides a tasty base. Olive oil helps the spices stick and adds richness. - Chili powder - Ground cumin - Garlic powder - Smoked paprika - Onion powder The seasoning blend makes this dish special. Chili powder gives a nice kick. Ground cumin adds warmth, while garlic and onion powders boost the flavor. Smoked paprika brings depth with its smoky taste. - Flour tortillas - Fresh cilantro - Lime wedges for serving To enjoy the fajitas, I use small flour tortillas that hold the filling well. Fresh cilantro adds a bright touch, and lime wedges bring a zesty finish. These extras make the meal even better. For the full recipe, check out the [Full Recipe]. - Set the oven to 425°F (220°C). - Line a sheet pan with parchment paper. - In a bowl, whisk together olive oil and spices. - Coat the chicken with the marinade well. - Add the sliced bell peppers and onion to the chicken. - Spread the mixture evenly across the sheet pan. - Bake for 20-25 minutes, stirring halfway through. This recipe makes it easy to prepare a tasty meal. You can enjoy it with warm tortillas. For the full recipe, check out the details provided earlier. To make the best sheet pan chicken fajitas, marinate the chicken longer if you can. Letting it soak in flavors for more time makes a big difference. A meat thermometer is also very handy. It helps you check if your chicken is fully cooked. Aim for 165°F (74°C) for safety. A fajita bar is a fun way to serve these. Lay out all the toppings for everyone to enjoy. Think about adding sour cream, salsa, or guacamole. To warm the tortillas, heat them in a dry skillet for about 30 seconds on each side. You can also wrap them in foil and place them in the oven for the last five minutes of cooking. Make your presentation pop with colorful toppings. Fresh avocado, diced tomatoes, and shredded cheese can make your dish look great. Don't forget to garnish with lime wedges and cilantro. These small touches bring out the flavors and make the dish more inviting. Enjoy the full recipe for more details on how to create this tasty meal! {{image_4}} You can switch the chicken for shrimp or tofu. Shrimp cooks fast and adds a nice flavor. Tofu is great for a plant-based option. If you want to use chicken, try different cuts like thighs. Thighs are juicy and full of flavor. If you want a meatless meal, replace chicken with mixed vegetables. Bell peppers, zucchini, and corn work well. Add beans for protein. Black beans or pinto beans add creaminess and taste. This keeps your meal hearty and filling. Want to spice things up? Add jalapeños for heat. They bring a nice kick that many love. You can also mix in different herbs and spices. Try oregano, cilantro, or smoked paprika for variety. Each adds unique flavors to your dish. Explore these options to find your favorite twist on this recipe! For the full recipe, check the link. After you enjoy your sheet pan chicken fajitas, store any leftovers in an airtight container. This keeps the flavors fresh. You can refrigerate them for up to 3 days. Make sure to let them cool before sealing to avoid steam buildup. To freeze the fajita mix, place it in a freezer-safe bag or container. Remove as much air as possible to prevent freezer burn. You can keep it frozen for up to 3 months. For thawing, move it to the fridge overnight. If you're in a hurry, use the microwave's defrost setting. To reheat without drying out your fajitas, use the oven. Preheat it to 350°F (175°C) and warm the fajitas in a covered dish for about 10-15 minutes. You can also use a skillet over low heat, adding a splash of water to create steam. This keeps everything juicy. Get creative with leftovers! Use them in tacos, wraps, or salads for a quick meal. You can even mix them into scrambled eggs for a tasty breakfast. For the full recipe, check it out above. Yes, you can use frozen chicken for this recipe. Just follow these guidelines: - Thawing: Always thaw the chicken before marinating. You can do this overnight in the fridge or use the microwave's defrost setting. - Cooking Time: If you skip thawing and bake from frozen, increase the cooking time by 5-10 minutes. - Check Doneness: Use a meat thermometer to ensure the chicken reaches 165°F (74°C). There are many tasty sides to pair with your fajitas. Here are some great options: - Rice: Cilantro lime rice adds a fresh touch. - Beans: Black beans or refried beans are both hearty and flavorful. - Salad: A simple green salad with lime vinaigrette complements the fajitas well. - Chips and Salsa: Serve with tortilla chips and your favorite salsa for a crunchy side. Want extra heat? Here are some tips to spice up your fajitas: - Add Jalapeños: Sliced fresh jalapeños can give a nice kick. - Use Hot Sauce: Drizzle your favorite hot sauce over the fajitas before serving. - Increase Spice Mix: Add more chili powder or a pinch of cayenne pepper to the marinade for more heat. For the complete recipe, check the Full Recipe section. In this blog post, we covered a tasty sheet pan chicken fajitas recipe. You learned about the key ingredients and how to prepare them. I shared tips to make your fajitas perfect, including variations for different diets. Storing leftovers and reheating them properly helps reduce waste. Remember, these fajitas are easy to customize and fun to serve. Enjoy making them with family or friends, and let your creativity shine. Your next meal can be delicious and simple!](https://joymealplan.com/wp-content/uploads/2025/06/bce38261-6b1a-4600-b2d8-c9c563997242-768x768.webp)