Cheeseburger Salad Bowl Flavorful and Nutritious Meal
Craving a tasty, filling meal that’s also good for you? This Cheeseburger Salad Bowl combines all your favorite flavors in a nutritious way. Packed with fresh veggies, seasoned beef, and creamy dressing, it’s the perfect dish for lunch or dinner. Join me as I guide you through simple steps to create this delightful salad, one that satisfies both your cravings and your health goals! Let’s dive in!
Why I Love This Recipe
- Quick and Easy: This cheeseburger salad comes together in just 30 minutes, making it a perfect weeknight meal.
- Healthy Twist: It offers all the flavors of a classic cheeseburger while being low-carb and packed with fresh veggies.
- Customizable: You can easily modify the toppings and dressings to suit your taste preferences.
- Kid-Friendly: With its familiar flavors, this salad is a hit among kids, making it a great family meal.
Ingredients
Main Ingredients
– 1 lb ground beef
– 4 cups romaine lettuce, chopped
– 1 cup cherry tomatoes, halved
– 1 cup pickles, sliced
– 1/2 red onion, finely sliced
– 1 cup shredded sharp cheddar cheese
Seasonings
– 1 teaspoon garlic powder
– 1 teaspoon onion powder
– Salt and pepper to taste
Dressing Components
– 1/4 cup ketchup
– 1/4 cup yellow mustard
– 1/4 cup mayonnaise
Each ingredient brings its own flavor to the cheeseburger salad bowl. The ground beef serves as the hearty base. Fresh vegetables add crunch and color. The cheddar cheese gives a rich and creamy finish.
Seasonings like garlic powder and onion powder enhance the beef’s taste. Salt and pepper balance everything out.
For the dressing, ketchup, yellow mustard, and mayonnaise create a classic burger taste. Each component works together, making this salad a tasty and satisfying meal.

Step-by-Step Instructions
Cooking the Beef
To start, you want to brown the ground beef. Heat a large skillet over medium-high heat. Add the 1 lb of ground beef to the pan. Use a spatula to break it up and stir as it cooks. Add 1 teaspoon each of garlic powder and onion powder. Sprinkle in salt and freshly ground black pepper to taste. Cook until the beef is browned, about 7 to 10 minutes. Drain any extra fat. Set the beef aside to cool slightly.
Preparing the Salad Base
While the beef cooks, take a big bowl. Combine 4 cups of chopped romaine lettuce, 1 cup of halved cherry tomatoes, 1 cup of sliced pickles, and 1/2 of a finely sliced red onion. Gently toss these fresh ingredients together. This ensures every bite has a mix of flavors and textures.
Combining Ingredients
Once the beef is cool, add it to your salad mix. Gently stir to incorporate the beef into the salad. Use a folding motion to keep the lettuce from wilting. This mixing helps spread the flavors throughout.
Making the Dressing
Next, grab a small bowl to make the dressing. Whisk together 1/4 cup of ketchup, 1/4 cup of yellow mustard, and 1/4 cup of mayonnaise. Keep whisking until you get a smooth consistency. Taste the dressing and adjust the flavors if you want. You can add more ketchup or mustard for extra zing.
Final Assembly
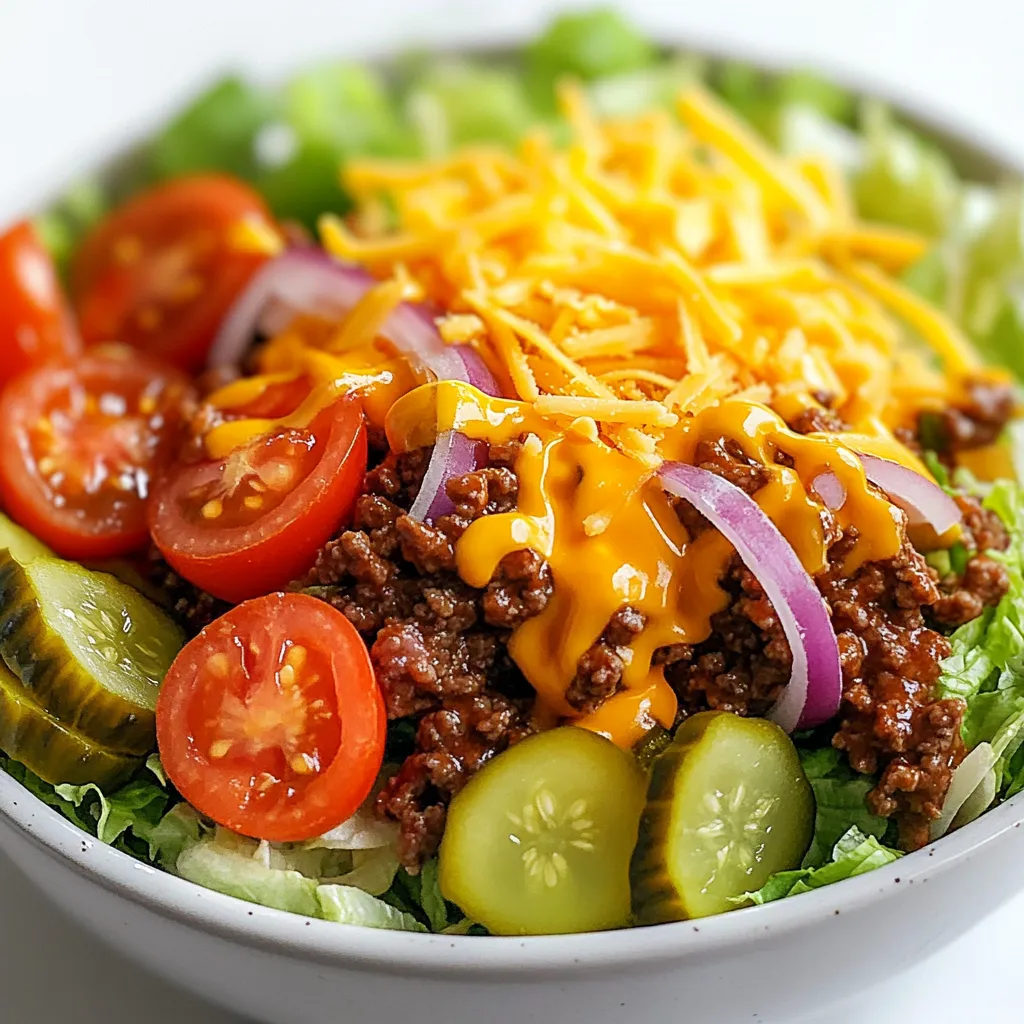
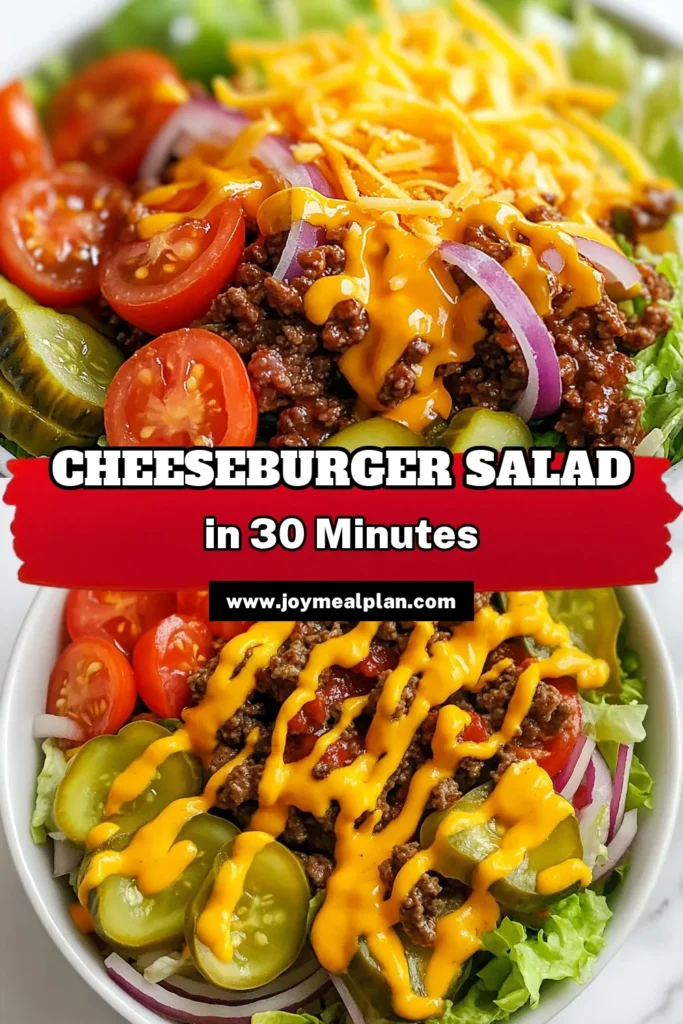
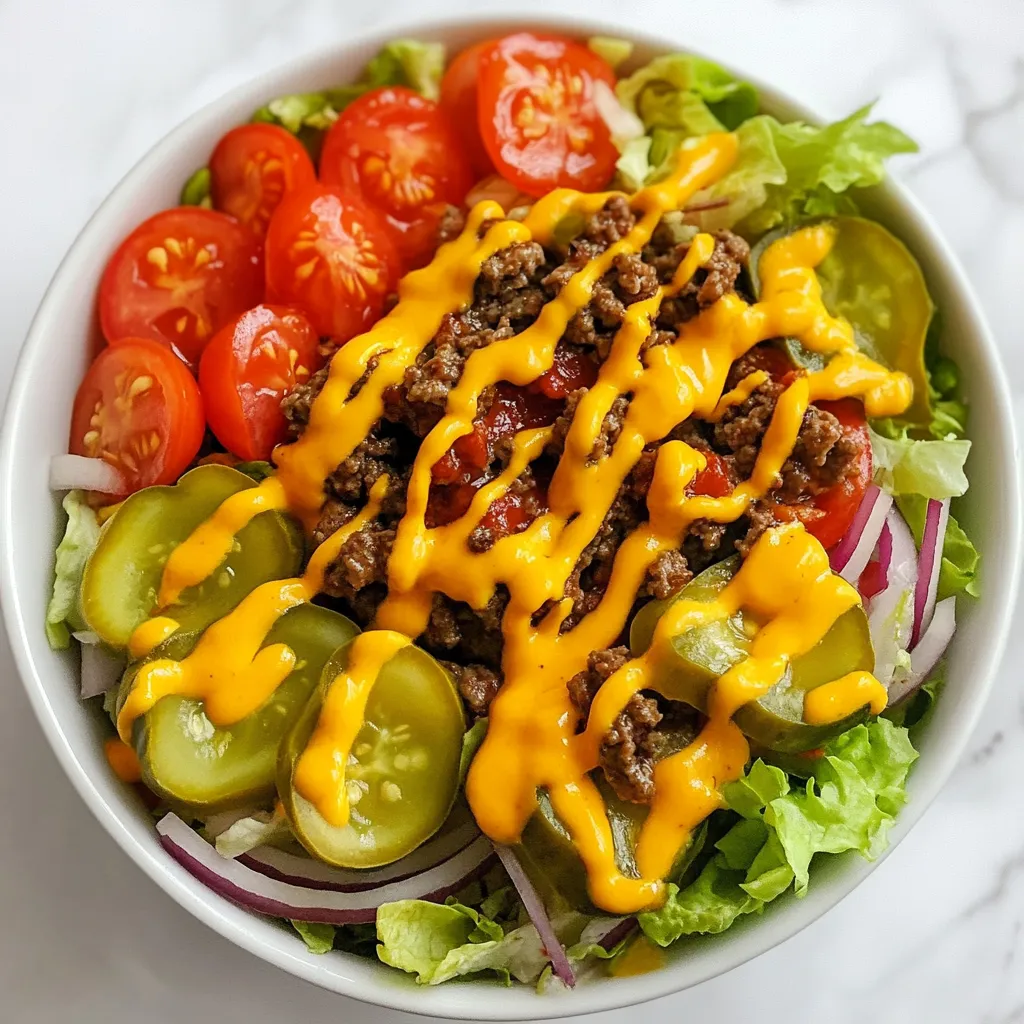
Now, drizzle your dressing over the salad mixture. Toss everything together so the salad is well coated. This will bring all the flavors together. Then, sprinkle 1 cup of shredded sharp cheddar cheese over the top. This adds a creamy and sharp taste.
Presentation Tips
To serve, dish the cheeseburger salad into bowls or plates. For extra visual appeal, add a sprinkle of fresh parsley or some extra pickle slices on top. Using colorful bowls can enhance the look of this vibrant dish. Enjoy your meal right away for the best freshness!
Tips & Tricks
Cooking Tips
To avoid greasy ground beef, choose lean meat. I recommend using 85% lean beef. This helps cut down on excess fat. When cooking, break the meat into small pieces. This ensures even cooking and browning. Use a spatula to stir often. This also helps drain fat as it cooks. For kitchen tools, use a large skillet. A non-stick pan works best for easy cleanup. A sturdy spatula is great for breaking up the beef.
Flavor Boosters
To enhance flavor, add spices like smoked paprika or cayenne pepper. These add a nice kick. You can also try adding fresh herbs like parsley or cilantro. A splash of Worcestershire sauce can deepen the taste. For a tangy twist, try a little vinegar. These options keep your cheeseburger salad exciting and tasty.
Serving Suggestions
For sides, consider crispy sweet potato fries or baked tortilla chips. These pair well with the salad’s flavors. A light fruit salad is also refreshing. For drinks, iced tea or lemonade complement the meal nicely. If you prefer something stronger, a cold beer works well too. These choices will round out your meal and make it even more enjoyable.
Pro Tips
- Choose Quality Beef: Opt for ground beef with a higher fat content (80/20) for a juicier and more flavorful result.
- Customize the Toppings: Feel free to add your favorite burger toppings such as avocado, bacon, or jalapeños to elevate the flavor.
- Make Ahead: Prepare the salad components in advance and store them separately. Combine just before serving for optimal freshness.
- Dressing Variations: Experiment with different dressings like ranch or BBQ sauce to give your cheeseburger salad a unique twist.
Variations
Ingredient Substitutions
You can easily swap out the ground beef for turkey or chicken. This change lowers fat but keeps the taste. Ground turkey or chicken works well in this salad. It stays juicy and adds great flavor.
If you want a vegan option, try plant-based ground beef. Brands like Beyond Meat or Impossible Burger work well. They give you a similar texture without meat. Just cook them the same way as beef.
Dressing Alternatives
You can make your own dressing for this salad. Try mixing Greek yogurt with ketchup and mustard. This makes a creamy dressing with less fat. You can also use vinegar or lemon juice for added tang.
For low-calorie options, consider vinaigrettes. A simple mix of olive oil and vinegar keeps it light. You can also use salsa for a fresh twist.
Enhancing the Salad
Adding fruits or nuts can make your salad exciting. Sliced apples or berries add a sweet touch. Nuts like walnuts or almonds give a nice crunch.
You can also include grains like quinoa. Quinoa adds protein and makes the salad more filling. Just cook the quinoa ahead of time and mix it in. Enjoy the extra flavor and texture!
Storage Information
Storing Leftovers
To store your cheeseburger salad, place it in an airtight container. Keep it in the fridge. This helps keep your salad fresh. It will last for about 3 days. If you add dressing, the salad may not stay crisp as long.
Reheating Tips
You can reheat the beef if you want warm leftovers. Use a microwave or skillet. Heat it until it’s hot, but don’t overcook. To keep your salad fresh, store the veggies and beef separately. This way, they stay crunchy and tasty.
Meal Prep Ideas
Prepping your salad components in advance saves time. Cook the beef and chop the veggies ahead of time. Store them in separate containers. When you’re ready to eat, mix them together. This keeps everything fresh and delicious. You can even pack the salad for lunch. It makes a great meal on the go!
FAQs
Can I make this salad ahead of time?
Yes, you can prepare this salad in advance. To keep it fresh, store the salad base and the dressing separately. This helps prevent sogginess. Keep the cooked beef in a sealed container in the fridge. You can combine everything just before serving. For the best taste, eat it within two days.
Is this salad healthy?
This salad packs a nutritional punch. Here are some highlights:
– Ground beef: Provides protein and iron.
– Romaine lettuce: Offers fiber and vitamins A and K.
– Tomatoes: Rich in antioxidants and vitamin C.
– Pickles: Low in calories and add crunch.
– Cheddar cheese: Good source of calcium and protein.
Overall, this cheeseburger salad bowl is a balanced meal.
What can I use instead of sharp cheddar cheese?
If you want a different cheese, you have options. Here are a few that work well:
– Monterey Jack: Creamy and mild.
– Pepper Jack: Adds a spicy kick.
– Mozzarella: Soft and stretchy.
– Vegan cheese: Great for dairy-free diets.
Choose based on your taste and dietary needs.
How do I adjust servings for a larger group?
Scaling up this recipe is easy. Start by doubling or tripling the amounts. For example:
– Beef: Use 2 or 3 pounds.
– Veggies: Increase the salad base as needed.
– Dressing: Double the ingredients for the sauce.
Mix and match until you have the right amount for your group. This way, everyone enjoys a delicious meal!
This blog post covered key ingredients and step-by-step instructions for making a tasty salad. You learned how to cook beef, prepare fresh veggies, and make a delicious dressing. Remember, feel free to swap ingredients and dressings to suit your taste. Store leftovers properly, and enjoy this salad at different meals. With these tips and tricks, you’ll impress anyone at the table. Enjoy your cooking adventure and make it your ow

Cheeseburger Salad Bowl
Ingredients
- 1 lb ground beef
- 1 teaspoon garlic powder
- 1 teaspoon onion powder
- to taste Salt and freshly ground black pepper
- 4 cups romaine lettuce, chopped into bite-sized pieces
- 1 cup cherry tomatoes, halved
- 1 cup pickles, sliced into rounds
- 1 2 red onion, finely sliced
- 1 cup shredded sharp cheddar cheese
- 1 4 ketchup
- 1 4 yellow mustard
- 1 4 mayonnaise
Instructions
- In a large skillet over medium-high heat, add the ground beef. Season it with garlic powder, onion powder, salt, and freshly ground black pepper. Cook, stirring frequently, until the meat is browned and no longer pink, about 7-10 minutes. Once cooked, drain any excess fat and set the beef aside to cool slightly.
- While the beef is cooking, take a large mixing bowl and combine the chopped romaine lettuce, halved cherry tomatoes, sliced pickles, and finely sliced red onion. Gently toss the ingredients together to ensure even distribution.
- Once the beef has cooled slightly, add it to the salad mixture. Stir gently to combine all the ingredients together.
- In a small bowl, whisk together the ketchup, yellow mustard, and mayonnaise until smooth. Taste and adjust the seasoning according to your preference, adding more of any ingredient if desired.
- Drizzle the prepared dressing over the salad mixture. Toss everything together until the salad is well coated with the dressing.
- Sprinkle the shredded sharp cheddar cheese over the top of the salad, enhancing both flavor and texture.
- Dish the cheeseburger salad into individual bowls or plates and serve immediately for maximum freshness.

. First, fill a large pot with water. Add a good amount of salt. Bring the water to a rolling boil. Once it boils, add the spaghetti. Cook it until it’s al dente, which usually takes about 8 to 10 minutes. Don't forget to check the package for exact times. After cooking, drain the pasta. Make sure to save about half a cup of the starchy water for later. Set the pasta aside. While the pasta cooks, it’s time to make the sauce. Grab a food processor. Add the ripe avocado flesh, minced garlic, lemon juice, basil, and olive oil. Blend everything together until it’s smooth and creamy. If your sauce looks too thick, don’t worry. Just add a bit of the reserved pasta water. Blend again until you reach your desired consistency. Now that the pasta is ready, return it to the pot. Keep the heat low. Pour the creamy avocado sauce over the warm pasta. Gently toss everything together. Make sure every strand of spaghetti gets coated in the sauce. To make your creamy avocado pasta shine, use ripe avocados. Ripe avocados blend smoothly and offer a rich texture. They should feel soft but not mushy. Next, gradually add pasta water when blending your sauce. This step helps to reach your desired creaminess. Start with a little, then add more as needed. Salt and pepper play a key role in flavor. Always taste before serving. If it feels bland, add more salt or pepper. You can also adjust with Parmesan cheese. This cheese adds a savory note and enhances the dish's richness. If you prefer a vegetarian option, skip the cheese and rely on the avocados for flavor. First impressions matter, especially in food. Garnish with cherry tomatoes for a pop of color. Their sweetness pairs well with the creamy sauce. Next, sprinkle some red pepper flakes for heat. This touch not only looks good but adds a nice kick. Remember, we eat with our eyes first, so make it beautiful! {{image_4}} If you want a gluten-free dish, you can swap regular pasta for gluten-free options. Look for pasta made from brown rice, quinoa, or lentils. These types work well and keep the same great taste. Cook them according to the package directions. This way, everyone can enjoy this creamy avocado pasta. To make this dish vegan, skip the Parmesan cheese. Instead, you can add nutritional yeast. It gives a cheesy flavor without the dairy. Just mix in about 1/4 cup of nutritional yeast into the avocado sauce. This keeps your dish creamy and rich while staying plant-based. You can boost protein by adding grilled chicken or shrimp. Cook the proteins separately until done. Then, slice the chicken or toss the shrimp in with the pasta. The added protein makes this dish heartier and more filling. It’s a great way to turn a light meal into a satisfying feast. For the full recipe, check out the Creamy Avocado Pasta Delight. After making creamy avocado pasta, you may want to save some for later. Store any leftovers in airtight containers. This keeps the pasta fresh and avoids any unwanted odors. Place it in the fridge within two hours of cooking. Enjoy the leftovers within three days for the best taste. If you want to freeze the sauce, that's an option too. To do this, pour the creamy avocado sauce into freezer-safe bags or containers. Make sure to remove as much air as possible to prevent freezer burn. The sauce will stay fresh for about three months. When you’re ready to use it, thaw it in the fridge overnight. When it's time to enjoy your leftovers, reheating is key. The best way to reheat creamy avocado pasta is on the stove. Place the pasta in a pan over low heat. Add a splash of water or olive oil to help loosen the sauce. Stir gently until warm. Avoid the microwave if you can, as it can make the sauce grainy. Enjoy your meal! For the full recipe of creamy avocado pasta, check the earlier section. Yes, you can use frozen avocado. Frozen avocado is convenient and often cheaper. It may not have the same taste as fresh, but it still works well. Just thaw the avocado before blending. This way, you get a creamy sauce without waiting for ripe avocados. If you want a dairy-free option, try nutritional yeast. It adds a cheesy flavor without dairy. You can also use a vegan cheese blend. These substitutes keep the dish tasty while catering to different diets. Feel free to experiment with flavors until you find what you love. Creamy avocado pasta stays fresh for about 2 days in the fridge. Store it in an airtight container. To prevent browning, cover the pasta tightly. If you notice any changes in color or smell, it’s best to toss it. Enjoy your leftovers quickly for the best taste! This recipe combines ripe avocados, pasta, and garlic for a creamy dish. You can adjust ingredients to fit your taste. Adding cheese or protein can enhance flavors. Don't forget to store leftovers properly to enjoy later. Cooking can be fun and simple. Now it's your turn to make this delicious pasta! Enjoy every bite.](https://joymealplan.com/wp-content/uploads/2025/06/e38e2670-4076-4ca9-b5ff-23e6aadb6cf7-768x768.webp)