
Keto Taco Salad Bowl Packed with Flavor and Freshness

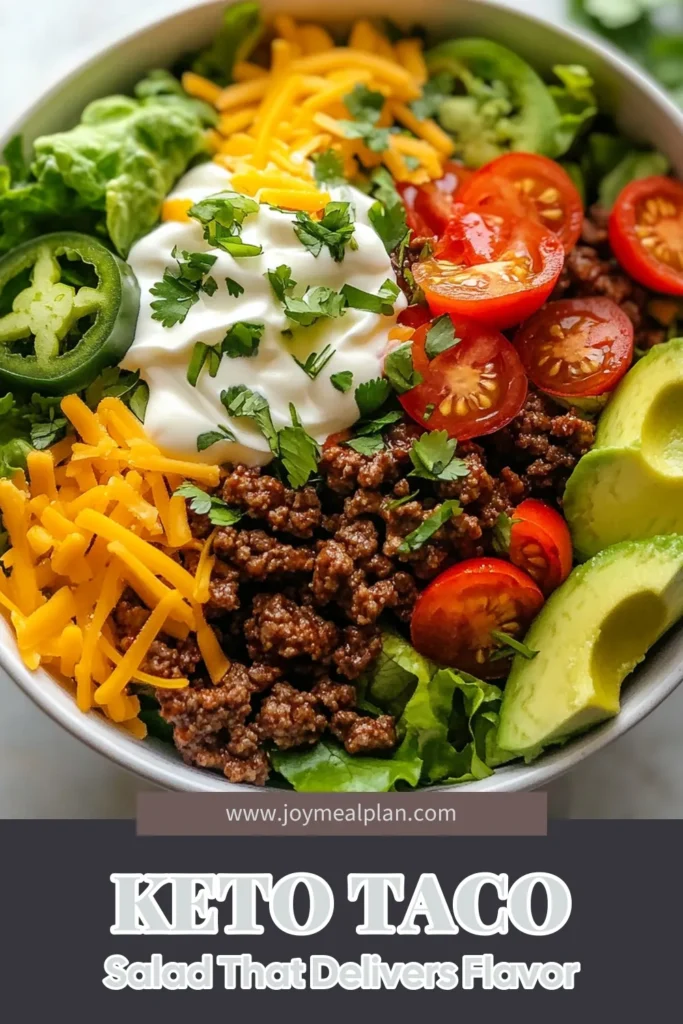
Are you ready to dive into a deliciously healthy meal? The Keto Taco Salad Bowl is packed with flavor and freshness that will satisfy your cravings without the carbs. With simple ingredients and easy steps, you’ll create a vibrant dish that’s perfect for lunch or dinner. Let’s explore how to whip up this tasty salad that’s not only good for you but also fun to make!
Why I Love This Recipe
- Quick and Easy: This Keto Taco Salad Bowl comes together in just 25 minutes, making it perfect for busy weeknights.
- Healthful Ingredients: Packed with fresh greens, protein, and healthy fats, this recipe is nutritious and satisfying.
- Customizable Toppings: You can easily adjust toppings to suit your tastes, whether you prefer extra spice or additional veggies.
- Low-Carb Delight: This dish fits perfectly into a keto diet while still delivering all the flavors of a traditional taco.
Ingredients
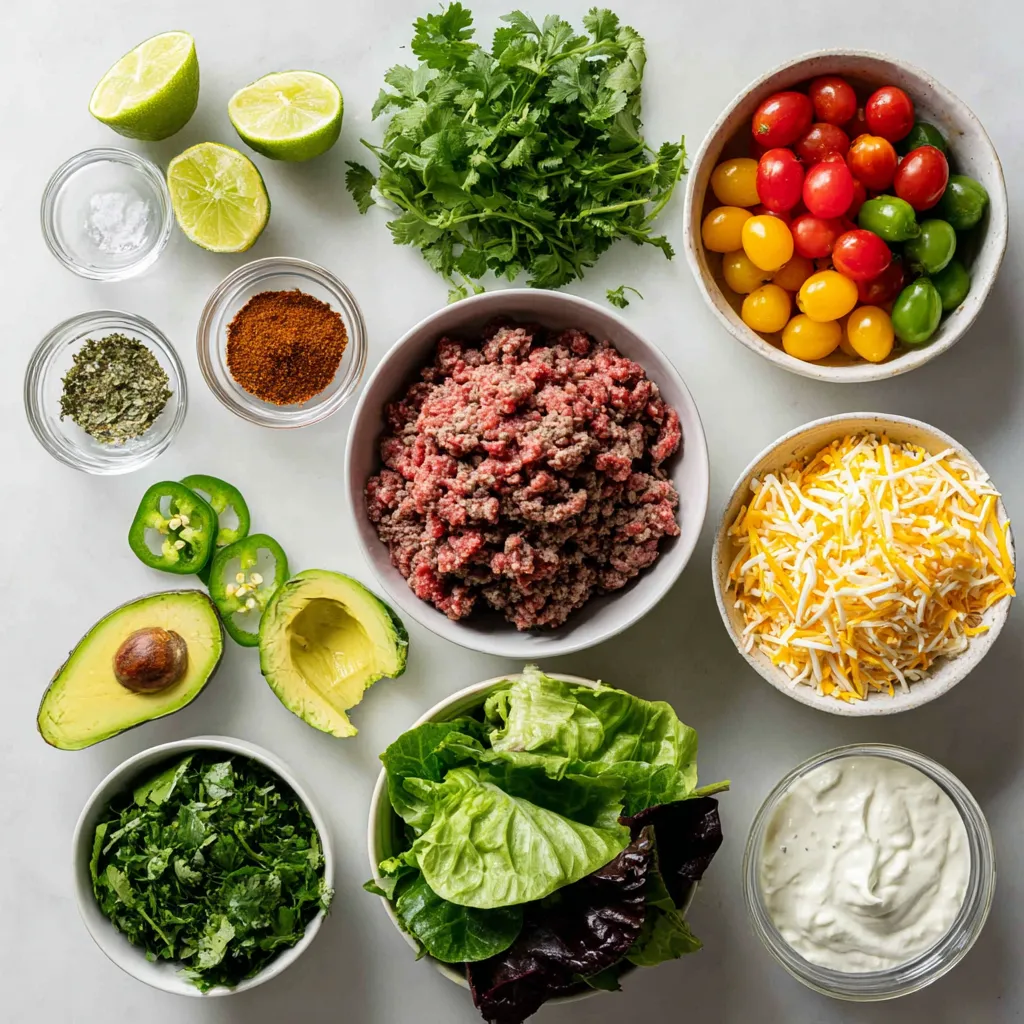
Main Ingredients
– 1 lb ground beef or turkey
– 1 tablespoon olive oil
– 1 teaspoon chili powder
– 1 teaspoon cumin
– 1 teaspoon garlic powder
– Salt and pepper to taste
The main ingredients create the flavor base of this dish. I prefer ground beef for its rich taste, but turkey is a great option too. You will need olive oil to sauté the meat. The spices like chili powder and cumin add warmth and depth. Garlic powder enhances the overall flavor. Make sure to add salt and pepper to suit your taste.
Salad Ingredients
– 4 cups mixed salad greens
– 1 cup cherry tomatoes, halved
– 1 avocado, diced
– 1/2 cup shredded cheese
– 1/4 cup sour cream
– 1/4 cup fresh cilantro, chopped
– 1 jalapeño, sliced (optional)
The salad ingredients are fresh and vibrant. I use a mix of greens like romaine, spinach, and arugula. These add crunch and nutrients. Cherry tomatoes bring sweetness, while avocado adds creaminess. You can choose any cheese you like, but I enjoy cheddar or pepper jack. Sour cream gives a smooth finish, while cilantro adds a fresh touch. If you like heat, slice jalapeños for a spicy kick.
Optional Serving Items
– Lime wedges
Lime wedges are optional but highly recommended. A squeeze of lime juice brightens the flavors in your salad. It adds a zesty twist that complements the dish perfectly. I always serve lime wedges on the side.
Step-by-Step Instructions
Cooking the Meat
1. Start by heating a large skillet over medium heat. Pour in 1 tablespoon of olive oil. Let it warm up for a minute.
2. Add 1 pound of ground beef or turkey into the skillet. Use a spatula to break it into smaller pieces.
3. Sauté the meat for about 5 to 7 minutes. Look for it to turn brown and cook all the way through.
4. Once the meat is browned, add 1 teaspoon of chili powder, 1 teaspoon of cumin, and 1 teaspoon of garlic powder.
5. Don’t forget a pinch of salt and pepper to taste. Stir everything well to coat the meat evenly.
6. Allow the mixture to simmer for another 2 to 3 minutes. This helps all the flavors mix together. Remove the skillet from heat.
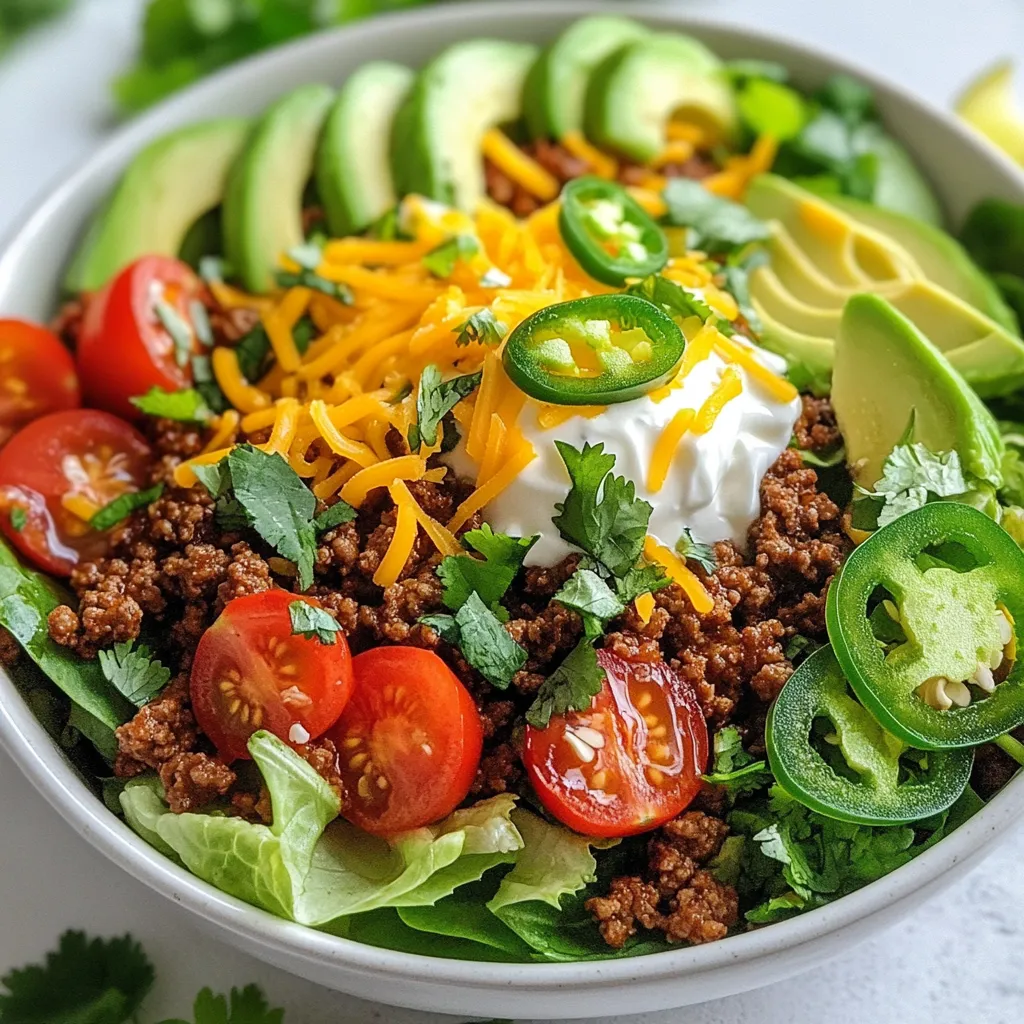
Assembling the Salad
1. Grab a large serving bowl. Layer in 4 cups of mixed salad greens. Use a mix of romaine, spinach, and arugula for the base.
2. Spoon the savory cooked meat right over the greens. Spread it out to cover the salad base.
3. Next, add 1 cup of halved cherry tomatoes and 1 diced avocado on top.
4. Finish with 1/2 cup of shredded cheese. Choose your favorite, like cheddar or pepper jack.
Final Touches and Serving
1. Drizzle 1/4 cup of sour cream over the entire salad. This adds creaminess and richness.
2. Sprinkle 1/4 cup of chopped fresh cilantro on top. This gives a burst of fresh flavor.
3. For a spicy kick, add slices of jalapeño if you like heat.
4. Serve the salad in individual bowls or place it in the center of the table for family-style dining.
5. Don’t forget to include lime wedges on the side. A squeeze of fresh lime juice adds a zesty finish!
Tips & Tricks
Cooking Tips
– Ensuring the meat is fully cooked: Always cook the ground beef or turkey until it’s brown. This usually takes about 5-7 minutes. Use a spatula to break it into small pieces. This helps it cook evenly.
– Best practices for seasoning: Add spices like chili powder and cumin after the meat is browned. This allows the flavors to mix well. Don’t forget to salt and pepper to taste. Stir the meat thoroughly to coat it with the spices.
Presentation Tips
– Vibrant bowl options: Choose a clear glass bowl to show off the colorful layers. The greens, tomatoes, and cheese create a fun look. This makes your taco salad feel festive and inviting.
– Decorative serving suggestions: For a special touch, arrange the toppings in groups. Place the cheese, tomatoes, and avocado in separate sections. This adds visual appeal and lets guests pick their favorites.
Dietary Tips
– Modifications for low-carb or dairy-free versions: For a low-carb option, skip the beans and corn. You can also use a dairy-free sour cream. There are many great brands that taste just as good! If you want more veggies, add bell peppers or cucumbers.
Pro Tips
- Choose Lean Meat: Opt for lean ground beef or turkey to keep your taco salad lower in fat while still being flavorful.
- Customize the Greens: Mix and match your salad greens for different textures and flavors; try adding kale or romaine for crunch.
- Layer for Flavor: When assembling, layer ingredients to create a beautiful presentation that also enhances flavor with each bite.
- Make it Ahead: Prepare the meat and toppings in advance for an easy, quick assembly at mealtime; just store them separately until ready to serve.
Variations
Ingredient Swaps
You can change the protein in this dish easily. Ground chicken or turkey work well too. If you want a plant-based option, try lentils or crumbled tofu. These swaps keep the meal tasty.
Next, switch up your greens. You can use romaine, spinach, or kale. Each green adds its own flavor. You can also mix in some shredded cabbage for crunch. Add your favorite toppings like radishes or bell peppers for extra color.
Flavor Enhancements
To spice things up, add more chili powder or paprika. A pinch of cayenne adds heat. If you love bold flavors, try some taco seasoning instead. It gives a great taste boost.
You can also add toppings like sliced olives or jalapeños. They add briny and spicy notes. Hot sauce is another fun way to enhance flavor. Choose your favorite brand for a kick.
Serving Style
Want to change how you serve this dish? Try making it a wrap! Use large lettuce leaves to hold your fillings. This makes a fun, hand-held meal.
Another idea is to use a bowl, but make it smaller. Create bite-sized portions in lettuce boats. This adds a crunchy texture and makes it easy to eat.
Storage Info
Storing Leftovers
To keep your Keto Taco Salad fresh, store it in an airtight container. Place the salad greens and toppings in separate containers. This keeps everything crisp. For the meat, let it cool before sealing it up. If you have extra sour cream or avocado, add those just before serving. They can brown quickly.
When it’s time to reheat the meat, use a skillet over medium heat. Stir it often to avoid burning. You can also microwave it. Just heat it in short bursts to keep it tender.
Shelf Life
Store your leftovers in the fridge for up to three days. After that, the salad greens may wilt and lose their crunch. The meat should stay safe to eat for a bit longer, but it’s best eaten fresh. Always check for any off smells or changes in texture before consuming.
Meal Prep Suggestions
For easy meal prep, cook the meat ahead of time and store it in the fridge. Chop the veggies and keep them in separate containers. This way, you can grab them quickly. I suggest assembling your salad just before serving. This keeps everything fresh and vibrant. Enjoy a delicious meal that feels made just for you!
FAQs
Is this recipe keto-friendly?
Yes, this recipe is keto-friendly. It uses low-carb ingredients to fit your diet. The ground beef or turkey provides protein with minimal carbs. The mixed salad greens, such as romaine and spinach, are also low in carbs. Toppings like avocado and cheese add healthy fats without adding many carbs. This makes it a great choice for anyone on a keto diet.
Can I make this ahead of time?
Yes, you can prepare this dish ahead of time. Cook the meat and store it in the fridge. You can also chop the veggies and mix them in a bowl. Keep the salad greens separate until serving. This keeps them fresh and crisp. Store everything in airtight containers. When you are ready to eat, just assemble your bowl.
What can I substitute for ground beef or turkey?
If you want a change, try ground chicken or pork. You can also use plant-based options like lentils or black beans. These provide protein and fit well in the salad. If you want a leaner option, you can use tofu or tempeh. These swaps keep the dish tasty and satisfying.
This blog post covers tasty salad ideas with ground beef or turkey. You learned about key ingredients, like fresh greens and savory toppings. We explored step-by-step cooking and assembling methods, alongside helpful tips for perfecting your dish. You now know how to store leftovers safely and even make variations.
Remember, you can switch ingredients and find what you love. Enjoy creating your salad masterpiec
Keto Taco Salad Bowl
Ingredients
- 1 lb ground beef or turkey
- 1 tablespoon olive oil
- 1 teaspoon chili powder
- 1 teaspoon cumin
- 1 teaspoon garlic powder
- to taste salt and pepper
- 4 cups mixed salad greens
- 1 cup cherry tomatoes, halved
- 1 whole avocado, diced
- 1 2 shredded cheese
- 1 4 sour cream
- 1 4 fresh cilantro, chopped
- 1 whole jalapeño, sliced (optional)
- as needed lime wedges for serving
Instructions
- In a large skillet, pour in the olive oil and heat it over medium heat. Add the ground beef or turkey to the skillet, using a spatula to break it apart into smaller pieces. Sauté the meat for approximately 5-7 minutes, or until it's nicely browned and cooked through.
- Once the meat is browned, add in the chili powder, cumin, garlic powder, along with a generous pinch of salt and pepper. Stir everything together thoroughly, allowing the spices to coat the meat evenly. Allow the mixture to simmer for an additional 2-3 minutes, so the flavors can develop and meld together. Remove the skillet from heat and set the seasoned meat aside.
- In a large serving bowl, layer the mixed salad greens as your base.
- Spoon the savory cooked meat over the bed of salad greens. Next, artfully arrange the halved cherry tomatoes, diced avocado, and a generous sprinkle of shredded cheese on top of the beef or turkey.
- To add a creamy element, drizzle the sour cream over the entire salad. Then, sprinkle the chopped cilantro on top for a burst of fresh flavor. If you're feeling adventurous, add the sliced jalapeños to bring a bit of spice to your bowl.
- Dish out the salad into individual bowls for your guests or enjoy it family-style. Don’t forget to include lime wedges on the side.
![For a great veggie stir fry, you need fresh veggies. Here’s what I use: - 1 cup broccoli florets - 1 bell pepper (red or yellow), sliced into thin strips - 1 cup sugar snap peas, trimmed - 1 medium carrot, cut into julienne strips - 1 cup mushrooms (shiitake or button), sliced Spices and oils bring flavor to your dish. I recommend these: - 2 cloves garlic, finely minced - 1 tablespoon fresh ginger, grated - 3 tablespoons soy sauce (or tamari for gluten-free) - 1 tablespoon sesame oil - 1 tablespoon vegetable oil for high-heat cooking - Salt and pepper, to taste You can add more fun to your stir fry with these options: - Cooked tofu or tempeh for protein - Cooked rice or noodles for a fuller dish - Chili flakes for some heat - Fresh herbs like cilantro for a fresh touch For the full recipe, check out [Full Recipe]. These ingredients make a colorful and tasty meal that’s easy to prepare. To start, wash all your vegetables. This step is super important. Cut the broccoli into small florets. Slice the bell pepper into thin strips. Julienne the carrot for a nice crunch. Slice your mushrooms too. Having everything ready makes cooking fast and fun. Grab a large skillet or wok for this part. Heat the vegetable oil over medium-high heat. You want the oil to shimmer a little. Now, add the minced garlic and grated ginger. Sauté them for around 30 seconds. Watch closely so they don’t burn! Next, toss in the broccoli, bell pepper, and carrot. Stir-fry these for about 3 to 4 minutes. They should be a bit soft but still crunchy. Then, add the sugar snap peas and sliced mushrooms. Keep cooking for another 3 to 4 minutes. This makes sure all veggies are tender but still bright. Once your veggies are just how you like them, pour in the soy sauce. Drizzle the sesame oil over the top. Stir everything well to mix the flavors. Let them cook together for 1 to 2 more minutes. Season with salt and pepper to taste. Remove from heat and sprinkle with toasted sesame seeds. This adds a nice touch! Serve the stir fry in a big bowl. You can add rice or noodles for a full meal. Check the Full Recipe for more details. Enjoy your vibrant dish! To get the right texture, cut your veggies small and even. This way, they cook quickly and stay crisp. Start with the harder veggies first, like carrots and broccoli. Cook them for a few minutes before adding softer ones like bell peppers and mushrooms. Stir the mix often to avoid burning. Keep an eye on the color; vibrant hues mean freshness! Adding flavor is key. Use fresh garlic and ginger for a bold taste. A splash of soy sauce brings saltiness. You can also try adding a bit of chili paste for heat. For a nutty touch, drizzle sesame oil right at the end. Also, sprinkle toasted sesame seeds on top for crunch and flavor. These simple changes can elevate your dish. Avoid overcrowding the pan. If you add too many veggies at once, they steam instead of fry. This makes them soggy. Always have your ingredients prepped before you heat the pan. Another mistake is cooking on low heat. High heat keeps the veggies crisp and colorful. Lastly, don’t skip the seasoning; it makes all the difference! For more details, check the Full Recipe. {{image_4}} You can use many different vegetables in your stir fry. If you don't have broccoli, try cauliflower or zucchini. Green beans add a nice crunch too. For a sweeter taste, add some baby corn or bell peppers. Just keep in mind that cooking times may change based on what you pick. Always cut the veggies into similar sizes. This helps them cook evenly and look great. This veggie stir fry is easy to adapt for special diets. To make it vegan, just stick with the current ingredients. Use tamari instead of soy sauce for a gluten-free option. You can even add some coconut aminos for a sweeter flavor. This keeps it tasty without gluten. Always check labels to ensure all ingredients meet your dietary needs. To make your stir fry more filling, add protein. Tofu is a great choice. Press it first to remove extra moisture, then cube it. You can also add chickpeas or edamame for plant-based protein. If you eat meat, try chicken or shrimp. Cook the protein first, then add it back with the veggies. This way, everything blends well together. For the full recipe, check the section above. After enjoying your veggie stir fry, let it cool down. Use an airtight container to keep it fresh. Store it in the fridge for up to three days. This way, you can savor your delicious meal again! Reheating is simple. You can use a microwave or stovetop. If using a microwave, heat in short bursts. Stir in between to ensure even heating. On the stovetop, add a splash of water to keep it moist. Heat on medium until warm. If you want to save some for later, freezing works well too. Place the cooled stir fry in freezer-safe bags. Remove as much air as possible before sealing. It can last for up to three months in the freezer. When ready to eat, thaw in the fridge overnight before reheating. Enjoy your easy veggie stir fry again with fresh flavors! For the full recipe, check the details above. It takes about 10 to 15 minutes to cook veggie stir fry. The prep time is around 15 minutes, and the actual cooking time is quick. You want to heat your pan and cook the veggies at high heat. This helps keep them crisp and colorful. Yes, you can use frozen vegetables for stir fry. They are handy and save time. Just remember that frozen veggies may release more water. Cook them for a bit longer to get rid of the moisture. This way, your stir fry stays flavorful and not soggy. Besides soy sauce, you can try other sauces for different flavors. Here are some great options: - Teriyaki sauce for a sweet touch - Hoisin sauce for a thicker, rich flavor - Oyster sauce for umami - Coconut aminos for a soy-free option These sauces can add a unique twist to your dish. To make your stir fry taste better, use fresh ingredients. Fresh veggies bring bright flavors. Adding garlic and ginger enhances the taste, too. You can also experiment with spices like red pepper flakes for heat. Lastly, finish with toasted sesame oil for a nutty flavor. For more ideas, check out the Full Recipe. To sum up, this blog post gives you all you need for a great stir fry. You learned about fresh veggies, essential spices, and fun add-ins. I showed you how to prepare, cook, and season your dish. The tips shared help avoid common mistakes and enhance flavor. You can also explore different variations and learn how to store leftovers. Stir fry is versatile and fun to make. Enjoy your cooking journey and make it your own!](https://joymealplan.com/wp-content/uploads/2025/06/d6e89b1e-9902-47ff-ae43-a4ac0f8c3362-768x768.webp)
. To store leftovers, let the dish cool first. Use an airtight container to keep it fresh. Place the container in the fridge. It will stay good for about 3 to 4 days. When you're ready to eat, just reheat it in the oven or microwave. Heating it in the oven helps keep the cheese nice and melty. If you want to enjoy One Pan Zucchini Parmesan later, freezing is a great option. Allow the dish to cool completely before freezing. Use a freezer-safe container or bag. It can last up to 2 months in the freezer. When you're ready to eat, thaw it overnight in the fridge. Reheat it in the oven at 350°F (175°C) until hot and bubbly. This way, you get a delicious meal even after some time! For the full recipe, check out the earlier section. Can I make this dish ahead of time? Yes, you can make One Pan Zucchini Parmesan ahead. Simply prepare the dish, but don’t bake it. Cover it and store it in the fridge for up to 24 hours. When you’re ready to eat, bake it as directed. This keeps the flavors fresh and ensures a warm meal. How do I make this recipe healthier? To make this dish healthier, you can: - Use less cheese or choose lower-fat versions. - Add more veggies like bell peppers or spinach. - Use whole-grain breadcrumbs for a crunch. These changes keep the taste while reducing calories. What do I serve with One Pan Zucchini Parmesan? This dish pairs well with: - A simple green salad for freshness. - Crusty bread to soak up the juices. - Grilled chicken or fish for protein. These sides balance the meal and add variety. What to do if the cheese isn't melting properly? If the cheese doesn’t melt, check the oven temperature. It should be at 400°F. You can also place the pan under the broiler for a few minutes. Just watch closely to avoid burning. How to avoid watery zucchini? To prevent watery zucchini, try these tips: - Salt the zucchini slices and let them sit for 15 minutes. This draws out moisture. - Pat them dry with a paper towel before cooking. By reducing moisture, you get a better texture in your dish. This recipe for One Pan Zucchini Parmesan is easy and tasty. You learned about the fresh ingredients needed, the simple steps to prepare and bake, and some helpful tips. Remember to experiment with different cheeses and flavors for variety. Proper storage can keep your dish fresh longer, too. I hope you enjoy making and sharing this dish with others! Get creative and make it your own.](https://joymealplan.com/wp-content/uploads/2025/06/9342c215-57b6-41ef-a9e0-54692f75029a-768x768.webp)
