Chicken Tortellini Broccoli Creamy Comfort Dish


Craving a creamy, warm dish that’s easy to make? Chicken Tortellini Broccoli is your answer! This comforting meal combines tender cheese tortellini, fresh broccoli, and juicy chicken in a rich sauce. Whether you’re a busy parent or looking for a quick weeknight dinner, this dish satisfies all. Follow my simple steps to create this delicious recipe your whole family will love. Let’s get started on this creamy comfort dish!
Why I Love This Recipe
- Quick and Easy: This dish comes together in just 30 minutes, making it perfect for busy weeknights.
- Comfort Food: The creamy sauce and cheesy goodness make this a warm, comforting meal that everyone will love.
- Versatile Ingredients: You can easily swap in different vegetables or proteins based on what you have on hand.
- Kid-Friendly: The combination of chicken and cheese with tortellini is a hit with kids and adults alike!
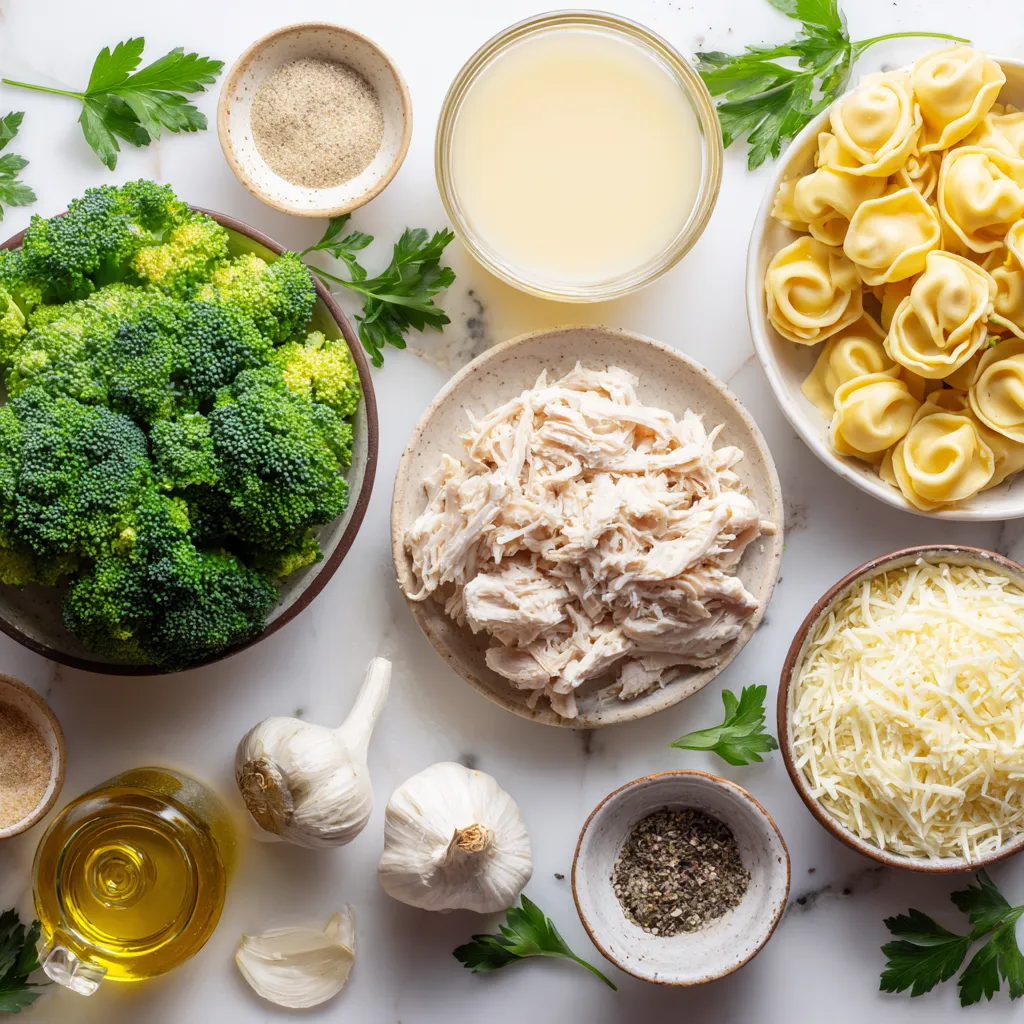
Ingredients
Required Ingredients
– 8 oz cheese tortellini
– 2 cups broccoli florets
– 1 cup cooked, shredded chicken
– 2 cups chicken broth
– 1 cup heavy cream
Optional Ingredients
– 1 teaspoon garlic powder
– 1 teaspoon onion powder
– 2 tablespoons olive oil
– 1 cup shredded mozzarella cheese
– 1/2 cup grated Parmesan cheese
Seasoning and Garnish
– Salt and pepper to taste
– Fresh parsley, finely chopped, for garnish
The base of this dish starts with cheese tortellini, which gives a rich and creamy bite. Broccoli florets add a nice crunch and bright color. You need cooked chicken for protein. I love using shredded chicken because it mixes well with the sauce. Chicken broth adds depth and flavor, while heavy cream ensures a silky finish.
For extra flavor, I suggest adding garlic powder and onion powder. Olive oil helps sauté the chicken nicely. Mozzarella brings extra creaminess, and Parmesan gives a sharp finish.
Don’t forget salt and pepper! They bring all the flavors together. Fresh parsley is perfect for garnishing. It adds a fresh touch and looks great on the plate.
Now, gather your ingredients, and let’s make this creamy comfort dish!
Step-by-Step Instructions
Cooking the Tortellini
– Boiling Water: Start by filling a large pot with water. Add a generous amount of salt. Bring the water to a rolling boil over high heat. This step is key for flavor.
– Cooking Time and Draining: Once the water boils, add 8 oz of cheese tortellini. Cook it according to the package, usually 3-5 minutes. The tortellini should be tender but firm. After cooking, drain it in a colander and set it aside.
Preparing the Broccoli
– Blanching Technique: In a different pot, bring water to a boil again. Carefully add 2 cups of broccoli florets. Cook for 2-3 minutes. The broccoli should turn bright green but remain crunchy.
– Cooling Method: After blanching, drain the broccoli in a colander. Rinse it under cold water. This stops the cooking and keeps the color vibrant. Set it aside with the tortellini.
Combining Ingredients
– Making the Creamy Sauce: In a large skillet, heat 2 tablespoons of olive oil over medium heat. Add 1 cup of cooked, shredded chicken. Sauté for 2 minutes until warm.
– Adding Tortellini and Broccoli: Pour in 2 cups of chicken broth and 1 cup of heavy cream. Stir in 1 teaspoon of garlic powder and 1 teaspoon of onion powder. Season with salt and pepper. Bring it to a gentle simmer. Once simmering, stir in the tortellini and broccoli. Gently mix to coat everything in the creamy sauce.
Final Touches
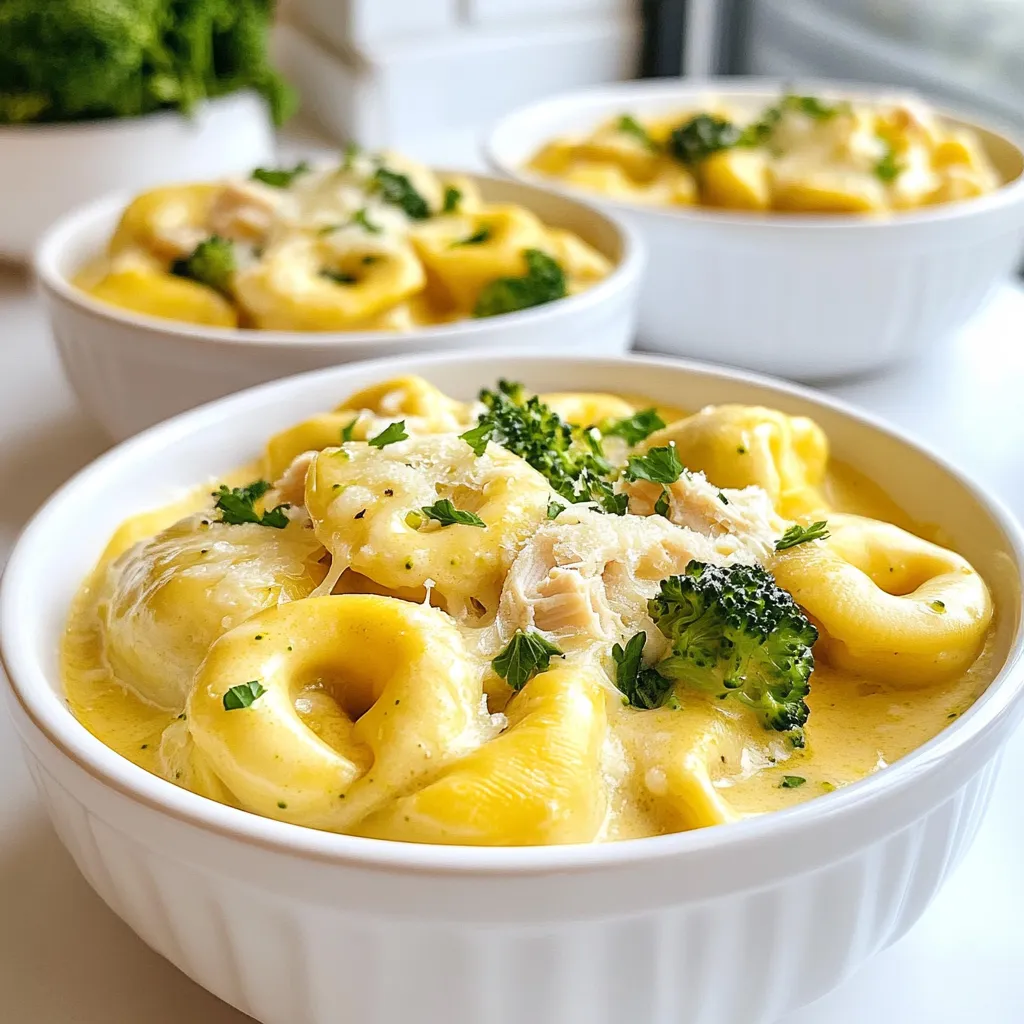
– Melting the Cheese: Sprinkle 1 cup of shredded mozzarella and 1/2 cup of grated Parmesan cheese over the mixture. Stir until the cheese melts and blends into the sauce. Taste and adjust salt or pepper if needed.
– Serving Suggestions: Spoon the Chicken Tortellini Delight into bowls. Garnish with fresh parsley for color. For an extra touch, drizzle with olive oil or add more Parmesan. Enjoy your comforting dish!
Tips & Tricks
Perfecting the Sauce
To achieve a creamy consistency, use heavy cream. This adds richness to your dish. Stir the cream into the chicken broth slowly. This helps to blend the flavors well. If the sauce is too thick, add a bit more chicken broth. For a thinner sauce, you can also add a splash of water.
For seasoning adjustments, taste as you cook. Add salt and pepper to bring out the flavors. Garlic and onion powder enhance the taste but do not overpower. A little bit goes a long way. If you love spice, consider adding a pinch of red pepper flakes.
Tortellini Cooking Tips
To avoid overcooking tortellini, follow package instructions closely. Most cheese tortellini cooks in just 3-5 minutes. Check for al dente texture. It should be firm yet tender. Drain it right away to prevent mushiness.
You can choose different types of tortellini. Cheese-filled is classic, but chicken or spinach tortellini works too. Each type brings its own flavor to the dish. Experiment to find your favorite!
Broccoli Preparation
To keep broccoli bright and crunchy, blanch it quickly. Boil for just 2-3 minutes until it turns bright green. Rinse under cold water right after. This stops the cooking and keeps its color.
If you want to try alternative cooking methods, consider steaming or roasting. Steaming also preserves nutrients. Roasting adds a nice char and flavor. Both methods work well with this dish.
Pro Tips
- Cook Tortellini Al Dente: Ensure you cook the tortellini until just al dente for the best texture. This will prevent it from becoming mushy when combined with the sauce.
- Chill Blanched Broccoli: After blanching, rinse the broccoli under cold water to stop the cooking process. This keeps the vibrant green color and crisp texture.
- Customize the Cheese: Feel free to mix different types of cheese, like cheddar or gouda, for a unique flavor twist. Just keep the mozzarella for that perfect melt!
- Garnish Creatively: For an extra touch of flavor and presentation, drizzle a bit of infused olive oil and add a sprinkle of red pepper flakes for a hint of spice.
Variations
Protein Substitutions
You can easily swap out the chicken in this dish. Turkey works well if you want a lighter meat. Shrimp also adds a nice flavor and cooks quickly. For a vegetarian option, try using mushrooms or chickpeas. They both add protein and texture without meat.
Flavor Variations
Spices and herbs can change the taste of this dish. Consider adding Italian herbs like basil or oregano. They give a fresh twist. You can also try a pinch of red pepper flakes for some heat. Different cheese types can change the creaminess. Use gouda for a smoky flavor or feta for a tangy touch.
Dietary Adaptations
If you need gluten-free options, look for gluten-free tortellini. Many stores offer this choice now. For those needing dairy-free meals, use coconut milk instead of heavy cream. Nutritional yeast can stand in for cheese and add a cheesy flavor. Always check labels to ensure your choices fit your dietary needs.
Storage Info
Refrigeration Tips
– To store leftovers, place them in an airtight container.
– Cool the dish to room temperature before sealing.
– Label the container with the date.
– Use within 3-4 days for best quality.
Freezing Instructions
– For freezing, let the dish cool completely first.
– Transfer to a freezer-safe container or bag.
– Remove as much air as possible to prevent freezer burn.
– It can last up to 3 months in the freezer.
Serving After Storage
– To refresh leftovers, reheat in a skillet over medium heat.
– Add a splash of chicken broth or cream if the sauce thickens.
– Stir gently to ensure even heating.
– Check the temperature; it should reach 165°F before serving.
FAQs
How long does it take to make Chicken Tortellini Broccoli?
The total time to make this dish is about 30 minutes. You spend about 15 minutes prepping. The cooking time is around 15 minutes. This quick cooking time makes it great for busy nights.
Can I substitute fresh broccoli with frozen broccoli?
Yes, you can use frozen broccoli instead of fresh.
Pros of Frozen:
– Convenient and ready to use.
– Often frozen at peak freshness.
Cons of Frozen:
– May lose some crunch.
– Can be softer when cooked.
I prefer fresh for its taste and texture, but frozen works well in a pinch.
What other ingredients can be added to Chicken Tortellini Broccoli?
You can easily mix in other veggies and proteins. Here are some ideas:
– Spinach for more greens.
– Bell peppers for color and sweetness.
– Peas for a pop of texture.
For proteins, try:
– Cooked shrimp for seafood lovers.
– Turkey for a leaner option.
– Tofu for a vegetarian twist.
These additions make the dish even more delicious.
Is this recipe kid-friendly?
Absolutely! Kids usually love this dish.
To make it more appealing, you can:
– Cut the broccoli into smaller pieces for easier eating.
– Use fun-shaped tortellini.
– Let kids sprinkle cheese on top before serving.
These small changes can make the dish more fun for children while they enjoy a tasty meal.
This article covered everything you need to make delicious Chicken Tortellini Broccoli. You learned about the key and optional ingredients to use. We walked through cooking the tortellini and preparing the broccoli. I shared tips on perfecting the sauce and offered variations to suit your taste. Don’t forget to store leftovers properly for later enjoyment. With these simple steps and tricks, you’ll create a dish that’s not just tasty but also looks great on the plate. Enjoy experimenting with flavors and making it your ow

Cheesy Chicken Tortellini Delight
Ingredients
- 8 oz cheese tortellini
- 2 cups broccoli florets
- 1 cup cooked, shredded chicken
- 2 cups chicken broth
- 1 cup heavy cream
- 1 teaspoon garlic powder
- 1 teaspoon onion powder
- 1 cup shredded mozzarella cheese
- 1/2 cup grated Parmesan cheese
- 2 tablespoons olive oil
- to taste salt
- to taste pepper
- for garnish fresh parsley, finely chopped
Instructions
- In a large pot, bring salted water to a rolling boil. Add the cheese tortellini and cook according to the package instructions, typically about 3-5 minutes, until al dente. Drain the tortellini and set aside in a bowl.
- In a separate pot, bring water to a boil again. Carefully add the broccoli florets and cook for 2-3 minutes, or until they are bright green and tender but still have a slight crunch. Drain the broccoli and immediately rinse under cold water to halt further cooking. Set aside.
- In a large skillet, heat the olive oil over medium heat. Once hot, add the shredded chicken to the skillet and sauté for 2 minutes, allowing it to heat through.
- Pour in the chicken broth and heavy cream directly into the skillet with the chicken. Stir in the garlic powder, onion powder, and season with salt and freshly ground pepper. Bring the mixture to a gentle simmer, stirring occasionally.
- When the sauce reaches a simmer, add the cooked tortellini and blanched broccoli to the skillet. Using a gentle hand, stir the ingredients to ensure they are evenly coated with the creamy sauce.
- Sprinkle the shredded mozzarella and grated Parmesan cheese over the tortellini and broccoli mixture. Stir well until the cheeses melt and integrate smoothly into the sauce, creating a creamy texture. Taste and adjust the seasoning with more salt or pepper as desired.
- Spoon the delicious Chicken Tortellini Delight into individual bowls, ensuring each serving is generously coated with sauce. Finish with a sprinkle of finely chopped fresh parsley for an inviting touch and a pop of color.