
Five Ingredient Buffalo Chicken Dip Easy and Tasty Snack


If you’re craving a delicious snack that’s easy to make, I’ve got the perfect recipe for you! This Five Ingredient Buffalo Chicken Dip is not only simple, but it’s also incredibly tasty. With just five basic ingredients, you can whip up a cheesy, spicy dip that will please any crowd. Let me show you how to create this mouthwatering treat in no time! Ready to dive in?
Why I Love This Recipe
- Flavor Explosion: This dip combines the rich creaminess of cheese and yogurt with the zesty kick of buffalo sauce, creating an irresistible flavor profile that keeps you coming back for more.
- Easy to Make: With just a few simple steps and minimal prep time, this dip is perfect for quick gatherings or casual parties.
- Crowd-Pleaser: Whether you’re at a game day event or a family get-together, this dip is sure to be a hit, appealing to both spice lovers and those who enjoy creamy goodness.
- Versatile Serving Options: Pair it with tortilla chips, vegetables, or even spread it on sandwiches for a delicious twist, making it a versatile addition to any spread.
Ingredients
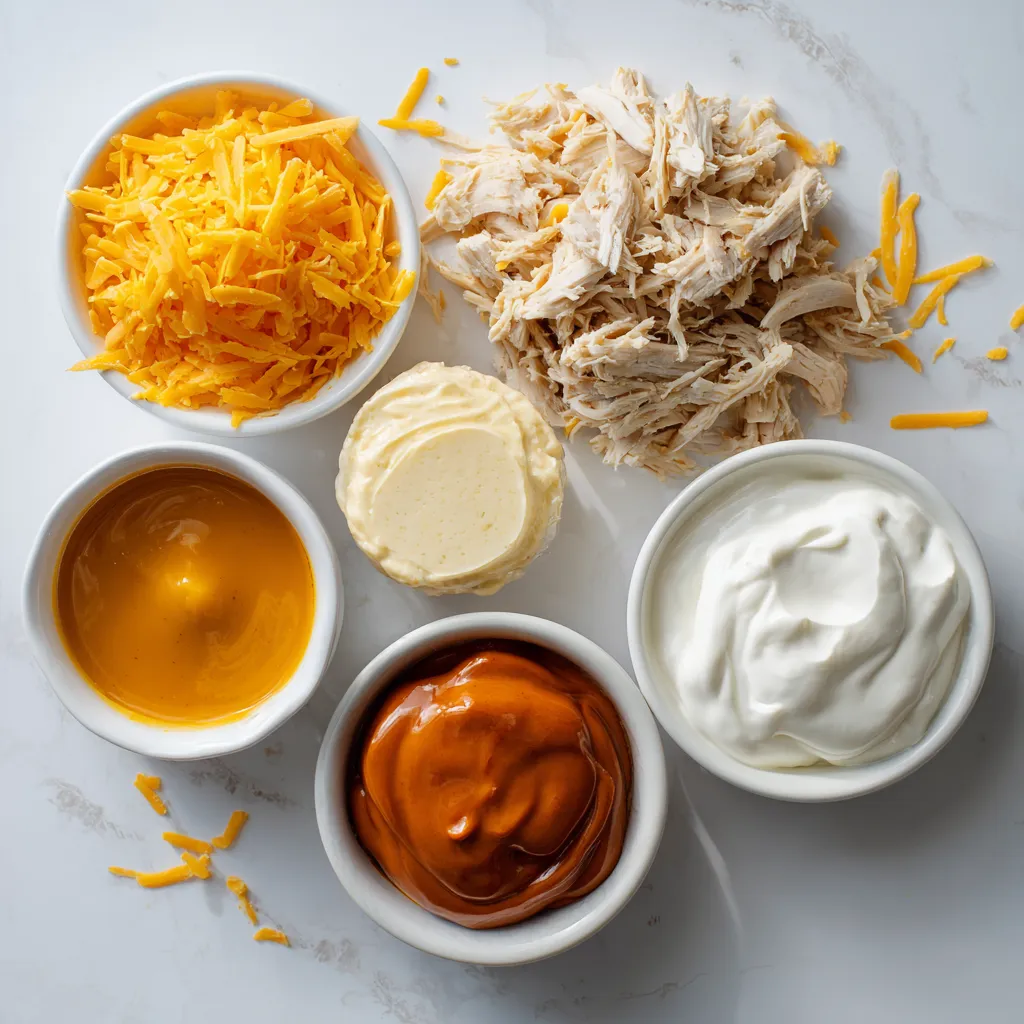
To make this easy and tasty buffalo chicken dip, you need just five simple ingredients. Here’s what you’ll gather:
– 2 cups shredded cooked chicken
– 1/2 cup cream cheese, softened
– 1/2 cup buffalo sauce
– 1 cup sharp cheddar cheese, shredded
– 1/2 cup plain Greek yogurt
Each ingredient plays a key role. The shredded chicken gives the dip its hearty base. Cream cheese adds smoothness. Buffalo sauce brings the heat and flavor. Sharp cheddar cheese adds a rich, cheesy taste. Lastly, Greek yogurt gives it a nice tang and creaminess.
When I make this dip, I like to use rotisserie chicken for speed. It saves time and tastes great. You can adjust the buffalo sauce for more or less spice based on your taste. The sharp cheddar is a must for that cheesy goodness.
This dip is not only easy to make, but it also packs a punch of flavor. You can whip it up for parties, game days, or a cozy night in. Just gather these ingredients, and you’re on your way to a delicious treat!
Step-by-Step Instructions
1. Preheat the oven
Start by preheating your oven to 350°F (175°C). This step is key for getting that nice, bubbly finish.
2. Blend cream cheese and Greek yogurt
In a large bowl, place 1/2 cup of softened cream cheese and 1/2 cup of plain Greek yogurt. Mix them together with a spatula or mixer. You want a smooth and creamy texture.
3. Incorporate buffalo sauce
Add 1/2 cup of buffalo sauce to the cream mixture. Stir well to blend the flavors. Adjust the amount of buffalo sauce if you like it spicier.
4. Mix in shredded chicken
Take 2 cups of shredded cooked chicken and add it to the bowl. Stir until all the chicken is coated in the creamy buffalo sauce.
5. Fold in cheddar cheese
Next, fold in 1 cup of shredded sharp cheddar cheese. Make sure the cheese is evenly mixed in for that cheesy flavor in every bite.
6. Transfer to baking dish
Carefully pour the mixture into an oven-safe baking dish. Spread it out evenly across the dish.
7. Bake until bubbly
Place the dish in the oven and bake for 20-25 minutes. You’ll know it’s ready when the dip is hot, bubbly, and has a golden top.
Enjoy your warm Buffalo Chicken Dip with chips or veggies!
Tips & Tricks
Cooking Tips
– Achieving the right creaminess
To get a creamy dip, mix the cream cheese and Greek yogurt well. Use a spatula or mixer to blend until smooth. This step is key. If you want a thicker dip, add more cream cheese. For a lighter texture, use more yogurt.
– Adjusting spice levels
You can control the heat by changing the amount of buffalo sauce. Start with half a cup. If you like it spicy, add more sauce bit by bit. Taste it after mixing. This ensures you get the heat just right for your crowd.
– Ensuring even cheese distribution
When adding cheddar, fold it gently into the dip. This helps the cheese mix in well. Make sure every bite has cheese for that delicious flavor. An even mix means no bite goes cheese-less.
Presentation Tips
– Serving suggestions
Serve the dip warm for the best taste. Use a big platter with tortilla chips, celery sticks, or carrot sticks. This makes it fun and easy for guests to dip.
– Garnishing ideas
Add a sprinkle of shredded cheddar on top for color. A drizzle of buffalo sauce can also enhance the look. These small touches make your dip look fancy and inviting.
– Ideal accompaniments for dipping
Fresh veggies like cucumber or bell pepper work well too. They add crunch and freshness. You can also try pita chips for a tasty twist. Choose a mix of dippers for a great snack spread.
Pro Tips
- Adjust the Spice Level: Feel free to modify the amount of buffalo sauce to suit your taste. Start with less if you’re sensitive to heat, and add more until you reach your desired spice level.
- Use Leftover Chicken: This dip is a perfect way to use up leftover rotisserie chicken or any cooked chicken you have on hand, making it a great option for quick meal prep.
- Add Extra Flavor: For an extra flavor boost, consider adding diced green onions or crumbled blue cheese into the mixture before baking.
- Keep it Warm: If serving at a party, use a slow cooker on low heat to keep the dip warm and gooey throughout the event.

Variations
Flavor Combinations
You can make this dip even more exciting with some fun flavors. Here are a few ideas:
– Adding blue cheese: Crumble some blue cheese into the mix. This adds a strong taste that pairs well with buffalo sauce. The creamy texture balances the heat of the dip.
– Incorporating veggies: Chop up some celery or bell peppers. Mixing in veggies adds crunch and freshness. It also helps cut through the rich flavors.
– Different protein options: Swap the chicken for shredded turkey or even pulled pork. Each protein brings its own unique flavor to the dip. You can use what you have on hand or what you love most.
Dietary Adjustments
If you have dietary needs, you can easily adapt this dip. Here are some ideas to make it work for you:
– Making it gluten-free: All the ingredients in this dip are naturally gluten-free. Just be sure to check your buffalo sauce label. Some brands may add gluten, so look for certified gluten-free options.
– High-protein alternatives: To boost protein, replace the Greek yogurt with cottage cheese. This keeps it creamy while adding more protein per serving. You can also add more chicken to increase the protein content.
– Vegan adaptations: For a vegan version, use shredded jackfruit instead of chicken. Replace cream cheese and yogurt with cashew cream or a nut-based yogurt. Additionally, choose a plant-based buffalo sauce to keep it fully vegan.
These variations let you customize your buffalo chicken dip to fit your taste and dietary needs. Enjoy experimenting!
Storage Info
Leftover Storage
To keep your buffalo chicken dip fresh, store it in an airtight container. Make sure to seal it well to avoid air exposure. Place it in the fridge if you plan to use it within three days. If you want to keep it for longer, freezing is a great option. Just follow these tips:
– Freezing tips: Use a freezer-safe container to prevent freezer burn. You can also wrap it tightly in plastic wrap before placing it in a container.
– Duration: The dip can last up to three months in the freezer. When ready to enjoy, thaw it overnight in the fridge.
Reheating Instructions
When reheating, you want to keep that tasty flavor and creamy texture. Here’s how to do it right:
– How to reheat without losing flavor: The best method is to reheat in the oven. Preheat your oven to 350°F (175°C), then place the dip in a baking dish. Cover it with aluminum foil to keep moisture in. Bake for about 15-20 minutes.
– Recommended reheating methods: You can also use the microwave. Just heat it in short bursts of 30 seconds, stirring in between, until it’s hot. However, the oven gives you that nice, gooey texture.
FAQs
Can I prepare this dip ahead of time?
Yes, you can make this dip ahead of time. Mix all ingredients, then store it in the fridge. When ready, just bake it for 20-25 minutes.
What can I serve with buffalo chicken dip?
Buffalo chicken dip pairs well with:
– Tortilla chips
– Celery sticks
– Carrot sticks
– Pita bread
You can also serve it with crackers for a fun crunch.
How long will leftovers last?
Leftovers will last about 3-4 days in the fridge. Store it in an airtight container to keep it fresh.
Can I use rotisserie chicken for this recipe?
Yes, using rotisserie chicken is a great idea! It saves time and adds flavor. Just shred the chicken and mix it in.
Is it possible to make this dip in a slow cooker?
You can definitely use a slow cooker! Just combine all the ingredients and cook on low for 2-3 hours. Stir occasionally for even heat.
This blog post has guided you on making a tasty buffalo chicken dip. We covered the key ingredients, simple steps, helpful tips, tasty variations, and smart storage ideas. You now have all you need to create a delicious dish. Enjoy making it for your next gathering or snack! Trust your cooking skills, and have fun sharing this dip with friends and family. Your kitchen will be filled with great flavors and smile

Buffalo Chicken Bliss Dip
Ingredients
- 2 cups shredded cooked chicken
- 0.5 cup cream cheese, softened to room temperature
- 0.5 cup buffalo sauce
- 1 cup sharp cheddar cheese, shredded
- 0.5 cup plain Greek yogurt
Instructions
- Begin by preheating your oven to 350°F (175°C) to ensure it's ready for baking.
- In a large mixing bowl, combine the softened cream cheese and Greek yogurt. Using a spatula or mixer, blend them together until you achieve a smooth and creamy consistency.
- Next, incorporate the buffalo sauce into the cream cheese and yogurt mixture. Stir in the shredded chicken, mixing until all ingredients are thoroughly combined and the chicken is well coated in the buffalo sauce.
- Gently fold in the shredded cheddar cheese, making sure it's evenly mixed throughout the dip for a delicious cheesy flavor in every bite.
- Carefully transfer the creamy chicken mixture into an oven-safe baking dish, spreading it out evenly across the surface.
- Place the baking dish in the preheated oven and bake for 20-25 minutes, or until the dip becomes hot, bubbly, and slightly golden on top.
- Once baked, remove the dish from the oven and allow it to cool for a few minutes before serving, as it will be very hot.

![- 1 pre-made phyllo pastry sheet (about 8-10 sheets) or one ready-made pie crust - 4 medium ripe tomatoes, thinly sliced - 1 cup fresh basil leaves, roughly chopped - 1 cup ricotta cheese - 1 cup shredded mozzarella cheese - 2 tablespoons extra virgin olive oil, plus additional for brushing - 1 teaspoon garlic powder - Salt and freshly cracked black pepper to taste - Optional: Balsamic glaze for drizzling When I create this fresh tomato basil tart, I love to use simple, fresh ingredients. The star is the ripe tomatoes. They bring bright flavor and juicy texture. I choose tomatoes that are firm but not hard. Their color should be vibrant. Basil is another key player. Fresh basil adds a sweet and peppery taste. I prefer to roughly chop it to release its oils. This way, every slice of the tart bursts with flavor. For creaminess, I use ricotta cheese. It adds a rich and smooth layer. I mix it with garlic powder, salt, and pepper. This mix gives a nice seasoning base. Next, mozzarella cheese adds a lovely stretch. It melts beautifully and gives that gooey texture we crave. Together, they make the tart creamy and savory. I also use extra virgin olive oil. It not only adds flavor but helps the crust brown nicely. A drizzle before baking makes a big difference. Lastly, I sometimes add balsamic glaze. It gives a sweet and tangy touch. It’s optional, but I find it elevates the dish. Each ingredient plays a role in making this tart special. When you gather these items, you set the stage for a delightful meal. Check out the [Full Recipe] for a step-by-step guide to bring this tart to life! 1. Preheating the oven Start by preheating your oven to 375°F (190°C). This step is key to getting a nice, crispy crust. 2. Preparing the pastry If using phyllo pastry, layer 4-5 sheets in a tart pan. Brush a thin layer of olive oil between each sheet. This adds flavor and helps create a crunchy texture. If you opt for a pie crust, just place it in the tart pan and crimp the edges for a nice look. 3. Making the ricotta mixture In a mixing bowl, combine ricotta cheese, garlic powder, salt, and pepper. Use a spatula to mix until smooth. This mixture adds creaminess to the tart. 1. Layering tomatoes and cheese Spread the ricotta mixture evenly over the crust. Then, layer the sliced tomatoes on top. Overlap the slices slightly for a pretty design. After the tomatoes, sprinkle shredded mozzarella cheese over them. Finally, add the chopped basil for a fresh taste. 2. Drizzling olive oil Drizzle the remaining olive oil over the top of the tart. This helps the tart brown nicely and boosts flavor. 1. Baking duration and tips Place the tart in your preheated oven. Bake for 25-30 minutes. Look for a golden brown crust and bubbly cheese. This means it’s nearly ready! 2. Cooling period before slicing Once baked, remove the tart from the oven. Let it cool on a wire rack for a few minutes. This cooling time helps set the filling, making slicing easier. Check out the Full Recipe to get all the details you need! For the best results, set your oven to 375°F (190°C). This temperature helps the tart cook evenly and creates a nice, crisp crust. To check for doneness, look for a golden-brown crust and bubbly cheese. The cheese should be slightly browned, adding flavor and texture. If you see these signs, your tart is ready! Garnishing makes your dish pop. Slice the tart into wedges and serve on a rustic wooden board. Add fresh basil leaves on top for a vibrant touch. You can also drizzle balsamic glaze over the tart right before serving. It adds a sweet and tangy flavor that enhances the dish. One mistake is ending up with a soggy crust. To prevent this, always brush the pastry with olive oil or egg wash before adding toppings. Another common issue is uneven cheese melting. Spread the cheese evenly and avoid overloading one side. This ensures every bite is cheesy and delicious. {{image_4}} To make your Fresh Tomato Basil Tart even more exciting, try using different cheeses. Instead of ricotta, you can use goat cheese or feta. Both add a unique tang. For mozzarella, consider using provolone or a sharp cheddar. These swaps change the taste while keeping it delicious. You can also play with herbs and spices. Instead of basil, use fresh oregano or thyme for a new flavor. A pinch of red pepper flakes can add a little heat. Just remember, keep the balance so it doesn't overpower the fresh tomatoes. Seasonal vegetables can enhance your tart. In summer, add zucchini or bell peppers for a colorful twist. In fall, roasted butternut squash works well. These veggies bring new flavors and textures to your dish. Don't shy away from incorporating different flavors. For instance, a sprinkle of smoked paprika gives a lovely depth. You could even add sun-dried tomatoes for a rich, sweet touch. These tweaks keep the tart fresh and exciting all year round. If you need vegan or gluten-free options, it’s easy to adapt. For a vegan tart, swap the cheeses for cashew cream or tofu. These provide creaminess without dairy. Use gluten-free pie crust or phyllo pastry for a gluten-free option. These variations allow everyone to enjoy this dish. You can create a tart that fits any diet without losing flavor. Check out the Full Recipe for more ideas! To keep your fresh tomato basil tart tasty, store leftovers properly. First, let the tart cool completely. Wrap it in plastic wrap or place it in an airtight container. This helps keep flavors and moisture in. If you prefer, you can also use aluminum foil for wrapping. Store it in the fridge for up to three days for the best taste. When ready to enjoy your leftover tart, preheat your oven to 350°F (175°C). Place the sliced tart on a baking sheet for even heating. Bake for about 10-15 minutes until it's warm. This method keeps the crust crisp and the cheese melty. To avoid sogginess, don’t microwave it. Microwaving can make the crust soft and chewy, which isn’t ideal. Enjoy your delicious tart again! To make a tomato basil tart from scratch, you can choose between two crust options. - Homemade crust: 1. Combine flour, butter, and salt in a bowl. 2. Mix until crumbly. 3. Add cold water, one tablespoon at a time, until the dough forms. 4. Roll out the dough and fit it into your tart pan. 5. Chill the crust for about 30 minutes before filling. - Store-bought crust: Use a pre-made phyllo pastry or ready-made pie crust. This saves time and effort. Simply place it in your tart pan and crimp the edges. I often use phyllo for a crisp texture, but a pie crust works great too. Each option gives a unique taste. Yes, you can prepare the tart in advance. Here are some tips: - Make the crust: You can bake the crust a day ahead. Cool it and store it in the fridge. - Prep the filling: You can mix the ricotta with seasonings a day before. Keep it in the fridge until you're ready to assemble. - Assemble and bake: Assemble the tart a few hours before serving. Bake it fresh to enjoy the best flavors. Store leftovers in an airtight container in the fridge. They stay good for 2-3 days. This tart pairs well with various side dishes and drinks. - Complementary side dishes: - A simple green salad with vinaigrette. - Roasted vegetables for added flavor. - Garlic bread for a comforting touch. - Drinks: - A chilled white wine, like Sauvignon Blanc. - Fresh lemonade for a refreshing option. These options enhance your meal and make it even more enjoyable. Check out the Full Recipe for more details on making this dish! You can make a tasty tomato basil tart with simple steps. We covered key ingredients, like fresh tomatoes and phyllo pastry. The baking process helps bring out rich flavors, while our tips keep your crust crispy. I shared several ways to adapt the tart for diets and seasons. Lastly, proper storage keeps leftovers fresh, making them easy to enjoy later. Dive in, try this recipe, and create your own delicious variations. Enjoy the process—it’s all about making a meal you love!](https://joymealplan.com/wp-content/uploads/2025/07/c4443384-77e0-40e2-9fba-17a466e29922-768x768.webp)


![- 1 can (15 oz) chickpeas, thoroughly drained and rinsed - 1 perfectly ripe avocado, peeled and pitted - 1 cup cherry tomatoes, halved - 1 medium cucumber, diced - 1/4 red onion, finely chopped - 1/4 cup fresh cilantro, chopped - 2 tablespoons freshly squeezed lemon juice - 1 tablespoon high-quality olive oil - Sea salt and freshly ground black pepper - 1/4 teaspoon ground cumin - Extra herbs for garnish - Each serving has about 200 calories. - Key vitamins include vitamin C, vitamin K, and fiber. This avocado chickpea salad packs a punch of flavor and nutrients! You get protein from chickpeas, healthy fats from avocado, and lots of vitamins from fresh veggies. The combo is not just tasty; it is good for you too. Pair this salad with pita chips for a crunchy bite. For the full recipe, check out the [Full Recipe]. To start, you need to mash the avocado. Take a ripe avocado and cut it in half. Remove the pit and scoop the flesh into a bowl. Use a fork to mash it. You want it creamy but still chunky. This adds a nice texture to your salad. Next, mix in the chickpeas. Open a can of chickpeas, drain and rinse them well. Carefully add them to the mashed avocado. Gently fold the chickpeas into the avocado. Be careful not to mash them. You want to keep the chickpeas whole for great bites. Now it's time to add in your vegetables. Chop up one cup of cherry tomatoes in half, dice a cucumber, and finely chop a quarter of a red onion. Don’t forget the cilantro! Add all these colorful veggies to your bowl. Gently mix everything together until the ingredients are well combined and coated in avocado. Then, you’ll make the dressing. In a small bowl, whisk together two tablespoons of freshly squeezed lemon juice and one tablespoon of high-quality olive oil. Add sea salt and freshly ground black pepper to taste. If you like, you can add a quarter teaspoon of ground cumin for extra flavor. This dressing will brighten the salad and tie everything together nicely. Now, drizzle the dressing over the chickpea and avocado mixture. Toss the salad gently. Make sure each ingredient gets a nice coat of dressing. Taste the salad. If it needs more flavor, adjust your seasoning. You can add more salt or lemon juice if you want it brighter. For the best taste, serve your salad right away. If you have time, let it chill in the refrigerator for 15-20 minutes. This allows the flavors to mix well. Don’t forget to check out the Full Recipe for more details! To select ripe avocados, look for ones that yield slightly when pressed. They should feel soft but not mushy. If they are hard, leave them at room temperature for a few days. Once ripe, keep them in the fridge to slow down the ripening process. To store leftover salad, use an airtight container. This keeps the salad fresh for up to two days. If you notice browning from the avocado, add a bit more lemon juice to help keep it vibrant. For a tasty pairing, serve your salad with crispy pita chips. The crunch adds a fun texture. You can also enjoy it on toasted bread for a quick meal. To present the salad, use a colorful bowl. Garnish with extra cilantro for a lively look. A sprinkle of sea salt on top can enhance the visual appeal, too. One common mistake is over-mashing the avocado. You want a creamy yet chunky texture. This keeps the salad interesting. Another mistake is not seasoning adequately. Be sure to taste and adjust your salt and lemon juice. Proper seasoning brings out all the fresh flavors in this dish. {{image_4}} You can easily boost your avocado chickpea salad with protein. Here are two great options: - Grilled chicken or shrimp: Both add a delicious, savory flavor. Just grill them and slice them up before mixing in. - Tofu for a vegetarian option: Tofu is a great meat substitute. Use firm tofu, press it, and cube it. Then toss it in for added protein. Adding new flavors can make your salad even better. Try these ideas: - Adding feta cheese: Crumbled feta adds a tangy taste that pairs well with the creamy avocado. - Experimenting with different dressings: You can switch up the dressing to change the flavor. Try balsamic, ranch, or a spicy vinaigrette for a twist. Using fresh, seasonal ingredients makes your salad shine. Here are some tips: - Incorporating seasonal veggies: Add bell peppers, radishes, or zucchini when they are in season for extra crunch and flavor. - Switching up herbs for different flavors: Try basil, parsley, or dill instead of cilantro to give your salad a new taste. These variations can turn your avocado chickpea salad into a unique dish every time you make it. For the full recipe, check out the earlier section. To keep your salad fresh, store it in the fridge. Use an airtight container to seal in the flavors. This method helps prevent browning and keeps the salad crisp. If you have space, consider using glass containers. They do not absorb odors and help you see the salad clearly. This salad lasts about three days in the fridge. After that, the ingredients may start to spoil. Check for signs like brown avocado or a sour smell. If you see either, it’s best to toss the salad. Freshness is key to enjoying this dish. Can you freeze avocado chickpea salad? I do not recommend freezing it. The avocado and tomatoes do not freeze well. They can become mushy when thawed. If you want to freeze, store the chickpeas and veggies separately. This way, you can mix fresh ingredients when you’re ready to eat. To make your avocado chickpea salad creamy, mash the ripe avocado well. Use a fork for this step. Aim for a mix of smooth and chunky textures. This keeps it interesting. Combine the mashed avocado with chickpeas gently. Folding helps maintain the shape of the chickpeas. Also, add a drizzle of olive oil for extra creaminess. Finally, use fresh lemon juice to brighten the flavors. These steps ensure your salad has a rich, creamy base. Yes, you can prepare this salad in advance. Start by chopping all the vegetables and storing them separately. This keeps them fresh and crisp. Mash the avocado just before serving. If you mash it early, it may brown. To keep the salad fresh, store it in an airtight container. You can also add lemon juice to the avocado to slow down browning. Chill the salad in the fridge for about 20 minutes before serving. This helps the flavors blend well. If you want to switch things up, try other legumes. White beans are a great option. They have a mild taste and a creamy texture. Black beans can add a fun twist with a bolder flavor. You can also use lentils for a different texture. Each legume gives a unique taste to the salad. So, feel free to get creative with your choices. Yes, this salad is gluten-free. All the main ingredients, like chickpeas and vegetables, are naturally free from gluten. This makes it a great option for those with gluten sensitivities. Always check your ingredient labels, especially for dressings. Some pre-made dressings may contain gluten. Using fresh lemon juice and olive oil ensures your dressing stays gluten-free. Enjoy this light and healthy salad without worry! For the full recipe, check out this Creamy Avocado Chickpea Delight. This blog post covered how to make a tasty avocado chickpea salad. We discussed key ingredients and gave precise steps for preparation. I shared helpful tips on freshness, serving ideas, and common mistakes to avoid. You can customize it with proteins or seasonal veggies. In summary, this salad is simple, nutritious, and versatile. It’s perfect for any meal. I encourage you to try it and share it with others. Enjoy crafting your delicious creation!](https://joymealplan.com/wp-content/uploads/2025/06/f9e70452-dbea-4dff-b8d7-5421933c3ab4-768x768.webp)