Authentic Cajun Jambalaya Flavorful and Simple Recipe

Ready to make your kitchen sizzle with a taste of Louisiana? In this post, I’ll show you how to whip up an authentic Cajun jambalaya that is both flavorful and simple. With the right ingredients and easy steps, you’ll impress family and friends in no time. From the classic Holy Trinity to the perfect spice mix, I’ll guide you to jambalaya success. Let’s dive in and create a dish that celebrates Cajun culture!
Why I Love This Recipe
- Bold Flavors: This jambalaya packs a flavorful punch with a perfect blend of spices, making each bite a delightful experience.
- One-Pot Wonder: Cooking everything in one pot not only simplifies the process but also allows the flavors to meld beautifully.
- Customizable: You can easily adjust the spice level and ingredients based on your preferences or what’s in your pantry.
- Hearty and Satisfying: This dish is packed with protein and vegetables, making it a filling meal perfect for any occasion.
Ingredients
Key Ingredients for Authentic Cajun Jambalaya
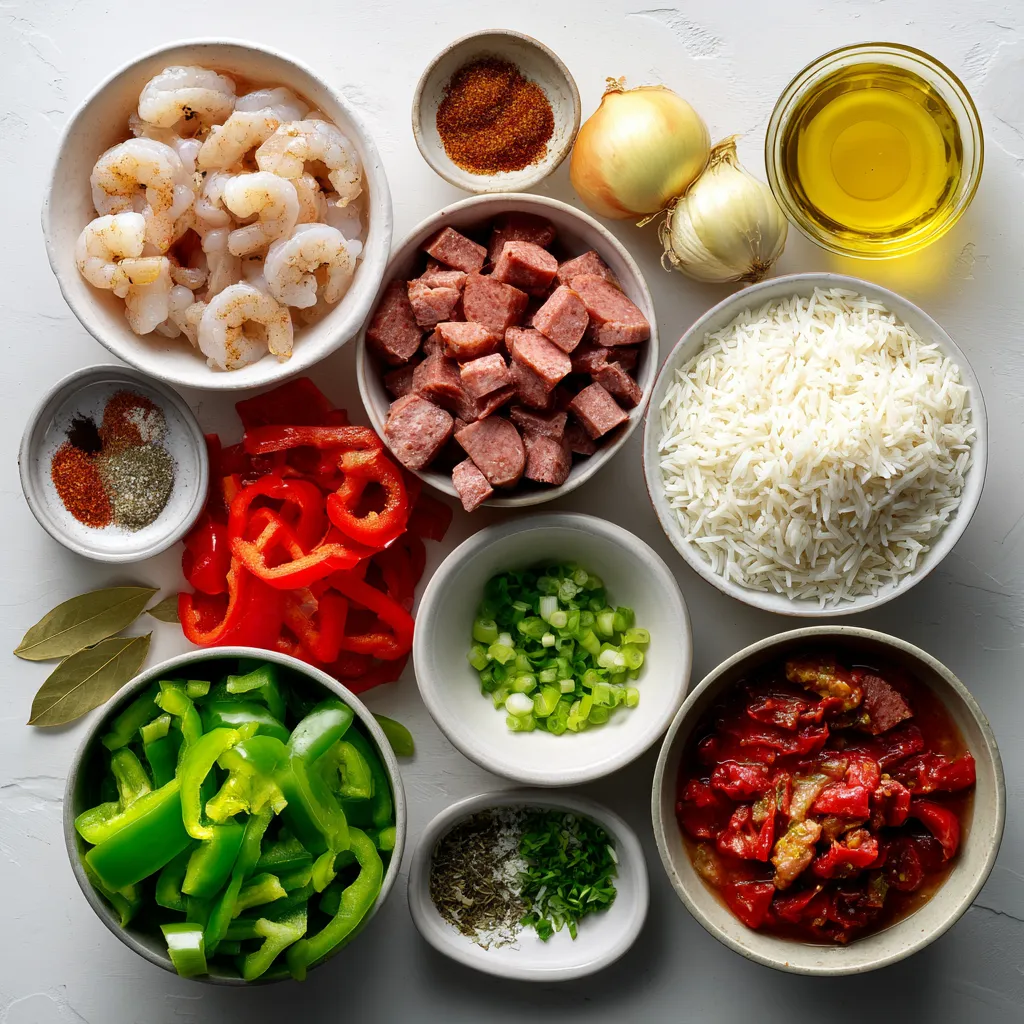
To make a great jambalaya, you need some key ingredients. Here’s a list to get you started:
– 1 lb boneless, skinless chicken thighs, diced
– 1 lb shrimp, peeled and deveined
– 1 and 1/2 cups andouille sausage, sliced
– 1 large onion, chopped
– 1 green bell pepper, diced
– 1 red bell pepper, diced
– 3 cloves garlic, minced
– 1 can diced tomatoes (14 oz)
– 3 cups chicken broth
– 2 cups long-grain rice, rinsed
– 2 tablespoons Cajun seasoning
– 1 teaspoon dried thyme
– 1 teaspoon smoked paprika
– 2 bay leaves
– Salt and black pepper to taste
– 3 tablespoons vegetable oil
– 1/4 cup green onions, sliced (for garnish)
– Fresh parsley, chopped (for garnish)
These ingredients blend together for rich flavor and texture.
Optional Ingredients to Enhance Flavor
You can add optional ingredients for more flavor. Consider these ideas:
– Chopped celery for crunch
– Diced jalapeños for heat
– Hot sauce for spice
– A splash of white wine for depth
– Okra for a traditional touch
These extras can tweak the taste to your liking.
A Note on Cajun Seasoning and “Holy Trinity”
Cajun seasoning is a mix of spices. It often includes paprika, cayenne, garlic powder, and more. Use it to kick up the flavor in your jambalaya.
The “Holy Trinity” is a key part of Cajun cooking. It refers to onion, bell pepper, and celery. These three ingredients form the base of many Cajun dishes, including jambalaya. They add sweetness and depth.
Using these ingredients correctly makes your jambalaya both authentic and delicious!

Step-by-Step Instructions
Preparing the Chicken and Sausage
Start by heating three tablespoons of vegetable oil in a large skillet over medium heat. When the oil is hot, add one pound of diced, boneless chicken thighs. Cook them for six to eight minutes until they turn brown on all sides. This step gives the chicken a nice flavor. Once done, take the chicken out and set it aside on a plate.
Next, add one and a half cups of sliced andouille sausage to the same skillet. Cook it for three to four minutes. You want it to brown and release its tasty oils. This adds depth to your jambalaya.
Sautéing the Vegetables
Now it’s time for the veggies! Toss in one large chopped onion, one diced green bell pepper, and one diced red bell pepper into the skillet with the sausage. Sauté these for about five minutes. You want the vegetables to get tender and flavorful. After that, stir in three minced garlic cloves. Cook for another minute until it smells amazing.
Cooking the Rice and Adding Shrimp
Next, return the browned chicken to the skillet. Add in one can of diced tomatoes (with juice), three cups of chicken broth, and two cups of rinsed long-grain rice. Sprinkle in two tablespoons of Cajun seasoning, one teaspoon of dried thyme, one teaspoon of smoked paprika, and two bay leaves. Mix everything well to combine.
Bring this mixture to a boil. Then, lower the heat and let it simmer. Cover the skillet with a lid and simmer for about 20 minutes. Stir occasionally to avoid sticking. When the rice is almost tender, it’s time to add one pound of peeled and deveined shrimp. Fold them gently into the mix and cover again. Cook for another five to seven minutes until the shrimp turn pink.
Final Seasoning and Serving Preparations
Once everything is cooked, take the skillet off the heat. Discard the bay leaves. Taste your jambalaya and add salt and black pepper as needed. Let it sit for about five minutes. This resting time helps the flavors blend.
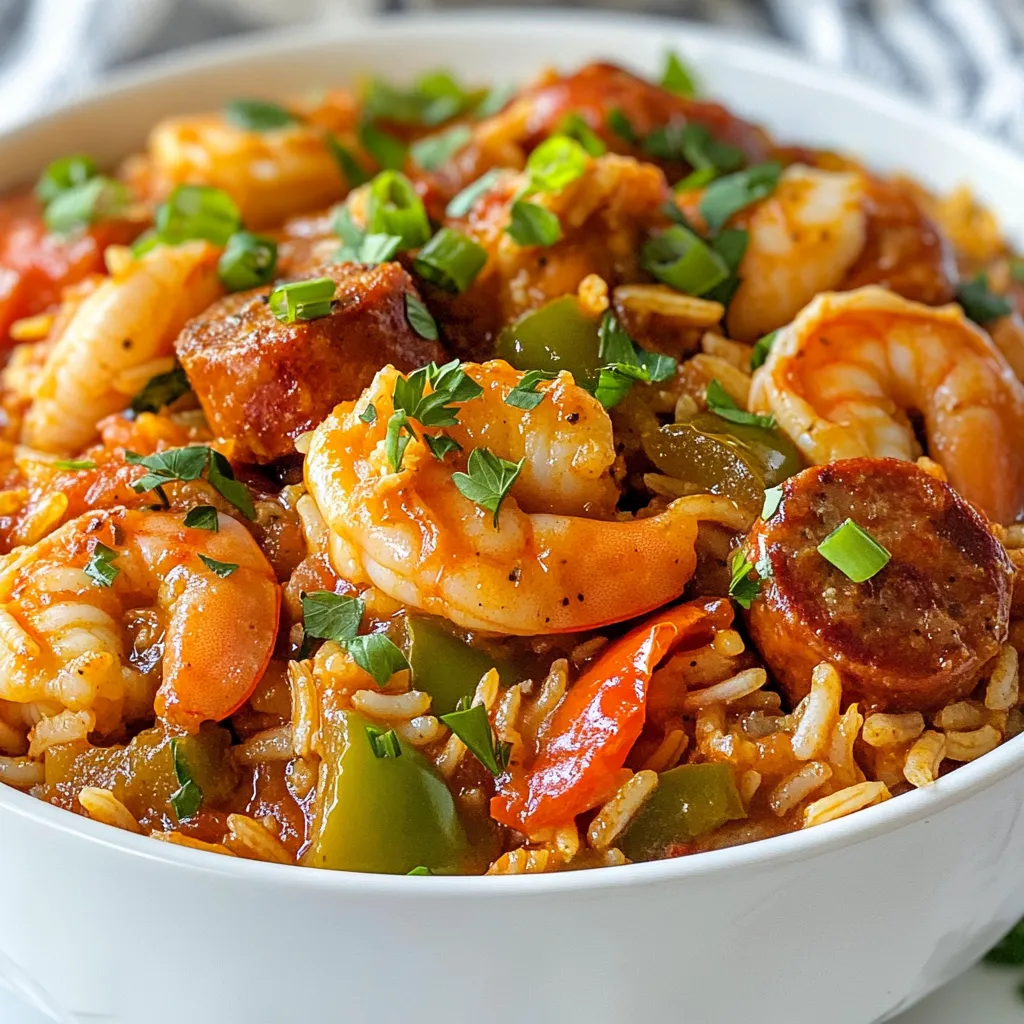
When ready to serve, dish the jambalaya into deep bowls. Garnish with sliced green onions and fresh parsley for a pop of color. You can also enjoy it with crusty bread or cornbread on the side. Enjoy your delicious creation!
Tips & Tricks
Tips for Perfecting Your Jambalaya
– Use fresh ingredients for the best taste.
– Rinse your rice to remove excess starch. This helps keep the grains separate.
– Adjust the Cajun seasoning to match your spice level. Start light and add more.
– Let the jambalaya sit for a few minutes before serving. This melds the flavors.
– Use a large skillet or Dutch oven to allow for even cooking.
Common Mistakes to Avoid
– Don’t skip the browning step for the chicken and sausage. This adds flavor.
– Avoid overcooking the shrimp. They only need about 5-7 minutes to turn pink.
– Don’t add too much liquid at once. This can make the dish soupy.
– Skipping the bay leaves can rob your jambalaya of depth. Remember to remove them before serving.
– Don’t rush the simmering step. It’s key for the rice to cook properly.
Serving Suggestions and Pairings
– Serve your jambalaya in deep bowls for a hearty presentation.
– Garnish with green onions and parsley for color and freshness.
– Pair it with crusty bread or cornbread to soak up the flavors.
– A simple green salad can balance out the meal’s richness.
– For a drink, try a cold beer or sweet tea. Both complement the spice well.
Pro Tips
- Use Fresh Ingredients: Always opt for fresh vegetables and herbs to enhance the flavors of your jambalaya. Freshness can make a significant difference in the final taste.
- Customize the Spice Level: Adjust the Cajun seasoning according to your preference. If you like it spicier, consider adding some cayenne pepper or hot sauce for an extra kick.
- Let it Rest: Allowing the jambalaya to sit for a few minutes after cooking helps the flavors meld together and improves the overall taste.
- Add More Seafood: For a seafood lover’s twist, feel free to incorporate other seafood like mussels or crab alongside the shrimp for added depth and flavor.

Variations
Seafood vs. Meat Jambalaya
You can choose seafood or meat for your jambalaya. Seafood jambalaya often features shrimp and fish. This version bursts with fresh ocean flavor. Meat jambalaya, on the other hand, usually includes chicken and sausage. Andouille sausage adds a spicy kick, which many love. Both options taste great and showcase the rich Cajun culture.
Vegetarian Cajun Jambalaya Options
Want a meat-free version? Try a vegetarian jambalaya! Use bell peppers, onions, and zucchini for a fresh taste. Add chickpeas or black beans for protein. Vegetable broth replaces chicken broth, giving it a rich flavor. You can even toss in some corn for sweetness. This dish still holds the essence of Cajun cooking.
Regional Variations of Jambalaya
Jambalaya changes from region to region. In Louisiana, you find the classic Creole style. This version often includes tomatoes and is more sauce-heavy. In contrast, the Cajun style is drier and uses no tomatoes. Some areas add different spices or ingredients. For instance, some folks enjoy adding okra for texture. Each region brings its twist to this beloved dish.
Storage Info
How to Properly Store Leftover Jambalaya
To store leftover jambalaya, wait for it to cool. Place it in an airtight container. Make sure to separate the rice and meat if possible. This helps keep everything fresh. Store it in the fridge for up to three days. If you want to keep it longer, freezing is a great option.
Reheating Tips for Optimal Flavor
When you reheat jambalaya, use the stove for the best taste. Add a splash of chicken broth to keep it moist. Heat it on low and stir often. You can also use a microwave. Cover it with a damp paper towel and heat in short bursts. Stir after each interval to avoid drying it out.
Freezing Jambalaya for Future Meals
To freeze jambalaya, let it cool completely. Portion it into freezer-safe bags. Squeeze out the air before sealing. Label the bags with the date. You can freeze them for up to three months. When ready to eat, thaw in the fridge overnight. Reheat on the stove or in the microwave. Enjoy your delicious meal anytime!
FAQs
What is the “Holy Trinity” in Cajun cooking?
The Holy Trinity in Cajun cooking is a mix of three key vegetables: onion, bell pepper, and celery. These ingredients form the base for many Cajun dishes, including jambalaya. They add depth and flavor to the dish. Using these three together gives your jambalaya that authentic taste.
Can I make jambalaya ahead of time?
Yes, you can make jambalaya ahead of time. In fact, it tastes even better the next day! Cook it fully, then cool it down. Store it in the fridge for up to three days. Reheat it gently on the stove. This makes meal prep easy and delicious.
What can I substitute for Andouille sausage?
If you can’t find Andouille sausage, you have options. You can use smoked sausage or kielbasa as a substitute. Both provide good flavor. For a lighter choice, turkey sausage works too. Just make sure to season well to keep that Cajun vibe.
How is jambalaya different from paella?
Jambalaya and paella are both rice dishes but have key differences. Jambalaya comes from Cajun and Creole culture in Louisiana. It is often spicier and uses a mix of meats and seafood. Paella hails from Spain and typically includes saffron and different seafood. The cooking methods also differ, with jambalaya being a one-pot dish.
Is jambalaya gluten-free?
Yes, jambalaya is generally gluten-free! The main ingredients, rice and meat, do not contain gluten. However, always check your Cajun seasoning and sausage to be sure. Some brands may add gluten or wheat.
In this post, I shared how to make authentic Cajun jambalaya. You learned about key ingredients, like chicken, sausage, and the Holy Trinity. I provided detailed steps for cooking and tips to avoid common mistakes. You can customize your dish with seafood or vegetarian options. Finally, I showed you how to store and reheat leftovers. Now, you have all the knowledge to make a tasty jambalaya that stands out at any meal. Enjoy your cookin

Spicy Cajun Jambalaya
Ingredients
- 1 lb boneless, skinless chicken thighs, diced into bite-sized pieces
- 1 lb shrimp, peeled and deveined
- 1.5 cups andouille sausage, sliced into rounds
- 1 large onion, finely chopped
- 1 medium green bell pepper, diced
- 1 medium red bell pepper, diced
- 3 cloves garlic, minced
- 1 can (14 oz) diced tomatoes with their juice
- 3 cups chicken broth (preferably low sodium)
- 2 cups long-grain rice, rinsed
- 2 tablespoons Cajun seasoning (adjust to taste)
- 1 teaspoon dried thyme
- 1 teaspoon smoked paprika
- 2 leaves bay leaves
- to taste salt and freshly ground black pepper
- 3 tablespoons vegetable oil
- 1/4 cup green onions, thinly sliced (for garnish)
- to taste fresh parsley, chopped (for garnish)
Instructions
- In a large skillet or Dutch oven, heat the vegetable oil over medium heat. Once hot, add the diced chicken thighs. Cook for about 6-8 minutes, stirring occasionally, until the chicken is browned on all sides. Remove the chicken from the skillet and set it aside on a plate.
- In the same skillet, add the sliced andouille sausage. Cook for 3-4 minutes until the sausage begins to brown and release its flavorful oils.
- Add the chopped onion, green bell pepper, and red bell pepper to the sausage in the skillet. Sauté the mixture for approximately 5 minutes, or until the vegetables are tender. Stir in the minced garlic and cook for an additional minute, or until fragrant.
- Return the browned chicken thighs to the skillet. Add in the diced tomatoes (with their juice), chicken broth, rinsed long-grain rice, Cajun seasoning, dried thyme, smoked paprika, and bay leaves. Mix everything together thoroughly.
- Bring the mixture to a boil, then lower the heat to a simmer. Cover the skillet with a lid and allow it to simmer for about 20 minutes, or until the rice is almost tender, stirring occasionally.
- Gently fold in the shrimp, ensuring they are evenly distributed. Cover the pot again and cook for an additional 5-7 minutes, or until the shrimp are pink and cooked through.
- Once cooked, remove the skillet from heat. Discard the bay leaves and taste the jambalaya. Adjust the seasoning with salt and freshly ground black pepper as needed.
- Allow the jambalaya to sit for about 5 minutes before serving, which helps the flavors meld together beautifully.


![To make the Homemade Crunchwrap Supreme, gather these items: - 1 lb ground turkey or beef - 1 packet of taco seasoning - 1 cup black beans, drained and rinsed - 1 cup corn kernels (fresh or frozen) - 1 cup shredded cheddar cheese - 1 cup lettuce, finely shredded - 1 large tomato, diced - ½ cup sour cream - 4 large flour tortillas - 4 small tostada shells - 1 tablespoon olive oil - Salsa for serving Each Crunchwrap has around 500 calories. It includes protein from the meat and beans. The cheese adds calcium but also fat. Fresh veggies bring fiber and vitamins. If you want to cut calories, use less cheese or sour cream. This recipe feeds four, perfect for a family meal or a fun gathering. You can swap ground turkey for chicken or even tofu for a veggie option. Use black beans or pinto beans based on your taste. For cheese, try pepper jack for some heat. If you need a gluten-free option, use corn tortillas instead of flour. You can also replace sour cream with Greek yogurt for a healthier twist. Enjoy making it your own! Making a Homemade Crunchwrap Supreme is fun and easy. You start by cooking the meat. Then, you mix it with beans, corn, and cheese. Next, you assemble the wrap with layers of toppings. Finally, you cook the wrap until it’s crispy and golden. 1. Brown the Meat: Heat 1 tablespoon of olive oil in a skillet. Add 1 lb of ground turkey or beef. Cook it for 5-7 minutes until it’s browned. 2. Season the Meat: Drain any extra grease. Add 1 packet of taco seasoning. If needed, splash in some water. Cook for another 2-3 minutes. 3. Combine Ingredients: In a bowl, mix the seasoned meat with 1 cup of black beans, 1 cup of corn, and half of 1 cup of shredded cheese. Stir well. 4. Prepare the Tortilla: Lay out 1 large flour tortilla on a flat surface. 5. Assemble the Crunchwrap: Spoon the meat and bean mix into the center. Leave about 2 inches of space from the edges. 6. Add Tostada and Toppings: Place 1 small tostada shell on top of the mixture. Spread ½ cup of sour cream over the tostada. Add 1 cup of shredded lettuce, 1 diced tomato, and the rest of the cheese. 7. Fold the Crunchwrap: Fold the edges of the tortilla over the filling. Make pleats around the edge until it’s all enclosed. 8. Cook the Crunchwrap: Heat a non-stick skillet on medium heat. Place the crunchwrap seam-side down. Cook for 2-3 minutes until golden, then flip it and cook for another 2-3 minutes. 9. Serve: Cut each crunchwrap in half. Serve warm with salsa on the side. While I can't show pictures, I recommend you take photos of each step. It can help you track your progress. You can also find great visual aids in the [Full Recipe]. They can guide you through the cooking process with ease! To get that perfect crunchwrap texture, you want a good balance. Start with a large flour tortilla. This gives you room to fold. Use a small tostada shell inside. This will add a nice crunch. When you cook it, make sure your skillet is hot. A hot skillet helps create a nice, crispy outside. Flip it gently to avoid spills. Let it brown evenly on both sides for the best result. Flavorful meat is key to a great crunchwrap. I like to use ground turkey or beef. Sauté it in olive oil until browned. After that, add taco seasoning. This is where the magic happens. Follow the packet instructions for best results. If the meat seems dry, add a splash of water. This helps the seasonings stick and blend. Mix in black beans and corn for added taste and texture. Making ahead can save you time. You can prepare the meat mixture a day before. Just store it in an airtight container. When you are ready, assemble your crunchwraps. This way, you can enjoy a fresh meal with less work. You can also freeze the assembled crunchwraps. Just make sure to wrap them well. When you are ready to eat, heat them up in the skillet. This keeps them nice and crispy. For more details, check the Full Recipe. {{image_4}} You can easily make a tasty veggie crunchwrap. Just replace the meat with veggies. Use a mix of black beans, corn, and diced peppers. You can add mushrooms for a nice texture. To keep it creamy, use extra sour cream or a plant-based option. This way, you get all the flavor without meat! Want to spice things up? Add some jalapeños to the filling. You can use fresh slices or pickled ones. If you like heat, toss in some hot sauce or pepper flakes. A dash of chipotle seasoning in the meat gives a smoky kick. This adds a new level of flavor! Don’t stick to just one topping. Try different sauces like guacamole or zesty salsa. You can also add sliced olives or diced onions for crunch. Consider using different cheeses, like pepper jack, for extra flavor. Mix and match to create your perfect crunchwrap. For the full recipe, check out the Ultimate Crunchwrap Supreme. To keep your leftover Crunchwrap Supreme fresh, wrap it tightly in plastic wrap or foil. Place it in an airtight container. This way, it stays safe from air and moisture. Store it in the fridge for up to three days. To enjoy it later, make sure you don’t leave it out too long. Reheating your Crunchwrap is easy. Start by taking it out of the fridge. Place it in a skillet over medium heat. Cover it with a lid. Heat for about 3-4 minutes on each side. This method keeps it crispy. You can also use the microwave if you're in a hurry. Just place it on a microwave-safe plate. Heat it for about 1-2 minutes until warm. If you want to save your Crunchwrap for later, freezing is a great option. Wrap each Crunchwrap in plastic wrap, then in foil. This helps protect it from freezer burn. You can freeze them for up to three months. When you’re ready to eat, let it thaw in the fridge overnight. Then, reheat it as described above. Enjoy your homemade Crunchwrap Supreme whenever you crave it! For the full recipe, check out the Ultimate Crunchwrap Supreme . To make your Crunchwrap Supreme gluten-free, use gluten-free tortillas. You can find them at most grocery stores. Make sure the taco seasoning is also gluten-free. Check the label to be sure. All other ingredients in this recipe are naturally gluten-free. The best way to reheat a crunchwrap is to use a skillet. Heat it over medium heat for about 2-3 minutes on each side. This keeps the crunchwrap crispy. You can also use an oven at 350°F. Bake it for about 10 minutes. This method warms it through without making it soggy. Yes, you can customize your crunchwrap for any diet. For a vegetarian option, skip the meat and add more beans or veggies. You can also switch the cheese for a dairy-free kind. If you like spice, add jalapeños or hot sauce. This recipe is flexible and allows for many tasty changes. Try different flavors to find what you love most. For the full recipe, refer to the Ultimate Crunchwrap Supreme. In this post, I covered how to make a Crunchwrap Supreme from start to finish. We discussed key ingredients, cooking steps, and storage tips. I shared tricks for the perfect texture and flavorful meat. You have options for vegetarian and spicy versions, plus ways to adjust for your taste. With these insights, you can now make this fun and tasty meal. Enjoy your Crunchwrap adventure!](https://joymealplan.com/wp-content/uploads/2025/06/9254d856-97cc-48f7-bdd4-96eee0233a6c-768x768.webp)


![For a great veggie stir fry, you need fresh veggies. Here’s what I use: - 1 cup broccoli florets - 1 bell pepper (red or yellow), sliced into thin strips - 1 cup sugar snap peas, trimmed - 1 medium carrot, cut into julienne strips - 1 cup mushrooms (shiitake or button), sliced Spices and oils bring flavor to your dish. I recommend these: - 2 cloves garlic, finely minced - 1 tablespoon fresh ginger, grated - 3 tablespoons soy sauce (or tamari for gluten-free) - 1 tablespoon sesame oil - 1 tablespoon vegetable oil for high-heat cooking - Salt and pepper, to taste You can add more fun to your stir fry with these options: - Cooked tofu or tempeh for protein - Cooked rice or noodles for a fuller dish - Chili flakes for some heat - Fresh herbs like cilantro for a fresh touch For the full recipe, check out [Full Recipe]. These ingredients make a colorful and tasty meal that’s easy to prepare. To start, wash all your vegetables. This step is super important. Cut the broccoli into small florets. Slice the bell pepper into thin strips. Julienne the carrot for a nice crunch. Slice your mushrooms too. Having everything ready makes cooking fast and fun. Grab a large skillet or wok for this part. Heat the vegetable oil over medium-high heat. You want the oil to shimmer a little. Now, add the minced garlic and grated ginger. Sauté them for around 30 seconds. Watch closely so they don’t burn! Next, toss in the broccoli, bell pepper, and carrot. Stir-fry these for about 3 to 4 minutes. They should be a bit soft but still crunchy. Then, add the sugar snap peas and sliced mushrooms. Keep cooking for another 3 to 4 minutes. This makes sure all veggies are tender but still bright. Once your veggies are just how you like them, pour in the soy sauce. Drizzle the sesame oil over the top. Stir everything well to mix the flavors. Let them cook together for 1 to 2 more minutes. Season with salt and pepper to taste. Remove from heat and sprinkle with toasted sesame seeds. This adds a nice touch! Serve the stir fry in a big bowl. You can add rice or noodles for a full meal. Check the Full Recipe for more details. Enjoy your vibrant dish! To get the right texture, cut your veggies small and even. This way, they cook quickly and stay crisp. Start with the harder veggies first, like carrots and broccoli. Cook them for a few minutes before adding softer ones like bell peppers and mushrooms. Stir the mix often to avoid burning. Keep an eye on the color; vibrant hues mean freshness! Adding flavor is key. Use fresh garlic and ginger for a bold taste. A splash of soy sauce brings saltiness. You can also try adding a bit of chili paste for heat. For a nutty touch, drizzle sesame oil right at the end. Also, sprinkle toasted sesame seeds on top for crunch and flavor. These simple changes can elevate your dish. Avoid overcrowding the pan. If you add too many veggies at once, they steam instead of fry. This makes them soggy. Always have your ingredients prepped before you heat the pan. Another mistake is cooking on low heat. High heat keeps the veggies crisp and colorful. Lastly, don’t skip the seasoning; it makes all the difference! For more details, check the Full Recipe. {{image_4}} You can use many different vegetables in your stir fry. If you don't have broccoli, try cauliflower or zucchini. Green beans add a nice crunch too. For a sweeter taste, add some baby corn or bell peppers. Just keep in mind that cooking times may change based on what you pick. Always cut the veggies into similar sizes. This helps them cook evenly and look great. This veggie stir fry is easy to adapt for special diets. To make it vegan, just stick with the current ingredients. Use tamari instead of soy sauce for a gluten-free option. You can even add some coconut aminos for a sweeter flavor. This keeps it tasty without gluten. Always check labels to ensure all ingredients meet your dietary needs. To make your stir fry more filling, add protein. Tofu is a great choice. Press it first to remove extra moisture, then cube it. You can also add chickpeas or edamame for plant-based protein. If you eat meat, try chicken or shrimp. Cook the protein first, then add it back with the veggies. This way, everything blends well together. For the full recipe, check the section above. After enjoying your veggie stir fry, let it cool down. Use an airtight container to keep it fresh. Store it in the fridge for up to three days. This way, you can savor your delicious meal again! Reheating is simple. You can use a microwave or stovetop. If using a microwave, heat in short bursts. Stir in between to ensure even heating. On the stovetop, add a splash of water to keep it moist. Heat on medium until warm. If you want to save some for later, freezing works well too. Place the cooled stir fry in freezer-safe bags. Remove as much air as possible before sealing. It can last for up to three months in the freezer. When ready to eat, thaw in the fridge overnight before reheating. Enjoy your easy veggie stir fry again with fresh flavors! For the full recipe, check the details above. It takes about 10 to 15 minutes to cook veggie stir fry. The prep time is around 15 minutes, and the actual cooking time is quick. You want to heat your pan and cook the veggies at high heat. This helps keep them crisp and colorful. Yes, you can use frozen vegetables for stir fry. They are handy and save time. Just remember that frozen veggies may release more water. Cook them for a bit longer to get rid of the moisture. This way, your stir fry stays flavorful and not soggy. Besides soy sauce, you can try other sauces for different flavors. Here are some great options: - Teriyaki sauce for a sweet touch - Hoisin sauce for a thicker, rich flavor - Oyster sauce for umami - Coconut aminos for a soy-free option These sauces can add a unique twist to your dish. To make your stir fry taste better, use fresh ingredients. Fresh veggies bring bright flavors. Adding garlic and ginger enhances the taste, too. You can also experiment with spices like red pepper flakes for heat. Lastly, finish with toasted sesame oil for a nutty flavor. For more ideas, check out the Full Recipe. To sum up, this blog post gives you all you need for a great stir fry. You learned about fresh veggies, essential spices, and fun add-ins. I showed you how to prepare, cook, and season your dish. The tips shared help avoid common mistakes and enhance flavor. You can also explore different variations and learn how to store leftovers. Stir fry is versatile and fun to make. Enjoy your cooking journey and make it your own!](https://joymealplan.com/wp-content/uploads/2025/06/d6e89b1e-9902-47ff-ae43-a4ac0f8c3362-768x768.webp)