Buffalo Chicken Lettuce Wraps Flavorful and Healthy Dish

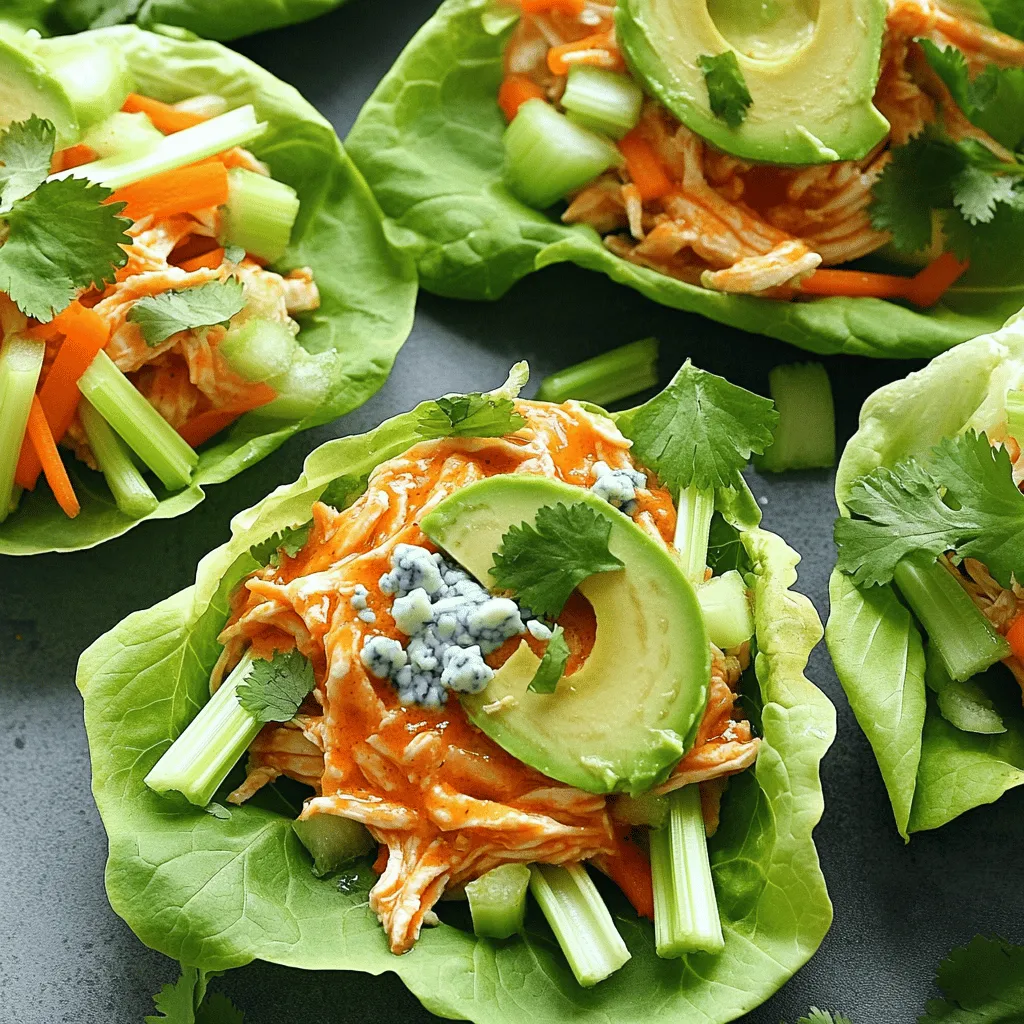
Looking for a tasty meal that’s also healthy? Try my Buffalo Chicken Lettuce Wraps! They’re packed with flavor and super easy to make. You can whip them up for lunch or dinner in no time. Plus, you can add your favorite toppings or switch up the spices. Let me guide you through this fun and delicious dish that will keep you coming back for more!
Ingredients
Main Ingredients for Buffalo Chicken Lettuce Wraps
For these tasty wraps, you will need:
– 1 lb boneless, skinless chicken breast, cooked and shredded
– 1/2 cup buffalo sauce (adjust for your spice level)
– 1 tablespoon olive oil
– 1/2 cup celery, finely diced
– 1/2 cup carrot, finely diced
– 1/4 cup blue cheese, crumbled (optional)
– 1 tablespoon fresh cilantro, finely chopped
– Salt and pepper to taste
– 1 head of romaine or butter lettuce, leaves separated
– Slices of avocado for garnish (optional)
These main ingredients create a bold flavor, making each bite exciting. The chicken takes center stage, paired perfectly with the spicy buffalo sauce. The veggies add crunch, while blue cheese brings creaminess.
Optional Ingredients for Variation
You can mix things up by adding:
– Diced bell peppers for sweetness
– Green onions for a mild onion taste
– Shredded cabbage for extra crunch
– Different types of cheese, like feta or cheddar
These options let you personalize your wraps. They can brighten the dish and add new flavors.
Ingredient Substitutions
If you want to change things a bit, consider these swaps:
– Use turkey or tofu instead of chicken for a lighter version.
– Swap buffalo sauce with barbecue sauce for a sweeter taste.
– Try Greek yogurt instead of blue cheese for a lighter creamy option.
These substitutions keep the dish fresh and exciting. They can also help with dietary needs while still being delicious.
Step-by-Step Instructions
Preparation Overview
To make buffalo chicken lettuce wraps, gather all your ingredients first. This helps you stay organized. You will need chicken, buffalo sauce, and fresh veggies. Prepare your lettuce leaves by washing and drying them. Make sure they are ready for the filling.
Step-by-Step Cooking Process
1. Heat one tablespoon of olive oil in a large skillet over medium heat. Wait until it shimmers slightly.
2. Add 1 pound of cooked and shredded chicken to the skillet. Pour in 1/2 cup of buffalo sauce. Stir well to coat the chicken evenly. Let it cook for about 3-4 minutes until heated.
3. Remove the skillet from the heat. Fold in 1/2 cup of finely diced celery and 1/2 cup of finely diced carrot. This adds crunch and flavor.
4. Season with salt and pepper to taste. If you like, add 1/4 cup of crumbled blue cheese for a creamy touch.
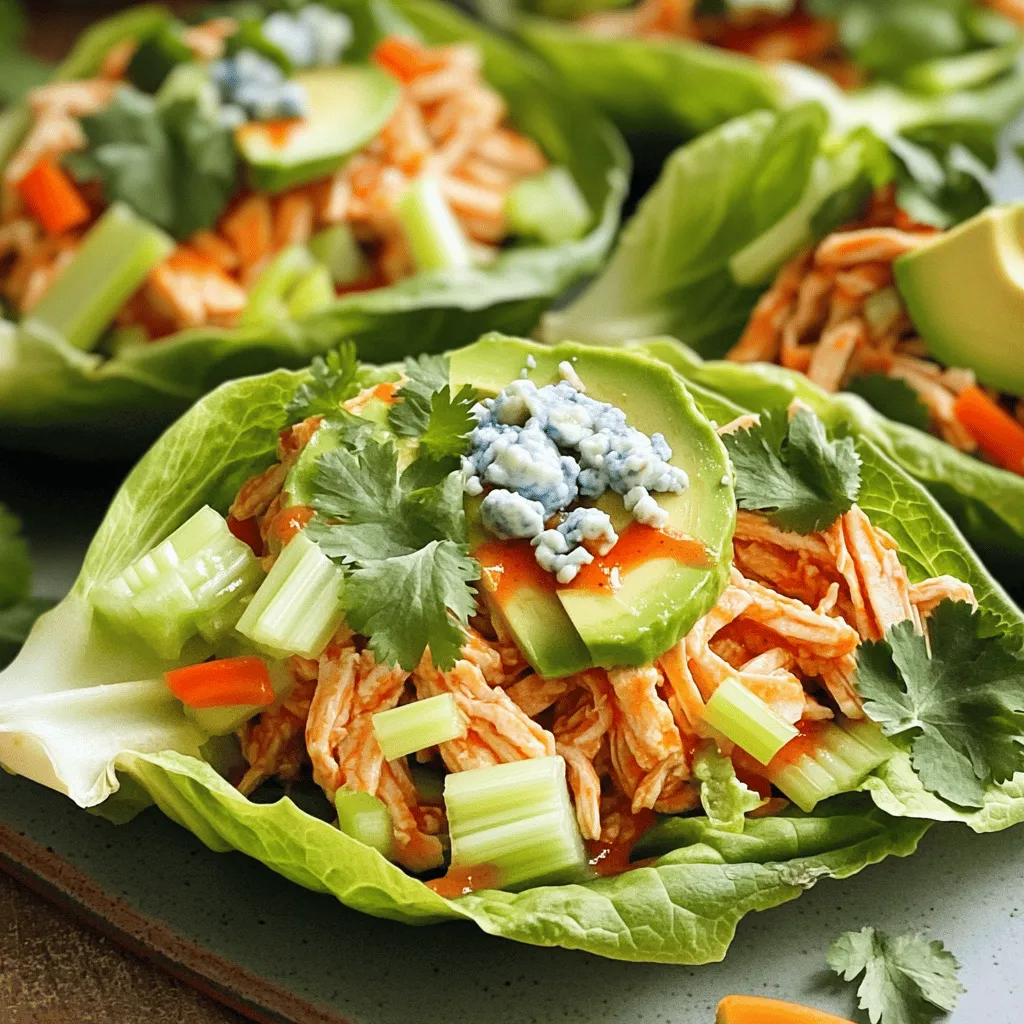
5. Take a lettuce leaf and place it on a serving plate. Spoon a generous portion of the buffalo chicken mixture into the center. Do not overfill the leaf.
6. Finish by sprinkling fresh cilantro on top. If you want, add a slice of creamy avocado for extra richness.
7. Carefully fold the lettuce leaf over the filling to create a wrap. Serve immediately for the best flavor.
Serving Suggestions
Arrange the wraps neatly on a platter. You can add a small bowl of extra buffalo sauce for dipping. A few sprigs of cilantro can brighten the presentation. Serve these wraps warm for the best taste and texture. Enjoy your flavorful and healthy dish!
Tips & Tricks
Key Tips for Success
To make the best Buffalo Chicken Lettuce Wraps, use fresh ingredients. Fresh lettuce gives a nice crunch. Choose romaine or butter lettuce for a sturdy wrap. Cook your chicken well, then shred it finely. This helps the sauce coat every piece. Mix the buffalo sauce gradually. This way, you can control the spice level.
Common Mistakes to Avoid
A common mistake is overfilling the lettuce leaves. This makes wraps hard to eat. Avoid using too much buffalo sauce at once. It can overpower the other flavors. Ensure you season your chicken mix with salt and pepper. This simple step boosts the taste. Don’t forget to fold in the veggies. They add crunch and freshness.
How to Adjust Spice Levels
To adjust spice levels, start with less buffalo sauce. You can always add more later. If you want a milder taste, mix in some ranch or yogurt. This cools down the heat. If you love spice, try adding extra hot sauce. You can also pair your wraps with cooling sides like sour cream or guacamole.

Variations
Alternative Proteins for the Wraps
You can swap the chicken for other proteins. Ground turkey works great as a lean option. Shredded pork adds a juicy twist. Try tofu for a plant-based choice. Each protein brings its unique flavor and texture.
Different Sauces and Dressings
Buffalo sauce is classic, but you can get creative. Try barbecue sauce for a sweet kick. Ranch dressing gives a creamy touch. A honey mustard blend adds a nice zing. Mix and match to find your favorite combo.
Vegan and Vegetarian Options
You can make these wraps vegan or vegetarian easily. Use chickpeas instead of chicken for protein. Cauliflower works well too, especially when roasted. For a creamy texture, add avocado or a vegan mayo. Everyone can enjoy this tasty dish!
Storage Info
How to Store Leftover Wraps
To store leftover wraps, place them in an airtight container. Keep them in the fridge for up to three days. Make sure the wraps are tightly sealed to keep them fresh. If you want to store the filling separately, use another container. This helps maintain the crunch of the lettuce.
Reheating Instructions
When you want to eat the leftover wraps, remove the filling from the lettuce. Heat the chicken mixture in a skillet over medium heat. Stir it often until it warms up. This should take about 5 minutes. Avoid microwaving, as it can make the chicken dry. Once warmed, serve it in fresh lettuce leaves for the best taste.
Freezing Buffalo Chicken Mixture
You can freeze the buffalo chicken mixture for later use. Place the cooled chicken mixture in a freezer-safe bag. Be sure to remove as much air as possible before sealing. The mixture will stay good for about three months. When you’re ready to eat, let it thaw in the fridge overnight. Reheat it in a skillet as mentioned earlier. Enjoy your meal with fresh lettuce once again!
FAQs
Can I make Buffalo Chicken Lettuce Wraps ahead of time?
Yes, you can make Buffalo Chicken Lettuce Wraps ahead of time. Prepare the chicken mixture and store it in the fridge. Keep the lettuce leaves separate until you are ready to serve. This way, the lettuce stays crisp. You can enjoy your wraps fresh and tasty, even after prepping them early.
What can I serve with Buffalo Chicken Lettuce Wraps?
Buffalo Chicken Lettuce Wraps pair well with many sides. Here are some great options:
– Carrot and celery sticks
– A fresh garden salad
– Sweet potato fries
– Quinoa salad
– A light yogurt dip
These sides add color and flavor to your meal. You can mix and match based on your preference.
Are Buffalo Chicken Lettuce Wraps gluten-free?
Yes, Buffalo Chicken Lettuce Wraps can be gluten-free. Use gluten-free buffalo sauce to keep it safe for those with gluten allergies. The chicken, veggies, and lettuce are naturally gluten-free. Always check the labels on sauces to ensure they meet your needs. Enjoy these wraps without worry!
Buffalo chicken lettuce wraps are simple and fun to make. We explored key ingredients, cooking steps, and handy tips. You learned how to vary your wraps and avoid common mistakes. Plus, you now know how to store leftovers safely.
Keep experimenting with flavors and textures. Share your creations with friends and enjoy!


![To make Buffalo Cauliflower Bites, you'll need the following ingredients. Each item plays a key role in creating that crispy and flavorful snack we all love. - 1 large head of cauliflower, cut into bite-sized florets - 1 cup all-purpose flour - 1 cup almond milk (or your choice of non-dairy milk) - 1 teaspoon garlic powder - 1 teaspoon onion powder - 1 teaspoon smoked paprika - 1/2 teaspoon salt - 1/2 teaspoon black pepper - 1 cup buffalo sauce (store-bought or homemade) - 2 tablespoons coconut oil, melted When choosing your ingredients, I suggest using fresh cauliflower. It gives the best texture and taste. For flour, any brand works, but all-purpose is great for a crispy batter. Almond milk adds a nice touch, but feel free to use your favorite non-dairy option. For buffalo sauce, you can buy it or make your own. Homemade sauce allows you to adjust the heat. Using high-quality spices, like smoked paprika, can elevate your dish. I recommend checking for freshness on all spices. This ensures your bites are packed with flavor. If you want a unique twist, try different sauces or spices. You can even add a little more garlic powder if you love that flavor. Now that you have your list ready, let's move on to the next steps in the recipe! 1. Start by preheating your oven to 450°F (230°C). This heat will make the cauliflower crispy. Line a baking sheet with parchment paper. This step helps with easy clean-up. 2. In a large bowl, combine the all-purpose flour, almond milk, garlic powder, onion powder, smoked paprika, salt, and black pepper. Use a whisk to mix until you have a smooth batter. The batter should not be too thick or too runny. 3. Now, take each cauliflower floret and dip it into the batter. Make sure it is coated well on all sides. Place the battered florets on the baking sheet in a single layer. Repeat until all florets are coated. 1. Bake the cauliflower in the oven for 20 minutes. This will make the florets tender. The batter will also start to get crispy. 2. While the cauliflower bakes, mix the buffalo sauce and melted coconut oil in another bowl. Stir well to combine. This sauce will give the bites their famous flavor. 3. After 20 minutes, take the baking sheet out of the oven. Carefully toss the baked cauliflower in the buffalo sauce mixture. Make sure each piece is coated evenly. 4. Spread the coated florets back onto the baking sheet. Return them to the oven for another 10 to 15 minutes. Keep an eye on them for your desired crispiness. 5. Once they are baked to your liking, take them out of the oven. Let the cauliflower bites cool for a few minutes before serving. This resting time helps the flavors settle. Now you're ready to enjoy these crispy and flavorful buffalo cauliflower bites! Check out the Full Recipe for more details. To make the batter just right, start with the flour. Use all-purpose flour for a good base. Then mix in your almond milk slowly. This helps you see the thickness. You want it to be smooth, not too thick or thin. A good batter will stick well to the cauliflower. For crispier bites, try a few tricks. First, bake the cauliflower for a little longer. Keep an eye on them; you want them golden brown. Another tip is to space the florets well on the baking sheet. This lets hot air flow around and makes them crispier. If you want an extra crunch, you can sprinkle some breadcrumbs before the final bake. To add more flavor, consider extra spices. A pinch of cayenne pepper gives a nice kick. You might also enjoy adding some cumin for a smoky taste. Mixing in these spices can create new flavors that excite your taste buds. When it comes to dipping, ranch or blue cheese dressing works great. If you like a sweeter touch, try honey mustard. You can even mix some sriracha with your ranch for a spicy twist. These sauces can make your buffalo cauliflower bites even more tasty. For the best experience, serve your bites hot and fresh! For the full recipe, check out the detailed steps above. {{image_4}} You have options for cooking buffalo cauliflower bites. The air fryer is a great choice. It can make the bites crispy without much oil. Here’s how to do it: 1. Preheat your air fryer to 400°F (200°C). 2. Coat the cauliflower florets with the batter just like in the oven method. 3. Place the florets in the air fryer basket. Make sure they are in a single layer. 4. Cook them for about 12-15 minutes, shaking the basket halfway through for even cooking. Grilling is another fun option. It adds a smoky flavor that pairs well with buffalo sauce. Here’s how to grill them: 1. Preheat your grill to medium-high heat. 2. Use skewers to hold the cauliflower florets. This makes flipping easier. 3. Brush the florets with oil and sprinkle with salt. 4. Grill for about 10-12 minutes, turning them until they are charred and tender. You can spice things up with sauce variations. If you love heat, add more hot sauce or cayenne pepper to your buffalo sauce. This will give your bites an extra kick. You can also try different sauces for unique flavors. A honey mustard sauce offers sweetness that balances the heat. You can mix honey, mustard, and a dash of hot sauce for a tasty alternative. Another option is a barbecue sauce for a smoky flavor. Simply toss your baked cauliflower bites in the sauce after baking. For more ideas, check the [Full Recipe]. These variations keep things interesting and let you customize your snack for any occasion. To keep your buffalo cauliflower bites fresh, store them in an airtight container. Place a paper towel inside to absorb moisture. This helps maintain their crispy texture. You can store them in the fridge for up to three days. When it’s time to reheat, avoid using the microwave. Instead, use the oven. Preheat it to 350°F (175°C). Spread the bites on a baking sheet. Heat for about 10 minutes, or until they are warm and crispy again. You can freeze these bites, but there are two ways to do it. 1. Freezing uncooked bites: Prepare the cauliflower bites, but do not bake them. Place the coated florets on a baking sheet and freeze them. Once frozen, transfer them to a freezer bag. They will last for about three months. 2. Freezing cooked bites: If you have leftover baked bites, let them cool completely. Then, store them in an airtight container or freezer bag. They can also last for about three months. To thaw, move them to the fridge overnight. For reheating, follow the same oven method as before. Bake at 350°F (175°C) for about 15 minutes, or until heated through. This keeps them crispy and tasty. You can serve buffalo cauliflower bites with many great sides. Some popular options include: - Ranch dressing - Blue cheese dressing - Celery sticks - Carrot sticks - Fresh parsley for garnish These options add crunch and flavor. They also make a nice contrast to the spicy bites. Yes, you can make this recipe gluten-free. Just replace the all-purpose flour with gluten-free flour. Almond flour or chickpea flour works well. The batter will still coat the cauliflower well and create that crispy texture. You will know the bites are done when they are golden brown. They should have a crispy texture. Check them after 20 minutes of baking and then again after the second bake. A fork should easily pierce the cauliflower. Absolutely! You can use other vegetables like: - Broccoli florets - Brussels sprouts - Zucchini slices These veggies will absorb the buffalo sauce flavor too. Just adjust the baking time as needed. Enjoy experimenting! For the full recipe, click here: [Full Recipe]. In this post, you learned how to make buffalo cauliflower bites. We covered each ingredient, from measurements to brand suggestions. The step-by-step instructions helped you prepare and bake for crispiness. Tips for enhancing flavor and storing leftovers were also shared. Remember, you can also try cooking methods like air frying or grilling. Feel free to mix up sauces for new tastes. Enjoy your cooking adventure, and have fun experimenting!](https://joymealplan.com/wp-content/uploads/2025/07/3e0c7ac8-f5c4-4624-a75b-d39bdd09bf1f-768x768.webp)


![- 1 ripe mango, diced - 2 ripe avocados, diced - 1 small red onion, finely chopped - 1 sweet red bell pepper, diced - 1 jalapeño, minced - 1/4 cup fresh cilantro, chopped - Juice of 2 limes - 1 tablespoon extra virgin olive oil - Salt and black pepper to taste How to choose the perfect mango Look for a mango that feels slightly soft when you press it. The skin should have a nice golden hue. A ripe mango smells sweet at the stem end. Choosing the best avocados Pick avocados that yield to gentle pressure. The skin should be dark green or black, depending on the variety. Avoid hard or overly mushy avocados. Signs of a fresh jalapeño A fresh jalapeño should be firm and glossy. Look for bright green skin without wrinkles. A fresh pepper has a crisp feel and a spicy aroma. These tips will help you find the best ingredients for your salsa. Fresh produce makes your dish more vibrant and tasty. For the full recipe, check the details above. - Start by washing all your fresh produce. - Dice the ripe mango into small cubes. - Carefully cut the avocados into bite-sized pieces. - Finely chop the red onion for sharp flavor. - Dice the red bell pepper for sweetness. - Mince the jalapeño, adjusting to your heat preference. Next, in a large mixing bowl, combine the diced mango, avocado, chopped onion, red bell pepper, and minced jalapeño. Gently fold in the chopped cilantro, spreading the fresh herb throughout. Squeeze the juice of two fresh limes over the mix, along with a tablespoon of olive oil. This adds richness. Use a spatula to carefully toss the ingredients. Keep the avocado pieces intact to maintain texture. Season the salsa with salt and freshly cracked black pepper, mixing lightly to combine. Resting time is key for great flavor. Let the salsa sit for about 10 minutes at room temperature. This duration allows the ingredients to blend and the flavors to develop. When you let the salsa rest, the lime juice and olive oil soak in. This process enhances the taste and makes every bite burst with flavor. Enjoy this fresh, vibrant dish as a wonderful side or topping. For the full recipe, check out the details above. - How to keep avocados from browning: To stop avocados from turning brown, use lime juice. The acid in lime juice slows oxidation. Squeeze fresh lime juice right after cutting the avocado. Mix it in well to cover all the flesh. You can also store the salsa in an airtight container to keep it fresh longer. - Using lime juice effectively: Lime juice brightens the flavors in your salsa. Use freshly squeezed lime juice rather than bottled juice. It tastes better and adds a nice zing. Aim for about two limes for this recipe. Adjust based on your taste! - Importance of ingredient proportions: Balance is key to great salsa. Use equal parts of mango and avocado for a good mix. Too much onion can overpower the other flavors. Keep the jalapeño mild if you prefer less heat. Taste as you go, and adjust the ingredients to suit your own palate. - Pairing with tortilla chips: Serve your mango avocado salsa with crispy tortilla chips. The crunch of the chips pairs well with the smoothness of the salsa. It makes for a perfect snack or appetizer at parties. - Using as a topping for grilled meats: This salsa works great as a topping for grilled chicken or fish. The sweet and spicy flavors complement the meat beautifully. Just spoon it on right before serving for the best taste. - Incorporating into tacos or burritos: Use this salsa to add freshness to tacos or burritos. It enhances your meal with vibrant flavors. Just add a scoop in your taco or wrap it up in a burrito, and enjoy! For the full recipe, check out the complete method to create this delicious dish. {{image_4}} You can make mango avocado salsa even better with new flavors. Try adding tropical fruits like pineapple or papaya. These fruits bring a sweet twist and a fun texture. You can also mix in fresh herbs like mint or basil. These herbs give a fresh taste that brightens the salsa. Want more heat? You can swap out the jalapeño for a serrano or habanero pepper. These peppers can make your salsa spicy and exciting. Just remember to taste as you go! Making mango avocado salsa fit your diet is easy. If you're vegan, this recipe is already perfect. It has no animal products and is full of healthy fats. If you need a low-sodium option, skip the added salt. The fresh lime juice and other ingredients give plenty of flavor. For those with allergies, check each ingredient. You can always swap out foods that cause issues for you. This salsa is a versatile dish that everyone can enjoy. Try these ideas to make it your own! For the full recipe, check out the [Full Recipe]. To keep your mango avocado salsa fresh, put it in the fridge. Use an airtight container. This helps prevent the salsa from browning. The salsa stays good for about 2 to 3 days in the fridge. If you see browning, it’s best to toss it. Yes, you can freeze mango avocado salsa! However, know that the texture might change. For best results, freeze it without the avocado. This keeps the salsa tasting fresh. When you're ready to use it, transfer it to the fridge for a slow thaw. To freeze, use a freezer-safe container. Leave some space at the top for expansion. You can also use freezer bags. Squeeze out the air before sealing. When thawing, avoid using a microwave. This can make the salsa mushy. Instead, let it sit in the fridge overnight. Once thawed, mix it well before serving. If it seems dry, add a splash of lime juice for extra flavor. Enjoy your mango avocado salsa fresh and flavorful! How long does mango avocado salsa last? Mango avocado salsa lasts about 2 to 3 days in the fridge. To keep it fresh, store it in an airtight container. The avocado may brown, but it will still taste good. Can I make salsa ahead of time? You can make salsa ahead of time. Just prepare it a few hours before serving. This allows the flavors to mix well. If you make it too early, the avocado may brown. What can I substitute for cilantro? If you dislike cilantro, you can use parsley instead. Parsley adds a fresh taste without the strong flavor of cilantro. Green onions or basil are also good options. What are the health benefits of mangoes and avocados? Mangoes are high in vitamins A and C. They support your immune system and promote healthy skin. Avocados contain healthy fats and fiber. They help with digestion and heart health. Is mango avocado salsa good for meal prep? Yes, mango avocado salsa is great for meal prep. It adds flavor to many meals. Use it on tacos, salads, or grilled meats for a fresh twist. Can I use canned ingredients instead of fresh? You can use canned ingredients, but fresh tastes better. Canned mango or avocado may change the texture. If you must use canned, pick options with no added sugar or salt. Mango avocado salsa is fresh, tasty, and easy to make. We covered how to choose ripe ingredients, prepare them, and enhance flavors. Remember to rest your salsa for the best taste. You can adjust it to fit your diet or add new ingredients. Store leftovers properly to enjoy later. This salsa pairs well with many dishes and adds great flavor. Enjoy your cooking and try new flavor combinations!](https://joymealplan.com/wp-content/uploads/2025/07/4f0b2596-afb2-4ef7-a95d-26c50b7bed60-768x768.webp)

