Skip to content
About
Contact
Cookie Policy
Copyright Policy
Disclaimer
Search
Home
Dinner
Appetizer
Desserts
Drinks
About
Contact
Privacy Policy
Toggle Menu
Home
/
Appetizer
- Page 11
Appetizer
Garlic Butter Steak Bites Flavorful and Easy Recipe
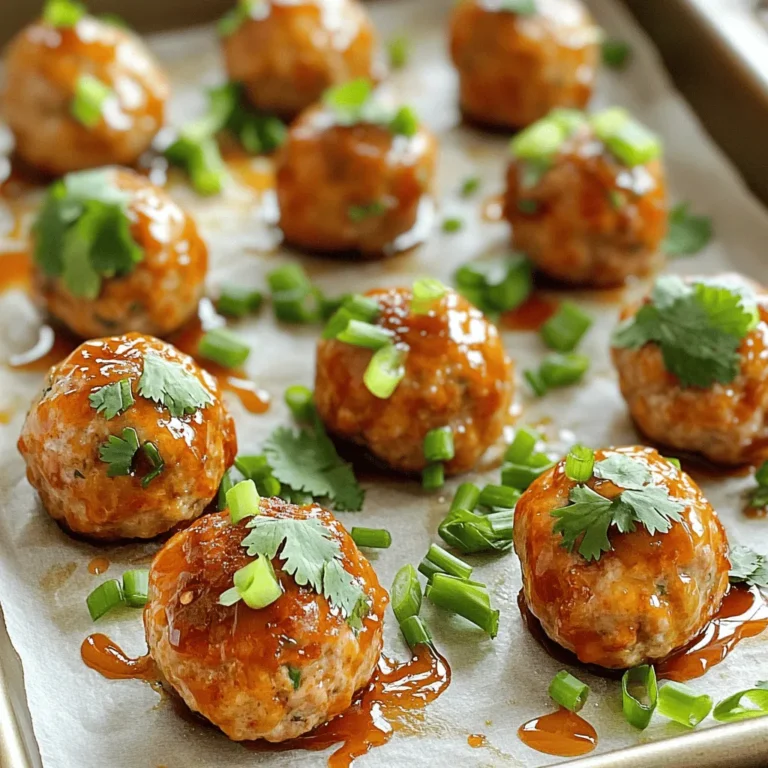
Sweet Chili Turkey Meatballs Tender and Flavorful Dish
Mango Avocado Salsa Fresh and Flavorful Delight
Easy Garlic Butter Steak Bites Tasty Quick Dinner
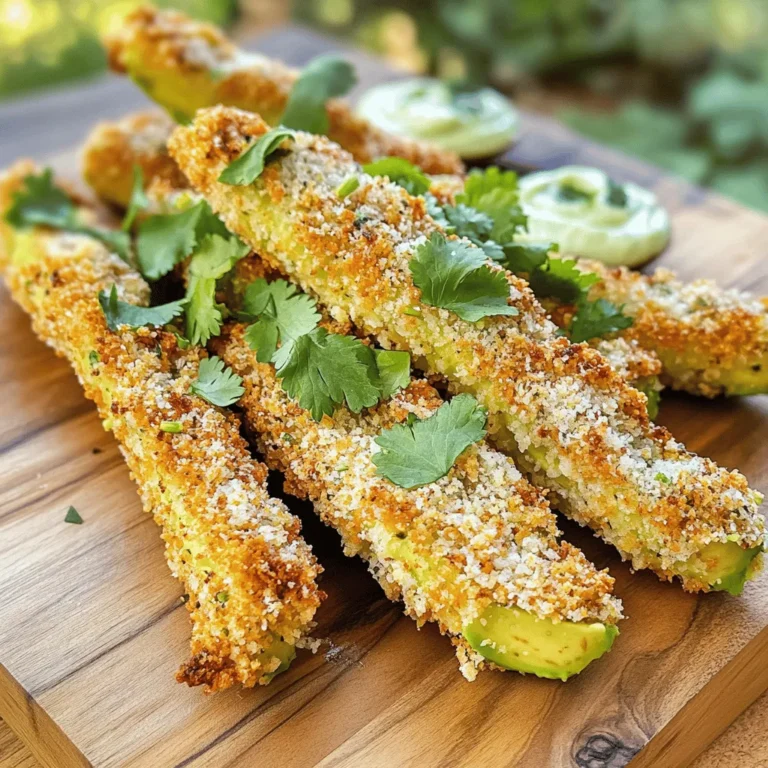
Crispy Air Fryer Avocado Fries Healthy Snack Delight
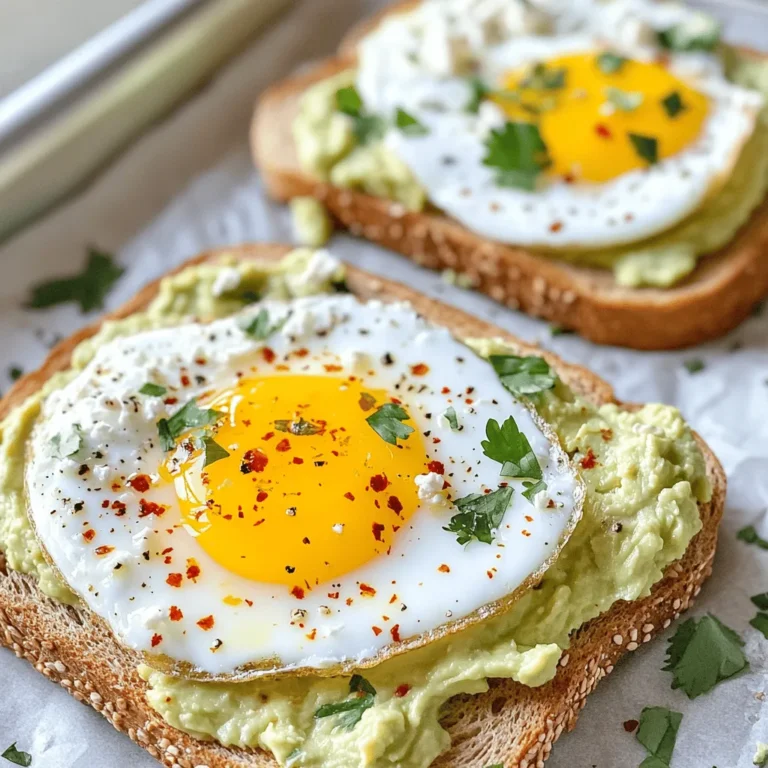
Viral Feta Egg Toast Simple and Tasty Recipe
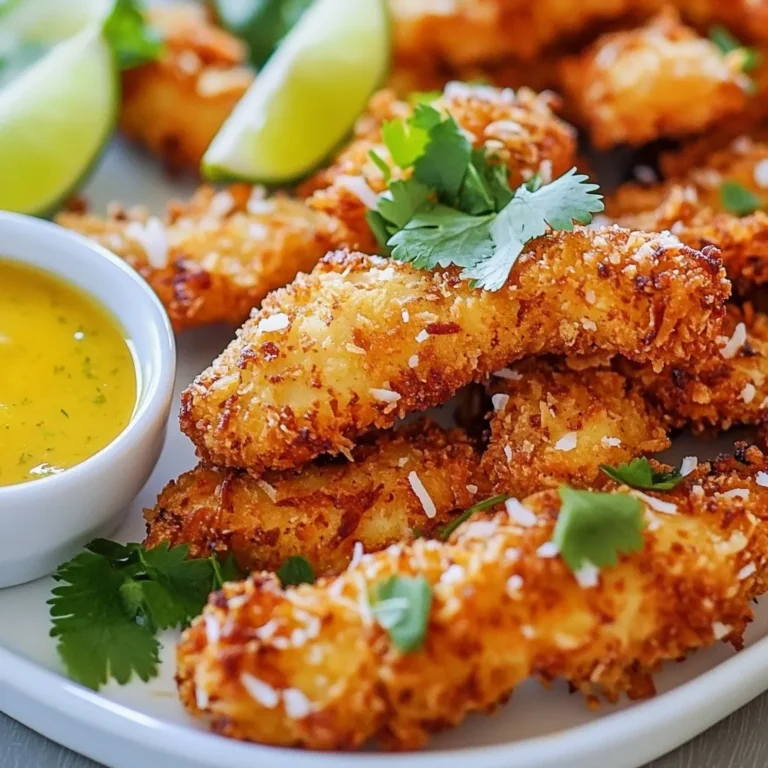
Crispy Coconut Chicken Strips Easy and Flavorful Recipe
Pickle Veggie Pinwheels Easy and Tasty Snack Recipe
Pickle Ranch Snack Crackers Quick and Tasty Recipe
Spicy Dill Pickle Hummus Tangy and Flavorful Dip
Page navigation
Previous Page
Previous
1
…
9
10
11
12
13
…
25
Next Page
Next
Home
Dinner
Appetizer
Desserts
Drinks
About
Contact
Privacy Policy
Toggle Menu Close
Search for:
Search

![- 1 lb sirloin steak, cut into 1-inch cubes - 3 tablespoons unsalted butter - 4 cloves garlic, minced - Fresh herbs: rosemary and thyme - Olive oil, salt, and pepper When making garlic butter steak bites, you want to start with high-quality sirloin steak. This cut is tender and holds flavor well. Cut it into 1-inch cubes for even cooking. Next, unsalted butter is key. It melts beautifully, adding richness. Garlic brings a strong flavor to the dish. Use fresh cloves, and don't skip this step. Fresh herbs like rosemary and thyme brighten the taste. Seasoning with salt and pepper enhances every bite. Finally, a splash of olive oil keeps the steak from sticking. - Alternative cuts of steak - Butter alternatives for a dairy-free version - Additional spices for flavor enhancement If you don't have sirloin, ribeye or tenderloin work well too. They offer rich flavors and tenderness. For a dairy-free option, you can use olive oil or coconut oil instead of butter. This keeps the dish tasty while meeting dietary needs. Want more flavor? Try adding spices like smoked paprika or chili flakes for a kick. You can mix and match based on what you have at home. The goal is to create a dish that you enjoy. For the complete recipe, check out the [Full Recipe]. First, pat the steak cubes dry with a paper towel. This step helps the steak sear better. If the surface is wet, the steak will steam instead of brown. Next, season both sides with salt and pepper. Use enough to enhance the flavor but not too much to overpower it. Heat a large skillet over medium-high heat. Add the olive oil and wait until it shimmers. This shows the oil is hot and ready. Carefully place the steak bites in a single layer. Avoid overcrowding the pan; this helps each piece brown nicely. Sear each side for 2-3 minutes until you reach your desired doneness. For best results, medium-rare is ideal. Once you remove the steak bites, lower the heat to medium. Add the unsalted butter to the same skillet. Let it melt completely, stirring with a wooden spoon. This picks up any flavorful bits from the pan. These bits add depth to your sauce. After melting, stir in the minced garlic, rosemary, and thyme. Cook for about a minute. You want the garlic fragrant but not browned, as it can taste bitter. Return the seared steak bites to the skillet. Gently toss them in the garlic butter sauce. This ensures each piece is well-coated. Cook for another 1-2 minutes. This allows the flavors to meld beautifully. The aroma will fill your kitchen, making it hard to wait. For the full recipe, refer to the earlier section. To get a great sear on your steak bites, you need patience. Heat your skillet until it's hot. A good sear locks in flavor and keeps the meat tender. If you crowd the skillet, the steak will steam instead of sear. Cook in batches if needed. This will give you that beautiful brown crust. When cooking garlic, be careful not to burn it. Add the garlic to the butter only after it has melted. Stir it for about a minute until it smells amazing. If you want a bit of spice, add a pinch of red pepper flakes. This will give your garlic butter a nice kick. For serving, think about how to impress your guests. You can serve the steak bites in the skillet they cooked in. This adds a rustic charm. Drizzle the garlic butter over the top for a nice look. Garnish with fresh herbs like parsley. Use toothpicks for easy eating. These ideas will make your dish stand out at any gathering. {{image_4}} You can use many cuts for steak bites. Sirloin is great, but ribeye is richer. Ribeye has more fat, which adds flavor. Other choices include tenderloin and flank steak. Each cut has its own cooking time. - Sirloin: Cook for 2-3 minutes per side for medium-rare. - Ribeye: Needs about 3-4 minutes per side. - Tenderloin: A quick 2-3 minutes per side works well. - Flank Steak: Cook for 3-4 minutes, but cut against the grain. You can change the flavor by adding herbs and spices. Try fresh cilantro or basil for a twist. If you want heat, use paprika or cayenne. These spices bring a new layer of taste to your dish. - Cilantro: Add at the end for a fresh taste. - Basil: Use fresh or dried for a sweet flavor. - Paprika: Adds warmth and color. - Cayenne: Just a pinch for a spicy kick. Want to make your dish fit your diet? There are great low-carb and keto choices. Use a different type of butter for dairy-free options. You can also skip the butter and use olive oil. - Low-Carb: Stick to steak and herbs. - Keto: All ingredients are keto-friendly. - Gluten-Free: This recipe is naturally gluten-free. - Dairy-Free: Olive oil can replace butter for a lighter taste. For the Full Recipe, check out the main section. To keep your cooked steak bites fresh, store them in the fridge. Let them cool first. Place them in an airtight container. This helps keep moisture in and air out. Use glass or plastic containers with tight lids. They work best for storage. When reheating, aim to keep the steak juicy. The best method is using the skillet. Heat it on low. Add a splash of broth or water to keep moisture. Place the steak bites in the skillet for a few minutes. Stir gently to warm them up. This method helps keep the steak tender and flavorful. You can freeze cooked steak bites for later. First, let them cool completely. Then, place them in a freezer-safe bag. Squeeze out as much air as you can. This prevents freezer burn. When you’re ready to eat, thaw them in the fridge overnight. Reheat in a skillet for best taste. To check if steak bites are done, use a meat thermometer. For medium-rare, aim for 130°F. Insert the thermometer into the center of a steak bite. You can also press the meat with your finger. If it feels firm but still has some give, it's likely medium-rare. - Tips for checking doneness levels: - Use a thermometer for accurate results. - Learn the feel of different doneness levels. - Recommended meat thermometers: - Instant-read thermometers work best. - Probe thermometers are great for cooking longer cuts. Yes, you can prepare some parts ahead of time. Cut the steak and season it a few hours before cooking. This makes the flavors blend well. - Preparing ahead of time: - Cut and season the steak. - Make the garlic butter and store it. - Best storage practices: - Keep uncooked steak in the fridge. - Store garlic butter in an airtight container. Garlic Butter Steak Bites go well with many sides. Fresh salads, roasted veggies, or mashed potatoes are popular choices. - Popular side dishes like salads and vegetables: - A crisp green salad adds freshness. - Roasted asparagus or broccoli complements the steak. - Creative serving suggestions: - Serve on a bed of creamy mashed potatoes. - Add some crusty bread to soak up the garlic butter. For medium-rare steak bites, sear them for about 2-3 minutes on each side. Timing can vary with the heat of your skillet. - Timing tips for different levels of doneness: - Medium: 3-4 minutes per side. - Rare: about 1-2 minutes per side. - Common mistakes to avoid during cooking: - Don't overcrowd the pan; it lowers the heat. - Avoid flipping too often; let them sear well. You’ve learned how to make delicious garlic butter steak bites step by step. We covered essential and optional ingredients, cooking techniques, and tips for the perfect sear. You can personalize the dish with different herbs and cuts of steak. Plus, we discussed how to store and reheat leftovers properly. Now, you have the tools to impress at any meal. Enjoy experimenting with flavors while creating your own delicious variations. Happy cooking!](https://joymealplan.com/wp-content/uploads/2025/07/52ecc706-aa2d-497b-a3c5-28ea991b92c7-768x768.webp)
![- 1 ripe mango, diced - 2 ripe avocados, diced - 1 small red onion, finely chopped - 1 sweet red bell pepper, diced - 1 jalapeño, minced - 1/4 cup fresh cilantro, chopped - Juice of 2 limes - 1 tablespoon extra virgin olive oil - Salt and black pepper to taste How to choose the perfect mango Look for a mango that feels slightly soft when you press it. The skin should have a nice golden hue. A ripe mango smells sweet at the stem end. Choosing the best avocados Pick avocados that yield to gentle pressure. The skin should be dark green or black, depending on the variety. Avoid hard or overly mushy avocados. Signs of a fresh jalapeño A fresh jalapeño should be firm and glossy. Look for bright green skin without wrinkles. A fresh pepper has a crisp feel and a spicy aroma. These tips will help you find the best ingredients for your salsa. Fresh produce makes your dish more vibrant and tasty. For the full recipe, check the details above. - Start by washing all your fresh produce. - Dice the ripe mango into small cubes. - Carefully cut the avocados into bite-sized pieces. - Finely chop the red onion for sharp flavor. - Dice the red bell pepper for sweetness. - Mince the jalapeño, adjusting to your heat preference. Next, in a large mixing bowl, combine the diced mango, avocado, chopped onion, red bell pepper, and minced jalapeño. Gently fold in the chopped cilantro, spreading the fresh herb throughout. Squeeze the juice of two fresh limes over the mix, along with a tablespoon of olive oil. This adds richness. Use a spatula to carefully toss the ingredients. Keep the avocado pieces intact to maintain texture. Season the salsa with salt and freshly cracked black pepper, mixing lightly to combine. Resting time is key for great flavor. Let the salsa sit for about 10 minutes at room temperature. This duration allows the ingredients to blend and the flavors to develop. When you let the salsa rest, the lime juice and olive oil soak in. This process enhances the taste and makes every bite burst with flavor. Enjoy this fresh, vibrant dish as a wonderful side or topping. For the full recipe, check out the details above. - How to keep avocados from browning: To stop avocados from turning brown, use lime juice. The acid in lime juice slows oxidation. Squeeze fresh lime juice right after cutting the avocado. Mix it in well to cover all the flesh. You can also store the salsa in an airtight container to keep it fresh longer. - Using lime juice effectively: Lime juice brightens the flavors in your salsa. Use freshly squeezed lime juice rather than bottled juice. It tastes better and adds a nice zing. Aim for about two limes for this recipe. Adjust based on your taste! - Importance of ingredient proportions: Balance is key to great salsa. Use equal parts of mango and avocado for a good mix. Too much onion can overpower the other flavors. Keep the jalapeño mild if you prefer less heat. Taste as you go, and adjust the ingredients to suit your own palate. - Pairing with tortilla chips: Serve your mango avocado salsa with crispy tortilla chips. The crunch of the chips pairs well with the smoothness of the salsa. It makes for a perfect snack or appetizer at parties. - Using as a topping for grilled meats: This salsa works great as a topping for grilled chicken or fish. The sweet and spicy flavors complement the meat beautifully. Just spoon it on right before serving for the best taste. - Incorporating into tacos or burritos: Use this salsa to add freshness to tacos or burritos. It enhances your meal with vibrant flavors. Just add a scoop in your taco or wrap it up in a burrito, and enjoy! For the full recipe, check out the complete method to create this delicious dish. {{image_4}} You can make mango avocado salsa even better with new flavors. Try adding tropical fruits like pineapple or papaya. These fruits bring a sweet twist and a fun texture. You can also mix in fresh herbs like mint or basil. These herbs give a fresh taste that brightens the salsa. Want more heat? You can swap out the jalapeño for a serrano or habanero pepper. These peppers can make your salsa spicy and exciting. Just remember to taste as you go! Making mango avocado salsa fit your diet is easy. If you're vegan, this recipe is already perfect. It has no animal products and is full of healthy fats. If you need a low-sodium option, skip the added salt. The fresh lime juice and other ingredients give plenty of flavor. For those with allergies, check each ingredient. You can always swap out foods that cause issues for you. This salsa is a versatile dish that everyone can enjoy. Try these ideas to make it your own! For the full recipe, check out the [Full Recipe]. To keep your mango avocado salsa fresh, put it in the fridge. Use an airtight container. This helps prevent the salsa from browning. The salsa stays good for about 2 to 3 days in the fridge. If you see browning, it’s best to toss it. Yes, you can freeze mango avocado salsa! However, know that the texture might change. For best results, freeze it without the avocado. This keeps the salsa tasting fresh. When you're ready to use it, transfer it to the fridge for a slow thaw. To freeze, use a freezer-safe container. Leave some space at the top for expansion. You can also use freezer bags. Squeeze out the air before sealing. When thawing, avoid using a microwave. This can make the salsa mushy. Instead, let it sit in the fridge overnight. Once thawed, mix it well before serving. If it seems dry, add a splash of lime juice for extra flavor. Enjoy your mango avocado salsa fresh and flavorful! How long does mango avocado salsa last? Mango avocado salsa lasts about 2 to 3 days in the fridge. To keep it fresh, store it in an airtight container. The avocado may brown, but it will still taste good. Can I make salsa ahead of time? You can make salsa ahead of time. Just prepare it a few hours before serving. This allows the flavors to mix well. If you make it too early, the avocado may brown. What can I substitute for cilantro? If you dislike cilantro, you can use parsley instead. Parsley adds a fresh taste without the strong flavor of cilantro. Green onions or basil are also good options. What are the health benefits of mangoes and avocados? Mangoes are high in vitamins A and C. They support your immune system and promote healthy skin. Avocados contain healthy fats and fiber. They help with digestion and heart health. Is mango avocado salsa good for meal prep? Yes, mango avocado salsa is great for meal prep. It adds flavor to many meals. Use it on tacos, salads, or grilled meats for a fresh twist. Can I use canned ingredients instead of fresh? You can use canned ingredients, but fresh tastes better. Canned mango or avocado may change the texture. If you must use canned, pick options with no added sugar or salt. Mango avocado salsa is fresh, tasty, and easy to make. We covered how to choose ripe ingredients, prepare them, and enhance flavors. Remember to rest your salsa for the best taste. You can adjust it to fit your diet or add new ingredients. Store leftovers properly to enjoy later. This salsa pairs well with many dishes and adds great flavor. Enjoy your cooking and try new flavor combinations!](https://joymealplan.com/wp-content/uploads/2025/07/4f0b2596-afb2-4ef7-a95d-26c50b7bed60-768x768.webp)
![- 1 pound sirloin steak, cut into bite-sized cubes - 4 tablespoons unsalted butter - 4 cloves garlic, minced - Fresh herbs: rosemary and thyme - Salt and pepper for seasoning - Olive oil and soy sauce To make easy garlic butter steak bites, you need fresh and simple ingredients. The star of this dish is the sirloin steak. It’s tender and juicy, perfect for bite-sized pieces. The butter, garlic, and herbs create a rich sauce. You can taste the freshness in every bite. Using unsalted butter allows you to control the salt. Fresh rosemary and thyme add a nice touch of flavor. They give the steak bites a lovely aroma. Don’t forget to season well with salt and pepper. This step is key for great taste. - Fresh parsley, finely chopped Garnishing with parsley adds color and a hint of freshness. It makes your dish look more appealing. Plus, it gives a slight herbal taste that complements the steak. You can also use other herbs if you prefer. Thyme or chives can work well too. For the full recipe, check the details below. Enjoy cooking these steak bites! To start, heat the olive oil in a large skillet. Use medium-high heat until it shimmers slightly. This heat is key for a great sear. High heat helps lock in the juices and gives a nice crust. Next, season the steak cubes well. Use salt and freshly cracked black pepper. Make sure each piece is coated evenly. This step adds flavor and makes your bites tasty. Place the seasoned steak in the hot skillet in a single layer. Avoid overcrowding the pan. Let the steak sear undisturbed for about 2-3 minutes. This develops a rich, brown crust. Flip the cubes carefully using tongs or a spatula. Cook for another 2-3 minutes for medium-rare. Feel free to adjust the time for your desired doneness. Once done, remove the steak and set it aside. In the same skillet, lower the heat to medium. Add the butter and let it melt fully. Once melted, stir in the minced garlic, chopped rosemary, and thyme. Sauté for 1-2 minutes until fragrant. Be careful not to let the garlic burn. Now, return the seared steak bites to the skillet. Pour in the soy sauce and toss everything together. Make sure the steak is well-coated in the rich garlic butter sauce. Cook for another minute to heat through. This step blends the flavors beautifully. For the complete process, check the [Full Recipe]. To get steak bites just right, adjust the cooking time. For rare steak, aim for about 2 minutes per side. Medium-rare needs about 3 minutes per side. For medium, increase the time to 4 minutes. Always check the internal temperature. - Rare: 125°F (51°C) - Medium-rare: 135°F (57°C) - Medium: 145°F (63°C) Using a meat thermometer helps you avoid overcooking. If you want your steak well-done, cook it for about 5 minutes per side. Remember, everyone has different tastes. You can boost flavor with fresh herbs. Try using basil, oregano, or parsley. Each adds a unique twist. Fresh herbs bring bright tastes to the dish. You can also add a splash of vinegar or citrus. A bit of lemon juice or balsamic vinegar adds a nice zing. This lifts the flavors and makes the dish pop. For a different taste, think about garlic butter sauce variations. You can use shallots or different types of onions. Feel free to experiment and find what you like best. Check the [Full Recipe] for more details! {{image_4}} You can switch things up by using chicken or shrimp. They cook quickly, just like steak. For chicken, cut it into bite-sized pieces. Use boneless, skinless thighs or breasts for the best flavor and tenderness. Cook the chicken until golden and fully cooked, about 5-7 minutes. For shrimp, use large, peeled shrimp. They only need about 3-4 minutes to cook. Add them to the skillet after the garlic butter melts. Toss them until they turn pink and opaque. Adjust your cooking times based on the protein you choose. Remember, the key is to not overcook. If you need gluten-free options, swap soy sauce with tamari or coconut aminos. Both options provide savory flavor without gluten. You can also use homemade sauces with gluten-free ingredients. For low-carb adaptations, skip the soy sauce and focus on the garlic butter. Add more herbs for flavor. You can also serve these bites with low-carb veggies like zucchini noodles or cauliflower rice. These changes keep your meal tasty and fit your diet. To store your garlic butter steak bites, follow these steps: - Let the steak bites cool to room temperature. - Place them in an airtight container. - Keep them in the fridge for up to three days. This method helps keep the steak juicy and flavorful. Use glass or plastic containers with tight lids. They help prevent moisture loss and odors from mixing. When it comes to reheating, you want to avoid overcooking the steak. Here’s how to do it right: - Use a microwave on low power for a quick reheat. - Heat in 30-second intervals, checking often. - For better results, use a stovetop. - Heat a non-stick skillet over low heat. - Add a splash of water or broth to steam the bites. - Stir gently until warmed through. This method keeps your steak bites tender and tasty. To check if steak bites are done, look for a nice brown color. They should feel firm but slightly springy when pressed. A meat thermometer can help too. For medium-rare, aim for 130°F to 135°F. For medium, target 140°F to 145°F. If you like them well done, go for 160°F. This way, you can get your perfect level of doneness every time. Yes, you can make these steak bites ahead of time! Cook the steak bites and let them cool. Store them in an airtight container in the fridge for up to three days. For best taste, reheat them in a skillet. This keeps the flavors fresh and the texture intact. Garlic butter steak bites pair well with many sides. Here are some tasty options: - Roasted vegetables - Mashed potatoes - Rice pilaf - A fresh green salad - Garlic bread These sides balance the rich taste of the steak bites and create a full meal experience. Absolutely! This recipe is great for meal prep. You can portion out the steak bites into meal containers. Add your favorite sides for a balanced meal. Just make sure to store them in the fridge. When you are ready to eat, reheat them as needed. Enjoy a quick, tasty meal all week long! This blog post shared a simple, tasty recipe for garlic butter steak bites. We covered the essential ingredients, step-by-step cooking instructions, and tips for perfect doneness. I also discussed variations using different proteins and dietary adjustments, plus how to store leftovers effectively. Cooking steak bites can be fun and satisfying. With the right techniques, you can impress any guest. Enjoy making these delicious bites, and feel free to experiment with flavors and sides!](https://joymealplan.com/wp-content/uploads/2025/07/6c147bbf-aecd-4f40-83f0-60b5a859338f-768x768.webp)

![To make Pickle Ranch Snack Crackers, you need the following ingredients: - 1 cup all-purpose flour - 1/2 cup cornmeal - 1 teaspoon baking powder - 1/2 teaspoon baking soda - 1/2 teaspoon salt - 1 tablespoon ranch seasoning mix - 1/4 cup dill pickle juice - 1/4 cup melted butter (cooled slightly) - 1/2 cup shredded cheddar cheese - 1/4 cup dill pickle slices (finely chopped) You can swap some ingredients if needed. For the all-purpose flour, try using whole wheat flour for added fiber. If you prefer a gluten-free option, use a gluten-free flour blend. Instead of cornmeal, you can use fine breadcrumbs for a different texture. If you want to skip the ranch seasoning, use herbs like dill, garlic powder, or onion powder to create your own flavor. Each serving, which is about two crackers, provides: - Calories: 120 - Total Fat: 8g - Saturated Fat: 4g - Cholesterol: 20mg - Sodium: 150mg - Carbohydrates: 10g - Fiber: 1g - Sugar: 1g - Protein: 3g These crackers are tasty and balanced, making them a fun snack for any occasion. You can enjoy them without guilt! 1. Preheat your oven to 350°F (175°C). This is key for baking. 2. Line a baking sheet with parchment paper. This helps with easy cleanup. 3. In a large bowl, mix the flour, cornmeal, baking powder, baking soda, salt, and ranch seasoning. Use a whisk to mix well. 4. Slowly add the dill pickle juice and melted butter. Stir until a dough forms. 5. Fold in the cheddar cheese and chopped dill pickles. Make sure they spread evenly in the dough. 6. Roll the dough into small balls, about the size of a quarter. Place them on the sheet, leaving space between them. 1. Flatten each ball gently with a fork or your fingers. Aim for even thickness. 2. Bake the crackers for 12-15 minutes. Watch closely for a light golden brown color. 1. Once baked, let the crackers cool on the sheet for a few minutes. 2. Transfer them to a wire rack to cool completely. This makes them crispier. 3. For a fun serving idea, arrange them on a colorful platter. Add fresh dill sprigs or serve with ranch dip for a tasty snack. Enjoy your Pickle Ranch Snack Crackers! You can find the full recipe above for more details. To get the right texture for your Pickle Ranch Snack Crackers, focus on mixing. Combine the dry ingredients well to avoid lumps. When adding the wet ingredients, mix just until combined. Overmixing can make your crackers tough. Roll the dough into small balls. Keep them uniform in size to ensure even baking. Flatten them gently for a crispier edge. To boost flavor, consider adding more ranch seasoning. You could also try garlic powder or onion powder. A pinch of cayenne can add a nice kick if you like spice. Adding herbs like dill or parsley can enhance the pickle flavor. For extra richness, sprinkle some grated Parmesan cheese on top before baking. One common mistake is using hot melted butter. It can change the dough's texture. Be careful not to skip the cooling step after baking. Allowing them to cool helps the crackers firm up. Also, don’t crowd the baking sheet. If they are too close, they may stick together. Check them often while baking to avoid burning. For a full recipe, refer to the complete instructions. {{image_4}} You can add fun twists to Pickle Ranch Snack Crackers. Want some heat? Try adding cayenne pepper or crushed red pepper flakes. Just a pinch will do! For a cheesy version, swap in pepper jack cheese instead of cheddar. Mixing in some garlic powder can also boost flavor. These tweaks keep your snack game exciting! If you need a gluten-free option, use gluten-free all-purpose flour. It works well in this recipe. You can also try almond flour for a nutty taste. Make sure your ranch seasoning is gluten-free too. This way, everyone can enjoy these tasty crackers without worry. These crackers shine when paired with dips. Creamy ranch dip is a favorite, but you can also serve them with hummus or guacamole. For a fun party snack, arrange them on a platter with fresh veggies. They also taste great with cheese slices or charcuterie. Each bite will surprise your guests! Explore the [Full Recipe] to start making your own delicious Pickle Ranch Snack Crackers today! Store your Pickle Ranch Snack Crackers in an airtight container. This keeps them fresh and crisp. You can use a glass jar or a plastic container. Make sure they are completely cool before sealing. If you live in a humid area, consider adding a small bag of rice to absorb moisture. When stored properly, these crackers can last up to one week. They taste best in the first few days. After that, they may lose some crunch. If you want to keep them longer, you can freeze them. Just place them in a freezer-safe bag or container. If your crackers lose their crunch, you can reheat them. Preheat your oven to 300°F (150°C). Spread the crackers on a baking sheet in a single layer. Heat them for about 5-7 minutes. Check often to avoid burning. Let them cool before enjoying again. For the full recipe, refer to the earlier section. Pickle Ranch Snack Crackers are tasty, crunchy treats. They mix the flavors of dill pickles and ranch dressing. These snacks are perfect for parties or game nights. They are easy to make at home with simple ingredients. To make Pickle Ranch Snack Crackers at home, follow these steps: 1. Preheat your oven to 350°F (175°C). 2. Line a baking sheet with parchment paper. 3. Mix flour, cornmeal, baking powder, baking soda, salt, and ranch seasoning in a bowl. 4. Add dill pickle juice and cooled melted butter. Stir to form a dough. 5. Fold in cheddar cheese and chopped pickles. 6. Roll the dough into small balls. Flatten each ball on the baking sheet. 7. Bake for 12-15 minutes until golden. 8. Let them cool on a wire rack. For the full recipe, check the details provided above. Pickle Ranch Snack Crackers can be a fun snack. They contain some healthy ingredients like cheese and pickles. However, they also have butter and flour, which add calories. Enjoy them in moderation as part of a balanced diet. You can find Pickle Ranch Snack Crackers at many grocery stores. Look in the snack aisle or near the crackers. Some stores may also sell them online. Check popular websites for easy shopping options. These crackers pair well with many dips and spreads. Serve them with ranch dressing, creamy dip, or hummus. You can also enjoy them with cheese or fresh veggies. They make a great snack for any gathering. This blog post covers everything about Pickle Ranch Snack Crackers. We discussed the key ingredients, including substitutions, and shared helpful nutritional data. You learned precise steps for preparation and baking, along with cooling tips for best results. I shared easy tricks to get the perfect texture and flavor. You now know various tasty variations to try and how to store them properly. Finally, you have answers to common questions about these delicious snacks. Enjoy making and sharing your own Pickle Ranch Snack Crackers!](https://joymealplan.com/wp-content/uploads/2025/07/696f27ca-dd07-4295-82fd-de9c637e8141-768x768.webp)
. Spicy Dill Pickle Hummus combines chickpeas, tahini, and pickles for a flavorful dip. You can enhance the taste with garlic, olive oil, and spices like smoked paprika. Remember to adjust flavors to your liking and store it right for freshness. This hummus is versatile; try variations with jalapeños or different herbs. It’s easy to make, nutritious, and perfect for snacks or meals. Enjoy creating this tasty treat and share it with friends!](https://joymealplan.com/wp-content/uploads/2025/07/3a5f2aa9-5489-447e-8fd1-d193bfa563b1-768x768.webp)