Skip to content
About
Contact
Cookie Policy
Copyright Policy
Disclaimer
Search
Home
Dinner
Appetizer
Desserts
Drinks
About
Contact
Privacy Policy
Toggle Menu
Home
/
Appetizer
- Page 12
Appetizer
Everything Bagel Cucumber Bites Tasty Party Treat
Spicy Thai Peanut Noodle Salad Flavorful and Fresh Dish
Pesto Mozzarella Stuffed Tomatoes Flavorful and Fresh
Avocado Toast with Poached Egg Flavorful Delight
Garlic Parmesan Roasted Potatoes Easy Weeknight Dish
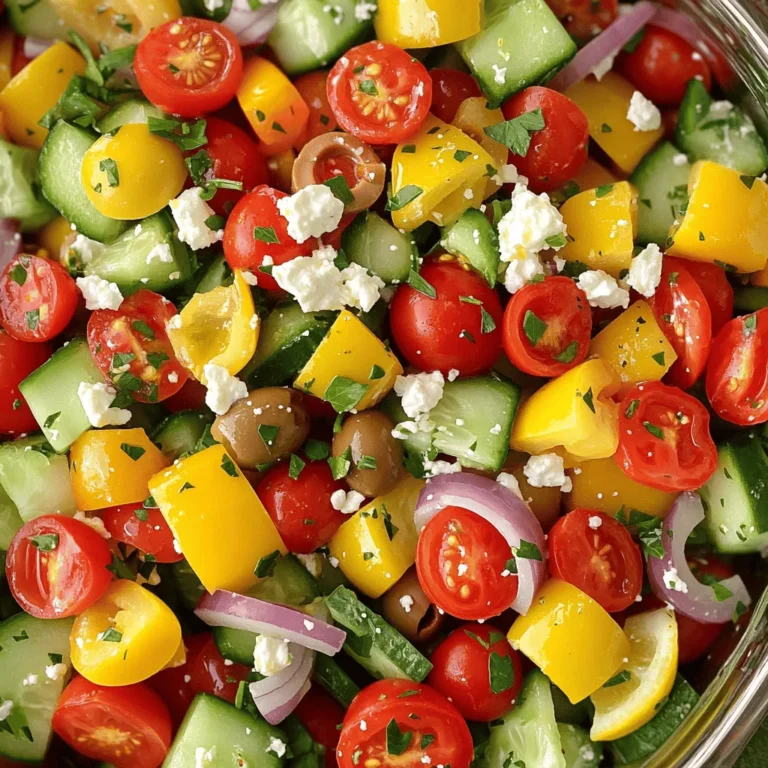
Easy Greek Salad Quick and Tasty Recipe Guide
Creamy Spinach Artichoke Dip Deliciously Cheesy Dish
Classic Guacamole Fresh and Flavorful Recipe Guide
Buffalo Cauliflower Bites Crispy and Flavorful Snack
Roasted Sweet Potato Wedges Crispy and Flavorful Delight
Page navigation
Previous Page
Previous
1
…
10
11
12
13
14
…
25
Next Page
Next
Home
Dinner
Appetizer
Desserts
Drinks
About
Contact
Privacy Policy
Toggle Menu Close
Search for:
Search


![- 2 ripe avocados - 4 slices of whole grain bread - 4 large eggs - 1 tablespoon fresh lemon juice - Salt and pepper to taste - Optional: red pepper flakes for heat - Fresh herbs for garnish To make avocado toast with poached egg, gather these fresh ingredients. Start with ripe avocados. They should feel slightly soft but not mushy. Whole grain bread gives a nice texture and is healthy, too. Eggs are key to this dish; use large eggs for a satisfying poach. Lemon juice adds brightness to the avocado spread. Salt and pepper enhance the flavors, while red pepper flakes can add a bit of heat if you like. Finally, fresh herbs make your dish look and taste wonderful. You can choose cilantro, chives, or parsley, depending on your preference. Check out the Full Recipe to see how these simple ingredients transform into a tasty meal! Start by toasting the whole grain bread. You can use a toaster for quick results. Alternatively, heat a dry skillet over medium heat and add the bread slices. Toast until they turn golden brown and crispy. This gives your toast the perfect base. While the bread toasts, grab your ripe avocados. Cut them in half and scoop the flesh into a bowl. Use a fork to mash the avocado; it should be creamy but still a bit chunky. Stir in fresh lemon juice and a pinch of salt and pepper. This adds flavor and keeps the avocado bright. Fill a medium saucepan with about 3 inches of water. Bring it to a gentle simmer. Crack each egg into a small bowl first. This helps keep them intact. Gently slide each egg into the water, one by one. Poach them for about 3-4 minutes. If you want firmer yolks, cook them a bit longer. Once the bread is toasted, take a slice and spread a generous layer of the avocado mix on top. Place a poached egg carefully on each slice. Make sure the yolk stays intact for that delightful runny experience. This layering creates both flavor and visual appeal. For a little extra heat, sprinkle some red pepper flakes over the poached eggs. This is optional, but it adds a nice kick. Finish by adding fresh herbs like chopped cilantro or chives. They provide a pop of color and freshness. Serve your toast right away to enjoy the great mix of textures and flavors. For the full recipe, check out the instructions above. To poach eggs well, start with fresh eggs. Fresh eggs hold their shape better. A common mistake is using water that boils too hard. This can break the eggs. Instead, let the water simmer gently. Add a splash of vinegar to help the egg whites stay together. If you want tools, consider using a poaching pod or a small mesh strainer. These tools make it easier to transfer eggs into the water. When picking avocados, look for ones that yield slightly to gentle pressure. This means they are ripe and ready. Avoid avocados with dark spots or large dents. The best varieties for flavor are Hass and Bacon. Hass avocados have a creamy texture and rich taste, while Bacon avocados are milder and lighter. Both make your toast tasty and delightful. You can toast bread in many ways. Use a toaster, skillet, or even an oven. For a crunchy texture, try broiling the bread for a short time. Keep an eye on it to avoid burning. To enhance your toast, add toppings like cheese, herbs, or spices. A sprinkle of garlic powder or a slice of mozzarella can elevate the flavor. Try different combinations to find your favorite! {{image_4}} You can add fun toppings for more flavor. Try sliced tomatoes or radishes for crunch. Smoked salmon gives a nice salty taste. Cheese options are also great. Feta or goat cheese can add creaminess and tang. The bread you choose changes the taste and feel. Whole grain gives a nutty flavor. Sourdough adds a bit of tang. For gluten-free eaters, use gluten-free bread. Each type adds its own special touch. Spices can make your toast even better. Cumin adds warmth, while paprika gives a slight kick. Fresh herbs like basil or dill can brighten the dish. Experimenting with these can enhance your avocado toast experience. Want to learn more? Check the Full Recipe for more ideas! To keep your leftover avocado fresh, use these tips. First, cover the avocado tightly with plastic wrap. Press the wrap directly onto the flesh to limit air exposure. You can also store it in an airtight container. Adding lemon juice can help slow down browning. If you have half an avocado, use it within one day for the best taste. For longer storage, consider freezing avocado. Cut it into chunks and toss it with lemon juice. Place the pieces in a freezer bag. They will last up to six months. Just remember, frozen avocado is best used in smoothies or spreads. Once you've cooked your poached eggs, store them in the fridge. They can last for about two days. Place them in a container with a lid to keep them fresh. When you are ready to eat them, gently reheat them in warm water to avoid overcooking. You can also use the eggs in salads or sandwiches. For the avocado spread, store it in the fridge as well. It can last about three days. If you notice browning, simply stir it before use. You can also use it as a dip for chips or veggies. This way, you can enjoy your delicious leftovers in various ways! To keep your poached eggs intact, follow these tips: - Use fresh eggs. Fresh eggs hold their shape better. - Crack each egg into a small bowl first. This helps you control the drop. - Create a gentle whirlpool in the water. Stir the water with a spoon before adding the egg. - Poach in simmering, not boiling, water. This helps prevent the eggs from breaking. These steps lead to beautiful poached eggs every time. Yes, you can prep some parts ahead of time! Here’s how: - Toast the bread just before serving for crispness. - Mash the avocado but add lemon juice to slow browning. - Store the avocado mix in an airtight container. Press plastic wrap on the surface to keep it fresh. - Poach the eggs right before serving for the best texture. Prepping ahead saves time, but fresh is always best! If you love avocado toast, try these dishes: - Hummus toast with sliced veggies. - Nut butter toast with banana slices. - Smoked salmon on cream cheese toast. - Ricotta with honey and figs on bread. These options are tasty and easy to make! Yes, avocado toast is a healthy choice! Here’s why: - Avocados are rich in healthy fats. They help your heart and keep you full. - Eggs provide protein, which is great for muscle health. - Whole grain bread offers fiber, good for digestion. - Adding fresh herbs boosts vitamins and flavor. This meal is a great way to start your day! For the full recipe, check out [Full Recipe]. This blog post explored the steps to make delicious avocado toast. We covered the key ingredients, from ripe avocados to perfectly poached eggs. You learned how to toast bread, prepare avocado spread, and assemble your dish. Keep these tips in mind. Experiment with toppings and seasoning. Try different breads for new flavors. With a little practice, you’ll create a tasty, healthy meal. Enjoy your avocado toast creations and share them with others!](https://joymealplan.com/wp-content/uploads/2025/07/56055f10-0617-41ac-9d2a-da1e092d61f6-768x768.webp)
![- 2 pounds baby Yukon gold potatoes - 4 tablespoons extra-virgin olive oil - 4 cloves garlic, finely minced To start, gather your primary ingredients. Baby Yukon gold potatoes taste great and roast well. The olive oil keeps everything moist and smooth. Garlic adds a bold flavor that makes these potatoes shine. - 1/2 cup freshly grated Parmesan cheese - 1 teaspoon dried Italian herbs - Salt and freshly ground black pepper Next, we need to season our potatoes. Freshly grated Parmesan cheese gives a rich, cheesy taste. Italian herbs, like oregano and basil, add a nice touch. Don’t forget to season with salt and black pepper for balance. - 2 tablespoons fresh parsley, finely chopped Lastly, for a pop of color and freshness, use chopped parsley. It brightens the dish and makes it more appealing. You can find the Full Recipe online to get all the details and cooking steps. - Preheat the oven to 425°F (220°C). - Prepare the baking sheet with parchment paper. First, I make sure my oven is hot. Preheating helps the potatoes cook evenly. Lining the baking sheet with parchment paper makes cleaning easier. It also helps the potatoes not stick. - Combine the potatoes with olive oil and seasonings. - Toss to coat the potatoes evenly. Next, I grab a large bowl. I add the halved baby Yukon gold potatoes. Then, I pour in the extra-virgin olive oil and minced garlic. I also add dried Italian herbs, salt, and pepper. This mix gives the potatoes their flavor. I toss everything until each piece is coated well. - Arrange the potatoes on the baking sheet. - Initial roasting and adding Parmesan cheese. - Final roasting until crispy and golden. Now, I spread the seasoned potatoes on the baking sheet. I make sure they have space between them. This helps them roast, getting crispy on the outside. I place the sheet in the oven for about 20 minutes. After that, I take it out and sprinkle Parmesan cheese on top. I put it back in the oven for another 15-20 minutes. I want the potatoes golden brown and crispy. When they are done, I take them out and sprinkle fresh parsley on top for color. You can find the full recipe in the previous section. To ensure even seasoning, always mix your ingredients well. When you combine the potatoes with olive oil and spices, make sure every piece gets coated. This step is key for flavor. Next, place the potatoes on the baking sheet with space between them. This spacing helps them roast evenly and get crispy. If they touch, they might steam instead of roast. For golden brown potatoes, roast them at a high temperature. I recommend 425°F (220°C). This heat gives the potatoes that nice crunch you want. Halfway through cooking, check them. If they look brown, they are getting close to being done. You can adjust the time based on your oven. When serving, think about the dish you use. A rustic wooden bowl adds a cozy touch. You can also use a decorative platter for a nice presentation. For garnish, sprinkle fresh parsley on top. This adds color and a fresh taste. Consider pairing these potatoes with grilled chicken or steak for a complete meal. They also go well with a fresh salad! For more detailed steps, check out the Full Recipe. {{image_4}} You can make Garlic Parmesan Roasted Potatoes even tastier. Adding fresh herbs like rosemary or thyme boosts flavor. They add a nice, earthy note. You can also infuse your potatoes with a bit of lemon zest. This gives a bright, fresh taste. Red pepper flakes can add a spicy kick. Just a pinch can make a big difference. If you want variety, try different cheeses. Cheddar or gouda can work well too. Each cheese brings a unique flavor. For a vegan option, use nutritional yeast. It has a cheesy flavor and is a great substitute for Parmesan. Cashew cheese is another tasty choice. You don’t have to stick with Yukon gold potatoes. Try red or fingerling potatoes for a new twist. They have different textures and flavors. Sweet potatoes are a fun alternative too. They add sweetness and a vibrant color to the dish. Each type of potato can change the taste and look of your meal. For the full recipe, check out the [Full Recipe]. To store leftover Garlic Parmesan Roasted Potatoes, let them cool first. Place them in an airtight container. You can keep them in the fridge for up to four days. When you want to reheat, use the oven or air fryer for best results. This keeps them crispy. Heat at 350°F (175°C) for about 10-15 minutes. Yes, you can freeze Garlic Parmesan Roasted Potatoes. To do this, let them cool completely. Spread them on a baking sheet and freeze for a few hours. Once frozen, transfer them to a freezer bag. This helps prevent them from sticking together. When you're ready to eat, thaw them overnight in the fridge. Reheat in the oven for best texture. Leftovers last about four days in the fridge. Check for signs of spoilage, like a bad smell or slimy texture. If you notice these signs, it’s best to throw them away. Enjoy your tasty Garlic Parmesan Roasted Potatoes while they're fresh! For the complete recipe, check the Full Recipe. Yes, you can make Garlic Parmesan Roasted Potatoes ahead of time. Cook the potatoes fully and let them cool. Then, place them in an airtight container. Store them in the fridge for up to three days. When you are ready to eat, reheat them in the oven. This method keeps them crispy. You can also prepare and season the potatoes a day before. Just wait to roast them until you are ready. Garlic Parmesan Roasted Potatoes pair well with many dishes. Here are some great options: - Grilled chicken - Roasted vegetables - Steak or pork chops - A fresh green salad These sides enhance the meal and add more flavor to your plate. To achieve that perfect crispy texture, follow these tips: - Use baby Yukon gold potatoes, as they roast well. - Make sure to space the potatoes on the baking sheet. This allows hot air to circulate. - Toss them in olive oil and seasonings before roasting. - Roast at a high temperature, around 425°F (220°C). - For extra crispiness, broil them for a few minutes at the end. Yes, you can use pre-cut frozen potatoes. They save time and are convenient. However, keep a few things in mind: - Thaw them first to ensure even cooking. - Adjust the cooking time since frozen potatoes may take longer. - Check for doneness by piercing them with a fork. They should be tender inside. Using frozen potatoes can still yield tasty results with this recipe. Garlic Parmesan Roasted Potatoes are simple yet delicious. You learned how to choose the right ingredients, prepare, and roast the potatoes to perfection. We discussed enhancing the flavor with various herbs and cheeses. You can store leftovers and even freeze them for later meals. Embrace this recipe and make it your own. It’s perfect for any meal. Enjoy the crispy goodness with your favorite dishes!](https://joymealplan.com/wp-content/uploads/2025/07/f9349f8b-67c5-4d5e-a46e-da791f5e9156-768x768.webp)
![- 1 cup fresh spinach, finely chopped - 1 cup canned artichoke hearts, well-drained and chopped - 1/2 cup cream cheese, softened to room temperature - 1/2 cup sour cream - 1/2 cup mozzarella cheese, freshly shredded - 1/4 cup Parmesan cheese, finely grated - 2 cloves garlic, minced - 1 teaspoon fresh lemon juice - Salt and freshly ground black pepper to taste - 1/4 teaspoon red pepper flakes (optional) - Tortilla chips or freshly sliced baguette for serving The ingredients for creamy spinach artichoke dip come together easily. You can choose fresh or canned artichokes. I prefer fresh spinach for flavor, but both work well. Cream cheese gives the dip its base, making every bite rich and smooth. The sour cream adds tanginess. For that cheesy pull, I use mozzarella. Parmesan adds a salty bite that brightens the whole dish. I always add fresh garlic for depth. A splash of lemon juice lifts the flavors, making them pop. Salt and pepper balance the dish. If you like heat, use red pepper flakes. They add a nice kick without overwhelming the flavors. Serve with tortilla chips or a sliced baguette for dipping. Each bite of this dip is a creamy, cheesy delight. For the full recipe, check the section above. Preheating your oven to 350°F (175°C) is key for this dip. This step makes sure your dip cooks evenly. You want it to bubble and get a nice golden color. Skipping this step can lead to an uneven bake. In a large bowl, mix together the cream cheese, sour cream, mozzarella, and Parmesan. Use a spatula or a hand mixer to blend until smooth. This creates a rich and creamy base. The cream cheese must be soft for easy mixing. Make sure there are no lumps. A smooth texture makes the dip great for dipping. Next, gently fold in the chopped spinach and artichoke hearts. Add in the minced garlic, lemon juice, salt, pepper, and red pepper flakes if you like some heat. Stir carefully to mix everything well. This is where the magic happens. The flavors of spinach and artichokes blend to create a delicious combination. Now, spoon the mixture into a baking dish. Spread it evenly to create a uniform layer. Place the baking dish in the preheated oven and bake for 25 to 30 minutes. You want to see bubbling around the edges and a light golden top. This means your dip is ready. Once baked, let it cool for a few minutes before serving. This short wait allows the flavors to meld beautifully, making it taste even better. For the Full Recipe, visit the provided link. To get that smooth and creamy dip, mix your cheeses well. Start with softened cream cheese and sour cream. This helps avoid lumps. Use a spatula or hand mixer to blend everything until it's nice and smooth. When you add spinach and artichokes, fold them in gently. This keeps the dip fluffy and creamy. Want to kick up the flavor? Add more garlic! You can use three or four cloves if you love garlic. Fresh herbs like basil or parsley also boost taste. A sprinkle of cayenne pepper adds a fun kick. Experiment with Italian seasoning for a unique twist. Each addition brings new flavor layers to your dip. Serve your dip warm for the best experience. When it comes out of the oven, let it cool for a few minutes. This allows the flavors to blend well. Serve it hot with tortilla chips or sliced baguette. The warmth makes it extra inviting and tasty. For a lovely touch, sprinkle some extra Parmesan on top before serving. {{image_4}} You can make this dip lighter by swapping some ingredients. Use low-fat cream cheese and sour cream for a healthier twist. Greek yogurt is another great choice. It adds creaminess without the extra fat. You won't miss the full-fat versions. Plus, you still get that rich taste you love. Want to change up the flavor? Try adding different cheeses. Cheddar or gouda can give it a fun kick. You can also mix in spices like cumin or paprika. These simple tweaks can make your dip unique. Don’t be afraid to experiment. Each time, you can create a new favorite. For a vegan version, replace dairy products with plant-based alternatives. Use cashew cream or tofu for the cream cheese. You can also use coconut yogurt instead of sour cream. Nutritional yeast gives it a cheesy flavor. These swaps keep the dish creamy while being vegan-friendly. Enjoy delicious flavors without the dairy! For the full recipe, check out [Full Recipe]. Store leftover dip in an airtight container. This keeps the dip fresh and tasty. Place it in the fridge within two hours of serving. For longer storage, you can freeze it. Use a freezer-safe container and label it with the date. Make sure to leave some space for expansion when freezing. To reheat your dip, use an oven or a microwave. In the oven, preheat to 350°F (175°C). Place the dip in a baking dish and cover it with foil. Heat for about 15-20 minutes, or until warm. In the microwave, heat in short bursts of 30 seconds, stirring in between. This way, you keep the dip creamy and avoid a rubbery texture. The dip lasts about 3-4 days in the fridge. Make sure it is sealed well. If frozen, it can last up to 2 months. To enjoy the best flavor, eat it within this time. Always check for any off smell or change in texture before eating. Yes, you can make this dip ahead of time! Prepare the dip and store it in the fridge. Use an airtight container to keep it fresh. You can make it a day before your event. Just remember to bake it right before serving. If you want to reheat it, warm it in the oven until it's hot and bubbly. This dip pairs well with many snacks. Try serving it with: - Tortilla chips - Fresh vegetable sticks like carrots and celery - Sliced baguette - Pita chips These options add crunch and freshness. They also bring out the creamy flavor of the dip. You can bake this dip in a slow cooker! First, mix all the ingredients as usual. Then, place the mixture in the slow cooker. Cook it on low for about 2 to 3 hours. Stir it occasionally to keep it smooth. This method makes the dip perfect for parties, as it stays warm and ready to enjoy. For the full recipe, check out the complete guide above. This creamy spinach artichoke dip is easy to make and fun to share. We covered the key ingredients and detailed step-by-step instructions to guide you. Remember to adjust flavors and textures to your liking, and don’t hesitate to explore variations. Whether making it healthier or trying vegan options, there’s a version for everyone. Store any leftovers properly, and reheat to enjoy it warm again. With this recipe, you are set for tasty gatherings and comfy nights in. Enjoy your delicious creation!](https://joymealplan.com/wp-content/uploads/2025/07/4577691d-75b4-487d-8cf6-776305dcf758-768x768.webp)

![To make Buffalo Cauliflower Bites, you'll need the following ingredients. Each item plays a key role in creating that crispy and flavorful snack we all love. - 1 large head of cauliflower, cut into bite-sized florets - 1 cup all-purpose flour - 1 cup almond milk (or your choice of non-dairy milk) - 1 teaspoon garlic powder - 1 teaspoon onion powder - 1 teaspoon smoked paprika - 1/2 teaspoon salt - 1/2 teaspoon black pepper - 1 cup buffalo sauce (store-bought or homemade) - 2 tablespoons coconut oil, melted When choosing your ingredients, I suggest using fresh cauliflower. It gives the best texture and taste. For flour, any brand works, but all-purpose is great for a crispy batter. Almond milk adds a nice touch, but feel free to use your favorite non-dairy option. For buffalo sauce, you can buy it or make your own. Homemade sauce allows you to adjust the heat. Using high-quality spices, like smoked paprika, can elevate your dish. I recommend checking for freshness on all spices. This ensures your bites are packed with flavor. If you want a unique twist, try different sauces or spices. You can even add a little more garlic powder if you love that flavor. Now that you have your list ready, let's move on to the next steps in the recipe! 1. Start by preheating your oven to 450°F (230°C). This heat will make the cauliflower crispy. Line a baking sheet with parchment paper. This step helps with easy clean-up. 2. In a large bowl, combine the all-purpose flour, almond milk, garlic powder, onion powder, smoked paprika, salt, and black pepper. Use a whisk to mix until you have a smooth batter. The batter should not be too thick or too runny. 3. Now, take each cauliflower floret and dip it into the batter. Make sure it is coated well on all sides. Place the battered florets on the baking sheet in a single layer. Repeat until all florets are coated. 1. Bake the cauliflower in the oven for 20 minutes. This will make the florets tender. The batter will also start to get crispy. 2. While the cauliflower bakes, mix the buffalo sauce and melted coconut oil in another bowl. Stir well to combine. This sauce will give the bites their famous flavor. 3. After 20 minutes, take the baking sheet out of the oven. Carefully toss the baked cauliflower in the buffalo sauce mixture. Make sure each piece is coated evenly. 4. Spread the coated florets back onto the baking sheet. Return them to the oven for another 10 to 15 minutes. Keep an eye on them for your desired crispiness. 5. Once they are baked to your liking, take them out of the oven. Let the cauliflower bites cool for a few minutes before serving. This resting time helps the flavors settle. Now you're ready to enjoy these crispy and flavorful buffalo cauliflower bites! Check out the Full Recipe for more details. To make the batter just right, start with the flour. Use all-purpose flour for a good base. Then mix in your almond milk slowly. This helps you see the thickness. You want it to be smooth, not too thick or thin. A good batter will stick well to the cauliflower. For crispier bites, try a few tricks. First, bake the cauliflower for a little longer. Keep an eye on them; you want them golden brown. Another tip is to space the florets well on the baking sheet. This lets hot air flow around and makes them crispier. If you want an extra crunch, you can sprinkle some breadcrumbs before the final bake. To add more flavor, consider extra spices. A pinch of cayenne pepper gives a nice kick. You might also enjoy adding some cumin for a smoky taste. Mixing in these spices can create new flavors that excite your taste buds. When it comes to dipping, ranch or blue cheese dressing works great. If you like a sweeter touch, try honey mustard. You can even mix some sriracha with your ranch for a spicy twist. These sauces can make your buffalo cauliflower bites even more tasty. For the best experience, serve your bites hot and fresh! For the full recipe, check out the detailed steps above. {{image_4}} You have options for cooking buffalo cauliflower bites. The air fryer is a great choice. It can make the bites crispy without much oil. Here’s how to do it: 1. Preheat your air fryer to 400°F (200°C). 2. Coat the cauliflower florets with the batter just like in the oven method. 3. Place the florets in the air fryer basket. Make sure they are in a single layer. 4. Cook them for about 12-15 minutes, shaking the basket halfway through for even cooking. Grilling is another fun option. It adds a smoky flavor that pairs well with buffalo sauce. Here’s how to grill them: 1. Preheat your grill to medium-high heat. 2. Use skewers to hold the cauliflower florets. This makes flipping easier. 3. Brush the florets with oil and sprinkle with salt. 4. Grill for about 10-12 minutes, turning them until they are charred and tender. You can spice things up with sauce variations. If you love heat, add more hot sauce or cayenne pepper to your buffalo sauce. This will give your bites an extra kick. You can also try different sauces for unique flavors. A honey mustard sauce offers sweetness that balances the heat. You can mix honey, mustard, and a dash of hot sauce for a tasty alternative. Another option is a barbecue sauce for a smoky flavor. Simply toss your baked cauliflower bites in the sauce after baking. For more ideas, check the [Full Recipe]. These variations keep things interesting and let you customize your snack for any occasion. To keep your buffalo cauliflower bites fresh, store them in an airtight container. Place a paper towel inside to absorb moisture. This helps maintain their crispy texture. You can store them in the fridge for up to three days. When it’s time to reheat, avoid using the microwave. Instead, use the oven. Preheat it to 350°F (175°C). Spread the bites on a baking sheet. Heat for about 10 minutes, or until they are warm and crispy again. You can freeze these bites, but there are two ways to do it. 1. Freezing uncooked bites: Prepare the cauliflower bites, but do not bake them. Place the coated florets on a baking sheet and freeze them. Once frozen, transfer them to a freezer bag. They will last for about three months. 2. Freezing cooked bites: If you have leftover baked bites, let them cool completely. Then, store them in an airtight container or freezer bag. They can also last for about three months. To thaw, move them to the fridge overnight. For reheating, follow the same oven method as before. Bake at 350°F (175°C) for about 15 minutes, or until heated through. This keeps them crispy and tasty. You can serve buffalo cauliflower bites with many great sides. Some popular options include: - Ranch dressing - Blue cheese dressing - Celery sticks - Carrot sticks - Fresh parsley for garnish These options add crunch and flavor. They also make a nice contrast to the spicy bites. Yes, you can make this recipe gluten-free. Just replace the all-purpose flour with gluten-free flour. Almond flour or chickpea flour works well. The batter will still coat the cauliflower well and create that crispy texture. You will know the bites are done when they are golden brown. They should have a crispy texture. Check them after 20 minutes of baking and then again after the second bake. A fork should easily pierce the cauliflower. Absolutely! You can use other vegetables like: - Broccoli florets - Brussels sprouts - Zucchini slices These veggies will absorb the buffalo sauce flavor too. Just adjust the baking time as needed. Enjoy experimenting! For the full recipe, click here: [Full Recipe]. In this post, you learned how to make buffalo cauliflower bites. We covered each ingredient, from measurements to brand suggestions. The step-by-step instructions helped you prepare and bake for crispiness. Tips for enhancing flavor and storing leftovers were also shared. Remember, you can also try cooking methods like air frying or grilling. Feel free to mix up sauces for new tastes. Enjoy your cooking adventure, and have fun experimenting!](https://joymealplan.com/wp-content/uploads/2025/07/3e0c7ac8-f5c4-4624-a75b-d39bdd09bf1f-768x768.webp)