Skip to content
About
Contact
Cookie Policy
Copyright Policy
Disclaimer
Search
Home
Dinner
Appetizer
Desserts
Drinks
About
Contact
Privacy Policy
Toggle Menu
Home
/
Appetizer
- Page 14
Appetizer
Fresh Tomato Bruschetta Flavorful and Easy Recipe
Spinach Strawberry Salad Fresh and Flavorful Delight
Whipped Feta Dip Creamy and Flavorful Delight
Chili Lime Grilled Shrimp Flavorful and Simple Recipe
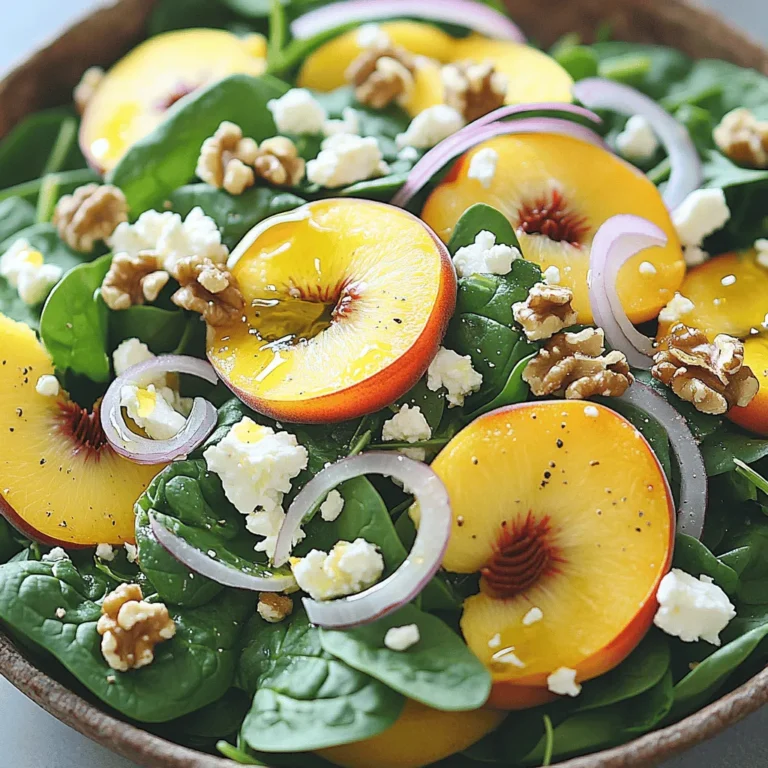
Peach Spinach Salad Refreshing and Simple Delight
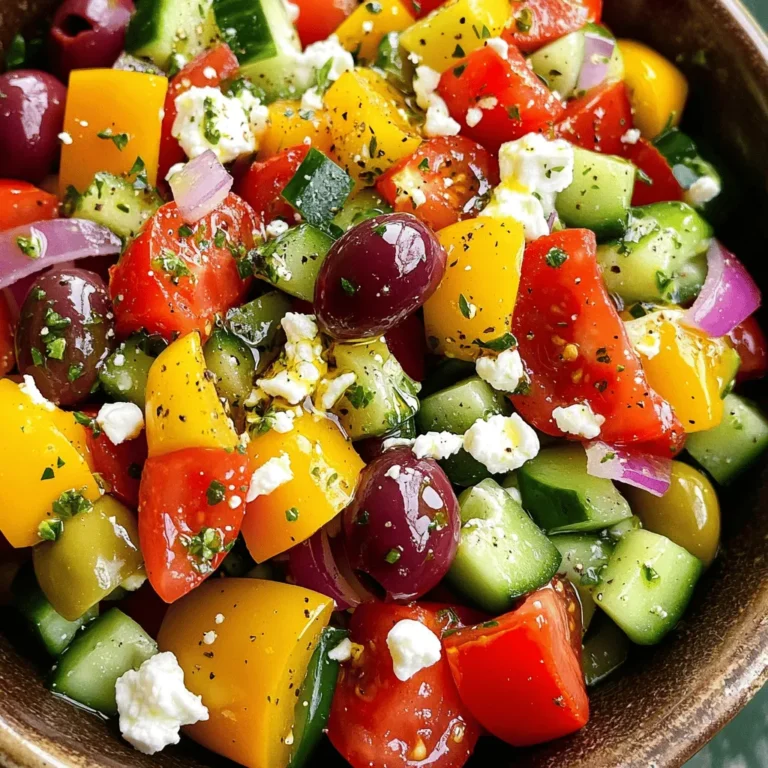
Easy Greek Salad Fresh and Flavorful Recipe
Crispy Air Fryer Chickpeas Perfectly Seasoned Snack
Lemon Herb Grilled Shrimp Flavorful and Simple Recipe
Buffalo Chicken Lettuce Wraps Flavorful and Healthy Snack
Spicy Thai Noodle Salad Flavorful and Fresh Delight
Page navigation
Previous Page
Previous
1
…
12
13
14
15
16
…
25
Next Page
Next
Home
Dinner
Appetizer
Desserts
Drinks
About
Contact
Privacy Policy
Toggle Menu Close
Search for:
Search

. To store unused tomato mixture, place it in an airtight container. This keeps the mix fresh for up to two days. If you have leftover bruschetta, avoid adding toppings until you're ready to serve. This prevents the bread from getting soggy. For the bread, store it in a paper bag. This helps maintain its crispness. Avoid plastic bags, as they trap moisture and make the bread soft. If you want to keep the bread fresh longer, freeze it. Just slice the bread before freezing for easy use later. You can freeze the tomato mixture and the bread separately. This helps keep each part fresh. To freeze the tomato mix, pour it into a freezer-safe bag. Remove excess air before sealing. When you're ready to eat, thaw the mixture overnight in the fridge. For the bread, place it in the oven at 350°F (175°C) for about 10 minutes to restore its crunch. Enjoy your bruschetta within three days for the best taste. Over time, the tomatoes may lose their fresh flavor. Look for signs of spoilage like discoloration or an off smell. If the bread feels soft or stale, it’s time to toss it. By following these simple storage tips, you can extend the life of your delicious bruschetta. Enjoy it fresh and vibrant every time! The best breads for bruschetta are Italian baguette or ciabatta. Both have a nice crust that crisps up well. You can also use sourdough for a tangy flavor. Choose a bread that is sturdy enough to hold the toppings. Yes! You can prepare the tomato mix a few hours ahead. Just store it in the fridge. This lets the flavors blend. Toast the bread right before serving for the best crunch. Keep the bread and topping separate until you serve. To serve more people, double the recipe. Use multiple loaves of bread. You can also make several batches of the tomato mix. It’s easy to scale up. Just remember to toast the bread in batches to keep it crisp. Bruschetta is best served fresh. The toasted bread should be warm. The tomato mix can be at room temperature. This combo gives a nice contrast. Serve it right after you assemble it for the best taste. Bruschetta pairs well with simple sides. Think of a light salad or soup. A fresh arugula salad works great. You can also serve it with olives or cheese. These add nice flavors and textures to your meal. In this post, we explored making bruschetta from fresh ingredients like ripe tomatoes, basil, and garlic. You learned how to prepare these components and create the perfect toast. We also covered tips for storage and common mistakes to avoid. Finally, I shared variations for different seasons and diets. Bruschetta is simple, fun, and a delightful treat. Enjoy experimenting and finding your favorite flavors!](https://joymealplan.com/wp-content/uploads/2025/07/10355497-7bd2-4922-b413-5484ea4e8a3f-768x768.webp)

![To make whipped feta dip, you need some key ingredients: - 1 cup crumbled feta cheese - 1/2 cup softened cream cheese - 1/4 cup creamy Greek yogurt - 2 tablespoons extra virgin olive oil - 1 tablespoon fresh lemon juice - 2 cloves garlic, minced finely - 1 teaspoon fresh thyme leaves (or 1/2 teaspoon dried thyme) - Salt and black pepper to taste These ingredients create a smooth and creamy base. The feta gives it a salty taste. The cream cheese and yogurt add richness. Olive oil adds a nice touch of flavor. Lemon juice brightens the dip, while garlic and thyme add depth. Toppings can elevate your dip and add color. Here are some great options: - Halved cherry tomatoes - Pitted olives - A sprinkle of fresh herbs Adding these toppings not only enhances the taste but also makes your dip look beautiful. Fresh herbs like parsley or basil pair well with feta's flavor. You can customize this dip with some easy swaps. If you want a lighter dip, use low-fat cream cheese or yogurt. For a vegan version, try using cashew cream instead of cream cheese. You can also use fresh herbs like oregano or dill in place of thyme. These changes let you enjoy the dip while fitting your taste or dietary needs. For the full recipe, you can refer to the recipe section above. Start by gathering your cheese ingredients. You need crumbled feta, cream cheese, and Greek yogurt. In a large bowl, mix them together. Make sure the cream cheese is soft. This helps it blend well. Use a spatula to combine them first. This step makes blending easier later. Next, grab your electric mixer or food processor. Blend the cheese mixture on medium speed. This should take about 2-3 minutes. You want it to be smooth and creamy. If you see lumps, keep blending. The goal is to make it fluffy. After blending, add olive oil, lemon juice, minced garlic, and thyme. Sprinkle in some salt and pepper. Blend again until everything is mixed well. Taste your dip and adjust seasoning if needed. When ready, transfer it to a nice bowl. Make a small well in the center and drizzle olive oil. For a pretty touch, add halved cherry tomatoes, olives, or fresh herbs on top. Serve it with pita chips or fresh veggies. Enjoy this creamy delight! For the full recipe, check out the Whipped Feta Delight Dip. To get the best texture, start with room-temperature cream cheese. It mixes better. Use a mixer or food processor for a smooth finish. Blend the cheeses for 2-3 minutes. This gives you a light and fluffy dip. If you want it creamier, add more yogurt or olive oil. The key to great flavor lies in your seasonings. Fresh garlic adds a strong kick. I love using fresh thyme. It brings a nice herbal touch. A squeeze of lemon juice brightens the dip. Taste as you go; adjust salt and pepper to your liking. If you want a little heat, add a pinch of red pepper flakes. Serve your whipped feta dip with crispy pita chips. Fresh veggies like carrots and cucumbers are great too. For a fun twist, use crusty bread. Garnish with cherry tomatoes or olives for color. This adds a nice pop to your dish. Explore different serving bowls to make it look fancy. You can find the Full Recipe above for more details. {{image_4}} To create a Mediterranean twist, add sun-dried tomatoes and black olives. These ingredients bring a burst of flavor that pairs perfectly with feta. You might also include fresh basil or mint for a refreshing note. Serve this dip with warm pita bread or crunchy veggies for a delightful snack. If you love heat, consider adding red pepper flakes or diced jalapeños. This will give your dip a fiery kick. You can also mix in a splash of hot sauce for an extra layer of flavor. Try serving with spicy tortilla chips or crispy celery sticks for a fun twist. For a vegan version, swap the feta and cream cheese for silken tofu and nutritional yeast. Blend them together with olive oil and lemon juice. This mix creates a creamy base that tastes great. Add your favorite herbs and spices for added flavor. Serve with fresh veggies for a healthy snack. Explore the [Full Recipe] to make your own whipped feta dip and customize it with these variations! To store whipped feta dip, place it in an airtight container. This keeps moisture out and flavors in. Make sure to press plastic wrap directly onto the dip before sealing the container. This extra layer helps prevent air from changing the dip's taste. You can enjoy whipped feta dip cold or warm. If you prefer it warm, gently heat it in the microwave. Start with 15 seconds, stir, and then heat in short bursts. Be careful not to overheat; you want it creamy, not hot. Whipped feta dip lasts about 4 to 5 days in the fridge. Check for any off odors or mold before using it. If it smells sour or looks different, toss it out. Freshness is key for this tasty dip! The best way to serve whipped feta dip is with a variety of dippers. I love using crispy pita chips, fresh veggies, or crusty bread. You can also pair it with crackers for added crunch. Place the dip in a nice bowl and drizzle some olive oil on top. Add colorful toppings like cherry tomatoes or olives for a pop of color. This makes the dip look great and taste even better. Yes, you can make whipped feta dip ahead of time. It stays fresh in the fridge for up to three days. Just store it in an airtight container. When you’re ready to serve, give it a quick stir. This keeps it creamy and smooth. If it thickens, add a little olive oil or yogurt to loosen it up. This way, you save time when guests arrive. If your dip is too salty, don't worry. You can fix it! Add a little more cream cheese or Greek yogurt to balance the salt. Blend it well to mix. You can also add a splash of lemon juice. This brings freshness and brightens the flavor. If you’re in a pinch, a pinch of sugar can help too. Taste as you go, so you get the flavor just right. We explored all about whipped feta dip, from essential ingredients to fun variations. You learned how to create a creamy dip that impresses friends. Remember, you can customize toppings and even make vegan options. Proper storage keeps your dip fresh and tasty. With these tips, whipping up this dish is easy and fun. Enjoy sharing your whipped feta dip at your next gathering. Trust me, it’s a crowd-pleaser!](https://joymealplan.com/wp-content/uploads/2025/07/35a48388-1c52-4076-af09-d3ade9d891c4-768x768.webp)
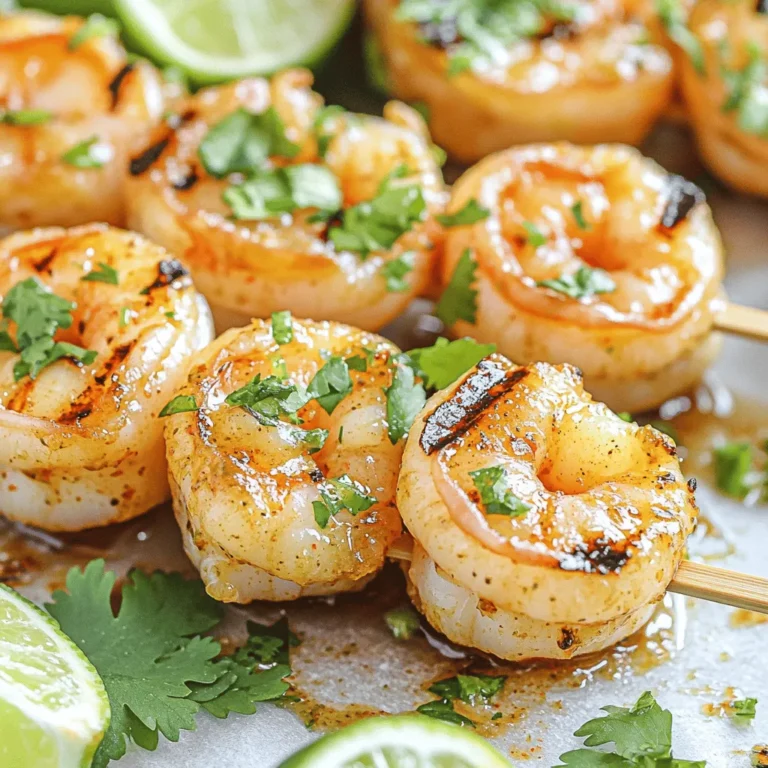

![- 1 pound large shrimp, peeled and deveined - 3 tablespoons extra virgin olive oil - Zest of 1 medium-sized lemon - 2 tablespoons freshly squeezed lemon juice - 2 cloves garlic, finely minced - 1 tablespoon fresh parsley, finely chopped - 1 tablespoon fresh dill, finely chopped - 1 teaspoon smoked paprika - Salt and freshly ground black pepper, to taste - 8 wooden skewers (soaked in water for at least 30 minutes) Using fresh ingredients makes a big difference in taste. The shrimp brings a sweet flavor, while lemon adds brightness. Olive oil gives a smooth touch that ties it all together. Fresh herbs like parsley and dill add aroma and depth. Garlic gives a nice kick, enhancing the taste. When you prepare the skewers, ensure your shrimp are spread out. This helps them cook evenly. The smoked paprika adds a hint of warmth that makes every bite special. Salt and pepper are key for balancing flavors. Soaking the wooden skewers prevents them from burning on the grill. For the complete recipe, check out the [Full Recipe]. It guides you step by step to make this dish shine. Enjoy the process and get ready for a tasty meal! In a mixing bowl, combine the following ingredients for a tasty marinade: - 3 tablespoons extra virgin olive oil - Zest of 1 medium-sized lemon - 2 tablespoons freshly squeezed lemon juice - 2 cloves garlic, finely minced - 1 tablespoon fresh parsley, finely chopped - 1 tablespoon fresh dill, finely chopped - 1 teaspoon smoked paprika - Salt and freshly ground black pepper, to taste Whisk these together until they blend well. This mix adds great flavor to the shrimp. Now, add the shrimp to your marinade. Make sure each shrimp is coated in the mix. Cover the bowl and place it in the fridge for 20-30 minutes. This time helps the shrimp soak up all the tasty flavors. While the shrimp marinates, preheat your grill to medium-high heat. If you use a grill pan, heat it on the stovetop until hot. Next, take the soaked wooden skewers and carefully thread the marinated shrimp onto them. Aim for about 4-5 shrimp per skewer. Once ready, place the skewers on the grill. Grill the shrimp for 2-3 minutes on each side. They should turn a lovely pink color and become opaque when they are done. Keep an eye on them; overcooking can make them rubbery. After grilling, remove the skewers and let them rest for a few minutes. This helps the shrimp stay juicy. For the full recipe, be sure to check the detailed instructions. To get the best grilled shrimp, focus on the right cooking time and temperature. Preheat your grill to medium-high heat. This temperature is key for juicy shrimp. Cook the shrimp for 2-3 minutes on each side. They will turn pink and opaque when done. Avoid cooking them too long. Overcooked shrimp get tough and rubbery. Marinating shrimp is a great way to boost flavor. I suggest letting them soak for 20-30 minutes. This time helps the shrimp absorb the tasty herbs and lemon. For even more flavor, try adding a splash of hot sauce or a dash of cayenne pepper to the marinade. This small change can add a nice kick. Serve your Lemon Herb Grilled Shrimp with fresh sides. Grilled vegetables are a perfect match. Try zucchini, bell peppers, or asparagus. A crisp green salad also pairs well. Toss in some avocado or nuts for extra texture. You can also serve the shrimp over rice or quinoa for a filling meal. For a refreshing touch, add lemon wedges and a sprinkle of herbs when serving. {{image_4}} You can change the herbs in this recipe. Instead of parsley and dill, try basil or cilantro. Each herb brings a new taste. Basil gives a sweet flavor, while cilantro adds a fresh one. You can mix and match to find your favorite. Experimenting with herbs makes the dish fun and unique. Don't have a grill? No problem! You can cook shrimp in the oven or on the stovetop. For oven broiling, preheat your broiler. Place the skewers on a baking sheet and broil for about 2-3 minutes per side. If using a stovetop grill pan, heat it over medium-high heat. Cook the shrimp as you would on an outdoor grill. Both methods will give you tasty results. Want to make this dish gluten-free? Simply check your smoked paprika for gluten. It's usually safe, but some brands may add gluten. For a low-carb option, skip any bread sides. Serve the shrimp with fresh veggies or a salad instead. This keeps your meal light and healthy. To keep leftover grilled shrimp fresh, place them in an airtight container. Make sure to cool them down first. Refrigerate them within two hours of cooking. Properly stored, they last for up to three days. If you want to enjoy them later, don’t forget to label the container. When it's time to reheat, don’t use the microwave if you can avoid it. Instead, heat a skillet over medium heat. Add a bit of olive oil to keep shrimp moist. Cook for about 2-3 minutes until warm. You can also reheat them on the grill for extra flavor. Just watch closely so they don’t overcook and become rubbery. Freezing grilled shrimp is a great way to save them for later. First, let them cool completely. Then, place them in a freezer-safe bag. Try to remove as much air as possible to prevent freezer burn. These shrimp can last for up to three months in the freezer. When you’re ready to eat, thaw them in the fridge overnight or use cold water for a quicker method. Shrimp cook quickly. Look for a bright pink color and opaque flesh. The shrimp should curl into a "C" shape. If they curl tightly into an "O," they may be overcooked. To avoid this, cook shrimp for just 2-3 minutes per side on a hot grill. Always check a few pieces to ensure even cooking. Yes, you can use frozen shrimp! Just remember to thaw them first. The best way is to place them in the fridge overnight. If you're in a hurry, run them under cold water for about 10-15 minutes. Once thawed, pat them dry with a paper towel. This helps the marinade stick better. You can use many herbs! Here are some great options: - Basil - Cilantro - Chives - Thyme - Oregano - Tarragon These herbs add unique flavors to your shrimp. Feel free to mix and match to find your favorite blend! For more ideas, check the Full Recipe for a guide on how to experiment with different herbs. In this article, we covered everything you need for Lemon Herb Grilled Shrimp. You learned about key ingredients, flavor enhancers, and step-by-step cooking instructions. We also explored tips to make the shrimp perfect and suggested delicious side dishes. Remember, these shrimp are versatile. You can adjust flavors or try different cooking methods. Enjoy grilling and make this dish your own. Happy cooking!](https://joymealplan.com/wp-content/uploads/2025/07/b27d11be-6f1b-4945-85cc-7eac089af2f5-768x768.webp)
. When making buffalo chicken lettuce wraps, choose your buffalo sauce wisely. Some sauces are mild, while others pack a punch. If you like heat, go for a hotter sauce. If you prefer less spice, choose a milder option. You can also add extra spices. A pinch of cayenne or red pepper flakes boosts the heat without changing the sauce. To make your wraps even better, think about toppings. Shredded carrots add crunch and color. You can also try diced celery for extra freshness. Blue cheese crumbles add a creamy touch. If you want a sauce, ranch or blue cheese dressing pairs well. They balance the heat of the buffalo sauce and add creaminess. Serve your wraps in a fun way. Use a large platter to hold the wraps. Surround them with extra lettuce leaves. This lets guests make their own wraps. Add a small bowl of dressing on the side for dipping. Use bright garnishes, like chopped green onions, to make the dish pop. These tips make your wraps look as good as they taste! {{image_4}} You can switch up the protein in these wraps. Ground chicken or turkey works well. Just cook it in the same way as the diced chicken. For a vegetarian twist, try using plant-based proteins. Crumbled tofu or tempeh can soak up the buffalo sauce nicely. These options keep the wraps healthy and flavorful. If you need gluten-free options, check your buffalo sauce. Many brands are gluten-free. For a dairy-free option, skip the blue cheese. You can use a vegan ranch dressing instead. It brings a nice creaminess without the dairy. These swaps let everyone enjoy the wraps. Pair your wraps with fresh veggies, like carrot sticks or cucumber slices. These sides add crunch and color. You might also serve chips for a fun crunch. For drinks, refreshing iced tea or lemonade works well. These options make a great meal or snack. If you want the full recipe, you can find it here: [Full Recipe] To store your buffalo chicken lettuce wraps, place them in an airtight container. This keeps them fresh and tasty. Try to refrigerate them within two hours after cooking. They will stay good for about 3 to 4 days in the fridge. When reheating, I suggest using the stovetop or microwave. For the stovetop, warm them in a skillet over low heat. This helps keep the wraps from getting soggy. If using a microwave, heat on medium power for short bursts. Do not reheat more than once, as this can affect the flavor and texture. Yes, you can freeze buffalo chicken wraps! To freeze, place the chicken filling in a freezer-safe bag or container. Remove as much air as possible. You can freeze them for up to three months. When ready to eat, thaw the filling overnight in the fridge. Reheat it and serve in fresh lettuce leaves for the best taste. The spice level depends on the buffalo sauce you choose. You can find mild, medium, or hot sauces. If you like heat, pick a hot sauce. For a mild kick, go for a mild sauce. You can also mix sauces to control the heat. If you want to tone down the spice, add extra toppings like ranch dressing or blue cheese. These cool flavors balance the heat well. Yes, you can prepare the chicken and other ingredients in advance. Cook the chicken and store it in the fridge for up to three days. You can also wash and dry the lettuce leaves ahead of time. Keep the chicken and lettuce in separate containers to maintain freshness. When you’re ready to eat, just assemble the wraps. This makes for a quick and healthy snack. If you want an alternative to lettuce, try tortillas or collard greens. Tortillas work well if you prefer a more traditional wrap. Collard greens are sturdy and add a nice flavor. You can also use rice paper for a fun twist. Each option brings its own taste and texture, so choose what you like best. For the complete recipe, check out the Buffalo Bliss Chicken Lettuce Wraps full recipe for easy access. Buffalo chicken lettuce wraps are a fun and tasty dish. We reviewed key ingredients, cooking steps, and tips for customization. You can mix flavors, adjust spice, and even swap proteins to suit your needs. These wraps are great for meals and snacks. Remember to store leftovers properly for later enjoyment. I hope this guide helps you create delicious wraps for friends or family. Enjoy experimenting with your own twists!](https://joymealplan.com/wp-content/uploads/2025/07/5600c779-5454-4d90-be3f-06d6a192c4a1-768x768.webp)
![- 8 oz rice noodles - 1 red bell pepper, thinly sliced - 1 cup shredded carrots - 1 cucumber, julienned - 1 cup bean sprouts - 1/4 cup fresh cilantro, roughly chopped - 1/4 cup roasted peanuts, coarsely crushed - 2 green onions, sliced - 3 tablespoons fish sauce (or vegetarian alternative, soy sauce) - 2 tablespoons freshly squeezed lime juice - 1 tablespoon brown sugar - 1 tablespoon toasted sesame oil - 1–2 tablespoons sriracha (adjust based on heat preference) This salad is light yet filling. It has about 250 calories per serving. The rice noodles provide carbs for energy. Fresh veggies add fiber, vitamins, and minerals. Peanuts offer healthy fats and protein. The dressing gives a zing with fish sauce and lime. You can swap fish sauce for soy sauce if needed. Eating this salad supports good health due to its fresh ingredients. The mix of flavors and textures makes it a delight. Enjoy every bite! Check out the Full Recipe for full details. Start by boiling water in a pot. Add 8 oz of rice noodles to the water. Cook them as per the package instructions. Once the noodles soften, drain them. Rinsing with cold water is key. This stops cooking and keeps them from getting sticky. Set the noodles aside until you need them. Grab a sharp knife and a cutting board. Thinly slice the red bell pepper. Shred the carrots with a grater. Julienne the cucumber into thin strips. Add 1 cup of bean sprouts. In a large bowl, mix all the veggies. Toss them gently to combine. This makes sure each vegetable is evenly mixed. In a smaller bowl, mix the dressing. Whisk together 3 tablespoons of fish sauce, 2 tablespoons of lime juice, and 1 tablespoon of brown sugar. Add 1 tablespoon of toasted sesame oil. For spice, include 1–2 tablespoons of sriracha. Taste the dressing and adjust as needed. You can make it sweeter or spicier based on your choice. Now, add the cooled rice noodles to the big bowl of vegetables. Pour the dressing over the top. Use gentle tossing motions to mix everything. This ensures each noodle and veggie gets coated with the tasty dressing. Transfer the salad to a colorful serving platter. Top it off with crushed roasted peanuts for crunch. Sprinkle fresh cilantro on top for flavor and color. For a nice touch, add lime wedges on the side. This salad looks great and tastes even better! Check the Full Recipe for more details. To boost flavor, add fresh lime juice. Lime brings great brightness. You can also add more herbs. Fresh mint or basil works well. If you want it spicier, adjust the sriracha. Start with one tablespoon and taste. Add more if you like heat! If you need gluten-free, choose rice noodles. They are a great alternative. For sauces, use tamari instead of soy sauce. If you want to skip fish sauce, use soy sauce or coconut aminos. These options keep the taste fresh. To make this salad in advance, cook the noodles and chop the veggies. Store ingredients separately in the fridge. This keeps everything crisp. When ready, mix them with dressing just before serving. This way, the salad tastes fresh. {{image_4}} You can add shrimp, chicken, or tofu to your Spicy Thai Noodle Salad. Each protein brings its own flavor and texture. For shrimp, cook them in a hot pan for just a few minutes until they turn pink. Use about 8 oz for a nice boost of protein. If chicken is your choice, grill or sauté about 1 cup of diced chicken until cooked through. For a plant-based option, use firm tofu. Cube about 8 oz and pan-fry until golden. Each of these options enhances the salad and makes it more filling. To make a vegan version, simply eliminate fish sauce and any meat. Replace fish sauce with soy sauce or a mix of soy and lime juice. This keeps the flavor rich while staying plant-based. You can add more vegetables like snap peas or radishes for crunch. Avocado is also a great addition for creaminess. Feel free to mix and match veggies based on what you love or have at home. Change your salad with the seasons by using fresh, local veggies. In spring, consider adding asparagus or peas. Summer is perfect for ripe tomatoes or zucchini. Fall brings hearty options like shredded Brussels sprouts or roasted squash. In winter, you can add kale or root vegetables. Adapting your recipe with seasonal ingredients keeps it exciting and fresh all year round. Explore new flavors and textures with each season. You can check the [Full Recipe] for more ideas to elevate your dish! To store leftovers properly, place the salad in an airtight container. Make sure to keep the salad separate from the dressing if you plan to eat it later. This helps maintain the crunch of the veggies. When stored this way, the salad lasts about three days in the fridge. If you mix the dressing in, aim to eat it within two days for the best taste. You can freeze the Spicy Thai Noodle Salad, but it's not ideal. Freezing can change the texture of the vegetables. If you decide to freeze it, use a freezer-safe container. Thaw the salad in the fridge overnight for best results. To serve, let it sit at room temperature for about 15 minutes after thawing. This helps bring back some freshness. To reheat the salad, use a microwave at low power. Heat it in 30-second intervals, stirring in between. This method keeps the noodles and veggies from becoming mushy. If you prefer it cold, serve it straight from the fridge. A squeeze of fresh lime juice can brighten the flavors after refrigeration. Preparing Spicy Thai Noodle Salad takes about 15 minutes. Cooking the rice noodles adds another 10 minutes. In total, you spend around 25 minutes. This recipe yields 4 servings, perfect for sharing or meal prep. Yes, you can make this salad ahead of time. I suggest preparing the vegetables and dressing first. Store them in separate containers. When you're ready to serve, combine everything. This keeps the salad fresh and crisp. If you need a substitute for fish sauce, soy sauce works well. It’s great for vegetarians. You can also use coconut aminos for a milder flavor. These alternatives maintain the dish's salty taste. Absolutely! You can add protein like shrimp, chicken, or tofu. You can also swap out vegetables based on your taste. Try adding mango for sweetness or radishes for a crunch. The options are endless. To make this salad gluten-free, use rice noodles. For the dressing, ensure you pick gluten-free soy sauce. Check labels when buying ingredients to avoid hidden gluten. This way, everyone can enjoy the salad. The Spicy Thai Noodle Salad recipe combines vibrant ingredients for a tasty dish. You learned how to cook rice noodles, prepare fresh vegetables, and create a zesty dressing. The nutritional benefits of the main ingredients make this salad a healthy choice. Remember, you can adjust flavors and ingredients to suit your taste. Try adding proteins or seasonal veggies for new twists. Follow proper storage tips to enjoy leftovers or make it ahead of time. With these guidelines, you’re set for a flavorful, customizable meal.](https://joymealplan.com/wp-content/uploads/2025/07/00f7a476-2e89-474b-9c80-2d6783f3d5a0-768x768.webp)