Skip to content
About
Contact
Cookie Policy
Copyright Policy
Disclaimer
Search
Home
Dinner
Appetizer
Desserts
Drinks
About
Contact
Privacy Policy
Toggle Menu
Home
/
Appetizer
- Page 15
Appetizer
Lemon Garlic Roasted Broccoli Flavor-Packed Side Dish
Ranch Chicken Tenders Crispy and Flavorful Delight
Garlic Lemon Asparagus Fresh and Flavorful Side Dish
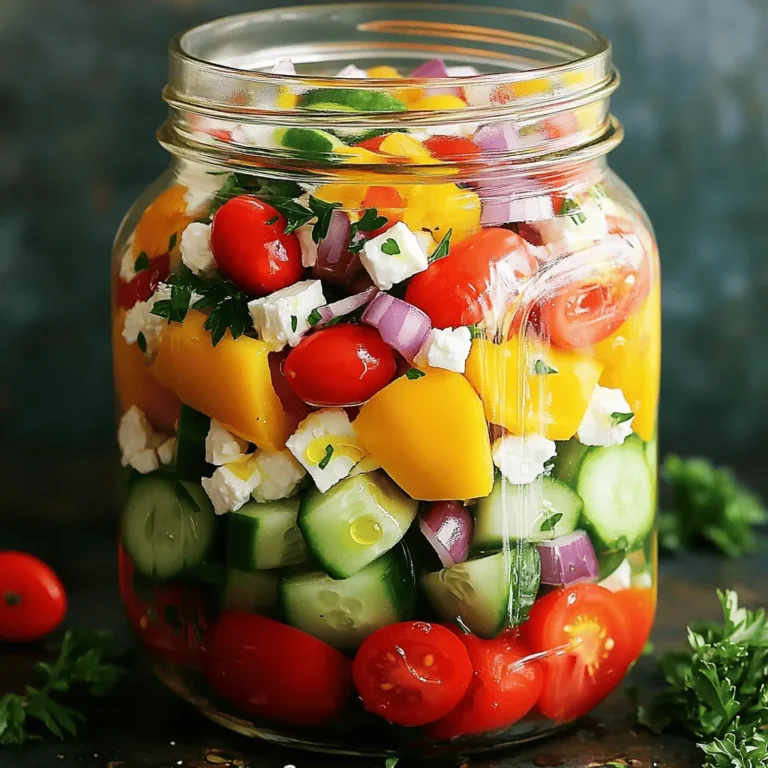
Mason Jar Greek Salad Fresh and Flavorful Delight
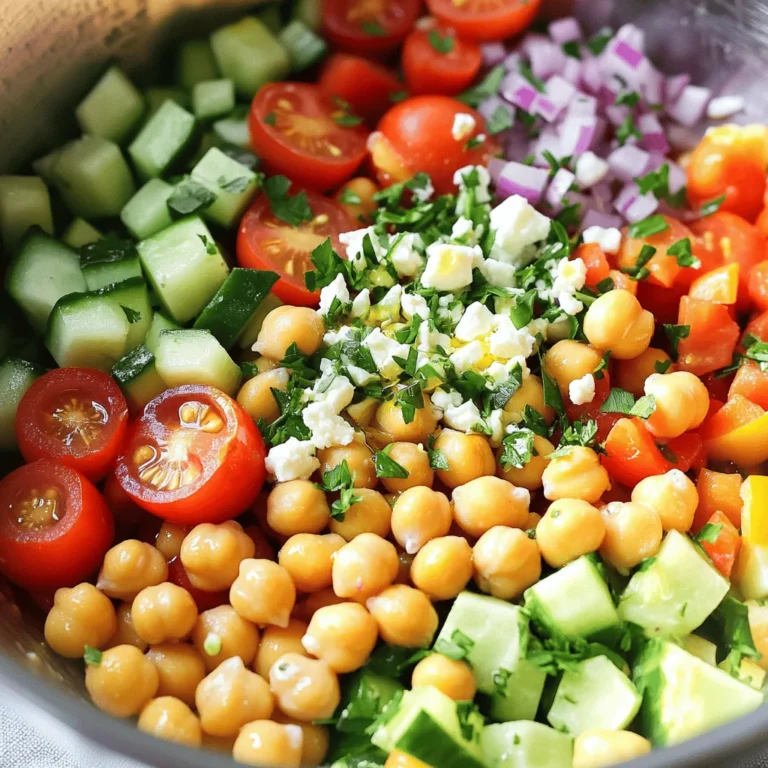
Simple Chickpea Salad Refreshing and Easy Recipe
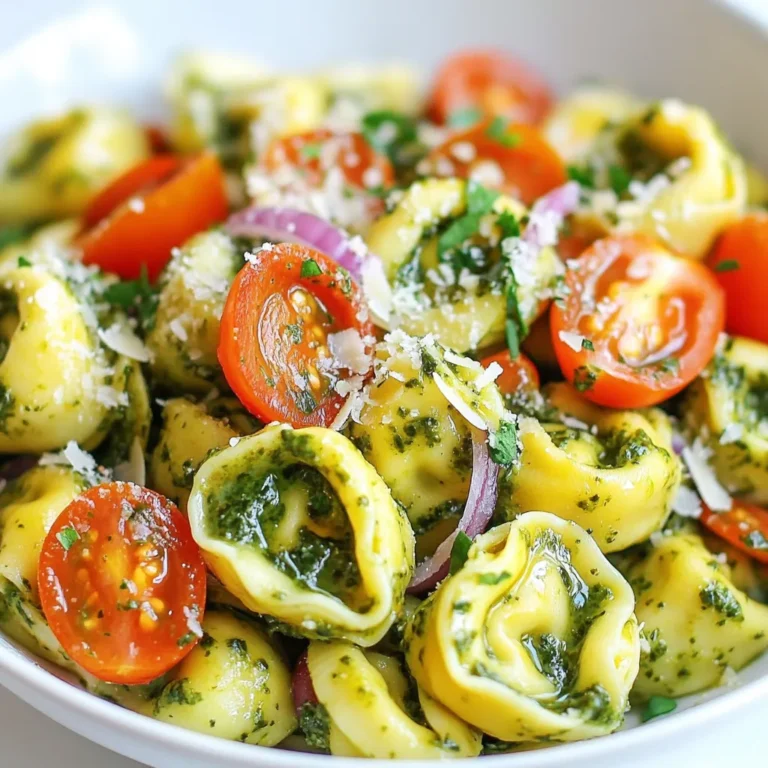
Creamy Pesto Tortellini Salad Fresh and Flavorful Dish
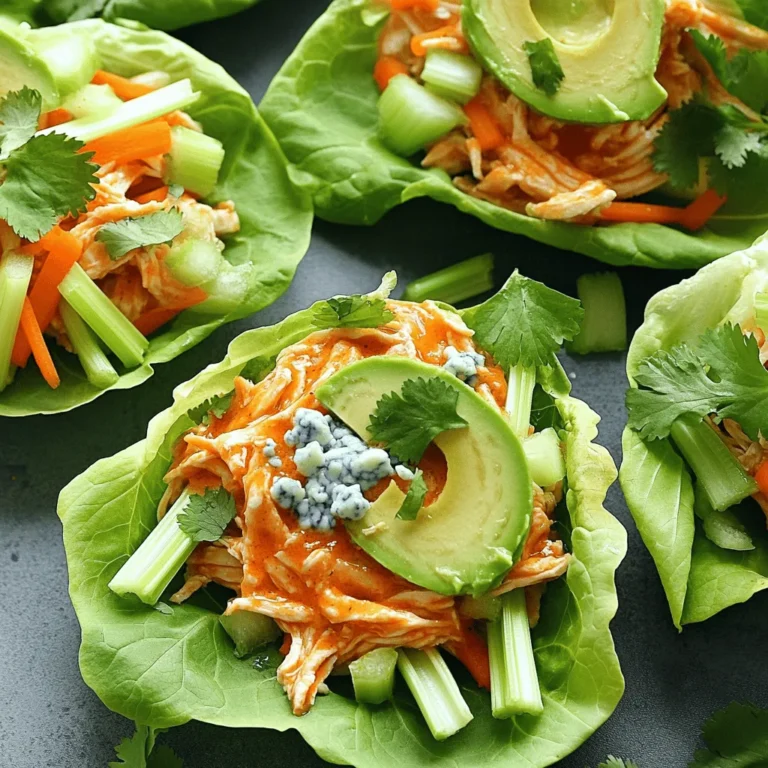
Buffalo Chicken Lettuce Wraps Flavorful and Healthy Dish
Garlic Parmesan Roasted Potatoes Flavorful Side Dish
Pesto Chicken Flatbread Tasty and Quick Meal Option
Classic Caprese Skewers Fresh and Flavorful Treats
Page navigation
Previous Page
Previous
1
…
13
14
15
16
17
…
25
Next Page
Next
Home
Dinner
Appetizer
Desserts
Drinks
About
Contact
Privacy Policy
Toggle Menu Close
Search for:
Search

. First, set your oven to 425°F (220°C). This temperature is key for roasting. A hot oven makes the broccoli crispy and tender. Preheating helps to lock in flavors too. In a large bowl, add the fresh broccoli florets. Then, mix in the minced garlic. Pour in the extra virgin olive oil, fresh lemon juice, and lemon zest. Add sea salt, black pepper, and crushed red pepper flakes if you want heat. Toss everything well. Make sure each floret is coated in the mixture. This step brings out the best flavor. Line a baking sheet with parchment paper for easy cleanup. Spread the broccoli mixture in a single layer. This helps it roast evenly. Place the sheet in the oven and roast for 20 to 25 minutes. Halfway through, use a spatula to toss the broccoli. Look for it to become tender and have crispy edges. If you like cheese, sprinkle on the grated Parmesan in the last 5 minutes. This adds a savory touch. When done, take it out and serve warm. Optionally, you can add more lemon zest on top. This brightens the dish and enhances the flavor. For the full recipe, check the details above. Enjoy your delicious Lemon Garlic Roasted Broccoli! To get the best roasted broccoli, start with a hot oven. I recommend 425°F (220°C). This high heat makes the broccoli tender and gives it crispy edges. Spread the florets on your baking sheet in a single layer. If they are crowded, they will steam instead of roast. Halfway through the cooking time, toss the broccoli gently. This helps it cook evenly and adds more crunch. Lemon and garlic shine in this dish. Use fresh garlic for a strong flavor. You can adjust the amount of garlic based on your taste. Adding crushed red pepper flakes brings extra heat. If you like cheese, sprinkle some grated Parmesan just before finishing. This adds a savory touch. Don’t forget to use the lemon zest; it brightens the dish. Serve your lemon garlic roasted broccoli hot. A colorful platter makes a big impact. Drizzle some extra olive oil or lemon juice on top. This adds shine and flavor. Pair it with lemon wedges for a zesty touch. This dish goes well with grilled meats, fish, or even pasta. It is a versatile side that complements many meals. Don't forget to check the full recipe for complete instructions. {{image_4}} You can boost the nutrition of your Lemon Garlic Roasted Broccoli. Try adding chickpeas for protein. They add a nice crunch too. Another option is to mix in nuts like almonds or walnuts. These add healthy fats and a satisfying texture. Toss in some cherry tomatoes for extra vitamins. They add a pop of color and sweetness. Each addition makes your dish even more nutritious. Feel free to experiment with different flavors. Instead of lemon, use lime for a twist. It gives a fresh taste that brightens the dish. You can also try balsamic vinegar for a rich, sweet flavor. Add smoked paprika for a hint of smokiness. For a simple yet tasty option, just use salt and pepper. Each change brings a new vibe to your roasted broccoli. If you want a vegan twist, skip the Parmesan cheese. Instead, sprinkle nutritional yeast on top. It gives a cheesy flavor without dairy. You can also add a splash of plant-based milk to the mix. This makes the broccoli creamy and delicious. For a richer taste, try tahini. It adds a nutty flavor that pairs well with garlic and lemon. These options keep your dish tasty and plant-friendly. You can find the full recipe to explore all these variations to your heart's content! Storing leftovers is easy. After cooking, let the broccoli cool down. Place it in an airtight container. This keeps it fresh for up to three days in the fridge. Reheating is simple. You can use the oven or a microwave. For the oven, heat to 350°F (175°C). Spread the broccoli on a baking sheet. Bake for about 10 minutes. If using a microwave, place the broccoli in a safe dish. Heat for one to two minutes or until warm. Freezing is a great option too. First, blanch the broccoli in boiling water for two minutes. Then, cool it quickly in ice water. Drain well and pack into freezer bags. Remove as much air as possible. Frozen broccoli lasts for about three months. When you want to use it, just cook straight from frozen. For the full recipe, check the section above. Enjoy your flavorful dish! You know roasted broccoli is done when it turns bright green and tender. The edges should be crispy and slightly browned. A fork should slide easily into the stem. This tells you it is ready to eat. If it looks dry or burnt, it may be overcooked. Roasting typically takes about 20-25 minutes, so keep an eye on it. Yes, you can use frozen broccoli. However, fresh broccoli gives the best taste and texture. Frozen broccoli may become soggy when roasted. If you use frozen, make sure to thaw it first and pat it dry. This step helps it roast better. Try to keep it in a single layer on your baking sheet for even cooking. Lemon Garlic Roasted Broccoli pairs well with many dishes. You can serve it with grilled chicken for protein. It also complements salmon or shrimp nicely. If you want a meatless option, try it with quinoa or brown rice. Adding a side of whole-grain bread can round out the meal. You can also mix it with pasta for a hearty dish. You can find the full recipe for Zesty Lemon Garlic Roasted Broccoli above. It includes detailed steps and ingredients to make this tasty side dish. In this post, we explored how to make tasty Lemon Garlic Roasted Broccoli. We covered key ingredients like fresh broccoli, garlic, and spices to boost flavor. The step-by-step guide included preheating the oven and roasting techniques. I shared tips to perfect your dish and variations for health and taste. Plus, we looked at how to store and reheat your leftovers. Try this recipe to enjoy a healthy side that’s quick to make and delicious.](https://joymealplan.com/wp-content/uploads/2025/07/2949f8fc-adf4-42c0-962a-019320107987-768x768.webp)

![- Preheat the oven to 400°F (200°C). - Rinse and trim the asparagus. First, I set my oven to 400°F (200°C). This temperature roasts the asparagus just right. Next, I rinse the asparagus under cold water. I clean each stalk well. To trim, I gently bend the end until it snaps. This removes the tough part. If you prefer, use a knife for a clean cut. - Mix garlic, olive oil, lemon zest, lemon juice, and seasonings. Now, let’s make the marinade! In a small bowl, I combine minced garlic, olive oil, lemon zest, and lemon juice. I add sea salt, black pepper, and red pepper flakes for a little heat. Whisk all these together until well mixed. This marinade brings a burst of flavor to our asparagus. - Toss asparagus in marinade. - Roast asparagus for 12-15 minutes in preheated oven. Next, I lay the asparagus on a baking sheet. I drizzle the marinade over them, making sure each spear gets coated. I use my hands or a spoon to toss gently. Then, I spread them out in a single layer. I place the tray in the hot oven. I roast the asparagus for 12-15 minutes. Halfway through, I give them a stir. This helps them cook evenly. When done, they should be tender with a bit of crispness. If you want, sprinkle grated Parmesan cheese over the asparagus in the last two minutes of roasting. It melts nicely and adds richness. Once finished, I take them out and garnish with fresh parsley. This adds color and makes the dish pop! For the complete recipe, check out the [Full Recipe]. How do you tell when asparagus is done cooking? Look for a bright green color. The stalks should be tender but still firm. You can also poke them with a fork to check for tenderness. If they bend easily but don’t break, they’re perfect! Want to boost the flavor? Try adding fresh herbs like thyme or basil. You can also use spices like garlic powder or onion powder. If you like a kick, sprinkle red pepper flakes on top. Just a pinch adds great heat without overpowering the dish. How can you serve Garlic Lemon Asparagus? First, arrange the asparagus on a nice platter. Keep them in a single layer for a neat look. You can sprinkle some extra lemon zest on top for brightness. Finally, add fresh parsley for a splash of color. This makes your dish pop and look tasty! For the full recipe, check out the complete guide. {{image_4}} You can cook Garlic Lemon Asparagus in different ways. Each method gives a unique taste. - Grilling: This adds a smoky flavor. You will get nice grill marks. But you should watch it closely. It cooks fast and may burn. - Roasting: This method brings out the natural sweetness. You will get a tender inside with a slight crisp. It takes a short time at high heat, which is perfect for busy cooks. - Sautéing on the stovetop: This is quick and easy. Heat oil in a pan, add the asparagus, and cook for a few minutes. You get a fresh taste and a bright green color. You can switch ingredients to suit your taste or diet. - Cheese Options: If you want a vegan dish, skip the Parmesan. You can use nutritional yeast for a cheesy taste without dairy. Feta cheese is also a great option if you want a different flavor. - Citrus Variations: Instead of lemon, try lime or orange. Each fruit brings its own twist. Lime gives a tangy kick, while orange adds sweetness. Many people have different diets. You can easily adapt this dish. - Gluten-Free: This recipe is already gluten-free. Just make sure any added ingredients are too. - Dairy-Free: Skip the cheese or use a dairy-free alternative. This keeps the dish light and fresh. - Low-Carb: Asparagus is low in carbs, making it perfect for health-conscious eaters. You can enjoy it without worries about carbs. Try these variations to make Garlic Lemon Asparagus your own! For the complete recipe, check the [Full Recipe]. To keep your Garlic Lemon Asparagus fresh, follow these tips: - Refrigeration: Place leftovers in an airtight container. This helps keep moisture in and prevents odors from other foods. Store them in the fridge for best results. - Freezing: If you want to save them longer, consider freezing. First, blanch the asparagus in boiling water for two minutes. Then cool them in ice water. Drain and place in freezer bags. Remove air to avoid freezer burn. When it's time to enjoy them again, you should reheat properly. - Reheating: For the best taste, heat in a skillet over medium heat. Add a splash of olive oil to keep them moist. Stir occasionally for even heating. You can also reheat them in the oven at 350°F (175°C) for about 10 minutes. Garlic Lemon Asparagus lasts about 3 to 5 days in the fridge. - Check for freshness: Look for any signs of spoilage, like discoloration or a sour smell. If they seem off, it's best to toss them. To maintain texture after storage, try these tips: - Avoid overcrowding in the container. This helps air circulate and keeps them crisp. - When reheating, don't overcook them. This keeps their vibrant color and crunch. Following these steps will help you enjoy your Garlic Lemon Asparagus longer, keeping the flavors fresh and delicious! For the complete preparation guide, check the Full Recipe. What are the health benefits of asparagus? Asparagus is low in calories and high in nutrients. It is rich in vitamins A, C, E, and K. This vegetable also has folate, which helps with cell growth. Asparagus is a good source of fiber, aiding digestion. Plus, it has antioxidants that fight free radicals in the body. Can I prepare Garlic Lemon Asparagus in advance? Yes, you can prepare Garlic Lemon Asparagus in advance. You can wash and trim the asparagus a day before. Mix the marinade and store it in the fridge. When you are ready to eat, toss the asparagus in the marinade and roast them. This helps the flavors meld well. Can I use frozen asparagus for this recipe? Yes, you can use frozen asparagus for this recipe. However, fresh asparagus will taste better. If using frozen, thaw them first. Drain excess water to avoid sogginess. Then proceed with the marinade and roasting steps. How can I make this recipe spicier? To make this recipe spicier, add more red pepper flakes. You can also add sliced fresh jalapeños or a dash of hot sauce. Mix these into the marinade for an extra kick. Start with a small amount and adjust to your taste. What dishes pair well with Garlic Lemon Asparagus? Garlic Lemon Asparagus pairs well with many dishes. It complements grilled chicken, fish, or steak. You can also serve it with pasta or rice. A light salad also works nicely with this dish. How can I incorporate this recipe into a meal prep plan? Incorporate Garlic Lemon Asparagus into your meal prep by adding it to your favorite meals. Roast a big batch and store it in the fridge. Use it as a side dish throughout the week. It can add color and flavor to your meals. In this blog post, we covered a simple yet delicious Garlic Lemon Asparagus recipe. We explored fresh ingredients, step-by-step cooking instructions, and useful tips for perfecting your dish. You learned about different cooking methods and diet modifications, plus how to store leftovers. Garlic Lemon Asparagus is a versatile side that enhances any meal. Try it out and enjoy creating your own flavors!](https://joymealplan.com/wp-content/uploads/2025/07/a67e5927-9a3c-4503-bb74-543c28219cb2-768x768.webp)
![- 2 pounds baby potatoes, halved - 4 tablespoons high-quality olive oil - 4 cloves garlic, finely minced - 1 teaspoon dried thyme - 1 teaspoon dried rosemary - ½ cup freshly grated Parmesan cheese - Salt and freshly ground black pepper to taste - Fresh parsley, finely chopped (for garnish) - Baking sheet - Parchment paper - Mixing bowl - Spatula or hands for tossing Gathering the right ingredients is key to making Garlic Parmesan Roasted Potatoes. I always choose small, fresh baby potatoes. Their size ensures they cook evenly and stay tender inside. You’ll need high-quality olive oil to help the potatoes crisp up nicely. Fresh garlic gives a strong flavor, while dried thyme and rosemary add warmth and depth. You can use pre-grated Parmesan, but fresh is best! It melts beautifully and enhances the taste. Don't forget salt and pepper; they really make the flavors pop. Finally, chop some fresh parsley. This adds a bright touch right before serving. As for equipment, a baking sheet lined with parchment paper makes cleanup easy and helps the potatoes roast evenly. A mixing bowl is essential for tossing the potatoes with oil and spices. You can use a spatula or your hands for this task. It’s important to coat each potato well for the best flavor. For more details and step-by-step guidance, check out the Full Recipe. Set your oven to 425°F (220°C). This high heat helps the potatoes become crispy. Preheating is key for even cooking. In a large mixing bowl, add 2 pounds of halved baby potatoes. Next, pour in 4 tablespoons of olive oil. Add 4 cloves of finely minced garlic, 1 teaspoon of dried thyme, and 1 teaspoon of dried rosemary. Sprinkle salt and pepper to taste. Toss everything well. Make sure each potato piece is coated in the tasty mix. This step makes all the flavors stick. Spread the seasoned potatoes on a lined baking sheet. Make sure they are in a single layer. If they are crowded, they won’t get crispy. Roast them for 25 minutes. They should start to soften and brown. After 25 minutes, carefully take the baking sheet out. Sprinkle ½ cup of grated Parmesan cheese over the potatoes. Gently toss to coat the potatoes with cheese. Return them to the oven for another 10-15 minutes. Watch for a golden brown color and crisp texture. Once done, let the potatoes cool for a few minutes. Sprinkle fresh parsley on top for a bright finish. For the complete guide, check the Full Recipe. To get your potatoes nice and crispy, keep them spread out on the baking sheet. If they are too close together, they will steam rather than roast. This can lead to soggy potatoes, which is not what you want. Check for doneness by piercing a potato with a fork. It should slide in easily when they are ready. You can make these potatoes even better by adding some herbs. Try fresh basil or oregano for a twist. If you love garlic, feel free to add more minced cloves. Just remember, balance is key. Too much garlic can overpower the dish. Garlic Parmesan Roasted Potatoes pair well with many dishes. They go great with grilled chicken or fish. You can also serve them alongside a fresh salad for a light meal. For a special touch, garnish with chopped parsley or a sprinkle of extra Parmesan. This adds color and makes the dish look fancy. Check out the full recipe for more tips on presentation! {{image_4}} Using fresh herbs can add more flavor than dried ones. Fresh herbs have a bright taste that brings life to your dish. If you use dried herbs, remember that they are stronger. Use about one-third the amount of dried herbs as fresh. Other herbs that pair well with garlic and Parmesan include: - Oregano - Basil - Chives - Dill These herbs can change the taste and make it your own. If you're looking for vegan options, try using vegan cheese. Many brands offer cheese that melts well and tastes great. For gluten-free needs, ensure your cheese is certified gluten-free. Potatoes are naturally gluten-free, making them a safe choice. For a quicker option, you can use an air fryer. The air fryer cooks potatoes fast and makes them super crispy. Cook them at 400°F for about 20 minutes, shaking the basket halfway through. Grilling the potatoes adds a smoky flavor. Toss halved potatoes with oil and seasonings, then wrap them in foil. Grill them over medium heat for 25-30 minutes. This method gives a delicious char and keeps the potatoes soft. Try these variations to make your Garlic Parmesan Roasted Potatoes even better! For the complete recipe, check out the [Full Recipe]. After enjoying your Garlic Parmesan Roasted Potatoes, store any leftovers in a safe way. Let the potatoes cool down before putting them in the fridge. This helps keep their taste and texture. Use an airtight container to keep them fresh. You can also use a zip-top bag, but make sure to remove as much air as possible. This keeps them from getting soggy. When it's time to eat leftovers, you have two good options: the oven or the microwave. The oven is best for keeping the crispiness. Preheat your oven to 375°F (190°C). Place the potatoes on a baking sheet and heat for about 10-15 minutes. Flip them halfway for even heating. If you're short on time, the microwave works, but it may make them soft. Heat in 30-second intervals until warm. To restore some crispiness in the microwave, use a plate lined with paper towels. This absorbs extra moisture. Enjoy your tasty dish again! For the full recipe, check out the details in the previous sections. To make Garlic Parmesan Roasted Potatoes crispy, follow these tips: - Use high heat: Preheat your oven to 425°F (220°C). High heat helps the potatoes crisp up. - Cut potatoes evenly: Halve the baby potatoes into similar sizes. This ensures they cook evenly. - Don’t overcrowd: Spread the potatoes in a single layer on the baking sheet. This allows air to circulate and helps them brown nicely. - Flip halfway: Toss the potatoes halfway through roasting. This promotes even browning and crispiness. - Add cheese at the right time: Sprinkle the Parmesan halfway through roasting. This helps it melt and form a crispy crust. Yes, you can use different types of potatoes. Here are some good options: - Yukon Gold: These are creamy and buttery. They roast well and have great flavor. - Red Potatoes: Their skin is thin and they hold their shape well when cooked. - Russet Potatoes: These are starchy and create a fluffy inside. They can also get nice and crispy. If you need a cheese alternative, consider these options: - Pecorino Romano: This cheese has a similar flavor and works well in this dish. - Nutritional Yeast: For a vegan option, sprinkle nutritional yeast for a cheesy flavor. - Grated Mozzarella: This cheese melts well, though it won't have the same sharpness. For the full recipe, check the Garlic Parmesan Roasted Potatoes section above. Garlic Parmesan Roasted Potatoes are easy and delicious. We covered the key ingredients, tools, and steps to roast your potatoes perfectly. You learned how to ensure crispiness and enhance flavor with herbs. I shared different variations to suit diets and cooking methods. Storing and reheating tips help keep leftovers tasty. With simple adjustments, you can enjoy this dish your way. Try making it for your next meal; it’s sure to impress. Enjoy the tasty results and happy cooking!](https://joymealplan.com/wp-content/uploads/2025/06/60840b92-dc9c-41ba-bef9-b9347b379e7b-768x768.webp)
. Yes, you can prepare Classic Caprese Skewers in advance. Assemble the skewers up to a few hours ahead of time. Just keep them in the fridge. To keep them fresh, cover them with plastic wrap. Avoid adding olive oil or balsamic glaze until you are ready to serve. This keeps the skewers from getting soggy. Right before serving, drizzle the oils and season with salt and pepper. To serve Caprese Skewers, presentation matters. Arrange them upright in a jar or glass. This creates a lovely display. You can add extra basil leaves around them for color. A small bowl of balsamic glaze on the side is a great touch. It invites guests to dip the skewers. Make sure each skewer is easy to grab. This helps keep the party fun and relaxed. You now have all the steps to create delicious Caprese skewers. From gathering fresh ingredients to assembling and serving them, it’s simple and fun. Remember to choose quality produce and experiment with variations to keep things exciting. These skewers not only look great but taste amazing too. Serve them at your next gathering, and watch your guests enjoy every bite. Enjoy your kitchen adventure, and savor the delicious results!](https://joymealplan.com/wp-content/uploads/2025/06/97cab98c-e756-45a3-bf7b-ace4126d32cb-768x768.webp)