Skip to content
About
Contact
Cookie Policy
Copyright Policy
Disclaimer
Search
Home
Dinner
Appetizer
Desserts
Drinks
About
Contact
Privacy Policy
Toggle Menu
Home
/
Appetizer
- Page 16
Appetizer
Rainbow Fruit Skewers Colorful and Simple Treats
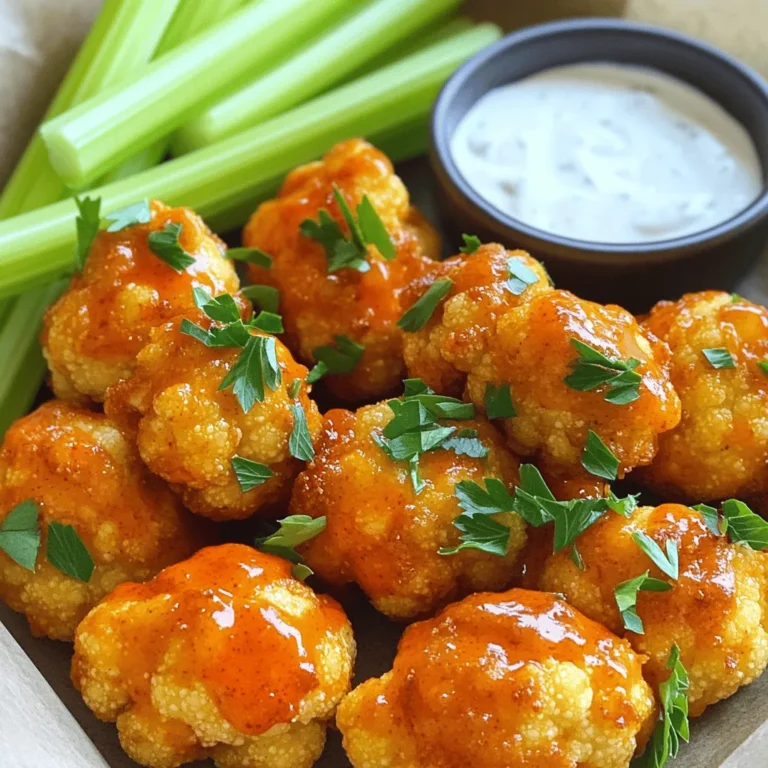
Buffalo Cauliflower Bites Flavorful and Healthy Snack
Rainbow Veggie Pinwheels Colorful and Healthy Snack
Crispy Air Fryer Sweet Potato Fries Simple Recipe
Savory Spinach Artichoke Dip Irresistibly Creamy
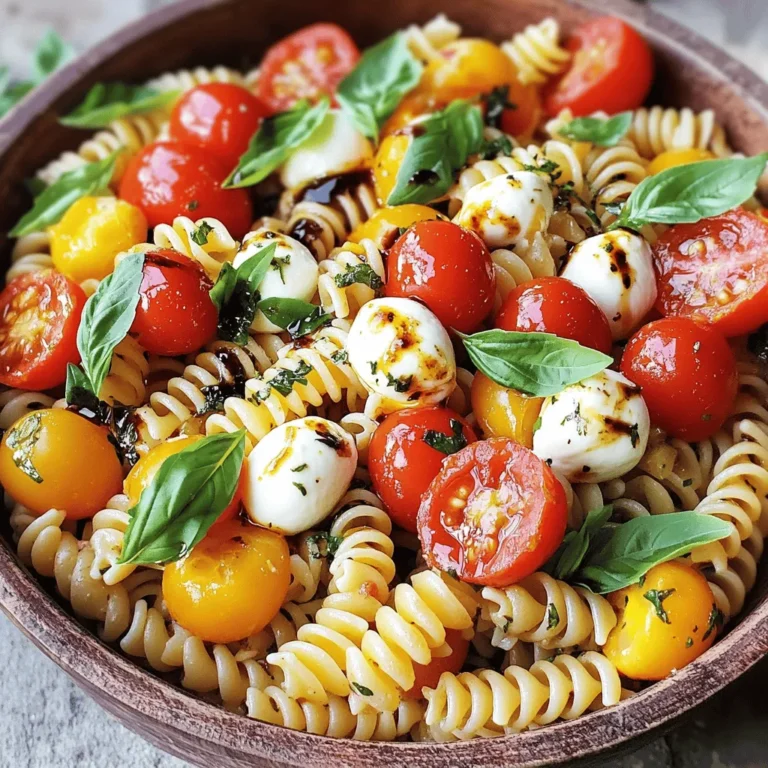
Caprese Pasta Salad Fresh and Flavorful Delight
Garlic Butter Steak Bites Savory and Simple Delight
Roasted Red Pepper Hummus Simple and Flavorful Recipe
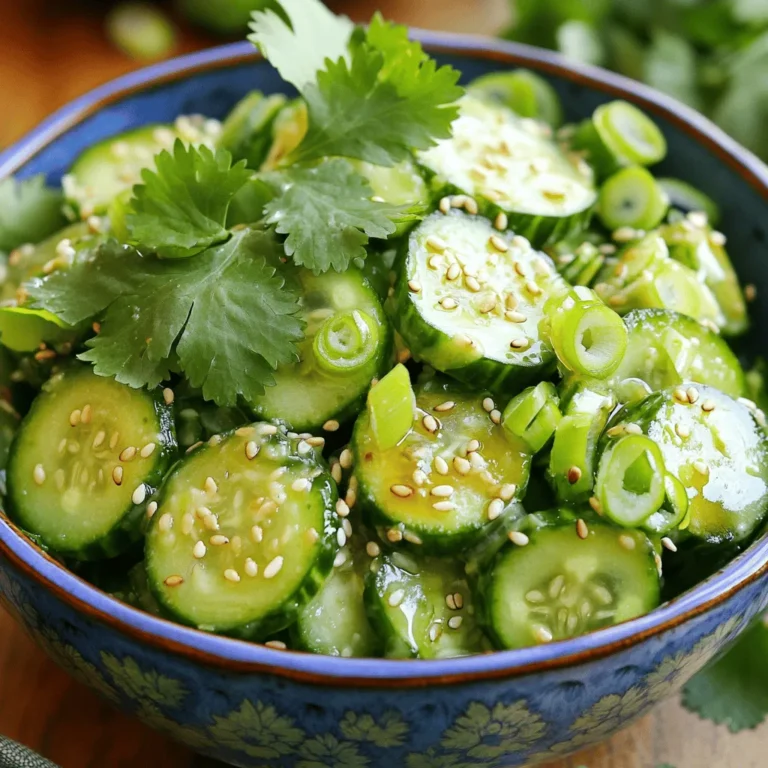
Smashed Cucumber Salad Refreshing and Flavorful Dish
Zesty Lemon Tahini Dressing Fresh and Flavorful Blend
Page navigation
Previous Page
Previous
1
…
14
15
16
17
18
…
25
Next Page
Next
Home
Dinner
Appetizer
Desserts
Drinks
About
Contact
Privacy Policy
Toggle Menu Close
Search for:
Search


. In this blog post, we explored how to make delicious garlic butter steak bites. We discussed the key ingredients, from sirloin steak to fresh herbs. You learned step-by-step cooking tips for perfect doneness. We also covered variations, presentation ideas, and storage methods for leftovers. By following these tips, you can create a tasty dish your friends and family will love. With a little practice, you can master this recipe and impress everyone at your next meal.](https://joymealplan.com/wp-content/uploads/2025/06/dbdd8f16-fd7f-4bf6-8b38-aa3e7b5cdfe5-768x768.webp)
![To make this tasty roasted red pepper hummus, you need a few key items. Here’s what you’ll need: - 1 can (15 oz) chickpeas, thoroughly rinsed and well-drained - 2 large roasted red peppers, peeled and coarsely chopped - 3 tablespoons creamy tahini - 2 tablespoons extra virgin olive oil, plus more for drizzling - 2 cloves of garlic, finely minced - 1 tablespoon freshly squeezed lemon juice - 1 teaspoon ground cumin for warmth - Salt and freshly cracked black pepper, to taste - Cold water, as required for desired creaminess - Smoked paprika and freshly chopped parsley for an elegant finish Want to kick your hummus up a notch? Consider these fun add-ins: - A pinch of cayenne pepper for heat - Roasted garlic for a sweeter taste - A tablespoon of fresh herbs like basil or cilantro - A splash of balsamic vinegar for tanginess - A bit of feta cheese for creaminess Feel free to mix and match these options. Each one can add a unique twist to your hummus. The ingredients in this hummus are not just tasty; they pack a nutritious punch: - Chickpeas: High in protein and fiber, they help keep you full. - Tahini: Made from sesame seeds, it adds healthy fats and calcium. - Olive Oil: Rich in monounsaturated fats, it supports heart health. - Garlic: Offers immune-boosting properties and can help lower blood pressure. - Red Peppers: Full of vitamins A and C, they promote healthy skin and eyes. Each ingredient works together to create a dish that's not only delicious but also good for you. For the full recipe, check out the detailed cooking guide. Making roasted red pepper hummus is easy and quick. You need a food processor. Gather all your ingredients first. This helps keep things organized. Start by blending everything together until smooth. You can add water for creaminess. 1. Place the rinsed chickpeas, chopped roasted red peppers, tahini, olive oil, minced garlic, lemon juice, and ground cumin into your food processor. 2. Secure the lid tightly. Blend the mix on high speed. Stop to scrape the bowl down. This ensures everything mixes well. 3. If the hummus is too thick, add cold water. Do this one tablespoon at a time. Blend after each addition until you reach the right creaminess. 4. Taste your hummus. Add salt and freshly cracked black pepper to make it better. 5. Transfer the smooth hummus to a serving bowl. Drizzle olive oil on top for extra flavor. 6. Sprinkle smoked paprika and chopped parsley on top for color and flair. To get your hummus just right, focus on the blending time. Blend longer for a smoother texture. If it’s still thick, keep adding cold water slowly. Make sure to taste as you go. Adjust the seasoning to your liking. A little tweak can make a big difference. One big mistake is using dry chickpeas. Always use canned chickpeas for smoothness. Another pitfall is not rinsing the chickpeas. Rinsing helps reduce the canned taste. Avoid over-blending; you want a creamy texture, not a soup. Lastly, be careful with salt. Start with a little and taste as you go. To boost flavor, try adding lemon zest. It adds brightness and fresh taste. You can also mix in roasted garlic for a sweet, rich flavor. For extra heat, toss in a pinch of cayenne pepper. Experiment with herbs like cilantro or basil for unique twists. Each of these can make your hummus stand out. Presentation matters! Serve the hummus in a colorful bowl to catch the eye. Drizzle olive oil on top for a glossy finish. Sprinkle smoked paprika or fresh herbs for color. Pair it with warm pita bread and crunchy veggies. Arrange these on a large platter for a beautiful spread. Explore the [Full Recipe] for more ideas on serving this dish. {{image_4}} Want some heat? Add a kick to your hummus! Use sliced jalapeños or red pepper flakes. Blend them in with your other ingredients for a spicy twist. This adds depth and flavor. You can also drizzle with hot sauce before serving. It’s a perfect match for those who love bold flavors. Herbs can give your hummus a fresh taste. Try adding fresh basil, cilantro, or parsley. You can also mix in other roasted veggies. Think zucchini or eggplant for extra flavor. These additions make your hummus unique and vibrant. They bring in new textures and tastes, making it fun to try different combinations. This hummus is already vegan and gluten-free! You can enjoy it with confidence. It uses chickpeas, tahini, and olive oil, which fit both diets perfectly. If you want to make it even more exciting, serve it with gluten-free crackers or veggie sticks. This way, everyone can enjoy it at any gathering. For the full recipe, check the details mentioned earlier. To keep your hummus fresh, place it in an airtight container. This helps prevent air from drying it out. Make sure to seal the lid tightly. You can also drizzle a thin layer of olive oil on top. This adds flavor and keeps it moist. Store the container in the fridge. It will stay good for about 4 to 5 days. If you want to save hummus for later, freezing is a great option. Start by placing the hummus in a freezer-safe container. Leave some space at the top, as it may expand when frozen. You can also use ice cube trays for small portions. Once frozen, transfer the cubes to a zip-top bag. This method makes it easy to thaw just what you need. Homemade hummus can last up to 3 months in the freezer. Choose containers made of glass or BPA-free plastic. Glass containers are great for keeping flavors intact. They are also easy to clean. If you use plastic, make sure it is strong and safe for freezing. Avoid containers that are too large for small amounts. This helps keep your hummus fresh. For extra care, label your containers with the date. This way, you’ll know when to use them. For the full recipe, check out the Roasted Red Pepper Hummus Delight. Homemade roasted red pepper hummus can last about 5 to 7 days in the fridge. Make sure to store it in an airtight container. This keeps it fresh and tasty. If you notice any changes in smell or color, it's best to toss it out. Yes, you can use jarred roasted red peppers. They save time and add great flavor. Just drain them well before adding to your hummus. This helps keep the hummus from getting too watery. Roasted red pepper hummus pairs well with many foods. Here are some ideas: - Warm pita bread - Fresh vegetable sticks like carrots, cucumbers, and bell peppers - Crackers or tortilla chips - A colorful mezze platter with olives and herbs You can find the full recipe above. Enjoy your tasty hummus! In this post, we explored the key ingredients and step-by-step instructions for roasted red pepper hummus. We covered tips for flavor, common mistakes, and variations. You learned how to store hummus properly and answered your main questions. Remember, this dish is simple yet versatile. Enjoy making your own hummus using fresh ingredients. Try different flavors to find your favorite mix. Happy cooking!](https://joymealplan.com/wp-content/uploads/2025/06/a7fe634f-a62f-44e2-9912-8eb9edd9a507-768x768.webp)
![This Zesty Lemon Tahini Dressing is a bright and tasty addition to many dishes. It takes just 10 minutes to make and serves four people. You can use it on salads, grain bowls, or as a dip for veggies. The balanced mix of flavors will make your meals pop! - 1/4 cup tahini paste - 1/4 cup freshly squeezed lemon juice (approximately 2 medium lemons) - 2 tablespoons extra virgin olive oil - 1 garlic clove, finely minced - 1 tablespoon maple syrup or honey (to taste) - 2-3 tablespoons filtered water (adjust for desired consistency) - Sea salt and freshly cracked black pepper, to taste - Zest of 1 lemon (for an aromatic finish) - Tahini paste provides healthy fats and protein, making it creamy and rich. - Lemon juice adds vitamin C and a bright, zesty flavor that lifts your dishes. - Extra virgin olive oil is a heart-healthy fat with a smooth taste that enhances the dressing. - Garlic brings flavor and has health benefits like boosting immunity. - Maple syrup or honey adds a hint of sweetness, balancing the tang of lemon. - Sea salt and black pepper enhance all the flavors, making every bite enjoyable. - Lemon zest gives an aromatic finish that deepens the lemon taste. This dressing is not only simple to make, but it also packs a punch of flavor and nutrition. You can easily adjust the sweetness and thickness to fit your taste. To make Zesty Lemon Tahini Dressing, start with the right ingredients. Gather your tahini paste, lemon juice, olive oil, garlic, maple syrup, water, salt, pepper, and lemon zest. Use fresh lemons for the best taste. Squeeze enough juice to fill 1/4 cup. A good juicer helps extract the juice easily. In a medium mixing bowl, add the tahini paste first. This helps create a smooth base. Pour in the lemon juice, extra virgin olive oil, and minced garlic. Next, add the maple syrup or honey for sweetness. Use a whisk to mix these ingredients together until smooth. Make sure there are no lumps left in the tahini. This step is key for a creamy dressing. Once the mixture is smooth, it’s time to adjust the consistency. Slowly add filtered water, one tablespoon at a time. If you want a thinner dressing, add more water. For a thicker dip, use less. Taste your dressing and decide if you need more salt, pepper, or lemon juice. The zest adds a nice aromatic touch. For best results, chill the dressing for about 10 minutes before serving. This enhances the flavors. This recipe makes about four servings of a fresh and zesty dressing. Enjoy experimenting with it on salads or as a dip! To make the best Zesty Lemon Tahini Dressing, I focus on balance. Each ingredient plays a role. The tahini brings creaminess, while the lemon adds bright zest. Use fresh lemon juice for the best taste. The garlic gives a nice kick, and sweet maple syrup rounds it out. Taste your dressing as you mix. Adjust the sweetness or tartness as needed. If it's too thick, add more water slowly. This dressing shines on salads. It pairs well with leafy greens or roasted veggies. I love to drizzle it over grain bowls with quinoa or farro. Use it as a dip for fresh veggies or pita chips. You can even spread it on wraps for extra flavor. The options are endless, so get creative with your meals! How you present the dressing matters. I like to serve it in a small, stylish bowl. Drizzle a little extra olive oil on top for shine. Sprinkle sesame seeds for texture and a nice look. You can also add lemon slices around the bowl for a colorful touch. This makes it eye-catching and fun to enjoy. For a truly gourmet touch, pair it with your favorite dishes and watch everyone enjoy! {{image_4}} You can tweak this recipe to suit your tastes. Try using sunflower seed butter in place of tahini. This adds a nutty flavor without sesame. If you're allergic to nuts, sunflower butter is a good choice. You can also use lime juice for a different citrus kick. It gives the dressing a unique twist. For a creamier texture, try adding Greek yogurt. This will thicken the dressing and add protein. Want to boost the flavor? Add fresh herbs like parsley, cilantro, or dill. These herbs bring freshness and color. For a spicy kick, mix in red pepper flakes or a dash of hot sauce. This adds heat and complexity. If you love garlic, increase the amount or add roasted garlic for a sweeter taste. A pinch of cumin can also deepen the flavor profile. This dressing works with many cuisines. It pairs well with Mediterranean dishes like falafel or grilled vegetables. Drizzle it over a fresh Greek salad for a zesty touch. You can also use it in Asian dishes, like a cold noodle salad. The lemon tahini dressing complements sesame flavors well. It is perfect for drizzling on grain bowls filled with quinoa or brown rice. For a fun twist, use it as a dip for fresh spring rolls. Explore the [Full Recipe] for all the delicious details! Store your Zesty Lemon Tahini Dressing in an airtight container. Glass jars work great. Make sure the lid is tight. This keeps the flavors fresh. Always use a clean spoon to scoop out the dressing. This way, you avoid adding germs. Keep your dressing in the fridge. It helps maintain its zesty flavor. If you leave it out, it can spoil quickly. Always chill it right after you make it. The colder it is, the better it tastes. Your dressing lasts up to a week in the fridge. After that, it may not taste good. Watch for changes in color or smell. If it smells sour or looks odd, throw it away. Trust your senses; they guide you well. This dressing is already vegan! It uses tahini, lemon juice, and maple syrup or honey. If you prefer, just stick with maple syrup. It gives a sweet touch and keeps everything plant-based. I don’t recommend freezing this dressing. Freezing can change its texture. When thawed, it may separate and lose its creamy feel. Instead, store it in the fridge for fresh use. This dressing shines on salads, grain bowls, and roasted veggies. Try it with fresh greens, quinoa, or as a dip for crisp veggies. It adds a zesty kick to any meal. To cut calories, reduce the olive oil or use less tahini. You can also add more water for a thinner dressing. This keeps the flavor while lowering the calorie count. For the full recipe, check the details above. In this post, we explored the key ingredients, step-by-step instructions, and helpful tips for Zesty Lemon Tahini Dressing. You learned about the benefits of each ingredient and how to achieve the perfect flavor balance. We also discussed variations and storage tips. To wrap up, this dressing is versatile and easy to make. With the right approach, you can impress your guests and enjoy tasty meals. Use this dressing often to enhance your dishes.](https://joymealplan.com/wp-content/uploads/2025/06/f654f103-f68b-4d89-afc0-0ab326df6c5a-768x768.webp)