Skip to content
About
Contact
Cookie Policy
Copyright Policy
Disclaimer
Search
Home
Dinner
Appetizer
Desserts
Drinks
About
Contact
Privacy Policy
Toggle Menu
Home
/
Desserts
- Page 17
Desserts
Raspberry Almond Thumbprint Cookies Delightful Treat
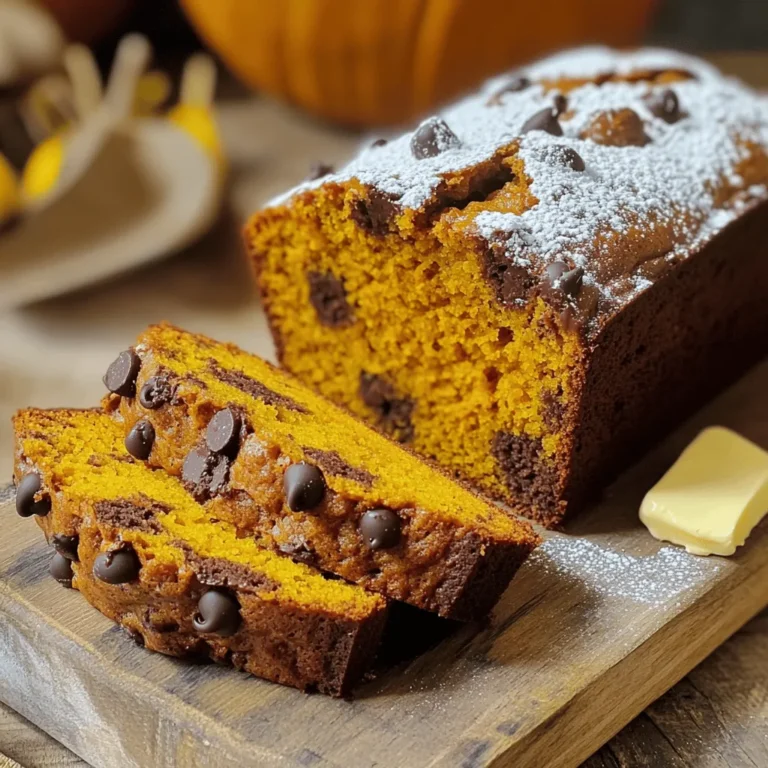
Chocolate Chip Pumpkin Bread Irresistible Recipe Guide
No Churn Oreo Ice Cream Simple and Delicious Dessert
Raspberry Almond Thumbprint Cookies Delightful Treat
Chocolate Lava Mug Cake Quick and Easy Recipe
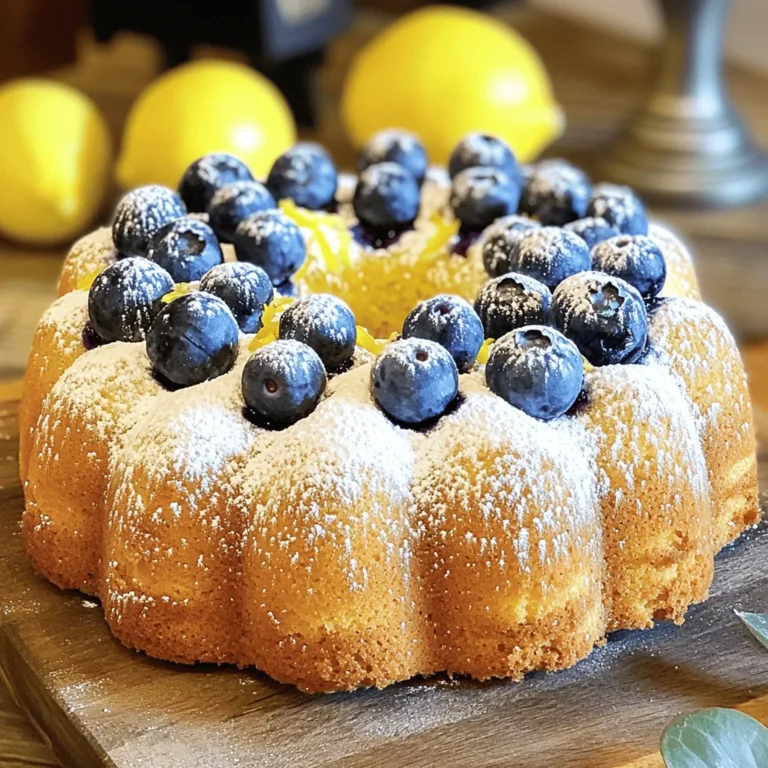
Lemon Blueberry Pound Cake Delightful Recipe Guide
Chocolate Chip Banana Bread Muffins Delightful Treat
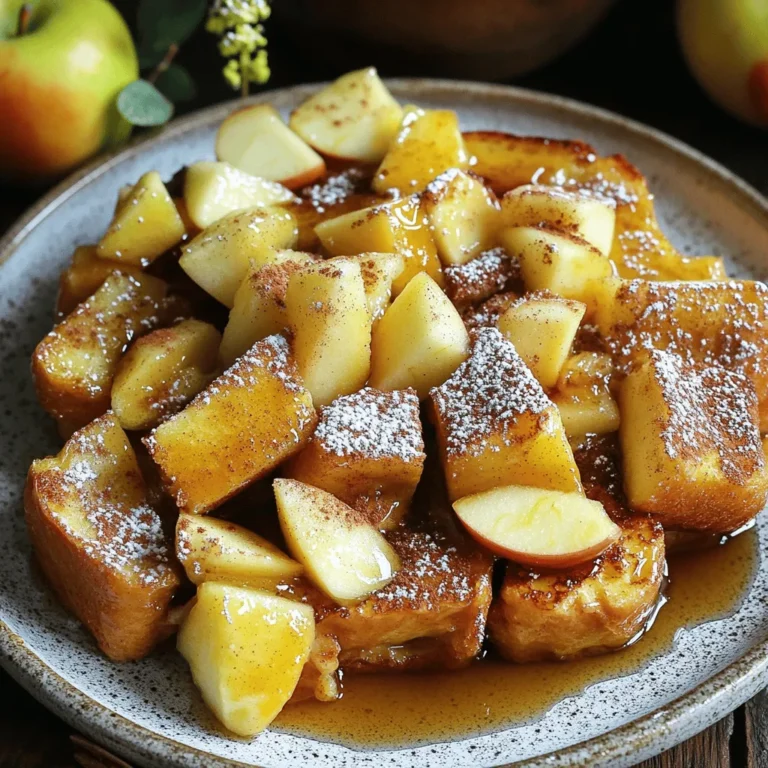
Apple Cinnamon French Toast Bake Tasty Breakfast Treat
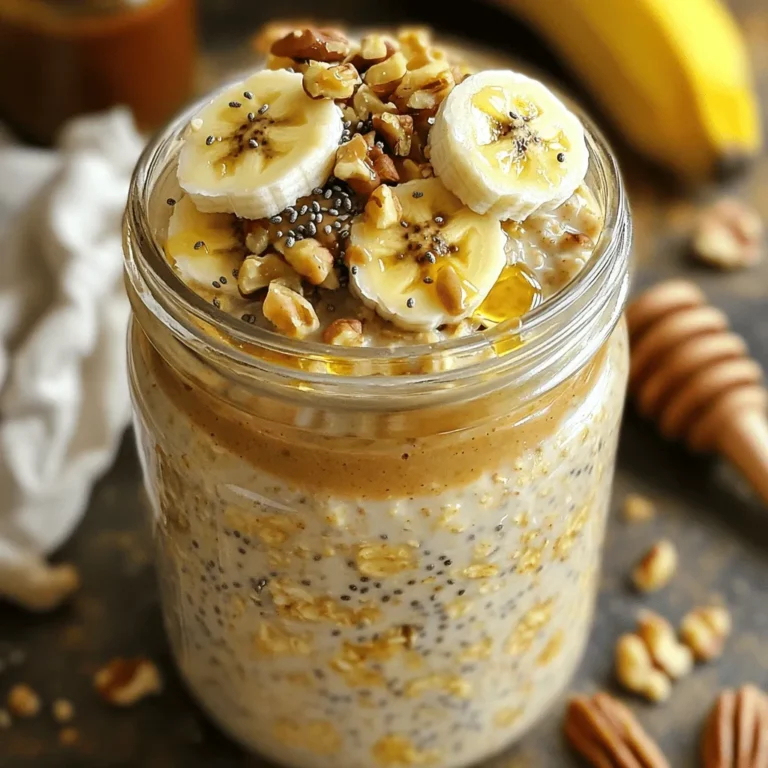
Peanut Butter Banana Overnight Oats Simple and Tasty
Chocolate Dipped Pretzel Rods Simple and Fun Treat
Page navigation
Previous Page
Previous
1
…
15
16
17
18
19
…
33
Next Page
Next
Home
Dinner
Appetizer
Desserts
Drinks
About
Contact
Privacy Policy
Toggle Menu Close
Search for:
Search

![The ingredients for Raspberry Almond Thumbprint Cookies are simple and delightful. Each one plays a key role in creating the perfect cookie. - 1 cup unsalted butter, softened to room temperature - 3/4 cup granulated sugar - 1 cup almond flour - 2 cups all-purpose flour - 1/2 teaspoon fine sea salt - 1 teaspoon pure vanilla extract - 1/4 teaspoon pure almond extract - 1/2 cup raspberry jam - Optional: Sliced almonds for garnish Using high-quality ingredients makes a big difference. The unsalted butter gives a rich flavor and smooth texture. Granulated sugar adds sweetness and helps the cookies spread just right. Almond flour brings a nutty taste that pairs well with raspberry jam. The fine sea salt balances the sweetness and enhances all the flavors. Vanilla and almond extracts add depth to the cookies. Raspberry jam gives that burst of fruity goodness, making each bite a treat. If you want a bit of crunch, sliced almonds add a lovely touch. For the complete recipe, check out the Full Recipe. Make sure you have everything ready before you start. Happy baking! - Preheat the oven to 350°F (175°C). This step ensures your cookies bake evenly and rise well. While the oven heats, line two baking sheets with parchment paper. This prevents cookies from sticking. - Cream the butter and sugar. In a large bowl, mix the softened butter and sugar until light and fluffy. This takes about 2-3 minutes. - Combine the dry ingredients and mix in the flavorings. Gradually add almond flour, all-purpose flour, and sea salt. Stir until a soft dough forms. Then, pour in vanilla and almond extracts and mix until smooth. - Roll the dough into balls. Use your hands to shape 1-inch balls and place them on the baking sheets. Make sure to space them about 2 inches apart, so they have room to spread. - Create indentations in each ball. Use your thumb or a small spoon to press down in the center of each dough ball. This creates a well for the jam. - Fill each indentation with raspberry jam. Carefully add about 1 teaspoon of jam to each well. Be careful not to overfill, or it may spill during baking. - Optional: For a crunchy texture, press sliced almonds around the edges of the filled indentations. - Bake the cookies. Place the baking sheets in the oven and bake for 12 to 15 minutes. Look for lightly golden edges. - Cooling instructions: After baking, let the cookies sit for about 5 minutes on the baking sheets. This helps them firm up. Then, transfer them to a wire rack to cool completely. - Presentation tips: Once cooled, dust the cookies lightly with powdered sugar. Arrange them on a decorative platter with fresh raspberries and mint leaves for a vibrant look. Check out the Full Recipe for more details and tips! Achieving the perfect texture To get soft and chewy cookies, use softened butter. This helps create the right mix of air and fat. Make sure to cream it well with the sugar. Mixing should take about 2 to 3 minutes. If you want a slight crunch, use finely ground almond flour. This gives the cookies a nice bite. Ensuring even cooking For even baking, space the cookie balls well on the baking sheet. Place them about 2 inches apart. This helps prevent them from sticking together. Additionally, rotate the baking sheets halfway through the baking time. This ensures all cookies bake evenly. Recommended amendments for enhanced flavor To boost the almond flavor, add a bit more almond extract. Just a few extra drops can make a big difference. You can also add a pinch of cinnamon for warmth. It pairs well with the raspberry jam and adds depth to the taste. Alternative fillings for the thumbprint While raspberry jam is great, try other flavors too! Strawberry, apricot, or even lemon curd can work well. Each jam gives a unique twist to the cookies. You can also use chocolate ganache for a rich, sweet center. Avoiding overfilling the jam When filling the cookie indentations, use about 1 teaspoon of jam. If you add too much, it can overflow during baking. This can make a mess on your baking sheet. Stick to the recommended amount for best results. Preventing dough from spreading too much in the oven If your dough spreads too much, try chilling it for about 30 minutes before baking. This helps firm up the butter. You can also bake on parchment paper, which helps maintain shape. Keeping your dough cold is key to keeping those lovely thumbprint shapes! {{image_4}} You can play with flavors in Raspberry Almond Thumbprint Cookies. Using different fruit jams can change the taste. Try strawberry, apricot, or blueberry jam for a fun twist. Each jam brings its unique flavor, making each bite special. You can also add chocolate or citrus flavors. Mix in some cocoa powder for a chocolatey touch. Or, add a hint of lemon zest for a fresh kick. These small changes can give your cookies a new vibe. Making these cookies gluten-free is easy. Substitute regular flour with gluten-free flour blends. Look for blends that include almond or coconut flour. These options keep the cookies soft and chewy. To maintain the right texture, watch the moisture levels. Gluten-free flour often absorbs more liquid. You may need to adjust the butter or add a bit of milk. This keeps the cookies from being too dry or crumbly. You can make these cookies vegan too. Replace butter with coconut oil or vegan butter. Both options keep the cookies rich and tasty. For eggs, use flaxseed meal or applesauce. These act as great binding agents. Flaxseed meal is simple to use. Mix one tablespoon with three tablespoons of water. Let it sit for a few minutes until it thickens. This blend works well and keeps the cookies together. To keep your Raspberry Almond Thumbprint Cookies fresh, store them in an airtight container at room temperature. This helps prevent them from getting stale. I recommend enjoying them within 5 to 7 days for the best taste. If you want to save some cookies for later, you can freeze them. For baked cookies, let them cool completely. Then, place them in a freezer-safe bag or container. They will stay good for up to three months. If you prefer to freeze the dough, wrap it tightly in plastic wrap, then place it in a freezer bag. When ready, thaw the dough in the fridge overnight for the best results. Reheating your cookies is easy! To keep their soft texture, preheat your oven to 300°F (150°C). Place the cookies on a baking sheet and warm them for about 5 to 8 minutes. This method helps restore their fresh-baked taste. Enjoy them warm, and they will feel like new! To make these cookies, follow these key steps: 1. Preheat your oven to 350°F (175°C). 2. Cream butter and sugar until fluffy in a bowl. 3. Combine dry ingredients: mix almond flour, all-purpose flour, and salt. 4. Add extracts: stir in vanilla and almond extracts. 5. Shape dough into 1-inch balls and place on a baking sheet. 6. Create indentations in the dough using your thumb. 7. Fill with jam: add raspberry jam to each well. 8. Bake cookies for 12 to 15 minutes until edges are golden. 9. Cool cookies on a wire rack after baking. This simple process leads to delicious treats. For the full recipe with detailed instructions, check the [Full Recipe]. Yes, you can use different nuts! If you are allergic to almonds, consider these options: - Pecans: Their rich flavor pairs well with fruit jams. - Walnuts: They add a nice crunch and depth to the cookies. - Cashews: These nuts give a creamy texture and mild taste. Feel free to experiment with your favorite nuts. Just chop them finely to mix into the dough or use them as a garnish. Many fun variations exist for thumbprint cookies. Here are some popular adaptations: - Different jams: Try strawberry, apricot, or blueberry for a twist. - Chocolate filling: Use chocolate ganache instead of jam for a rich flavor. - Citrus zest: Add lemon or orange zest to the dough for a fresh taste. These variations keep the recipe interesting. Mixing flavors can lead to delightful surprises! This blog post covered how to make delicious Raspberry Almond Thumbprint Cookies. We explored the ingredients, preparation steps, and tips for the best results. You learned about variations, storage methods, and common mistakes to avoid. Remember, baking is fun and rewarding. Try these cookies with different jams or flavors for new twists. Keep practicing to refine your skills. Enjoy baking and sharing these tasty treats with others. You now have the tools to impress your friends and family with your cookie-making expertise.](https://joymealplan.com/wp-content/uploads/2025/07/587afd51-3098-4c90-9a32-308dc83d9cb5-768x768.webp)

![To make these tasty cookies, you need simple ingredients that work well together. Here is what you will need: - 1 cup unsalted butter, softened to room temperature - 1 cup powdered sugar, plus extra for dusting - 1 teaspoon pure vanilla extract - 2 cups all-purpose flour, sifted - 1/2 teaspoon pure almond extract - 1/4 teaspoon sea salt - 1 cup raspberry jam (store-bought or homemade) - 1/2 cup sliced almonds (for topping) These key ingredients create a rich and buttery base for the cookies. The powdered sugar adds sweetness, while the extracts bring depth of flavor. The raspberry jam provides a fruity burst in every bite. You can customize these cookies to suit your taste. Here are some optional ingredients to consider: - Different jams: Swap raspberry jam for strawberry, apricot, or blueberry for new flavors. - Citrus zest: Add a teaspoon of lemon or orange zest for a bright twist. - Chopped nuts: Use pecans or walnuts instead of almonds for a different crunch. These optional ingredients let you make the cookies your own. Feel free to mix and match to create your perfect treat. For the complete details on how to put these ingredients together, check out the Full Recipe. To start, gather your ingredients. You will need butter, powdered sugar, vanilla extract, almond extract, flour, sea salt, raspberry jam, and sliced almonds. First, preheat your oven to 350°F (175°C). Line a baking sheet with parchment paper to avoid sticking. In a large bowl, cream the softened butter and powdered sugar. Use an electric mixer on medium speed for about 3-4 minutes. You want the mixture to be light and fluffy. Next, add in the vanilla and almond extracts. Beat until smooth. In another bowl, mix the sifted flour and sea salt. Gradually add this to the butter mix. Stir gently, just until it forms a dough. Avoid overmixing. With a tablespoon, scoop the dough and roll it into balls. Place them on the baking sheet about 2 inches apart. Now, make a small indentation in each dough ball using your thumb or a spoon. This will hold the jam. Spoon 1/2 teaspoon of raspberry jam into each well. Be careful not to overflow. Next, sprinkle sliced almonds around the jam. Press them lightly into the dough for a nice crunch. Bake in the preheated oven for 15-18 minutes. Look for a light golden brown on the edges. Once baked, let the cookies rest for 5 minutes on the sheet. Then, transfer them to a wire rack to cool completely. When cool, dust them with extra powdered sugar for a nice touch. For a beautiful presentation, arrange the cookies on a decorative plate. Scatter fresh raspberries around them for color. Enjoy your delicious Raspberry Almond Thumbprint Cookies! For the full recipe, refer to the earlier section. To bake the best raspberry almond thumbprint cookies, follow these tips: - Use softened butter: This helps create a creamy texture. - Sift your flour: Sifting aerates the flour, leading to lighter cookies. - Space them out: Place cookies 2 inches apart on the baking sheet. This prevents them from sticking together. - Check the time: Bake until the edges are light golden brown, about 15-18 minutes. Many home bakers face pitfalls while baking. Avoid these common mistakes: - Overmixing the dough: This makes cookies tough. Mix just until combined. - Not measuring flour correctly: Use a spoon to fill the measuring cup, then level it off. - Skipping the cooling time: Let the cookies rest before moving them. This helps them set. You can add extra flavors to your cookies for a twist. Consider these options: - Zest of lemon or orange: A little zest brightens the cookie's taste. - Chopped dark chocolate: Mix in for a rich contrast to the raspberry jam. - Coconut flakes: Add for a tropical touch and added texture. These tips will help you create the perfect batch of raspberry almond thumbprint cookies. For the complete recipe, check the Full Recipe section. {{image_4}} You can use different jam flavors in these cookies. Try strawberry or apricot for a fresh twist. Blueberry jam also works well and adds a nice color. Each jam gives the cookies its own unique taste. Experimenting with flavors keeps things exciting. If you want to change the nuts, you have many choices. Pecans or walnuts add a rich flavor. You can even skip the nuts if you prefer a nut-free cookie. Just remember, the crunch will be lost, but the jam will still shine. To make gluten-free thumbprint cookies, use a gluten-free flour blend. Brands like Bob’s Red Mill or King Arthur Flour work well. Just check that the blend has xanthan gum to bind everything together. This way, everyone can enjoy these tasty treats! Follow the [Full Recipe] for the main steps and enjoy your baking journey! To keep your Raspberry Almond Thumbprint Cookies fresh, store them in an airtight container. This will help keep them soft and tasty. If you stack them, place wax paper between layers. This helps prevent sticking. You can also use a cookie tin for a charming touch. When stored properly, these cookies will last about one week at room temperature. If you place them in the fridge, they may last up to two weeks. However, cold air can dry them out. So, if you want the best taste, enjoy them fresh! Freezing cookies is a great idea for later cravings. Allow the cookies to cool completely first. Then, place them in a single layer on a baking sheet. Freeze them for about an hour. After that, transfer them to a freezer-safe bag. They can last up to three months in the freezer. When ready to eat, thaw them in the fridge overnight or let them sit at room temperature for a few hours. For the full recipe, check out the details above! If you don’t have almond extract, you can use vanilla extract instead. This will still give your cookies great flavor. You can also try hazelnut extract for a unique twist. The cookies will still taste delicious! Yes, you can use other nuts! If you prefer, try pecans, walnuts, or even pistachios. Just chop them finely and use them in place of sliced almonds. Each nut adds a different flavor and texture. To make cookies softer, add an extra tablespoon of butter. This will give them a chewier texture. For firmer cookies, bake them a minute longer. Keep an eye on them to avoid overbaking. Adjusting these small details can really change your cookie experience. Raspberry almond thumbprint cookies are easy and fun to make. You learned about key ingredients, simple steps, and helpful tips to bake them perfectly. We also explored tasty variations and storage methods. If you follow these instructions and suggestions, your cookies will impress. Enjoy sharing this sweet treat with others. Baking can be simple and rewarding. So, gather your ingredients and start creating!](https://joymealplan.com/wp-content/uploads/2025/07/b4014d7b-fb87-49bc-9ed6-2b0ba339c469-768x768.webp)
![To make the best Chocolate Lava Mug Cake, you need a few simple ingredients. Here is the list: - 4 tablespoons all-purpose flour - 4 tablespoons granulated sugar - 2 tablespoons unsweetened cocoa powder - 1/8 teaspoon baking powder - A pinch of salt - 3 tablespoons milk - 2 tablespoons vegetable oil - 1/4 teaspoon vanilla extract - 1 square (approximately 1 ounce) of semi-sweet chocolate or a handful of chocolate chips - Optional: Ice cream or whipped cream for serving These ingredients come together to create a rich and gooey dessert. The all-purpose flour gives structure, while the sugar adds sweetness. Cocoa powder brings that deep chocolate flavor. Baking powder helps the cake rise, and salt balances the taste. Milk and oil keep it moist, and vanilla adds a lovely aroma. The star of the show is the semi-sweet chocolate, which melts in the center. If you want to make it extra special, consider adding ice cream or whipped cream on top when you serve it. These toppings add a creamy contrast to the warm cake. For the full recipe, check out the detailed instructions in the next section. Enjoy your cooking! 1. Combining dry ingredients Start with a large mug. Add 4 tablespoons of all-purpose flour, 4 tablespoons of granulated sugar, 2 tablespoons of unsweetened cocoa powder, 1/8 teaspoon of baking powder, and a pinch of salt. Stir these dry ingredients well with a fork. Make sure there are no lumps. 2. Mixing wet ingredients and creating the batter Next, pour in 3 tablespoons of milk, 2 tablespoons of vegetable oil, and 1/4 teaspoon of vanilla extract. Mix these wet ingredients into the dry ones until the batter is smooth. You want it to be creamy and free of dry spots. 3. Inserting the chocolate for the molten center Now, take your chocolate square or a handful of chocolate chips. Push it gently into the center of the batter. Make sure it is mostly covered but still visible. This will create that gooey center we love. 4. Cooking in the microwave Place the mug in the microwave. Cook on high for 30 to 40 seconds. Start checking after 30 seconds. The cake should rise and look set, but the center must remain soft. Avoid cooking too long; we want that lava! 5. Cooling and serving suggestions Carefully remove the mug from the microwave. It will be hot! Let it cool for about one minute. This helps it set a bit. For serving, top your cake with ice cream or whipped cream. This adds flavor and makes it even more special. For the full recipe, check out the detailed instructions above. To get the best lava cake, timing is key. Start with 30 seconds in the microwave. Check it, and if it’s not done, add 10 seconds. You want the sides firm and the center soft. The mug you use matters too. Pick a large mug, about 12 ounces. This size gives the cake room to rise. A small mug may overflow or cook unevenly. Smooth batter is a must for the best cake. Mix the dry ingredients well first. Then, add the wet ingredients slowly. Stir until there are no lumps. This helps the cake cook evenly and keeps it nice and soft. Toppings can take your cake to the next level. Ice cream is a classic choice. The cold creaminess pairs well with the warm cake. Whipped cream adds a light, airy contrast. For drinks, coffee or milk works great. The rich flavors of coffee enhance the chocolate. Milk softens the sweetness, making it perfect for any palate. Enjoy your cake with these simple but delicious pairings. For the complete recipe, refer to the [Full Recipe]. {{image_4}} You can easily switch some ingredients in your chocolate lava mug cake to fit your needs. Here are some ideas: - Gluten-free options: Use gluten-free flour instead of all-purpose flour. Almond flour or a gluten-free blend work well. - Vegan substitutions: Replace milk with almond milk or oat milk. Use coconut oil instead of vegetable oil. You can also swap the egg for a flaxseed egg if needed. - Using different chocolate types: Try dark chocolate or white chocolate for a unique twist. Each type offers its own flavor. Want to make your mug cake even more special? Consider adding extra flavors: - Adding nuts or fruit: Mix in chopped nuts like walnuts or pecans for crunch. You can also add berries or banana slices for a fresh taste. - Incorporating extracts for flavor enhancement: A drop of almond extract or peppermint extract can elevate the flavor. Just a little goes a long way! For the full recipe, check the earlier section. Enjoy making your chocolate lava mug cake with these fun variations! Store your leftover chocolate lava mug cake in the fridge. Use a clean, airtight container. This keeps the cake fresh for up to two days. If you want to reheat it, place it back in the microwave for about 10 to 15 seconds. Check the center to see if it's warm enough. You want to keep that gooey center! You can freeze the batter if you want to save time later. Just mix the ingredients as usual and pour the batter into a freezer-safe container. It will last for about a month. When you’re ready to bake, thaw it in the fridge overnight. Then, cook it in the microwave as per the [Full Recipe]. This way, you can enjoy a fresh chocolate lava mug cake whenever you want! Can I use a different type of chocolate? Yes, you can! You might try dark chocolate or milk chocolate. Both will give a rich flavor. Just ensure the chocolate is semi-sweet for the best lava effect. Is it possible to make this recipe in the oven? Absolutely! Preheat your oven to 350°F (175°C). Pour the batter into a small baking dish. Bake for about 10-12 minutes. Check the center to keep it gooey. How do I know when the cake is done cooking? Watch for the cake to rise. The edges should look set, but the center should jiggle a bit. If it's too firm, it may not have that lovely lava center. Can I make multiple cakes at once? Yes, you can. Just prepare each cake in its own mug. Cook them in batches, checking the time. You may need to add a few seconds for each additional mug. For the full recipe, check out the detailed instructions above! This blog post covered how to make a chocolate lava mug cake. We discussed the ingredients you need, from flour to chocolate chips. I shared step-by-step instructions for mixing and cooking. You learned tips for that perfect lava center and fun serving ideas. Always feel free to try different ingredients or toppings. Experimenting can make your cake even better. Enjoy your delicious treat, and happy baking!](https://joymealplan.com/wp-content/uploads/2025/07/50d0d175-347a-4c26-b8c0-a14731d5df33-768x768.webp)
![To make these tasty chocolate chip banana bread muffins, gather these simple ingredients: - 3 ripe bananas, thoroughly mashed - 1/2 cup granulated sugar - 1/4 cup brown sugar, firmly packed - 1/3 cup unsalted butter, melted and slightly cooled - 1 large egg, at room temperature - 1 teaspoon vanilla extract - 1 teaspoon baking soda - 1/4 teaspoon salt - 1 teaspoon ground cinnamon - 1 1/2 cups all-purpose flour - 1 cup semi-sweet chocolate chips - 1/2 cup chopped walnuts (optional, for added crunch) Using the right amounts matters! Here’s a quick guide for measuring: - Bananas: Use ripe ones for natural sweetness. - Sugars: Granulated sugar is your base, while brown sugar adds moisture. - Butter: Melt it but let it cool a bit so it won’t cook the egg. - Flour: Spoon it into your cup and level it off for accuracy. You can swap some ingredients for different flavors or dietary needs: - Butter: Use coconut oil for a dairy-free option. - Sugar: Try honey or maple syrup for a natural sweetener. - Flour: Use whole wheat flour for more fiber. - Nuts: Feel free to skip walnuts or use pecans instead. For the full recipe, check the [Full Recipe]. First, gather your ingredients. You will need: - 3 ripe bananas, thoroughly mashed - 1/2 cup granulated sugar - 1/4 cup brown sugar, firmly packed - 1/3 cup unsalted butter, melted and slightly cooled - 1 large egg, at room temperature - 1 teaspoon vanilla extract - 1 teaspoon baking soda - 1/4 teaspoon salt - 1 teaspoon ground cinnamon - 1 1/2 cups all-purpose flour - 1 cup semi-sweet chocolate chips - 1/2 cup chopped walnuts (optional, for added crunch) Next, preheat your oven to 350°F (175°C). Prepare a muffin tin by lining it with paper liners or greasing it with cooking spray. This keeps the muffins from sticking. In a large bowl, mash the bananas well. Then, add the granulated sugar, brown sugar, and melted butter. Mix until smooth and creamy. Now, crack the egg into the bowl. Add the vanilla extract, and whisk until everything is mixed well. Sprinkle the baking soda, salt, and ground cinnamon over the banana mix. Stir gently to combine. Gradually sift in the all-purpose flour. Mix lightly with a spatula until just combined. Be careful not to over-mix, or your muffins may turn out dense. Finally, fold in the chocolate chips and walnuts, if using. This adds great texture and flavor to the muffins. Now, divide your batter evenly among the muffin tin cups. Fill each cup about two-thirds full. This allows the muffins to rise nicely. Place the muffin tin in the oven. Bake for 18-20 minutes. You will know they are done when a toothpick inserted into the center comes out clean or with a few moist crumbs. Once baked, take the muffins out of the oven. Let them cool in the tin for about 5 minutes. After that, carefully transfer them to a wire rack to cool completely. For an extra touch, serve the muffins warm. Lightly dust them with powdered sugar. You can also add a few extra chocolate chips on top. Pair them with coffee or tea for a delightful treat. For the full recipe, check out the Choco-Banana Bliss Muffins! To get soft and fluffy muffins, follow a few key steps. Use ripe bananas; they add natural sweetness and moisture. Mash them well, leaving no lumps. This helps blend the flavors. Don't over-mix the batter. Stir just until the flour disappears. Over-mixing can lead to tough muffins. When adding chocolate chips, fold them in gently. This keeps them evenly spread without breaking apart. A few common mistakes can ruin your muffins. First, check your oven temperature. An oven that is too hot can burn the muffins. Use an oven thermometer if needed. Avoid using cold ingredients. Always let your egg and butter come to room temperature. This helps your muffins rise better. Also, remember to fill your muffin cups only 2/3 full. This allows room for rising. These muffins are great on their own. For a special touch, serve them warm. Dust them with powdered sugar, and add extra chocolate chips on top. Pair them with coffee or tea for a cozy treat. You can also enjoy them with a dollop of yogurt or a scoop of ice cream. These options add a fun twist to your muffin experience. For the full recipe, check out the [Full Recipe]. {{image_4}} You can make these muffins gluten-free. Use a gluten-free flour blend instead of all-purpose flour. Many blends work well, like almond or coconut flour. Always check the package to ensure it is gluten-free. This option keeps the muffins soft and tasty while being safe for those with gluten issues. For a vegan version, swap the egg with a flax egg. To make a flax egg, mix 1 tablespoon of ground flaxseed with 2.5 tablespoons of water. Let it sit for 5 minutes until it thickens. Use coconut oil or vegan butter in place of regular butter. Also, choose dairy-free chocolate chips to keep it all plant-based. Want to boost nutrition? Add nuts like walnuts or pecans for crunch and healthy fats. You can also mix in ground flaxseed for extra fiber. This addition makes the muffins heartier and adds a nutty flavor. Just fold these ingredients into the batter before baking. For the full recipe, check out the Choco-Banana Bliss Muffins section above. You can store your chocolate chip banana bread muffins at room temperature. Place them in an airtight container. They stay fresh for about 2 to 3 days. If your kitchen is warm, refrigerate them to keep them from spoiling. Just remember, the fridge may dry them out a bit. To keep muffins longer, freeze them. First, let them cool completely. Wrap each muffin in plastic wrap. Then, place them in a freezer bag. Label the bag with the date. These muffins can last up to 3 months in the freezer. When ready to eat, just thaw them at room temperature or microwave for a quick treat. Reheat muffins for the best taste. You can use a microwave for about 15-20 seconds. This warms them up and melts the chocolate chips. If you want a crispy top, use an oven. Preheat to 350°F (175°C) and bake for about 5-10 minutes. Enjoy them warm for a delightful treat! For the full recipe, check out the Choco-Banana Bliss Muffins. You can check if your muffins are done by using a toothpick. Insert it into the center of one muffin. If it comes out clean or with a few moist crumbs, they are ready. The muffins should also look golden brown on top. If they are still wet, bake them for a few more minutes. Always keep an eye on them as oven times can vary. Yes, you can use frozen bananas! Just make sure to thaw them first. Once thawed, mash them well. Frozen bananas can actually make your muffins even sweeter. They also add moisture, making your muffins soft and delicious. They’re a great way to avoid waste if you have ripe bananas at home. You can add a few things to boost the flavor. Here are some options: - Nuts: Add chopped walnuts or pecans for a nice crunch. - Spices: Try adding nutmeg or extra cinnamon for warmth. - Extracts: A splash of almond extract can add a nice twist. - Fruits: Diced apples or berries can enhance the taste. - Zest: A bit of lemon or orange zest can brighten the flavors. Explore your own ideas, too! Cooking is all about creativity. Check the Full Recipe for more details on how to make these muffins. You learned about making delicious muffins from start to finish. We covered ingredients, measurements, and tasty alternatives. The step-by-step guide helps you bake easily. Tips and tricks will help you dodge common mistakes and perfect muffin texture. You also discovered fun variations, like gluten-free options and healthy extras. Lastly, we discussed storage tips to keep muffins fresh. I hope you feel ready to bake and enjoy these muffins with creative twists.](https://joymealplan.com/wp-content/uploads/2025/07/4f3c9815-0868-484a-ae71-7a97e3378a4a-768x768.webp)