Skip to content
About
Contact
Cookie Policy
Copyright Policy
Disclaimer
Search
Home
Dinner
Appetizer
Desserts
Drinks
About
Contact
Privacy Policy
Toggle Menu
Home
/
Desserts
- Page 27
Desserts
Easy Baked French Toast Casserole Simple and Tasty
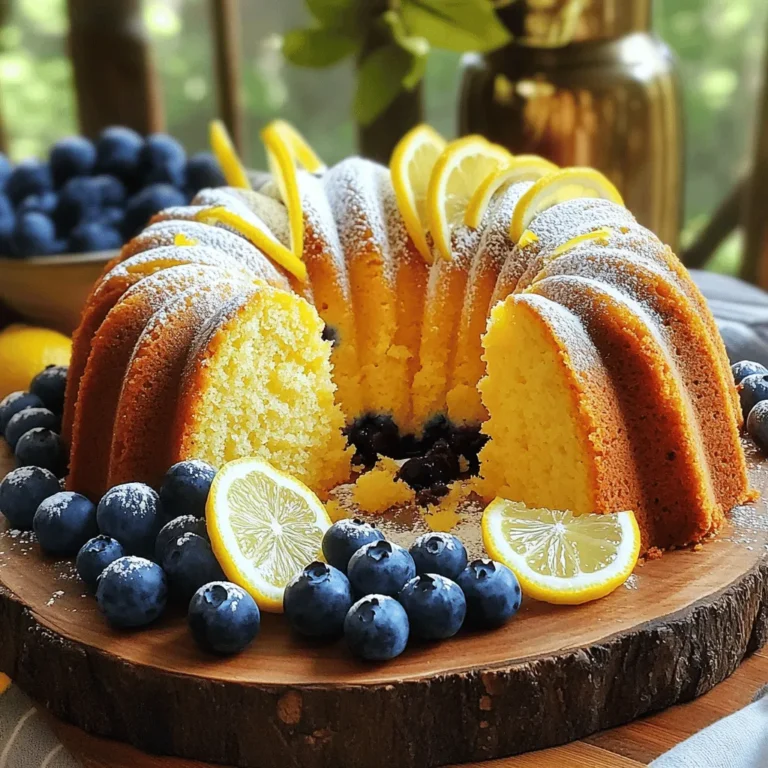
Lemon Blueberry Pound Cake Flavorful Delight Recipe
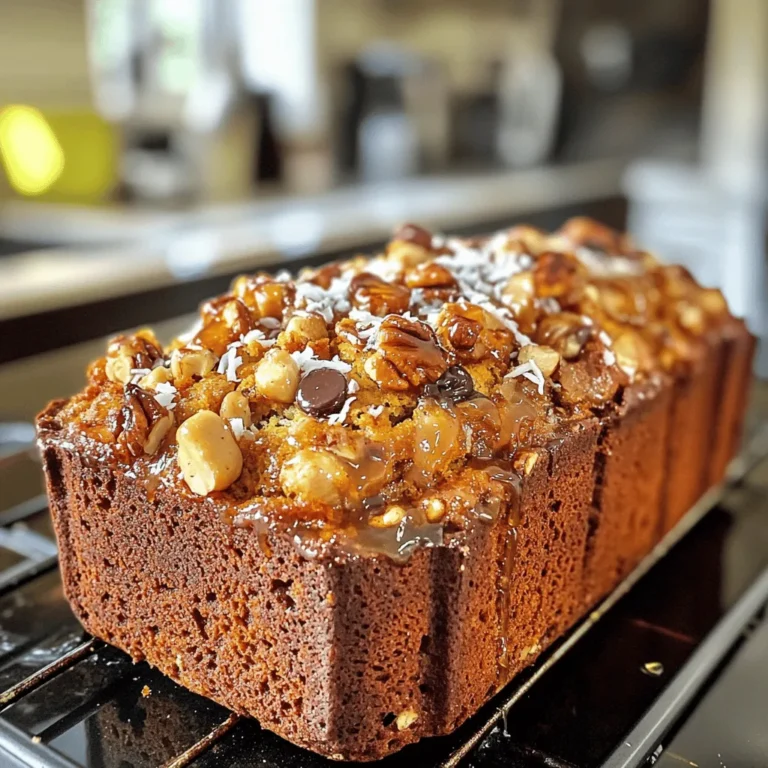
Chunky Monkey Banana Bread Simple and Tasty Recipe
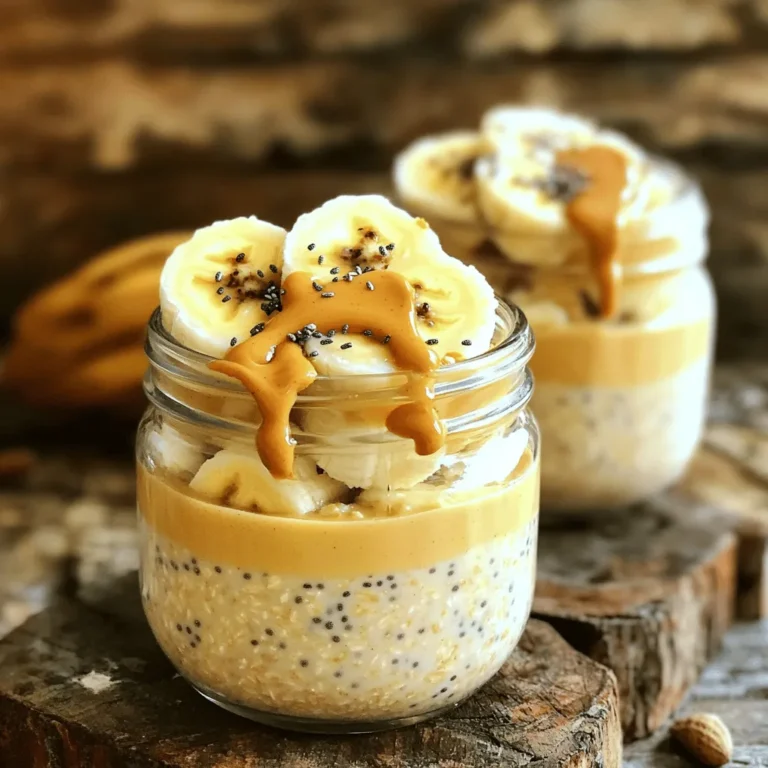
Peanut Butter Banana Overnight Oats Quick and Easy Recipe
Mini Cinnamon Roll Bites Tasty and Easy Snack Treat
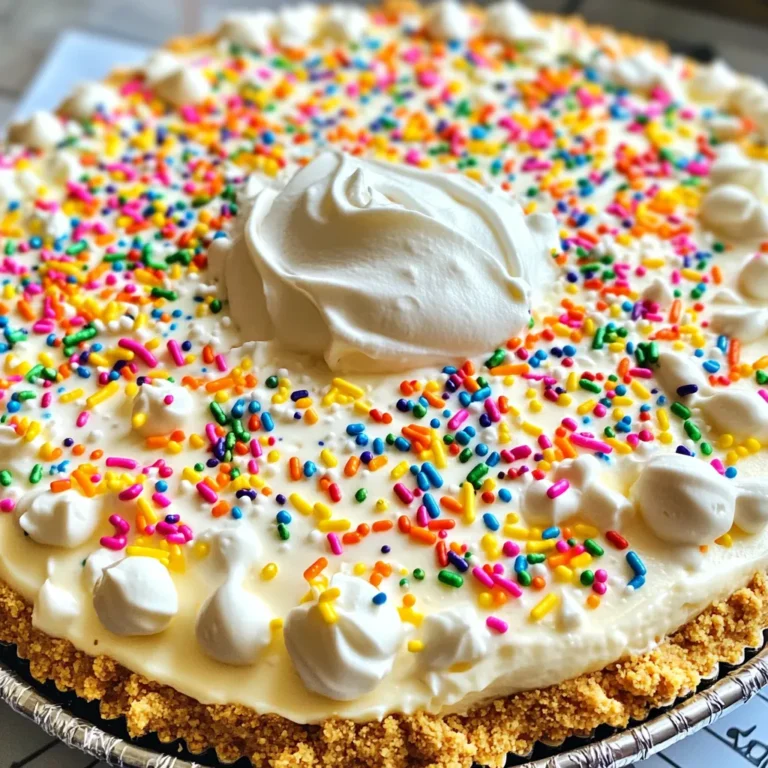
No Bake Funfetti Cheesecake Simple and Tasty Delight
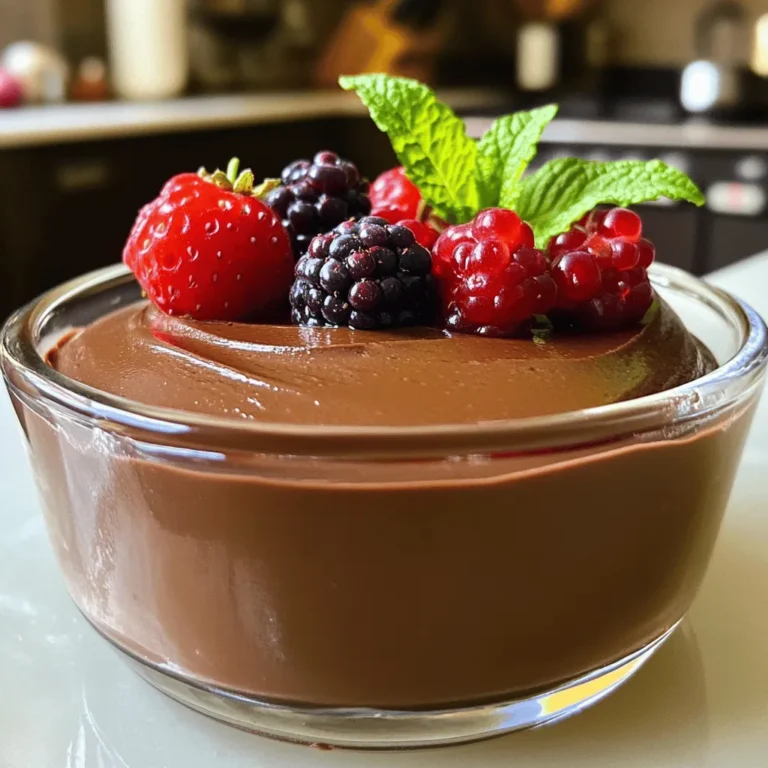
Vegan Chocolate Mousse Creamy and Simple Recipe
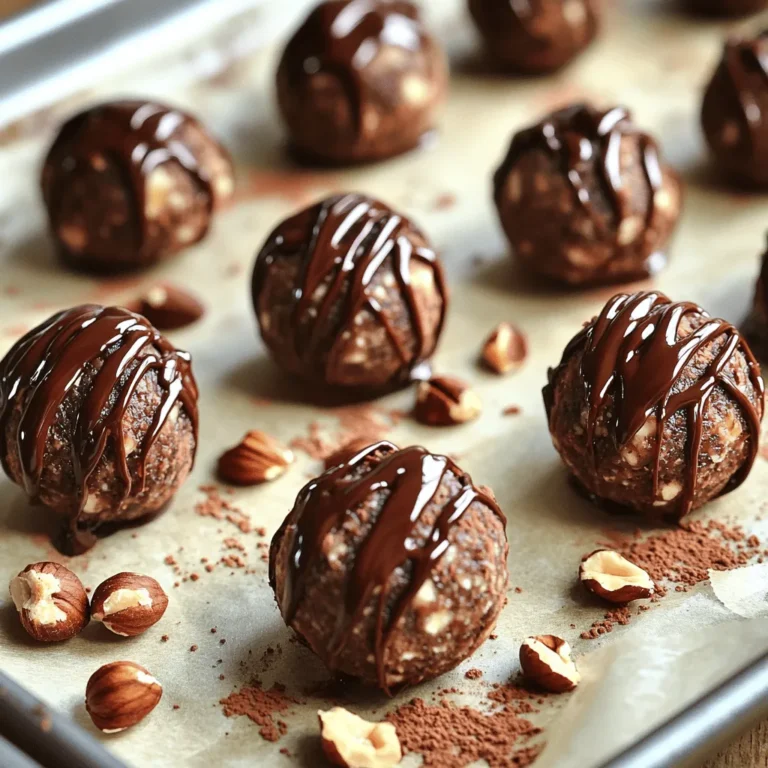
Chocolate Hazelnut Energy Balls Easy and Healthy Snack
Chai Spice Cookies Warm and Cozy Treats for All
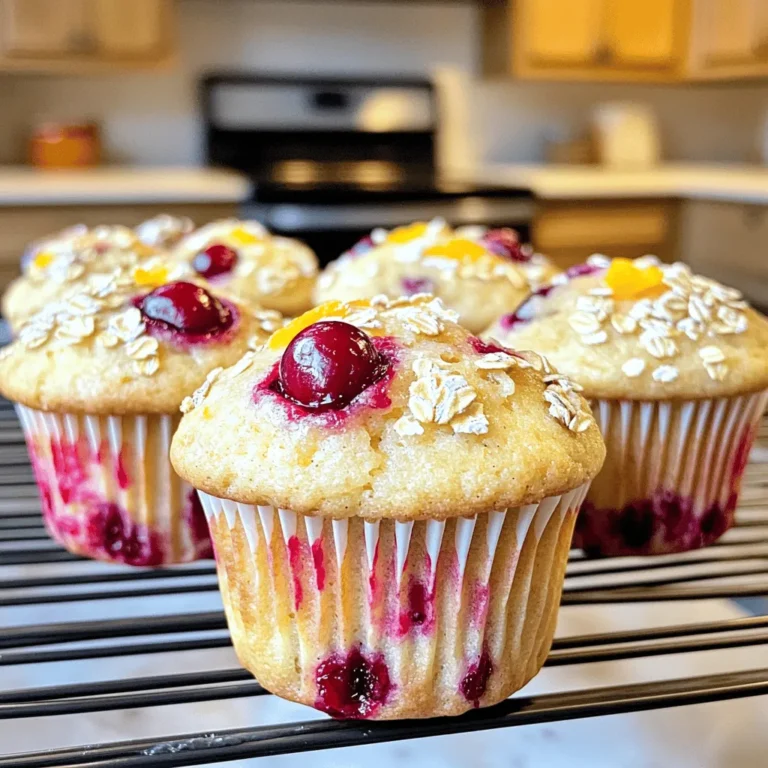
Cranberry Orange Muffins Fresh and Flavorful Treat
Page navigation
Previous Page
Previous
1
…
25
26
27
28
29
…
33
Next Page
Next
Home
Dinner
Appetizer
Desserts
Drinks
About
Contact
Privacy Policy
Toggle Menu Close
Search for:
Search

![To make this tasty casserole, you need some key items: - 1 loaf of brioche or challah bread, cut into 1-inch cubes - 6 large eggs - 2 cups whole milk - 1 cup heavy cream - 1/2 cup pure maple syrup - 1 teaspoon vanilla extract - 1 teaspoon ground cinnamon - 1/4 teaspoon salt - 1 cup fresh strawberries, sliced (or any berries of your choice) - Butter, for greasing the baking dish - Powdered sugar, for dusting (optional) These ingredients create a rich and creamy base that fills each bite with flavor. The bread soaks in the egg mixture, adding softness and taste. You can tweak the recipe to fit your taste. Here are some ideas: - Other fruits like blueberries, raspberries, or bananas - Nuts for added crunch, like walnuts or pecans - Chocolate chips for a sweet twist - Different spices like nutmeg or ginger - Yogurt or sour cream for tanginess Feel free to mix and match! Customizing makes this dish even more fun and tasty. If you lack some ingredients, here are easy swaps: - Use almond milk or oat milk instead of whole milk for a dairy-free option. - Swap heavy cream with half-and-half if you want a lighter touch. - Try agave syrup instead of maple syrup for a different sweet flavor. - For gluten-free, use gluten-free bread, ensuring it’s sturdy enough to hold up. These substitutions keep the dish good while catering to your needs. Don't hesitate to experiment! For the full recipe, check out the detailed instructions. First, set your oven to 350°F (175°C). Grab a 9x13-inch baking dish. Grease it well with butter. This step helps prevent the casserole from sticking. Make sure every corner gets some butter. In a large bowl, crack six eggs. Add two cups of whole milk and one cup of heavy cream. Pour in half a cup of pure maple syrup. Next, add one teaspoon of vanilla extract and one teaspoon of ground cinnamon. Sprinkle in a bit of salt, about one-fourth teaspoon. Whisk all these ingredients together until smooth. It should look creamy and well-mixed. Now, take your loaf of brioche or challah bread. Cut it into one-inch cubes. Gently fold these cubes into your egg mixture. Use a spatula to coat each piece. Let this sit for about ten minutes so the bread can soak it up well. After ten minutes, fold in one cup of sliced strawberries. Make sure they spread evenly in the mix. Pour everything into your greased baking dish. Spread it out evenly with a spatula. Now, place it in the oven. Bake for 45 to 50 minutes. The top should turn golden brown. Finally, let it cool for five to ten minutes. Dust with powdered sugar if you'd like. Enjoy your lovely Easy Baked French Toast Casserole! For the full recipe, check [Full Recipe]. To get a creamy custard, mix eggs and milk well. Use whole milk for richness. Heavy cream adds more creaminess. Whisk until the mixture is smooth. Let the bread soak for at least 10 minutes. This helps it absorb the custard. The bread should feel soft but not mushy. You can prepare this dish a day before. Just mix the custard and soak the bread. Cover it and store in the fridge overnight. This lets the bread soak up all the flavors. In the morning, just pop it in the oven. It saves you time and effort! Serve your casserole warm for the best taste. Cut it into squares for easy serving. Top with fresh berries or a drizzle of maple syrup. A dusting of powdered sugar adds a nice touch. You could also add a dollop of whipped cream. This makes it look fancy and inviting! For the full recipe, check out the details above. {{image_4}} You can change the fruit in your casserole. I love using fresh strawberries. They add sweetness and color. You can also use blueberries, raspberries, or blackberries. Apples work well too. Cut them into small pieces and mix them in. For a tasty twist, add bananas. They become soft and sweet after baking. Want to amp up the flavor? Try adding spices like nutmeg or ginger. A pinch of each can give your casserole a warm taste. You can also use different extracts. Almond extract adds a nice touch, while orange zest can brighten the dish. Just remember, a little goes a long way! If you're looking for healthier choices, you can make your casserole low-fat. Use low-fat milk and cream. You can also swap the brioche for whole grain bread. For a gluten-free version, use gluten-free bread. It tastes great and keeps the dish light. Don't worry; it will still be delicious! For the full recipe, check out the delightful baked French toast casserole. Enjoy trying out these variations! To store leftovers, let the casserole cool completely. Then, cover it tightly with plastic wrap or foil. You can also place it in an airtight container. This keeps it fresh for up to three days in the fridge. If you have leftover slices, it’s best to separate them with parchment paper to avoid sticking. When you are ready to eat, preheat your oven to 350°F (175°C). Place the casserole in an oven-safe dish. Cover it with foil to prevent it from drying out. Heat it for about 20 to 25 minutes, or until it is warm all the way through. You can also microwave individual pieces for quick reheating. Just be sure to cover them to keep moisture in. If you want to keep the casserole longer, freezing is a great option. First, cool it completely. Then, cut it into portions and wrap each one in plastic wrap. Place the wrapped pieces in a freezer-safe bag or container. This keeps them fresh for up to three months. When you are ready to eat, thaw in the fridge overnight. Then, reheat as mentioned above. Enjoy a tasty meal even after some time! Yes, you can make this dish ahead of time! You can prepare it the night before. Just mix the egg base and soak the bread. Cover it and place it in the fridge. In the morning, bake it fresh. This helps the flavors blend well. For the best taste, use brioche or challah bread. These breads soak up the egg mixture well. They also give a soft texture and rich flavor. You can also try French bread or even sourdough. You’ll know it’s done when the top is golden brown. The center should feel firm, not jiggly. You can use a toothpick to check. If it comes out clean, it’s ready to serve! Yes, you can make this casserole dairy-free! Use almond milk or oat milk instead of regular milk. Replace heavy cream with coconut cream or a dairy-free alternative. This keeps the dish tasty and creamy. Serve it warm for the best experience. You can top it with fresh berries or a drizzle of maple syrup. Dusting powdered sugar on top adds a nice touch. This dish is perfect for breakfast or brunch! For the full recipe, check the section above. This baked French toast casserole is easy and customizable. You learned about essential ingredients, how to prepare the dish, and great tips for success. Remember, you can add fruits or spices for flavor. Storage and reheating options make leftovers simple, too. Whether you serve it for breakfast or brunch, this dish shines. Enjoy making it your own and sharing it with others!](https://joymealplan.com/wp-content/uploads/2025/06/5fa2b09d-6300-4549-87d2-c50cfd6f4f67-768x768.webp)