Skip to content
About
Contact
Cookie Policy
Copyright Policy
Disclaimer
Search
Home
Dinner
Appetizer
Desserts
Drinks
About
Contact
Privacy Policy
Toggle Menu
Home
/
Dinner
- Page 26
Dinner
Cheeseburger Salad Bowl Flavorful and Nutritious Meal
Maple Glazed Salmon Tasty and Easy Dinner Recipe
Savory Sweet Potato Black Bean Chili Recipe to Enjoy
Savory Greek Chicken Gyro Wraps Easy and Flavorful
Margherita Flatbread Pizza Simple Flavorful Delight
BBQ Chicken Stuffed Sweet Potatoes Flavorful Meal
Sausage Tortellini Soup Flavorful Easy Comfort Meal
Creamy Mushroom Chicken Meatballs Delicious Dinner Option
Savory Slow Cooker Moroccan Chickpeas Easy Recipe
Rainbow Veggie Noodle Stir Fry Colorful and Crunchy Meal
Page navigation
Previous Page
Previous
1
…
24
25
26
27
28
…
65
Next Page
Next
Home
Dinner
Appetizer
Desserts
Drinks
About
Contact
Privacy Policy
Toggle Menu Close
Search for:
Search


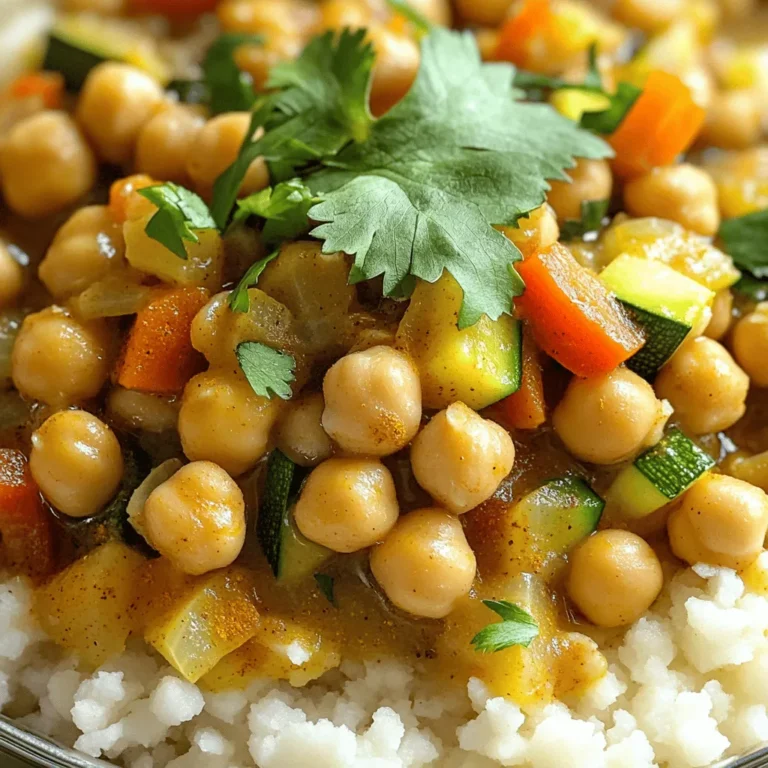
![To make this savory sweet potato black bean chili, gather these main ingredients: - 2 medium sweet potatoes, peeled and cut into 1-inch cubes - 1 can (15 oz) black beans, thoroughly rinsed and drained - 1 can (14.5 oz) diced tomatoes - 1 medium onion, finely chopped - 2 cloves garlic, finely minced - 1 bell pepper, diced - 1 cup vegetable broth - 2 teaspoons ground cumin - 1 teaspoon smoked paprika - 1 teaspoon chili powder - ½ teaspoon dried oregano - Salt and freshly cracked pepper to taste - 2 tablespoons extra virgin olive oil - Fresh cilantro, chopped, for garnish - Lime wedges, for serving If you want to take your chili to the next level, you can add some optional ingredients: - 1-2 jalapeños, diced for heat - 1 cup corn, for sweetness and crunch - 1 teaspoon cayenne pepper, for extra spice - 1 tablespoon apple cider vinegar, to brighten flavors This chili is not just tasty; it’s also packed with nutrition. Here’s a quick breakdown: - Calories: About 250 per serving - Protein: 10 grams - Fat: 7 grams - Carbohydrates: 45 grams - Fiber: 12 grams - Sugars: 5 grams This dish is rich in fiber and protein, making it a filling meal. It also provides a good source of vitamins A and C from the sweet potatoes and peppers. For the full recipe, check out the provided link! Start by gathering your ingredients. You need sweet potatoes, black beans, diced tomatoes, onion, garlic, bell pepper, vegetable broth, spices, olive oil, salt, and pepper. Make sure to peel and cube the sweet potatoes into 1-inch pieces. Rinse the black beans well and drain them. Chop the onion and garlic finely. Dice the bell pepper. This will set you up for success! Heat olive oil in a large pot over medium heat. Add the chopped onion and bell pepper. Sauté them for about 5 minutes until they are soft. Then, add the minced garlic. Stir for 1 minute until you smell its great aroma. Next, add the sweet potatoes, diced tomatoes, and vegetable broth. Sprinkle in cumin, smoked paprika, chili powder, oregano, and season with salt and pepper. Mix everything together. Bring the mix to a gentle boil, then lower the heat. Cover the pot and let it simmer for 25-30 minutes. The sweet potatoes should be tender and easy to fork. Finally, fold in the black beans and let them warm for about 5 minutes. Taste it and adjust the seasoning if you want. Serve the chili hot in vibrant bowls. Top each bowl with fresh cilantro and a lime wedge. The lime adds a nice burst of flavor. For more richness, you can add a dollop of avocado or sour cream. This chili tastes great and looks beautiful on the table. For the full recipe, check out the [Full Recipe] link! To boost flavors in your sweet potato black bean chili, use a few easy tricks. Start by sautéing your onions and peppers in olive oil. This step builds a solid flavor base. Make sure they soften and release their natural sugars. Next, add garlic for aroma, stirring it briefly. This brings out the richness in your chili. Using smoked paprika adds depth. It gives a subtle, smoky taste that lifts the dish. Always taste as you go. Adjusting the seasoning lets you find the perfect balance. Many people rush when cooking chili. Give your sweet potatoes enough time to soften. If they are still hard, your chili will not taste great. Another mistake is ignoring the beans. Be sure to fold them in gently so they don’t break apart. Also, don’t skip the lime! It brightens the flavors. Lastly, avoid overcooking the chili. A gentle simmer is enough to meld the flavors without losing texture. If you like heat, there are simple ways to spice things up. Start with mild chili powder, then add cayenne or hot sauce for more warmth. You can also use diced jalapeños for a fresh kick. For less heat, choose milder peppers and skip the extra spices. Always taste before serving. This way, you can adjust the spice level to suit everyone’s palate. {{image_4}} This chili is already vegetarian and vegan. You can enhance it by adding more veggies. Try using zucchini, corn, or mushrooms. These add texture and flavor. You can also swap the vegetable broth for a homemade version. Just boil water with herbs and spices to boost taste. This chili is gluten-free as is. If you want, you can add gluten-free grains. Quinoa or brown rice make great additions. Cook them separately and mix them in before serving. This will give you a hearty meal without gluten. You can make this chili your own with fun add-ins. Try adding fresh spinach or kale for extra greens. A splash of lime juice brightens the flavors. For a smoky kick, add chipotle peppers in adobo sauce. You can also top it with avocado, cheese, or yogurt. These toppings add creaminess and contrast. Check out the Full Recipe for more ideas! To keep your sweet potato black bean chili fresh, first, let it cool down. Then, pour it into an airtight container. This helps prevent spills and keeps the flavor locked in. You can store it in the fridge for up to three days. Make sure to label the container with the date for easy tracking. If you want to save your chili for later, freezing is a great option. Use freezer-safe bags or containers. Pour the chili into the bags, leaving some space for expansion. Seal them tightly to avoid freezer burn. You can freeze your chili for up to three months. Remember to label the bags with the date so you know when to use them. When you're ready to enjoy your chili again, there are a few ways to reheat it. The best method is to use a pot on the stove. Heat it over medium-low heat, stirring often until it's hot. If you prefer the microwave, pour the chili into a microwave-safe bowl. Cover it loosely and heat for 2-3 minutes, stirring halfway through. Always check that it’s hot all the way through before serving. For added flavor, squeeze some fresh lime juice on top before you dig in! If you do not have sweet potatoes, you can use butternut squash or regular potatoes. Both options will add a nice texture and flavor to the chili. You may also try carrots for a slightly sweeter taste. Adjust the cooking time as needed, since these veggies may take different times to cook. To add heat to your chili, you can use fresh jalapeños or serrano peppers. Chop them up and add them with the onions. You can also increase the chili powder or smoked paprika. Adding a dash of hot sauce or cayenne pepper at the end can give it an extra kick too! Yes, canned black beans work great in this recipe. They save time and still taste delicious. Make sure to rinse and drain them well before adding to the chili. This helps remove excess sodium and keeps the flavor balanced. To serve more people, just double or triple the ingredients. Keep the same cooking steps, but watch the cooking time. You may need a larger pot to accommodate the extra chili. Always taste and adjust seasoning as you increase the amounts. For the full recipe, check out the earlier section. This article covered key ingredients and cooking steps for your dish. You learned about optional ingredients for added flavor and useful tips to improve taste. We explored variations, including vegetarian and gluten-free options. You also picked up on how to store leftovers and common questions. Remember, cooking is fun, and experimenting makes it even better. Enjoy your dish and feel proud of your culinary skills!](https://joymealplan.com/wp-content/uploads/2025/07/8c039768-80c3-4c1c-94c6-06aef8e7156d-768x768.webp)
![- 1 lb chicken breast, sliced into strips - 2 tablespoons extra-virgin olive oil - 2 teaspoons dried oregano - 1 teaspoon garlic powder - 1 teaspoon smoked paprika - Salt and freshly ground black pepper to taste - 4 large pita breads - 1 cup shredded romaine lettuce - 1 large ripe tomato, diced - 1/2 medium red onion, thinly sliced - 1 cup cucumber, diced - 1/2 cup tzatziki sauce (store-bought or homemade) - Fresh parsley, finely chopped (for garnish) These ingredients create a tasty and fresh wrap. The chicken is the star, tender and juicy after marinating. The olive oil adds healthy fat, while oregano brings that classic Greek flavor. Garlic and smoked paprika give depth and warmth to each bite. You can mix in extras for fun twists. Consider adding: - Feta cheese for a salty touch - Bell peppers for a crunchy bite - Olives for a briny flavor - Avocado for creaminess These add-ins can make your gyro unique. You can customize it to fit your taste. Each ingredient brings health benefits. Chicken is high in protein, perfect for muscle repair. Olive oil is rich in good fats that support heart health. Fresh veggies like lettuce and cucumber offer fiber and hydration. Tomatoes add vitamins and antioxidants that fight disease. With these ingredients, you enjoy a meal that is not only delicious but good for you too. For the complete recipe, check out the Full Recipe. To start, I mix the chicken strips with olive oil, oregano, garlic powder, smoked paprika, salt, and pepper. This blend adds great flavor to the chicken. I make sure to coat the chicken well. After mixing, I cover the bowl with plastic wrap. I let it sit in the fridge for at least 30 minutes. For the best taste, I recommend marinating for up to 2 hours. Next, I heat my grill or skillet over medium-high heat. Once it's hot, I add the marinated chicken strips. I avoid overcrowding the pan to ensure even cooking. I let them cook for about 6-8 minutes. I flip them occasionally until they turn golden brown. I check that the internal temperature reaches 165°F. After cooking, I take the chicken off the heat and let it rest for a few minutes to keep it juicy. While the chicken rests, I prepare the pita bread. I warm it on the grill or in the microwave. If I use the microwave, I heat it for about 15-20 seconds. This helps the pita become soft and easy to wrap. Next, I chop the veggies. I dice the tomato and cucumber, and slice the red onion thinly. I also shred the romaine lettuce. These fresh toppings will add crunch and flavor to my wraps. Once everything is ready, I can start assembling the wraps. For the full recipe, check the details above! To get the best flavor in your chicken, use fresh ingredients. Start with quality chicken breast. Marinate it with olive oil, oregano, garlic powder, and smoked paprika. Each of these adds a unique taste. Let the chicken marinate for at least 30 minutes. For deeper flavor, marinate it for up to 2 hours. This gives the spices time to soak in. When cooking, use a hot grill or skillet. This helps to seal in the juices. Tzatziki sauce is key for your wraps. If you make it at home, use plain yogurt as the base. Add diced cucumber, minced garlic, lemon juice, and salt. Mix well for a refreshing taste. Chill the sauce for a bit to let the flavors blend. You can also buy tzatziki sauce if you're short on time. Make sure to taste it before you serve. Adjust the seasoning as needed to suit your taste. Wrapping your gyro properly is crucial. Start with a warm pita. This makes it pliable and easy to fold. Place a generous amount of tzatziki sauce in the center. Layer your veggies and chicken on top. When wrapping, tuck in the edges. This keeps all the tasty filling secure. Hold the wrap tightly as you eat. This way, you won't lose any delicious bites. Try this method for a neat and enjoyable meal. For more details, check out the Full Recipe. {{image_4}} If you want a meat-free meal, try using grilled vegetables or falafel. You can use zucchini, bell peppers, or eggplant. These veggies add a nice char and flavor. Place them in the marinade, just like you would with chicken. Cook them until they are soft and golden. This choice keeps the wrap tasty and satisfying. While tzatziki is classic, you can explore other sauces. Try hummus for a creamy texture. A spicy feta dip can add a kick. You might also enjoy adding a yogurt-based dressing or tahini sauce. Each sauce gives a new twist to your gyro wrap. Play around to find your favorite combination. Feel free to change up the veggies in your gyro wrap. Add roasted red peppers or olives for more flavor. Try shredded carrots or sliced radishes for some crunch. You can also use fresh herbs like dill or mint. Each addition gives your wrap a unique taste and makes it fun to create. After your meal, store any leftover gyro wraps in the fridge. Place them in an airtight container. This keeps them fresh for about 2-3 days. If you want to keep them longer, separate the chicken and veggies from the pita. This prevents sogginess. When reheating, use a skillet for the chicken. Heat it over medium heat for about 5 minutes, stirring gently. This helps keep the chicken juicy. For the pita, warm it in a microwave for 15-20 seconds. You can also use a skillet, heating it for about 1 minute per side. If you want to prepare ahead, you can freeze the chicken. Place cooked chicken strips in a freezer bag. Remove as much air as possible. They can last up to 3 months in the freezer. When ready to eat, thaw them in the fridge overnight before reheating. Avoid freezing the pita and fresh veggies; they taste best fresh. For more details, check the Full Recipe. Yes, you can use pre-cooked chicken. It saves time and effort. Just heat it before adding it to the wraps. You can also add your favorite spices to boost the flavor. This option is great for busy days or quick meals. Serve Greek Chicken Gyro Wraps warm. They taste best right after you make them. You can add extra tzatziki sauce on the side for dipping. Pair with a fresh salad or roasted veggies for a complete meal. It’s all about enjoying the flavors together. You can find ready-made Greek Chicken Gyro Wraps at many grocery stores. Look in the deli or prepared food section. Some restaurants also sell them for takeout. Check local Mediterranean or Greek eateries too. If you want a quick fix, this is a great option. For the full experience, try making them fresh at home using the [Full Recipe]. Greek chicken gyro wraps are full of flavor and easy to make. We covered key ingredients, from chicken to tzatziki. I shared marinating and cooking steps to help you nail it. You also learned tips for great wraps and tasty variations. Plus, I included storage info to keep your meal fresh. These wraps can fit any taste, and they are great for meal prep. Enjoy making your own gyro wraps, and feel free to get creative!](https://joymealplan.com/wp-content/uploads/2025/07/794e22a0-9e47-4100-a61d-0611f2557fa8-768x768.webp)