Skip to content
About
Contact
Cookie Policy
Copyright Policy
Disclaimer
Search
Home
Dinner
Appetizer
Desserts
Drinks
About
Contact
Privacy Policy
Toggle Menu
Home
/
Dinner
- Page 28
Dinner
Everything Bagel Crusted Salmon Flavorful Easy Recipe
Sheet Pan Lemon Garlic Salmon Tasty Family Dinner
Maple Dijon Glazed Salmon Flavorful and Easy Recipe
Garlic Herb Butter Salmon Rich and Flavorful Recipe
Cajun Shrimp Alfredo Flavorful and Creamy Delight
Lemon Butter Shrimp Pasta Delightful and Simple Recipe
Garlic Parmesan Orzo Flavorful and Simple Side Dish
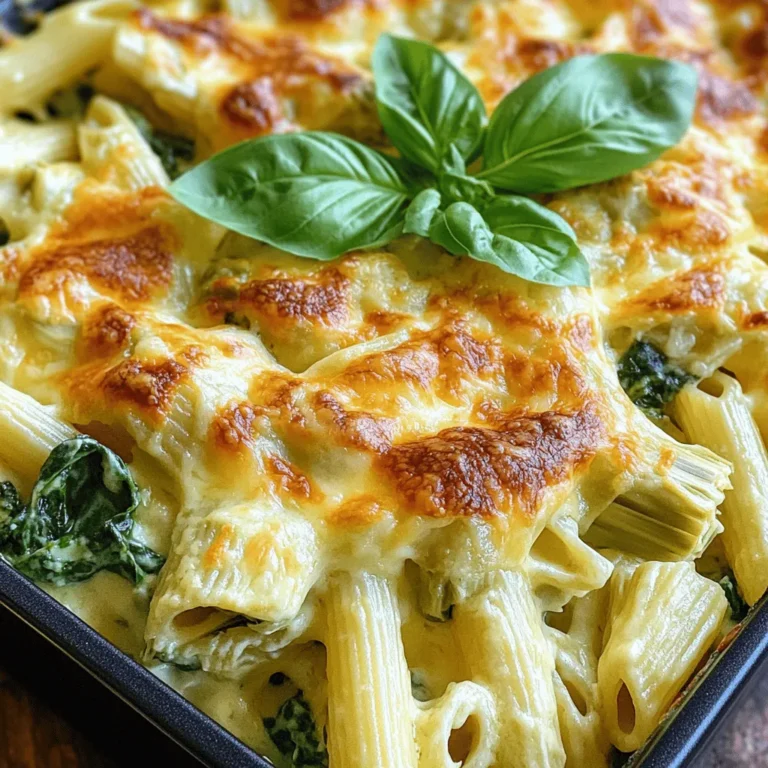
Spinach Artichoke Pasta Bake Delightful and Simple
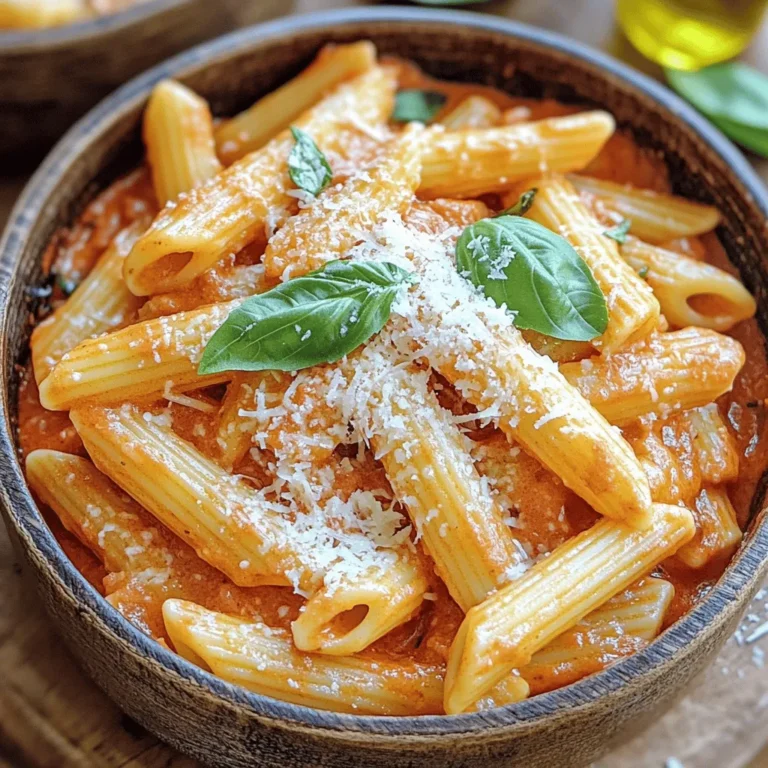
One Pot Creamy Tomato Pasta Simple and Tasty Delight
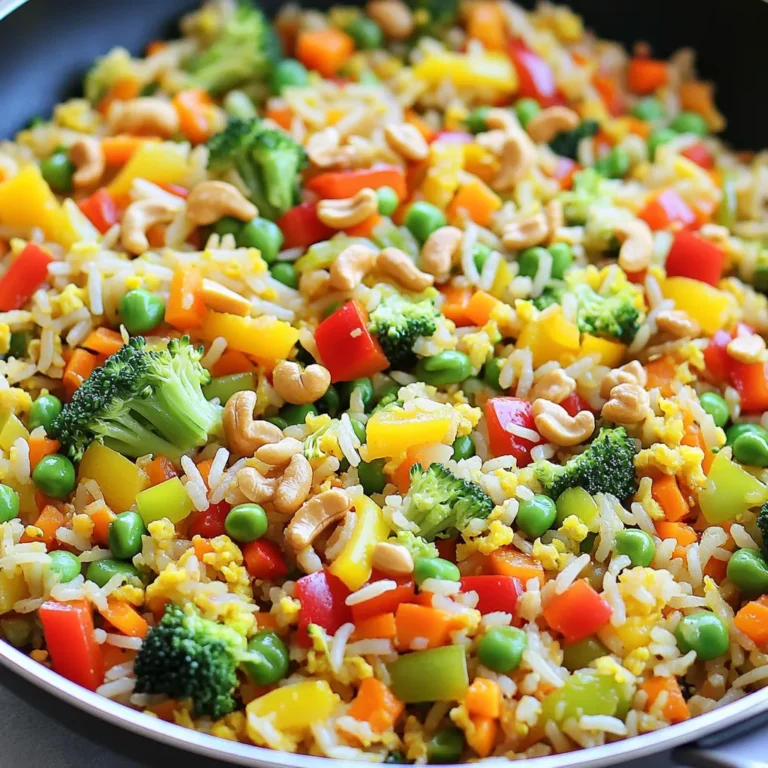
Veggie Packed Fried Rice Tasty and Healthy Meal
Page navigation
Previous Page
Previous
1
…
26
27
28
29
30
…
65
Next Page
Next
Home
Dinner
Appetizer
Desserts
Drinks
About
Contact
Privacy Policy
Toggle Menu Close
Search for:
Search

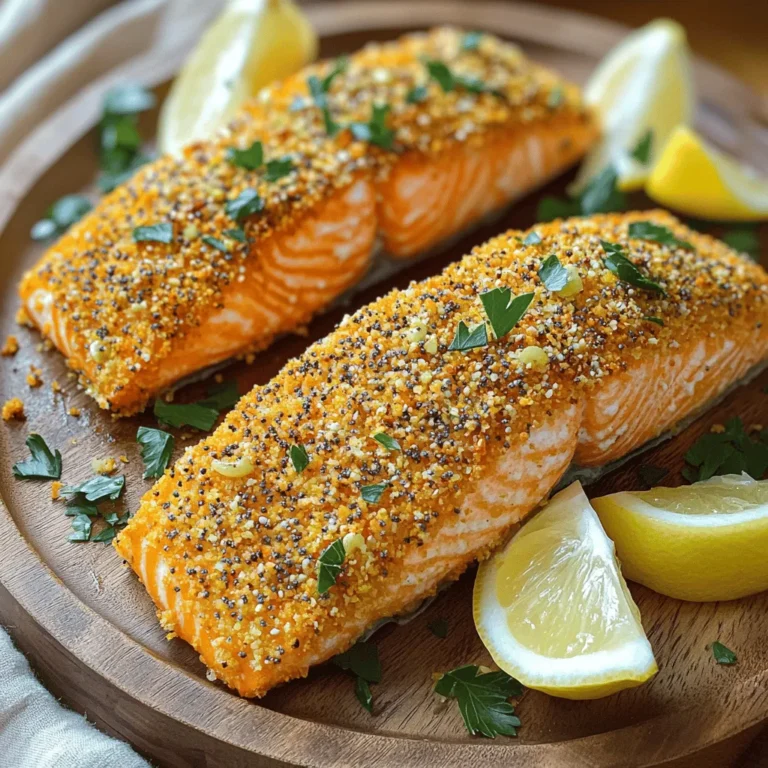
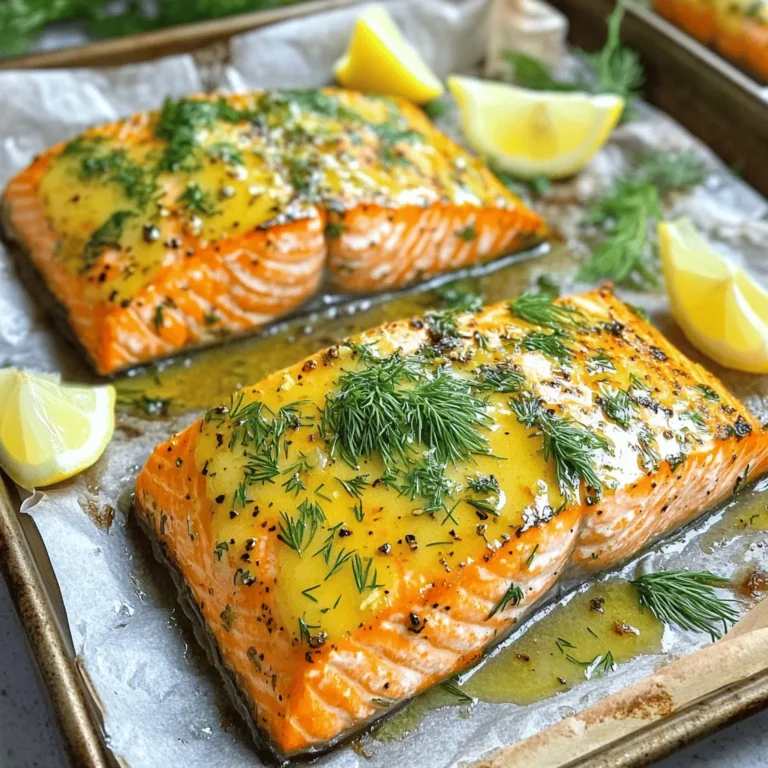
. - Preheat the oven to 400°F (200°C). - Line the sheet pan with parchment paper. - Whisk together olive oil, garlic, lemon juice, lemon zest, dill, salt, and pepper. - This mix adds flavor and moisture to your salmon. - Coat salmon fillets with the marinade. - Arrange cherry tomatoes and asparagus on the sheet pan. - Make sure the veggies are spread out for even cooking. - Transfer the pan to the oven and bake for 15-20 minutes. - The salmon will be done when it flakes easily with a fork. - Check that the asparagus is tender but still crisp. - Let the dish rest for a few minutes before serving. - Garnish with lemon slices and optional dill for a fresh look. I love how easy this dish is to prepare. You can find the Full Recipe for more details. To ensure salmon is perfectly cooked, use a fork to test it. When it flakes easily, it’s done. Aim for an internal temperature of 145°F. This way, your salmon will be moist and tender. Resting time is key after cooking. Let the salmon sit for about 5 minutes before serving. This helps the juices redistribute, making each bite more flavorful. Serving directly from the pan gives a cozy feel. It makes the meal feel more relaxed and invites everyone to dig in. For plating, use a large plate. Place a salmon fillet in the center. Arrange the asparagus and tomatoes around it. A touch of fresh dill on top adds color and flavor. To boost flavor, consider adding spices like paprika or smoked sea salt. Fresh herbs like basil or parsley can also work well. For marinades, try mixing honey with soy sauce for a sweet twist. You can also use a splash of white wine to elevate the dish. For the full recipe, check the links above. {{image_4}} You can easily swap salmon for other fish like trout or cod. These fish cook similarly and absorb flavors well. If you want a different protein, try chicken breasts. They work great too. For vegetarian or vegan options, use tofu or tempeh. Both can soak up the lemon garlic marinade and bring great taste. Using seasonal vegetables can brighten your dish. In spring, try green beans or baby carrots. Summer is perfect for zucchini or bell peppers. In fall, consider sweet potatoes or Brussels sprouts. Winter brings root vegetables like parsnips and turnips. If you want to switch out asparagus or tomatoes, don't hesitate. Broccoli or cauliflower can add nice crunch and flavor. Experimenting with herbs and spices opens new doors. Try fresh basil or parsley for a bright twist. If you want a bolder taste, use smoked paprika or cumin. You can also play with sweet and savory. Adding fruits like pineapple or peaches can bring a fun contrast to the dish. Mixing flavors can create a memorable meal! For the full recipe, check out the [Full Recipe]. Store any leftover salmon and veggies in the fridge. Use airtight containers to keep them fresh. Make sure the lid fits tightly. This helps maintain flavor and texture. It's best to eat leftovers within two days for the best taste. To reheat salmon, use low heat to avoid drying it out. You can use the oven or microwave. For the oven, set it to 350°F (175°C) and warm for about 10 minutes. If using the microwave, place salmon on a plate and cover it with a damp paper towel. Heat in short bursts of 30 seconds until warmed through. You can freeze cooked salmon and veggies for later. Wrap each piece tightly in plastic wrap, then place in a freezer bag. Be sure to remove as much air as possible. For thawing, move them to the fridge for a few hours or overnight. This keeps the salmon tasty and moist. How long to bake salmon at different temperatures? For salmon, the general rule is to bake it at 400°F for 15-20 minutes. If you choose 375°F, it may take 20-25 minutes. At 425°F, check it after 12-15 minutes. Cooking time varies with thickness and oven accuracy. Always check for doneness to avoid overcooking. Can I use frozen salmon for this recipe? Yes, you can use frozen salmon. Just be sure to thaw it first. Place it in the fridge overnight or use cold water for quicker thawing. Pat the salmon dry before adding the marinade. This helps it absorb the flavors better. What temperature should salmon be cooked to? Salmon should reach an internal temperature of 145°F. Use a meat thermometer to check. When done, it should flake easily with a fork. The color will change from bright pink to opaque. How can I tell when the salmon is done? You can tell salmon is ready when it flakes easily. Press it gently with a fork. If it breaks apart, it's done. The color should be a light pink with a slightly opaque appearance. What sides pair well with lemon garlic salmon? Great sides include rice, quinoa, or a fresh salad. Roasted potatoes or steamed veggies also work well. These sides complement the salmon's bright flavors. You might want to add a squeeze of lemon on top. Is it okay to substitute any ingredients? Yes, you can substitute ingredients. Use any firm fish if you don't have salmon. For veggies, try broccoli or zucchini. You can swap fresh herbs with dried ones, but use less. Adjust the flavors to suit your taste! For the complete recipe, check out the Full Recipe section. This blog post showed you how to make a delicious lemon garlic salmon dish. We covered the main ingredients, easy steps for cooking, and tips for great results. You learned about variations and storing leftovers for later. Cooking should be fun, and this recipe is simple and tasty. Try it out and enjoy your meal. Once you master this dish, feel free to experiment with your own flavors and sides. Happy cooking!](https://joymealplan.com/wp-content/uploads/2025/07/8e928ca0-d1e7-48e9-9001-0d995acac6dc-768x768.webp)
![Let’s dive into what you need for this flavorful dish. Each ingredient plays a key role in making Cajun Shrimp Alfredo a true delight. - 8 oz fettuccine pasta - 1 lb large shrimp, peeled and deveined - 2 tablespoons Cajun seasoning - 2 tablespoons olive oil - 3 cloves garlic, minced - 1 cup heavy cream - 1 cup freshly grated Parmesan cheese - 1/4 cup fresh parsley, finely chopped - Salt and black pepper to taste - Lemon wedges, for a zesty garnish The fettuccine pasta gives the dish its heartiness. I prefer large shrimp because they soak up flavors well. Cajun seasoning brings the heat and spice, making this dish pop. Olive oil is perfect for sautéing the shrimp, while garlic adds depth. Heavy cream creates that rich and creamy sauce we crave. The Parmesan cheese melts in beautifully, adding a savory note. Fresh parsley adds color and freshness, while salt and black pepper enhance all the flavors. Finally, lemon wedges brighten every bite. Gather these ingredients, and let’s start cooking! For the full recipe, check the details above. Bring a large pot of salted water to a boil. The water should bubble steadily. Add the fettuccine to the pot. Cook the pasta according to the package instructions. Aim for al dente, which means it should be firm but tender. Once cooked, drain the pasta. Reserve about 1/4 cup of the pasta water. This water will help adjust the sauce later. In a medium bowl, toss the peeled and deveined shrimp with Cajun seasoning. Make sure each shrimp gets a good coating. This seasoning gives the shrimp its bold flavor. You want every bite to burst with flavor. Heat olive oil in a large skillet over medium heat. Wait until the oil shimmers before adding the shrimp. Spread the shrimp in a single layer. Cook for 2-3 minutes on each side. Look for the shrimp to turn pink and opaque. This means they are fully cooked. Once done, remove the shrimp from the skillet and keep them warm on a plate. In the same skillet, add minced garlic. Sauté it for about 30 seconds. You want it fragrant but not burnt. Next, pour in the heavy cream. Stir constantly to blend it with the garlic. Bring the mixture to a gentle simmer. Lower the heat to keep it warm without boiling. Gradually whisk in the freshly grated Parmesan cheese. Continue whisking until the cheese melts and the sauce is smooth. If the sauce is too thick, add some of the reserved pasta water. This helps you reach your desired consistency. Add the cooked fettuccine and shrimp back into the skillet. Toss everything together, ensuring the pasta and shrimp are well coated with sauce. Taste and season with salt and black pepper if needed. Remove the skillet from the heat. Stir in the freshly chopped parsley for color and freshness. Plate the Cajun Shrimp Alfredo right away. Garnish with lemon wedges for a zesty finish. This adds a nice pop of flavor and brightness to your dish. For a lovely presentation, serve the pasta in deep bowls. Place shrimp on top and sprinkle with more parsley. Enjoy your flavorful and creamy delight! For the full recipe, check the details above. Seasoning is key to great Cajun Shrimp Alfredo. The right spices bring warmth and depth. I love using Cajun seasoning for its bold taste. It includes paprika, garlic powder, and cayenne pepper. You can adjust the heat to your liking. Fresh ingredients make a big difference too. Use plump shrimp and fresh garlic. This ensures each bite bursts with flavor. One common mistake is overcooking shrimp. Shrimp cooks fast, so watch them closely. They should turn pink and opaque in just a few minutes. If you cook them too long, they’ll become rubbery. Another mistake is the sauce consistency. A sauce that is too thick can overpower the dish. Too thin, and it won't coat the pasta well. Aim for a creamy texture that clings to every strand. If your sauce is too thick, use reserved pasta water. Add it a little at a time until you reach the right consistency. This also helps the sauce stick to the pasta better. If it’s too thin, add a bit more cheese. Grated Parmesan works wonders for thickening. Balancing flavors is crucial too. Taste as you go, and adjust with salt or lemon juice. This brightens the dish and enhances the overall taste. For the Full Recipe, check your favorite cooking site! {{image_4}} You can swap shrimp for other seafood. Scallops or crab meat taste great too. If you prefer meat, use chicken or sausage. Each option offers a unique twist. You can also change the pasta type. Fettuccine is the classic choice, but penne or linguine work well too. Whole wheat or gluten-free pasta is an option for different diets. Just be sure to adjust cooking times. If you want less spice, use less Cajun seasoning. Start with one tablespoon and taste as you go. You can also add a touch of paprika for flavor without heat. For more heat, try adding cayenne pepper or crushed red pepper flakes. A little goes a long way, so add slowly. Adjusting the spice lets you customize the dish to your taste. Adding vegetables can make this dish even better. You can toss in bell peppers, spinach, or broccoli. They add color and nutrients while keeping it tasty. For more protein options, think about adding tofu or chickpeas. These options provide great texture and flavor. Don't hesitate to mix and match to find your favorite version of Cajun Shrimp Alfredo. For the full recipe, click here: [Full Recipe]. To keep your Cajun Shrimp Alfredo fresh, store it in the fridge. Use airtight containers to prevent moisture loss. Make sure the dish cools down before sealing it. This way, you can avoid soggy pasta. I recommend dividing the leftovers into smaller portions. This makes it easier to reheat only what you need. When you are ready to enjoy your leftovers, use the stovetop or microwave for reheating. The stovetop gives you better control over the heat. Heat it in a skillet on low. Stir it often to warm evenly. If it looks too thick, add a splash of milk or cream to loosen it up. The microwave works too, but be cautious. Heat in short bursts. Stir between each burst to avoid hot spots. Yes, you can freeze Cajun Shrimp Alfredo! However, the shrimp may change texture after freezing. To freeze, let the dish cool completely. Then, pack it in a freezer-safe container or bag. Remove as much air as possible to prevent freezer burn. When you are ready to eat, thaw it in the fridge overnight. Reheat as mentioned before to bring back the creamy goodness. For the best taste, try to eat it within three months. For the complete cooking experience, check out the Full Recipe. Cajun Shrimp Alfredo is a creamy pasta dish that blends Italian and Cajun flavors. It features tender shrimp, seasoned with a mix of spices, served in a rich Alfredo sauce. This dish has roots in both Cajun cooking and classic Italian cuisine. The combination of heat and creaminess makes it a favorite for many. Yes, you can use different pasta types! While fettuccine is traditional, you can try linguine, penne, or even spaghetti. Each pasta shape will hold the sauce differently, giving a unique taste experience. Choose your favorite pasta based on texture and how it pairs with the sauce. The spice level of Cajun Shrimp Alfredo largely depends on the Cajun seasoning you use. Cajun seasoning can range from mild to hot. If you prefer less heat, start with a smaller amount of seasoning. You can always add more to suit your taste. This dish should be flavorful without overwhelming your palate. You can prep elements ahead of time. Cook the pasta and shrimp separately, then store them in the fridge. Make the sauce fresh when you're ready to eat. This keeps the pasta from becoming soggy. If you need to reheat, do so gently to maintain its creamy texture. Cajun Shrimp Alfredo pairs well with several side dishes. Consider a simple green salad with a lemon vinaigrette. Garlic bread is also a great choice for scooping up that creamy sauce. For a heartier meal, you can serve it with roasted vegetables or steamed asparagus to add some crunch. This blog post guides you through making Cajun Shrimp Alfredo. You learned about essential ingredients, cooking techniques, and storage tips. I hope the simple steps help you create a tasty meal. Remember, fresh ingredients and proper seasoning boost flavor. Avoid common mistakes like overcooking the shrimp. If you change the ingredients, you still keep the dish delicious. With practice, you’ll master this recipe. Enjoy sharing this meal with friends and family!](https://joymealplan.com/wp-content/uploads/2025/07/5e89eb09-a87e-488e-952d-2e76586b8ac0-768x768.webp)
![To make Lemon Butter Shrimp Pasta, gather these items: - 8 oz linguine or spaghetti - 1 lb large shrimp, peeled and deveined - 4 tablespoons unsalted butter - 3 cloves garlic, minced - Zest and juice of 1 large lemon - 1/2 teaspoon crushed red pepper flakes (optional) - Salt and freshly ground black pepper, to taste - 1/4 cup fresh parsley, finely chopped - Grated Parmesan cheese for serving (optional) If you need substitutes, here are some ideas: - Use fettuccine instead of linguine or spaghetti. - Swap shrimp for scallops or chicken. - Use olive oil in place of butter for a lighter dish. - Fresh garlic can be replaced with garlic powder, but use less. To ensure great taste, focus on freshness: - Buy shrimp that smells clean, like the ocean. - Look for shrimp with a firm texture and a slight sheen. - Choose fresh parsley with vibrant green leaves. - Use fresh lemons for the best flavor, avoiding dried or bottled juice. These tips help create a dish that is as delightful as it is simple. For the complete recipe, refer to the [Full Recipe]. Start by boiling a large pot of salted water. Once it bubbles, add 8 oz of linguine or spaghetti. Cook until the pasta is al dente. This usually takes about 8 to 10 minutes. Before draining, save 1/2 cup of the pasta water. Drain the pasta and put it in a big bowl. In a large skillet, melt 2 tablespoons of unsalted butter over medium heat. When the butter bubbles, add 1 lb of peeled and deveined shrimp. Sprinkle salt, black pepper, and crushed red pepper flakes if you want some heat. Cook the shrimp for 3 to 4 minutes until they turn pink and opaque. Take the shrimp out and set them aside on a plate. In the same skillet, add 2 more tablespoons of unsalted butter. Then, add 3 cloves of minced garlic. Sauté for about a minute. You want the garlic fragrant but not browned. Next, stir in the zest and juice of 1 large lemon. Mix well until combined. Now, add the cooked pasta to the skillet with the lemon garlic sauce. Toss gently to coat the noodles. If it feels dry, add a little of the reserved pasta water. Keep tossing until the pasta reaches a creamy texture. Fold in the cooked shrimp and 1/4 cup of chopped parsley. Make sure everything is evenly mixed. Taste the dish. Adjust the flavor with extra salt or black pepper if needed. Serve the pasta hot in shallow bowls. For a nice touch, add extra parsley and a sprinkle of grated Parmesan cheese on top. To cook shrimp just right, time is key. You want shrimp to turn pink and opaque. This usually takes about 3 to 4 minutes on medium heat. If you overcook them, they become tough. Keep an eye on them while they sauté. If they curl tightly, they are likely overdone. Take them out as soon as they are done. Lemon is the star of this dish. Zest and juice both bring bright flavor. Start with just the juice of one lemon. Taste the pasta sauce before adding more. If it’s too sour, add a pinch of sugar. This helps balance the flavors. You can also add more butter to soften the lemon taste. Sometimes things don’t go as planned. If your sauce is too thick, add some of the reserved pasta water. This will help loosen it up. If the shrimp seems bland, sprinkle a little more salt. For a bit of heat, add extra crushed red pepper flakes. Just remember to adjust slowly and taste often. For the full recipe, check out the detailed instructions. {{image_4}} You can make this dish even better by adding veggies. Spinach, cherry tomatoes, and bell peppers work well. Just sauté them with the shrimp for a quick cook. For a fresh crunch, try adding arugula or zucchini at the end. This boosts flavor and nutrition. If you want to switch up the protein, consider using scallops or chicken. Scallops cook fast like shrimp. Just remember to adjust the cook time. Chicken needs a bit longer. Cut it into small pieces to ensure even cooking. You can also use tofu for a vegetarian option. If you need a gluten-free option, swap regular pasta for gluten-free pasta. Rice noodles or zucchini noodles are great choices. They absorb the sauce well and keep the dish light. Always check labels to ensure your ingredients are gluten-free. To keep your lemon butter shrimp pasta fresh, store it in an airtight container. Place it in the fridge within two hours of cooking. It will stay good for up to three days. When you’re ready to eat, check for any signs of spoilage, like a sour smell or unusual texture. You can freeze this dish for longer storage. Allow the pasta to cool completely before freezing. Use a freezer-safe container or bag, and try to remove as much air as possible. It can last in the freezer for about two months. When you are ready to enjoy it, thaw it in the fridge overnight. For reheating, use the stovetop for best results. Place the pasta in a skillet over medium heat. Add a splash of water or broth to help revive the sauce. Stir often until heated through. You can also use the microwave, but be sure to cover it to keep moisture in. Heat it in short bursts, stirring in between. This will help keep the pasta from drying out. For extra flavor, add a squeeze of fresh lemon juice before serving. For a full recipe, check out the details above! To make Lemon Butter Shrimp Pasta, start by cooking the pasta. Boil salted water, add linguine or spaghetti, and cook until al dente. Reserve some pasta water before draining. Next, melt butter in a skillet over medium heat. Add shrimp, season with salt and pepper, and sauté until pink. Remove shrimp and cook garlic in the same skillet. Add lemon zest and juice, then return the pasta and shrimp. Toss everything together, adding reserved pasta water as needed. Finish with parsley and serve hot. For the complete recipe, check the Full Recipe section. You can serve Lemon Butter Shrimp Pasta with a fresh green salad or garlic bread. A light, crisp white wine pairs well too. For added flavor, consider a side of roasted vegetables. These options enhance the meal and balance the rich flavors. Yes, you can use frozen shrimp. Just thaw them before cooking. Place the shrimp in cold water for about 15-20 minutes. After they are thawed, peel and devein if needed. This allows you to enjoy this dish even when shrimp is not fresh. To prevent pasta from sticking, use plenty of water when boiling. Stir the pasta during the first few minutes of cooking. Drain it well and toss it with a little olive oil after draining. This keeps the noodles separate and ready for the sauce. Linguine and spaghetti are the best choices for this dish. They hold the sauce well and complement the shrimp. You can also try fettuccine for a thicker noodle. Choose a pasta that you enjoy, as it can enhance your overall experience. In this blog post, I covered the key ingredients for Lemon Butter Shrimp Pasta and offered tips on making it shine. You learned how to cook shrimp perfectly and balance that bright lemon flavor. I shared variations to suit your taste and provided essential storage info for leftovers. With these steps, you can create a delicious meal. Try new ingredients or variations to keep things exciting. Enjoy making this dish and impressing your family and friends!](https://joymealplan.com/wp-content/uploads/2025/07/d5b21a26-0d28-4d5a-916e-1d45c765ab6a-768x768.webp)
![- 1 cup orzo pasta - 2 tablespoons extra virgin olive oil - 4 cloves garlic, finely minced - 3 cups vegetable broth - 1 cup fresh spinach, chopped - 1/2 cup freshly grated Parmesan cheese - 1 teaspoon lemon zest - Salt and black pepper to taste - Fresh parsley for garnish The star of this dish is orzo pasta. It’s small and cooks fast. I love how it soaks up flavors. The extra virgin olive oil adds a rich taste. Garlic is key here too; it brings a warm aroma. I prefer fresh garlic, as it packs a punch. The vegetable broth makes this dish savory and adds depth. Fresh spinach gives color and nutrients. Parmesan cheese gives that creamy finish. Lemon zest brightens everything up. A dash of salt and pepper helps balance the flavors. - Red pepper flakes for added spice - Additional vegetables (e.g., cherry tomatoes, peas) If you like heat, add red pepper flakes. They give a nice kick. You can also toss in more veggies. Cherry tomatoes add sweetness, while peas bring a pop of color. These extras make the dish even more fun. - Caloric value per serving - Key nutrients present Each serving of Garlic Parmesan Orzo has around 250 calories. It's rich in carbohydrates, which gives you energy. The spinach adds iron and vitamins. Parmesan brings protein and calcium. This dish is not just tasty, it’s also good for you! For the full recipe, check out Garlic Parmesan Orzo Delight. 1. In a medium pot, bring 3 cups of vegetable broth to a rolling boil. 2. Once boiling, add 1 cup of orzo pasta. Cook it until al dente, which takes about 8-10 minutes. Stir it occasionally to prevent sticking. 1. While the orzo cooks, heat 2 tablespoons of extra virgin olive oil in a large skillet over medium heat. 2. Add 4 cloves of finely minced garlic to the skillet. Sauté it for about 1 minute. The garlic should smell fragrant, but don’t let it brown. 1. Once the orzo is cooked, reserve about 1/2 cup of the broth. Drain the rest. 2. Add the cooked orzo to the skillet with the garlic. 3. Pour in the reserved broth and stir gently to combine. 4. Next, add 1 cup of roughly chopped fresh spinach to the skillet. Cook for 2-3 minutes until the spinach wilts. 5. Remove the skillet from heat, then fold in 1/2 cup of freshly grated Parmesan cheese and 1 teaspoon of lemon zest. 6. Season to taste with salt and freshly cracked black pepper. 7. Transfer the garlic Parmesan orzo to a serving dish. Garnish with fresh parsley for a pop of color. For the full recipe, check out the detailed instructions above. Enjoy your flavorful and simple side dish! - How to avoid overcooking orzo: Keep a close eye on the orzo as it cooks. Stir it often to prevent sticking. Start checking for doneness a minute or two before the package time ends. You want it al dente, which means it should still have a little bite. - Tips for perfectly sautéed garlic: Use a medium heat for your skillet. Add minced garlic and stir constantly. Cook it for about one minute until it smells great. Be careful not to let it brown, as this can make it taste bitter. - Best practices for garnishing: Always garnish your dish right before serving. Fresh parsley adds a nice color and flavor. A sprinkle of extra Parmesan on top makes it even better. - Suggested pairings: Garlic Parmesan orzo pairs well with a light salad or grilled chicken. You can also serve it with roasted vegetables for a balanced meal. - How to store leftovers: Let the orzo cool to room temperature. Then, place it in an airtight container. Store it in the fridge for up to three days. - Reheating recommendations: When reheating, add a splash of vegetable broth to prevent it from drying out. Heat on low in a skillet or microwave until warm. For the full recipe, check out the Garlic Parmesan Orzo Delight. {{image_4}} You can easily adapt Garlic Parmesan Orzo to fit a vegetarian diet. One way is by substituting different greens. Instead of spinach, try kale or arugula. Both add unique flavors and textures. You can also boost protein by adding beans or tofu. These options make the dish heartier and more filling. Want to change the flavor profile? Experiment with herbs and spices. Fresh basil or thyme can bring a new twist. You can also add a splash of lemon juice for extra tanginess. This brightens the dish and enhances the garlic and cheese. Don't be afraid to get creative! If you need a gluten-free option, use gluten-free pasta. Many brands offer orzo made from rice or quinoa. Just remember to adjust the cook times. Gluten-free pasta may cook faster than regular orzo. Keep an eye on it to ensure it doesn’t get mushy. For the full recipe, check out [Full Recipe]. Garlic Parmesan Orzo is a tasty and easy side dish. It combines orzo pasta with garlic, cheese, and fresh spinach. This dish is perfect for any meal. You can enjoy it with chicken, fish, or even as a main dish. - Prep Time: 10 minutes - Total Time: 20 minutes - Servings: 4 Serve the orzo in warm bowls. This keeps it cozy and inviting. You can add extra Parmesan on top for flavor. A sprinkle of fresh parsley adds color. For a complete meal, pair it with a light side salad or grilled vegetables. You can also try it alongside roasted chicken or fish for a balanced plate! Making Garlic Parmesan Orzo is quick and easy. You will need about 10 minutes to prep. Cooking takes around 10 minutes. So, in total, it takes about 20 minutes. This dish is perfect for busy nights when you need a tasty side fast. Yes, you can make Garlic Parmesan Orzo ahead of time. Prepare it a few hours before serving. Just store it in an airtight container in the fridge. When you are ready to eat, reheat it gently on the stove. Add a splash of broth or water to keep it moist. Absolutely! This Garlic Parmesan Orzo works well for meal prep. You can portion it into containers. Store in the fridge for up to four days. It reheats easily, making it a great side for any meal. You can even add different proteins or veggies to mix things up! This blog post shared a simple Garlic Parmesan Orzo recipe. You learned about the main ingredients and optional add-ins. I detailed preparation and cooking steps to make your dish shine. Tips and variations catered to your taste and dietary needs. Cooking orzo should be fun and easy. You can experiment with flavors while enjoying a hearty meal. Remember, this recipe is flexible and can fit many diets. Enjoy making your orzo, and share it with friends and family!](https://joymealplan.com/wp-content/uploads/2025/07/b2d855f4-c1dc-4e96-adea-f1579eb882d3-768x768.webp)