Skip to content
About
Contact
Cookie Policy
Copyright Policy
Disclaimer
Search
Home
Dinner
Appetizer
Desserts
Drinks
About
Contact
Privacy Policy
Toggle Menu
Home
/
Dinner
- Page 32
Dinner
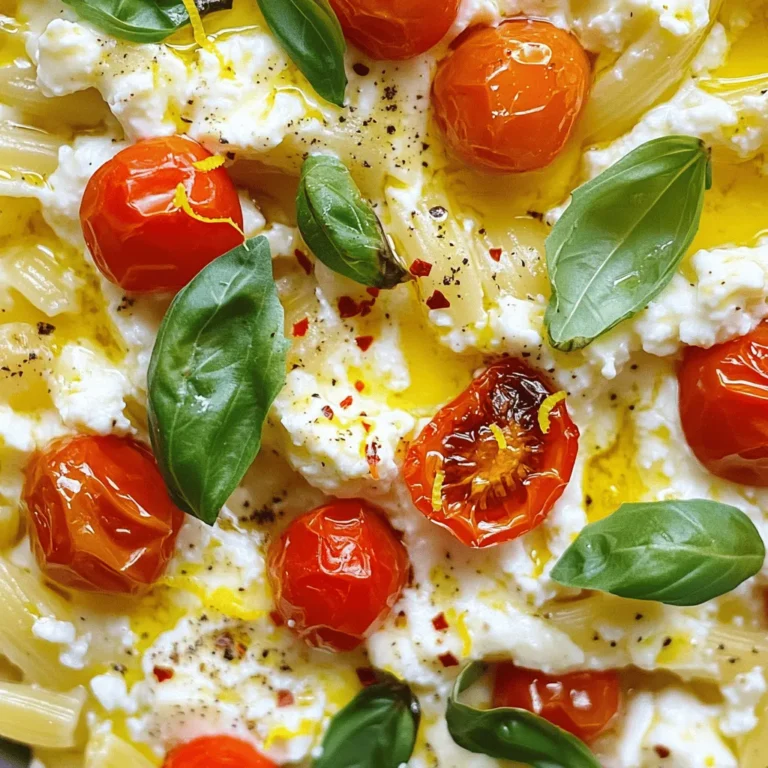
Baked Feta Pasta Flavorful and Easy Weeknight Meal
Easy Chicken Shawarma Flavorful and Simple Recipe
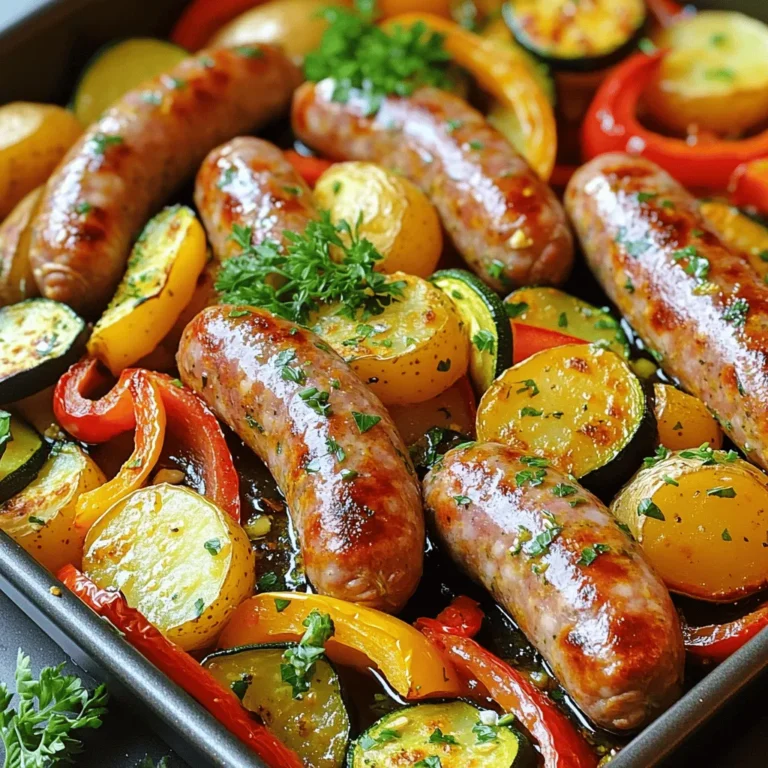
One-Pan Roasted Sausage and Veggies Tasty Dinner
Easy Chicken Tikka Masala Simple Recipe to Enjoy
Chickpea Shawarma Bowls Flavorful and Filling Meal
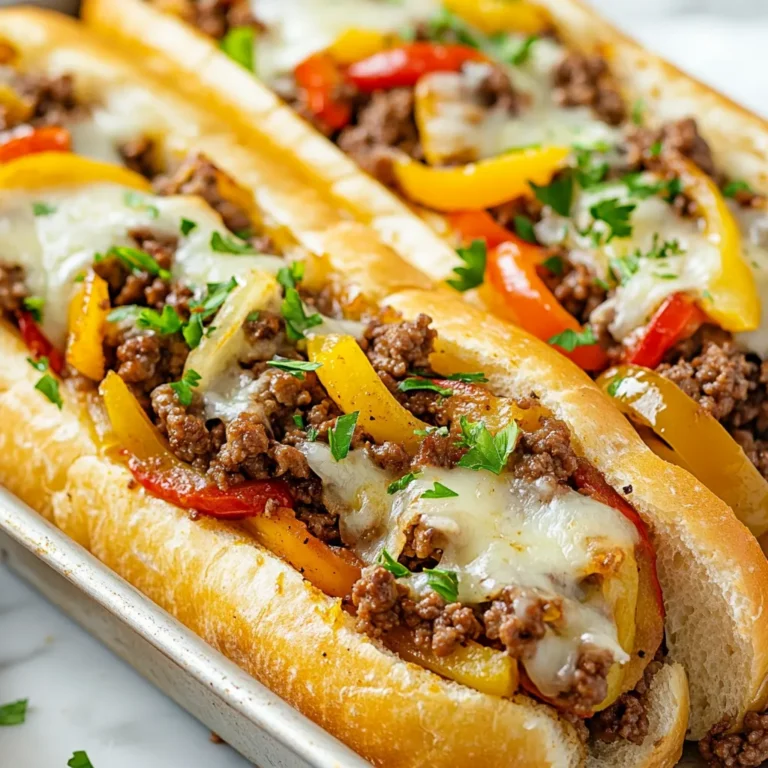
Ground Beef Philly Cheesesteaks Easy and Tasty Recipe
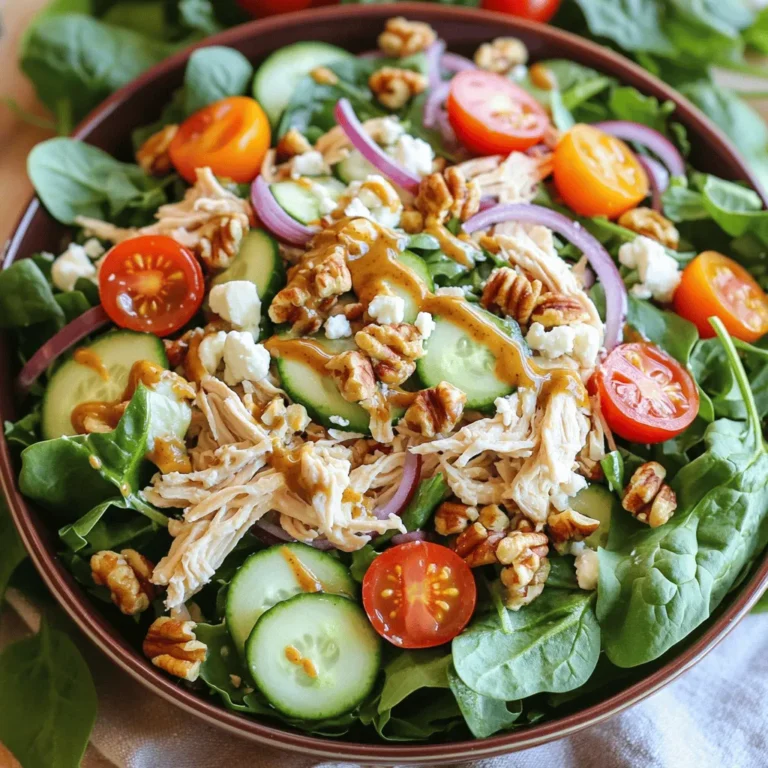
Honey Mustard Chicken Salad Flavorful and Fresh Dish
Loaded Chicken Burrito Bowls Flavorful and Nutritious
Easy Chickpea Salad Sandwich Quick and Healthy Meal
Honey Garlic Glazed Salmon Irresistible Flavor Boost
Page navigation
Previous Page
Previous
1
…
30
31
32
33
34
…
65
Next Page
Next
Home
Dinner
Appetizer
Desserts
Drinks
About
Contact
Privacy Policy
Toggle Menu Close
Search for:
Search

![To make Easy Chicken Shawarma, gather these items: - 500g boneless, skinless chicken thighs - 2 tablespoons extra virgin olive oil - 3 cloves garlic, finely minced - 1 tablespoon ground cumin - 1 tablespoon ground coriander - 1 tablespoon smoked paprika - 1 teaspoon ground turmeric - 1 teaspoon ground cinnamon - 1 teaspoon sea salt - ½ teaspoon freshly ground black pepper - Juice of 1 large lemon - 4 soft pita breads - Fresh parsley, finely chopped, for garnish - Tomato, cucumber, and red onion, thinly sliced, for serving - Creamy yogurt or rich tahini sauce, for drizzling This list covers all you need for vibrant flavors. You can swap chicken thighs for chicken breasts if you prefer leaner meat. If you're short on spices, try a ready-made shawarma mix for ease. To prepare this dish, you'll need: - A medium mixing bowl for the marinade - A whisk to blend the ingredients - A grill or large skillet for cooking - A meat thermometer to check doneness - Storage containers for leftovers Using a meat thermometer ensures you cook the chicken to 75°C (165°F). This keeps it juicy and safe to eat. Store any leftovers in airtight containers for up to three days. Enjoy your flavorful meal, and don't forget to check the [Full Recipe] for all the steps! To start, we need to make a tasty marinade. Take a medium mixing bowl and combine these ingredients: - 2 tablespoons extra virgin olive oil - 3 cloves garlic, finely minced - 1 tablespoon ground cumin - 1 tablespoon ground coriander - 1 tablespoon smoked paprika - 1 teaspoon ground turmeric - 1 teaspoon ground cinnamon - 1 teaspoon sea salt - ½ teaspoon freshly ground black pepper - Juice of 1 large lemon Whisk these together until mixed well. This mix makes your chicken full of flavor. Next, add the 500g boneless, skinless chicken thighs. Make sure every piece is coated in the marinade. Cover the bowl tightly with plastic wrap. For the best taste, let it sit in the fridge for at least 1 hour. If you can, leave it overnight for even better flavor. When you are ready to cook, preheat your grill or a large skillet on medium-high heat. You want it nice and hot. Take the marinated chicken out of the fridge. Let it sit at room temperature for about 10 minutes. This helps it cook evenly. Place the chicken on the hot grill or skillet. Cook for about 6-8 minutes on each side. You want the chicken to have a nice char and be fully cooked. Check that the internal temperature reaches 75°C (165°F). Once cooked, let the chicken rest for 5 minutes. Then slice it into thin strips. This gives you a tender texture. Now, it’s time to fill our pitas. Take your warm pita bread and place a good amount of sliced chicken inside. For extra crunch and color, add some fresh toppings: - Fresh parsley, finely chopped - Tomato, thinly sliced - Cucumber, thinly sliced - Red onion, thinly sliced Finish your shawarma with a drizzle of creamy yogurt or zesty tahini sauce. Wrap the pita up tight, and it's ready to eat! Enjoy your homemade shawarma delight! For a complete guide, check out the Full Recipe. To achieve the best char marks on your chicken, start with a hot grill or skillet. Make sure the grill is preheated to medium-high heat. Cook the chicken without moving it too much. Let it sit for about 6 to 8 minutes on each side. This allows those crispy, golden marks to form. Resting the chicken before slicing is also key. Once you take the chicken off the heat, let it rest for 5 minutes. This helps the juices stay inside the meat. When you slice it, the chicken will be tender and juicy. Pair your chicken shawarma with tasty side dishes. A fresh tabbouleh salad makes a great choice. You can also serve hummus or baba ganoush for dipping. These flavors complement the shawarma well. For drinks, a chilled lemonade or mint tea works nicely. These drinks balance the spices and add a refreshing touch. Want to spice things up? Try adding a pinch of cayenne pepper to the marinade. This will give your chicken an extra kick. You can also drizzle some sriracha or harissa sauce over the finished shawarma for added heat. If you prefer milder flavors, simply reduce the spices. Use less cumin or paprika in the marinade. This way, you can adjust the taste to suit your preferences. For more variety, try adding fresh herbs like mint or dill for a burst of freshness. For the full recipe, check the section above. {{image_4}} You can easily make this dish plant-based. Use chickpeas or tofu instead of chicken. For chickpeas, drain and rinse one can. Toss them with the same marinade. If you choose tofu, press it to remove water and cut it into cubes. Marinate the tofu just like the chicken. For a veggie-loaded option, try grilled vegetables. Zucchini, bell peppers, and mushrooms work great. Slice them into strips and marinate them. Grill until they are tender and slightly charred. If you do not have a grill, don’t worry! You can use an Instant Pot. Cook the marinated chicken on high pressure for about 8 minutes. This keeps the chicken juicy. You can also use an oven. Preheat it to 200°C (400°F). Place the chicken on a baking sheet and roast for 20-25 minutes. Check that the chicken reaches 75°C (165°F) inside. Another great choice is the slow cooker. Add the marinated chicken and cook on low for 6-8 hours. This makes the chicken very tender and flavorful. To make your shawarma extra special, try new toppings. Feta cheese adds a nice salty flavor. Pickled vegetables can give a tangy crunch. You can also experiment with sauces. A spicy harissa or cool tzatziki can change the flavor. Consider regional spices too. Try za'atar for a herby taste or sumac for tartness. Each spice can make your shawarma unique. For the full recipe, check out Shawarma Delight: Easy Chicken Edition. To keep your chicken shawarma fresh, store it properly. Place the leftover chicken in an airtight container. This will help maintain its flavor and moisture. For the best taste, eat leftovers within three days. If you have assembled pitas, store the chicken and veggies separately. This keeps the pita from getting soggy. You can keep the sliced chicken in the fridge for three days, too. When it's time to enjoy your leftovers, reheating is key. Use a skillet or oven to heat the chicken. This method helps keep the chicken juicy. Avoid using a microwave, as it can dry out the meat. Heat the chicken over medium heat for about five minutes. Stir it gently to keep it moist. If the chicken seems dry, add a splash of water or broth. You can freeze leftover chicken shawarma for later. Place the cooled chicken in a freezer-safe container. Make sure to remove excess air to prevent freezer burn. It can last up to three months in the freezer. When you're ready to eat, thaw the chicken in the fridge overnight. Reheat it on the stove for the best texture. You can enjoy that delicious flavor anytime! Chicken shawarma is a popular dish from the Middle East. It has roots in the Levant region. Traditionally, cooks stack marinated meat on a vertical spit. They cook it slowly, letting the juices flow down. The meat is then shaved off in thin strips. The spices in shawarma are what make it special. Common spices include cumin, coriander, and paprika. These give the chicken a warm, rich flavor. Shawarma is often served in pita bread with fresh veggies and sauce. Yes, you can prep chicken shawarma in advance. Marinate the chicken the night before. This helps the flavors mix well. When you are ready to cook, take it out of the fridge. Cook it fresh for the best taste. You can also slice the cooked chicken and store it. Place it in an airtight container in the fridge. It will last for about 3 days. Just reheat it when you are ready to eat. If you want to change things up, try these alternatives to pita bread: - Flatbreads - Tortillas - Naan bread - Lettuce wraps for a low-carb option These options work well with the chicken and veggies. You can also serve shawarma over rice or in a bowl with salad. To make a gluten-free chicken shawarma, choose gluten-free pita or flatbreads. Look for brands that clearly state they are gluten-free. You can also use lettuce as a wrap. Always check the spice blend for gluten. Some pre-made spices might contain gluten. Make your own mix using cumin, paprika, and other safe spices. The best sauces for chicken shawarma include: - Creamy yogurt sauce - Rich tahini sauce Yogurt sauce is smooth and tangy. It cools down the spices. Tahini sauce is nutty and flavorful. Both add a wonderful touch to your shawarma. Drizzle them on top or serve them on the side for dipping. For the full recipe, check out Shawarma Delight: Easy Chicken Edition. In this guide, we explored how to make Easy Chicken Shawarma from start to finish. We covered essential ingredients, tools, marinating techniques, cooking methods, and clever tips for serving and storing leftovers. You can easily customize this dish for various tastes and dietary needs, ensuring everyone enjoys it. With a little practice, you’ll master the art of shawarma. Get ready to impress your family and friends with your new skills in the kitchen!](https://joymealplan.com/wp-content/uploads/2025/07/dcd86bca-5250-4056-852d-a4436d844aa2-768x768.webp)
![To make Easy Chicken Tikka Masala, gather these essential ingredients: - 500g chicken breast, diced into bite-sized pieces - 1 cup plain yogurt - 2 tablespoons garam masala - 1 tablespoon ground cumin - 1 tablespoon ground coriander - 1 teaspoon turmeric - 1 teaspoon chili powder (adjust for spice level) - 4 cloves of garlic, finely minced - 1 inch fresh ginger, grated - 2 tablespoons olive oil - 1 medium onion, finely chopped - 1 can (400g) diced tomatoes, with juices - 1 cup coconut milk - Salt, to taste - Fresh cilantro (coriander), chopped, for garnish To boost the taste, you can add these optional items: - 1 tablespoon lemon juice for a tangy twist - 1-2 green chili peppers, chopped, for extra heat - 1 teaspoon sugar to balance flavors - Additional spices like cinnamon or cardamom for depth You will need these items to make cooking easier: - A large mixing bowl for marinating chicken - A sharp knife and cutting board for prep - A skillet or frying pan for cooking - A spoon or spatula for stirring - Measuring spoons for accurate ingredient amounts - A serving dish for presentation Gathering these ingredients and utensils sets you up for a flavorful cooking experience. Enjoy the process of making this delightful dish! To start, take a mixing bowl. In it, add 1 cup of plain yogurt. Then, mix in 2 tablespoons of garam masala, 1 tablespoon of ground cumin, and 1 tablespoon of ground coriander. Next, add 1 teaspoon of turmeric and 1 teaspoon of chili powder. You can adjust the chili powder to suit your taste. Finally, add half of the minced garlic and the grated ginger. Stir everything together until it forms a smooth marinade. This mix is key to a flavorful dish. Now, take 500g of diced chicken breast. Add it to the marinade you just made. Make sure every piece is well-coated. This is where the magic happens! Cover the bowl with plastic wrap or a lid. Place it in the refrigerator for at least 1 hour. For the best flavor, let it sit overnight. This allows the spices to soak into the chicken. Heat 2 tablespoons of olive oil in a large skillet over medium heat. Once the oil is hot, add 1 finely chopped onion. Sauté it for about 5 minutes until it turns soft and clear. Next, add the remaining minced garlic and grated ginger. Cook for 1-2 more minutes. This step fills your kitchen with a lovely aroma. Now, add the marinated chicken to the skillet. Reserve any leftover marinade. Cook the chicken for about 7-10 minutes until it browns. Then, pour in the can of diced tomatoes with their juices and the reserved marinade. Stir everything together and bring it to a simmer. Let it cook for 10 more minutes. Lower the heat, and stir in 1 cup of coconut milk. Mix it well. Let it simmer gently for another 10 minutes. You can add water if you want a thinner sauce. Season with salt to taste. When it’s ready, turn off the heat and let it sit for a few minutes. This resting time helps the flavors blend well. For the full recipe, refer to the earlier section. To get the best flavor, marinate your chicken well. Use plain yogurt as your base. Yogurt helps to tenderize the meat and adds a tangy taste. Mix yogurt with spices like garam masala, cumin, and turmeric. This mixture will coat every piece of chicken. Make sure to let it marinate for at least one hour. For the best results, marinate overnight. This gives the spices more time to soak in. Cooking techniques matter a lot. Start by sautéing onions in olive oil. This adds sweetness and depth to your dish. After the onions are soft, add garlic and ginger for more flavor. These ingredients should cook just until fragrant. This step enhances the taste of the whole dish. When adding the marinated chicken, let it brown well. Browning adds a nice texture. Finally, add diced tomatoes and coconut milk, stirring thoroughly to combine. To make your meal complete, serve Chicken Tikka Masala with basmati rice or naan. The rice soaks up the sauce, making every bite delicious. Naan is perfect for scooping up the sauce. For a fresh touch, garnish with chopped cilantro. You can also add lime wedges for extra zing. This adds a bright flavor that balances the spices. For more fun, consider serving a side salad or yogurt raita to cool things down. {{image_4}} You can easily swap chicken for vegetables or tofu. For a vegetarian version, use firm tofu. Cut it into cubes and marinate just like the chicken. You can also use mixed vegetables like bell peppers, zucchini, and cauliflower. These options soak up the spices nicely. Cook them until they're tender. The flavors will still shine through. Not everyone enjoys the same level of heat. If you want less spice, reduce the chili powder. Start with a half teaspoon and taste as you go. For more heat, add extra chili powder or even fresh chopped chilies. Remember, you can always add more, but it’s hard to take it away. If you have dietary needs, you can make changes easily. For a dairy-free version, use almond yogurt instead of plain yogurt. If you're gluten-free, check that all spices and canned goods are gluten-free. Coconut milk is a great dairy substitute, but you can also use vegetable broth for a lighter sauce. You can find the full recipe [here]. To store leftover chicken tikka masala, let it cool down first. Then, place it in an airtight container. This helps keep it fresh. Store it in the fridge for up to four days. If you want to keep it longer, consider freezing it. When reheating chicken tikka masala, use the stove for the best taste. Place it in a pan over low heat. Stir occasionally to warm it evenly. You can add a splash of water or coconut milk if it seems too thick. You can also use a microwave, but be careful not to overheat. To freeze chicken tikka masala, ensure it is fully cooled. Place it in freezer-safe bags or containers. Remove as much air as possible to prevent freezer burn. It can last up to three months in the freezer. When ready to eat, thaw it in the fridge overnight before reheating. Yes, you can make Easy Chicken Tikka Masala ahead of time. Prepare the dish, then cool it down. Store it in a sealed container in the fridge for up to three days. When ready to eat, just reheat on the stove until hot. This helps the flavors meld even more! If you want to swap out coconut milk, try using heavy cream or Greek yogurt. These options add creaminess without losing flavor. You can also use almond milk, but it may change the taste a bit. Just remember to adjust the seasoning to keep it tasty. Easy Chicken Tikka Masala can be made spicy or mild. The chili powder is the main spice. Start with a small amount if you prefer less heat. You can always add more later, but you can’t take it out once it’s in! Adjust it to your taste for the best experience. We explored how to make easy Chicken Tikka Masala, focusing on ingredients, instructions, and tips. You learned about required and optional ingredients that elevate flavor. Understanding marinating and cooking steps ensures juicy chicken. Plus, I shared ways to adapt recipes for different diets and spice levels. In closing, enjoy your meal and feel free to experiment. Happy cooking!](https://joymealplan.com/wp-content/uploads/2025/07/7203decf-58c7-4016-ac99-38120703d330-768x768.webp)

![- 2 cups cooked brown rice - 1 lb boneless, skinless chicken breast, diced - 1 can (15 oz) black beans, rinsed and drained - 1 cup corn (fresh, frozen, or canned) - 1 ripe avocado, diced - 1/2 cup shredded cheddar cheese - 1 tablespoon taco seasoning - Salt and black pepper to taste - Optional toppings: sour cream, salsa, sliced jalapeños For these Loaded Chicken Burrito Bowls, I focus on simple, fresh ingredients. The brown rice serves as a wholesome base. It adds fiber and nutrients. I choose boneless, skinless chicken breast for lean protein. It cooks up juicy and tender. Black beans bring extra protein and a creamy texture. Rinsing them helps remove excess sodium, making them healthier. Corn adds sweetness and a pop of color. You can use fresh, frozen, or canned, based on your preference. Avocado is a delightful addition. It brings creaminess and healthy fats. The shredded cheddar cheese adds richness and flavor. For seasoning, I use taco seasoning. It gives a bold taste without extra effort. I also add salt and black pepper to enhance the flavors. Toppings are where you can get creative. I suggest sour cream for creaminess. Salsa adds zest, and sliced jalapeños bring heat. Feel free to mix and match as you like. You can find the Full Recipe for all these delicious ingredients and how to prepare them. - Heat olive oil in a skillet over medium heat. - Add diced chicken and season with taco seasoning. First, I heat a tablespoon of olive oil in a skillet over medium heat. I want the oil to shimmer before adding the chicken. Once it’s hot, I toss in the diced chicken breast. I sprinkle it with taco seasoning, along with a pinch of salt and black pepper. I cook this for about 6 to 8 minutes. I stir often to ensure even cooking. The chicken should turn a lovely golden brown and reach an internal temperature of 165°F. - Prepare brown rice according to package instructions. - Fluff rice once cooked. While the chicken cooks, I prepare brown rice. I follow the package instructions closely. This step is key for fluffy rice. Once it’s cooked, I use a fork to fluff the rice. Fluffy rice makes a great base for my burrito bowls. - Mix black beans, corn, and tomatoes in a bowl. - Combine with cooked chicken and layer on rice. Next, I grab a large mixing bowl. I combine the rinsed black beans, corn, and halved cherry tomatoes. I gently toss them together until they mix well. Once the chicken is done, I add it to the bowl. I stir everything together to let the flavors blend. Now it's time to build the burrito bowls! I divide the fluffy brown rice into four serving bowls. I spoon the chicken mixture on top of the rice in each bowl. Next, I add diced avocado, shredded cheese, and fresh cilantro. For a zesty finish, I serve lime wedges on the side. You can also add sour cream or salsa if you want. For the full recipe, check the complete instructions and ingredient list. Enjoy making your loaded chicken burrito bowls! How to ensure chicken is cooked thoroughly To cook chicken safely, use a meat thermometer. The internal temperature should reach 165°F. Cook chicken pieces until they are golden brown and no longer pink inside. This ensures it is juicy and safe to eat. Best practices for fluffy rice For fluffy rice, rinse it well before cooking. This removes extra starch that makes it sticky. Cook it with the right water ratio, usually 2 cups of water for every cup of rice. After cooking, fluff it gently with a fork. This keeps the grains separate and light. Colorful arrangement ideas for the toppings To make your burrito bowls pop, layer the toppings by color. Place bright tomatoes, vibrant corn, and green avocado on top. This adds visual interest. You can also create small sections on the bowl for each topping. This way, each bite looks and tastes amazing. Using garnishes to enhance visual appeal Fresh herbs like cilantro can elevate your dish. Sprinkle them on top for a burst of color. Lime wedges can add a zesty touch. Place them artfully around the bowl for that extra flair. Suggestions for extra spices or ingredients to add To boost the flavor, try adding cumin or smoked paprika. These spices add warmth and depth. You can also mix in jalapeños for heat or lime juice for brightness. Freshly chopped garlic can also add a punch of flavor. Alternative cooking methods for chicken If you want to switch it up, grill or bake the chicken instead of pan-frying. Grilling adds a nice smoky flavor. Baking can keep it tender and juicy. You can marinate the chicken beforehand to infuse even more flavor. For the Full Recipe, check the earlier section for all the details! {{image_4}} You can easily make Loaded Chicken Burrito Bowls vegetarian or vegan. To do this, simply replace the chicken with a plant-based protein. Options include lentils, tempeh, or tofu. For a vegan cheese option, try cashew cheese or nutritional yeast. For gluten-free options, make sure to check your taco seasoning. Some brands add gluten. You can also swap brown rice for quinoa or cauliflower rice. If you like heat, add jalapeños or hot sauce to your bowl. This gives a spicy kick that enhances the flavors. You can also try different beans like pinto or kidney beans. Each type adds a unique taste and texture to your dish. Feel free to adjust your ingredients based on what is in season or what you like best. You can swap corn for bell peppers or zucchini for a fresh twist. For cheese, consider using feta or goat cheese for a different flavor. If you want a creamy topping, try Greek yogurt instead of sour cream. These swaps keep your bowls exciting! For the full recipe, check out the complete details in the recipe section. To keep your loaded chicken burrito bowls fresh, store them in airtight containers. This helps preserve flavor and texture. Place all components in separate containers if possible. This way, the rice, chicken, and toppings stay fresh longer. Generally, leftovers last about 3 to 4 days in the fridge. Make sure to check for any signs of spoilage before eating. If the chicken looks or smells off, it's best to toss it. When reheating, use the microwave for quick warmth. Place the food in a microwave-safe bowl, cover it with a damp paper towel, and heat it in 30-second intervals until warm. This method keeps the rice moist and prevents it from drying out. For the best texture, consider reheating in a skillet. Add a splash of water, cover, and cook on low heat until everything is warmed through. This method helps maintain flavor and texture. To freeze components, let them cool completely first. Portion the rice, chicken, and toppings into freezer-safe containers. Label them with the date. This makes it easy to track freshness. You can freeze cooked chicken and rice for up to 3 months. When ready to eat, thaw them overnight in the fridge. Reheat them as mentioned above to enjoy your delicious meal again. You can add many tasty toppings to your burrito bowls. Here are some great ideas: - Sour cream: Adds creaminess and a tangy flavor. - Salsa: Choose your favorite type, from mild to spicy. - Sliced jalapeños: For some heat and crunch. - Chopped green onions: Adds freshness and color. - Lettuce: A nice crunch and extra nutrients. - Black olives: For a salty, savory touch. - Cheese: Try a different cheese like queso fresco or pepper jack. Mix and match these options to find your favorite combination. Each topping can change the flavor and texture of the dish. Yes, you can prepare Loaded Chicken Burrito Bowls ahead of time. Here are some tips for meal prep: - Cook the chicken and rice: You can cook and store these in separate containers in the fridge. - Prep toppings: Chop your vegetables and store them in airtight containers. - Assemble before serving: When ready to eat, layer the rice, chicken, and toppings in a bowl. This keeps everything fresh. When stored properly, the ingredients can last for about 3 to 4 days in the fridge. You can easily customize your burrito bowls to fit your needs. Here are some tips: - Dietary needs: If you're vegetarian, use beans instead of chicken. For vegan, skip cheese and sour cream. - Flavor preferences: Add different spices or sauces to change the flavor. - Vegetable swaps: Use seasonal vegetables, like bell peppers or zucchini. - Grain choices: Try quinoa, cauliflower rice, or even lettuce wraps instead of brown rice. Get creative and make the dish your own! For the complete ingredients and instructions for Loaded Chicken Burrito Bowls, check out the [Full Recipe]. This post shared how to make tasty Loaded Chicken Burrito Bowls. You learned about main and optional ingredients. I explained step-by-step instructions, helpful tips, and fun variations. You can customize the bowls to your liking and store leftovers easily. Making these burrito bowls is fun and flexible. Enjoy your meal and get creative with flavors. The possibilities are endless, so dive in and make it your own!](https://joymealplan.com/wp-content/uploads/2025/07/a2d38b5a-a8a2-4e80-9f96-ef24cf5264b7-768x768.webp)

