Skip to content
About
Contact
Cookie Policy
Copyright Policy
Disclaimer
Search
Home
Dinner
Appetizer
Desserts
Drinks
About
Contact
Privacy Policy
Toggle Menu
Home
/
Dinner
- Page 34
Dinner
Garlic Roasted Green Beans Simple and Tasty Recipe
Crispy Chickpea Buddha Bowl Flavorful and Nourishing Meal
Roasted Sweet Potato Black Bean Salad Flavorful Dish
Baked Teriyaki Tofu Crunchy and Flavorful Delight
Mason Jar Cobb Salad Fresh and Flavorful Meal Option
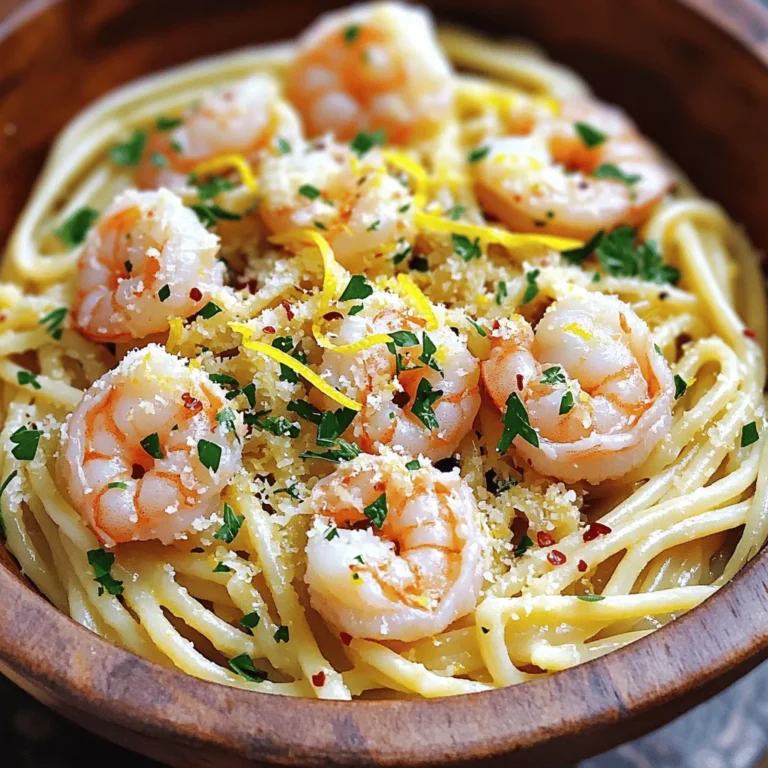
Garlic Lemon Shrimp Pasta Simple and Flavorful Dish
Easy Chicken Tikka Masala Rich Flavor in Minutes
Roasted Veggie Power Bowl Healthy and Simple Recipe
Garlic Butter Shrimp Flavorful and Easy Dinner Delight
Sriracha Honey Chicken Flavorful Weeknight Delight
Page navigation
Previous Page
Previous
1
…
32
33
34
35
36
…
65
Next Page
Next
Home
Dinner
Appetizer
Desserts
Drinks
About
Contact
Privacy Policy
Toggle Menu Close
Search for:
Search

![To make garlic roasted green beans, you'll need these simple items: - 1 pound fresh green beans, trimmed and rinsed - 4 large cloves garlic, finely minced - 3 tablespoons extra virgin olive oil - 1 teaspoon freshly grated lemon zest - 1 teaspoon balsamic vinegar - ½ teaspoon red pepper flakes (optional for heat) - Sea salt and freshly ground black pepper to taste - 2 tablespoons finely grated Parmesan cheese (optional) I always prefer fresh green beans for this recipe. They taste better and have a nice crunch. Fresh beans roast evenly and soak up the flavors well. If you can’t find fresh ones, frozen beans work too. Just make sure to thaw and drain them first. They may not be as crisp, but they will still taste great. You can change some ingredients if you need to. If you don’t have garlic, try using garlic powder. Instead of lemon zest, you can use orange zest for a different flavor. If you want a different vinegar, try red wine vinegar. For a dairy-free option, skip the Parmesan cheese or use a vegan cheese instead. These swaps keep the dish tasty and fun! To start, gather your ingredients. You will need: - 1 pound fresh green beans, trimmed and rinsed - 4 large cloves garlic, finely minced - 3 tablespoons extra virgin olive oil - 1 teaspoon freshly grated lemon zest - 1 teaspoon balsamic vinegar - ½ teaspoon red pepper flakes (optional for heat) - Sea salt and freshly ground black pepper to taste - 2 tablespoons finely grated Parmesan cheese (optional) First, preheat your oven to 425°F (220°C). This step is key for crispy beans. Next, take a large mixing bowl and add the green beans. Toss in the minced garlic, olive oil, lemon zest, and balsamic vinegar. If you like a little heat, add red pepper flakes. Season with sea salt and black pepper to taste. Mix everything well. You want each bean coated with flavor. Now, it’s time to roast! Spread the green beans on a large baking sheet. Make sure they lie flat in a single layer. This helps them roast evenly. Place the baking sheet in the oven and roast for 15-20 minutes. Halfway through, give the beans a toss. This ensures they cook evenly. You’ll know they’re done when they’re tender but still have a slight crunch. Once out of the oven, if you like, sprinkle grated Parmesan cheese on top. The heat will melt it slightly, making it even better. Transfer the roasted green beans to a nice serving dish. Serve them warm to your family or guests. They pair well with many main dishes. Try them with grilled chicken or fish. You can also serve them as a stand-alone snack. For the full recipe, please see the earlier section. Enjoy your tasty green beans! To boost the taste of garlic roasted green beans, add a squeeze of lemon. Lemon brings brightness and freshness. You can also use fresh herbs like thyme or rosemary. These herbs add depth and aroma. If you love heat, try adding more red pepper flakes. Just be careful not to overdo it! For the best texture, spread the beans on the baking sheet. Make sure they are in a single layer. This helps them roast evenly. Toss them halfway through cooking to ensure all sides get crispy. If you want them extra crispy, leave them in for a few more minutes. Serve your garlic roasted green beans in a nice dish. You can sprinkle extra Parmesan cheese on top for a gourmet look. Adding a few lemon wedges next to the beans can enhance the presentation. It also invites your guests to add more flavor if they wish. For a pop of color, place fresh herbs on top before serving. This will make your meal look and taste amazing! You can find the full recipe for garlic roasted green beans [Full Recipe]. {{image_4}} You can mix in other veggies with garlic roasted green beans. Carrots, bell peppers, and zucchini work well. Just cut them into similar sizes. This way, they all cook evenly. Toss them with the green beans in the same mix for great flavor. You can also try adding cherry tomatoes for a pop of color and sweetness. Add herbs to change the taste of your garlic roasted green beans. Fresh thyme or rosemary adds a lovely aroma. A sprinkle of smoked paprika gives a warm, savory hint. You can also try a dash of cumin for a unique flavor. These twists make your dish exciting and fresh each time. This recipe is already vegetarian. To make it vegan, simply skip the Parmesan cheese. You can also add nutritional yeast for a cheesy flavor without dairy. It’s a great way to keep it creamy and flavorful. Enjoy these garlic roasted green beans as a side dish or main meal. Each variation keeps it fun and tasty! For the full recipe, check out the detailed instructions provided earlier. After enjoying your garlic roasted green beans, you might have leftovers. Cool the beans down first. Then, place them in an airtight container. They stay fresh in the fridge for about 3-4 days. When ready to eat, check for any signs of spoilage. If they look good, you can enjoy them again! If you have more leftovers than you can eat, freezing is a great option. First, let the beans cool completely. Then spread them on a baking sheet in a single layer. Freeze them for about an hour. This step helps the beans stay separate. After freezing, transfer them to a freezer-safe bag. They can last up to 3 months in the freezer. Label the bag with the date so you know when to use them. Reheating garlic roasted green beans is simple. You can use the oven or a microwave. For the oven, preheat it to 350°F (175°C). Spread the beans on a baking sheet and heat for about 10 minutes. If you use a microwave, place the beans in a safe dish. Heat them for 1-2 minutes, stirring halfway. This method keeps them tasty and warm. For extra flavor, add a splash of olive oil or a sprinkle of salt before serving. Enjoy your meal! To make garlic roasted green beans, start by preheating your oven to 425°F (220°C). In a big bowl, mix 1 pound of fresh green beans with 4 minced garlic cloves, 3 tablespoons of olive oil, 1 teaspoon of lemon zest, and 1 teaspoon of balsamic vinegar. If you like spice, add ½ teaspoon of red pepper flakes. Season with sea salt and black pepper. Toss everything until the beans are well coated. Spread the beans on a baking sheet in a single layer. Roast them for 15-20 minutes, tossing halfway. When they are tender and crisp, serve hot. You can find the Full Recipe for more details. Yes, you can prepare garlic roasted green beans ahead of time. You can trim and wash the green beans and mix them with the garlic and oil. Store this mix in the fridge for up to a day. When you’re ready to eat, just roast them as directed. This makes dinner prep easier, and you can enjoy more time with your guests. Garlic roasted green beans pair well with many dishes. You can serve them alongside grilled chicken or fish for a balanced meal. They also complement pasta dishes, like spaghetti or fettuccine. If you want a vegetarian option, try them with quinoa or rice. Their bright flavor adds a nice touch to any plate. This post covered garlic roasted green beans from ingredients to serving ideas. Fresh or frozen beans work well, and you can swap key ingredients easily. Roasting creates a rich flavor, and adding herbs boosts it even more. Don’t forget about storage; knowing how to keep leftovers can help. Remember, you can customize this dish with other veggies or herbs. Enjoy experimenting with flavors! Roasted green beans can fit any meal.](https://joymealplan.com/wp-content/uploads/2025/07/774fbef7-0e10-49a5-abc6-76b985870023-768x768.webp)
![To make the Roasted Sweet Potato Black Bean Salad, you will need these fresh and vibrant ingredients: - 2 medium sweet potatoes, peeled and cut into bite-sized cubes - 1 can (15 oz) black beans, thoroughly rinsed and drained - 1 vibrant red bell pepper, diced - 1 small red onion, finely chopped - 2 cups fresh spinach, roughly chopped - 1 ripe avocado, diced - 3 tablespoons olive oil, divided - 1 teaspoon ground cumin - 1 teaspoon smoked paprika - Salt and freshly ground black pepper to taste - Juice from 1 lime - ¼ cup fresh cilantro, chopped (optional) Each item adds a layer of flavor. Sweet potatoes give a naturally sweet taste. Black beans add protein and creaminess. The red bell pepper brightens the dish with color and crunch. The red onion gives a nice zing. Spinach adds a fresh touch while the avocado brings richness. Olive oil helps blend it all together while the spices create a warm, smoky flavor. Finally, lime juice and cilantro brighten the salad, making it truly special. For the full recipe, check out the complete details to guide you through the cooking process! - Preheat the oven to 425°F (220°C). - Mix sweet potatoes with olive oil and seasonings. Start by preheating your oven. This step is key for getting those sweet potatoes nice and crispy. While the oven heats, grab a large bowl. Toss in your sweet potatoes, olive oil, ground cumin, and smoked paprika. Add a good pinch of salt and pepper. Stir well until every piece is coated in the mix. - Spread sweet potatoes on a baking sheet and roast for 25-30 minutes. Next, spread your sweet potatoes on a baking sheet. Make sure they are in a single layer. This helps them roast evenly. Place the baking sheet in the oven. Roast for 25-30 minutes. Halfway through, give them a quick stir. This way, all sides get that lovely caramelization. - In a bowl, combine black beans, red bell pepper, red onion, and spinach. - Add roasted sweet potatoes and mix with lime juice and remaining oil. - Gently fold in diced avocado and cilantro. While your sweet potatoes roast, take another bowl. Combine the black beans, diced red bell pepper, chopped red onion, and fresh spinach. Mix these ingredients well. Once the sweet potatoes are done, let them cool for just a moment. Then, add them to your bowl. Drizzle lime juice and the last bit of olive oil over the mix. Toss gently until everything is well combined. Finally, fold in your diced avocado and cilantro. Be gentle to keep the avocado nice. For the full recipe, check below! To get sweet potatoes just right, you need a few tricks. First, cut them into even pieces. This ensures they roast at the same time. Use a sharp knife for clean cuts. Next, toss them well with olive oil and spices. The oil helps with caramelization. Spread them out on the baking sheet. Avoid crowding the pan, as this can lead to steaming instead of roasting. Stir them halfway through roasting. This helps them brown evenly. If you see them getting too dark, reduce the oven temperature. Want to boost flavors? Add some extra spices. A pinch of cayenne pepper gives heat. Garlic powder adds depth. Fresh herbs like thyme or oregano can brighten the dish. Experiment with what you like best. Don’t forget about lime juice! It adds brightness and balances sweetness. You can also try a splash of balsamic vinegar for a unique twist. Make your salad pop! Use a large bowl to show off the colors. Layer your ingredients for a beautiful look. Start with greens at the bottom. Then add the roasted sweet potatoes and black beans. Garnish with fresh cilantro and lime wedges. This adds color and extra flavor. A sprinkle of feta cheese can also enhance visual appeal. Serve it chilled or at room temperature for the best experience. For the full recipe, check out the detailed steps to make this vibrant dish! {{image_4}} You can switch up the black beans if you like. Kidney beans or pinto beans work well too. If you want to change the sweet potatoes, try butternut squash for a different taste. If you need more protein, add cooked chicken or quinoa. Both options bring a nice texture and boost the nutrition. You can also toss in cooked lentils for a plant-based protein option. Homemade dressings can really change the flavor of your salad. A simple lime vinaigrette adds brightness. Just mix lime juice, olive oil, and a pinch of salt. For a creamier option, blend avocado with Greek yogurt and lime juice. This gives a rich, smooth texture. You can also try tahini dressing for a nutty flavor that pairs well with the salad. Seasonal veggies are a fun way to change your salad. In spring, add fresh peas or asparagus for a crisp bite. In summer, try ripe cherry tomatoes for sweetness. In fall, consider adding roasted Brussels sprouts or kale for a hearty feel. Fresh herbs like basil or mint can brighten up the dish. They add a lovely aroma and freshness that complements the flavors nicely. To keep your salad fresh, store the components separately. Place the roasted sweet potatoes in one container. Use another container for the black beans, red bell pepper, onion, and spinach. This way, the flavors stay bright, and the textures remain nice. You can mix them when you are ready to eat. This salad stays fresh in the fridge for about three to five days. The sweet potatoes hold well, while the other veggies stay crisp. Just make sure to seal the containers tightly. If you notice any changes in smell or texture, it's best to toss it. When reheating, keep the sweet potatoes and other veggies separate. Use a skillet on medium heat for the sweet potatoes. Stir gently until warm. This keeps them crispy. For the beans and veggies, you can heat them in the microwave for about 30 seconds. Avoid heating too long, so you don’t lose their crunch. Yes, you can make this salad ahead of time. Prepare the sweet potatoes and other ingredients separately. Store them in airtight containers in the fridge. Mix everything together right before serving. This way, the salad stays fresh and tasty. Absolutely! All the ingredients in this salad are gluten-free. Sweet potatoes, black beans, and veggies are safe for those with gluten issues. Always check labels, especially with canned goods, to ensure they are certified gluten-free. This salad pairs well with many dishes. You can serve it with grilled chicken or fish for added protein. It also goes great with quinoa or a warm tortilla. For a light meal, enjoy it with a bowl of soup. You can easily adjust this salad for different diets. For vegan options, skip the cheese and use a vegan dressing. If you're vegetarian, add cheese for extra flavor. For low-carb diets, reduce the sweet potatoes and add more greens or avocado. For the complete detailed recipe for Roasted Sweet Potato Black Bean Salad, check here: [Full Recipe]. This blog covered how to make a delicious roasted sweet potato and black bean salad. We explored the main ingredients, preparation steps, and useful tips to perfect your dish. You learned about variations and storage methods to keep your salad fresh. This salad is not just tasty; it’s also good for you. Try it for a quick meal or as a side. Enjoy customizing it to fit your taste and needs. With these techniques, you can impress anyone at the table.](https://joymealplan.com/wp-content/uploads/2025/07/525cd2b1-78c5-4050-8250-da110bbc1063-768x768.webp)

![To make Easy Chicken Tikka Masala, gather these key ingredients: - 500g boneless chicken thighs, cut into bite-sized pieces - 1 cup plain yogurt - 2 tablespoons garam masala - 1 tablespoon ground cumin - 1 teaspoon ground coriander - 1 teaspoon paprika - 1 teaspoon turmeric - 1 tablespoon ginger, minced - 3 cloves garlic, minced - 1 onion, finely chopped - 1 can (400g) crushed tomatoes - 1 cup coconut milk - 2 tablespoons vegetable oil - Salt to taste - Fresh cilantro for garnish These ingredients create a rich, creamy sauce that brings the dish to life. The yogurt is key for tender chicken. The spices add depth and warmth, making every bite flavorful. You can customize your Chicken Tikka Masala with these optional ingredients: - Lemon juice for brightness - Green chili for heat - Bell peppers for crunch - Peas for color Adding these extras can change the flavor profile and make it your own. Feel free to mix and match based on your taste. If you have allergies, there are simple swaps you can use: - Use almond or soy yogurt instead of dairy yogurt. - Swap coconut milk for almond milk for a nut-free option. - Replace chicken with tofu or chickpeas for a vegan dish. These substitutions keep the dish delicious while catering to your dietary needs. Enjoy your cooking adventure! For the complete recipe, check out the Full Recipe link. First, grab a large bowl. Mix 1 cup of plain yogurt, 2 tablespoons of garam masala, 1 tablespoon of ground cumin, 1 teaspoon of ground coriander, 1 teaspoon of paprika, 1 teaspoon of turmeric, 1 tablespoon of minced ginger, 3 cloves of minced garlic, and a pinch of salt. Stir well until it’s smooth. Now, add 500g of bite-sized chicken thighs. Make sure each piece is coated well with the marinade. Cover the bowl with plastic wrap. Pop it in the fridge for at least 30 minutes. For the best taste, let it sit overnight. Next, heat 2 tablespoons of vegetable oil in a large skillet over medium-high heat. Once hot, add 1 finely chopped onion. Cook the onion for 5-7 minutes. You want it to turn golden brown and soft. This step adds a sweet flavor. After the onion is ready, add the marinated chicken. Cook it for about 8-10 minutes. Stir it occasionally to brown all sides evenly. Once the chicken is browned, it’s time to add more flavor. Pour in 1 can of crushed tomatoes. Stir gently to mix everything. Bring the mixture to a gentle simmer. Let it simmer for about 10 minutes. Stir it now and then to stop it from sticking. After that, slowly pour in 1 cup of coconut milk. Stir again to combine. Simmer for another 10 minutes. This makes the sauce thick and creamy. Taste and add more salt if needed. Finish by garnishing with fresh cilantro for a pop of color and taste. To get the best flavor in your Chicken Tikka Masala, start with fresh spices. Fresh spices give a robust taste that dried spices lack. Use whole spices when possible, and grind them yourself. This step unleashes their natural oils and aromas. Another key is the yogurt marinade. It adds tenderness and tang. Marinate your chicken for at least 30 minutes, but overnight is best. This waiting time allows the spices to soak in fully. For perfect chicken, cook it in batches. Overcrowding the pan steams the meat instead of browning it. Use medium-high heat to get a nice sear on the chicken. This creates a deep flavor that you want. Once you add the crushed tomatoes and coconut milk, let it simmer gently. This step helps the flavors meld together beautifully. You can make Chicken Tikka Masala ahead of time. Cook it fully, then let it cool. Store it in an airtight container in the fridge for up to three days. Reheat it on low heat, adding a splash of water if needed. This dish also freezes well. Portion it out and freeze it for up to three months. When you're ready, thaw it overnight in the fridge and reheat. For more details, check the Full Recipe. {{image_4}} You can easily make a vegetarian version of Chicken Tikka Masala. Replace the chicken with firm tofu or vegetables like bell peppers and zucchini. Tofu soaks up flavors well. Marinate it the same way as chicken. Cook it in the same sauce for that rich taste. This way, you keep the essence of the dish while making it meat-free. If you enjoy spicy food, add some heat to your Chicken Tikka Masala. You can include chopped green chilies or a pinch of cayenne pepper in the marinade. Adjust the spice level to your liking. Just remember, a little heat goes a long way! You can also serve it with a side of spicy chutney for an extra kick. You can swap chicken for other proteins too. Paneer, a fresh cheese, works great in this dish. Cut the paneer into cubes and marinate it just like the chicken. Cook it in the same way for a rich and creamy meal. Tofu and paneer both add their own unique texture and flavor to the dish. This makes it more exciting and diverse for your taste buds. For the complete recipe, check out the [Full Recipe]. To keep your Chicken Tikka Masala fresh, let it cool down first. Use an airtight container for storage. Place it in the fridge. It will stay good for about three to four days. For best results, store it without the rice or naan. To enjoy your Chicken Tikka Masala again, use the stove or microwave. If using the stove, heat it over low heat. Stir often to prevent sticking. If using the microwave, cover the dish and heat in short bursts. This way, it warms evenly. Always check the temperature to ensure it is hot throughout. You can freeze Chicken Tikka Masala if you want to save some for later. Place it in a freezer-safe container or bag. Make sure to leave some space for expansion. It can stay good for up to three months. When you’re ready to eat, thaw it in the fridge overnight. Reheat it on the stove or microwave, and enjoy this rich flavor again! For the full recipe, check the section above. You should marinate chicken for at least 30 minutes. For the best taste, let it sit overnight. This allows the spices to soak in deeply. The yogurt keeps the chicken tender while adding flavor. Yes, you can use bone-in chicken. It will add more flavor to your dish. Just be aware that it may take longer to cook. Adjust your cooking time to ensure the chicken is fully cooked. Serve Chicken Tikka Masala with fluffy basmati rice or warm naan. Both options soak up the rich sauce well. You can also add a side of cucumber salad for a fresh crunch. For the complete recipe, check out the Full Recipe section. You’ll find all the steps to make this rich, flavorful dish in no time! In this post, we covered the key ingredients for easy Chicken Tikka Masala, from marinade to sauce. I shared tips for perfect flavor and cooking techniques. You can even explore vegetarian options or different proteins like tofu. Storing leftovers properly ensures you enjoy this dish later. Remember, marinating the chicken is key, and you can customize it to your taste. With these steps, you’ll cook a delicious meal that’s sure to impress!](https://joymealplan.com/wp-content/uploads/2025/07/18c11e8b-b17f-4eb1-983f-851954d1111b-768x768.webp)