Skip to content
About
Contact
Cookie Policy
Copyright Policy
Disclaimer
Search
Home
Dinner
Appetizer
Desserts
Drinks
About
Contact
Privacy Policy
Toggle Menu
Home
/
Dinner
- Page 36
Dinner
Baked Feta Pasta Simple and Creamy Delight
Creamy Pesto Spinach Gnocchi Bake Savory Delight
Garlic Herb Roasted Potatoes Delightful Easy Side
Chicken Caesar Pasta Salad Fresh and Flavorful Meal
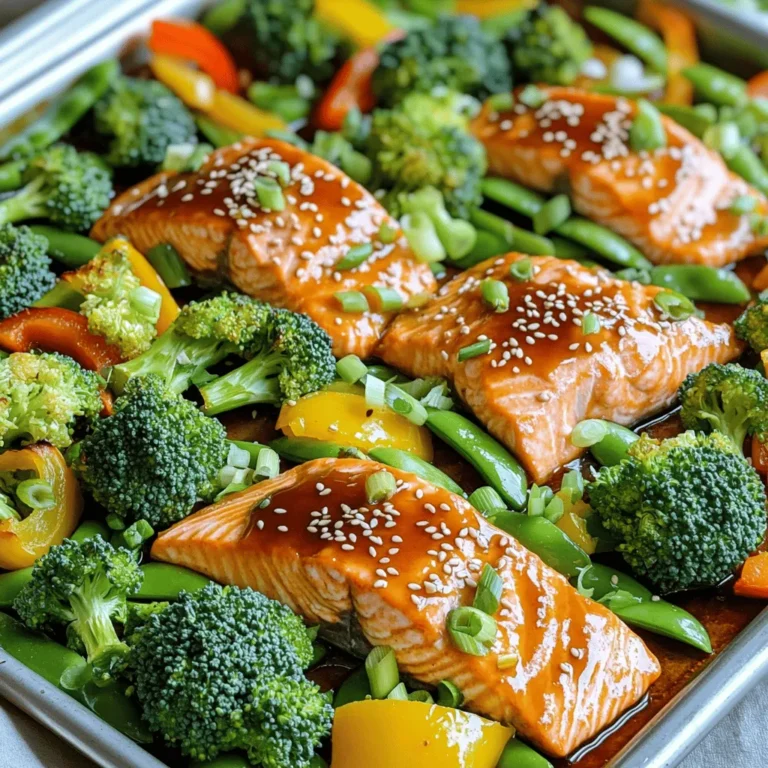
Sheet Pan Teriyaki Salmon Quick and Tasty Dinner
Garlic Butter Steak Bites Flavorful and Simple Recipe
Easy Chicken Fajita Bowls Flavorful and Simple Meal
Nutritious Avocado Toast with Egg Easy Breakfast Delight
Cheesy Broccoli Rice Casserole Simple Comfort Food
Lemon Herb Grilled Salmon Flavorful and Simple Dish
Page navigation
Previous Page
Previous
1
…
34
35
36
37
38
…
65
Next Page
Next
Home
Dinner
Appetizer
Desserts
Drinks
About
Contact
Privacy Policy
Toggle Menu Close
Search for:
Search

![- Feta cheese - Cherry tomatoes - Olive oil - Garlic - Dried oregano - Red pepper flakes - Salt and pepper - Pasta options (penne or fusilli) - Fresh basil leaves - Optional garnishes (lemon zest) For this dish, you need fresh and high-quality ingredients. The feta cheese brings creaminess, while the cherry tomatoes add sweetness. Olive oil enhances the flavor and helps with cooking. Garlic gives a lovely aroma and taste. Dried oregano adds a hint of earthiness, and red pepper flakes can bring a nice kick. Salt and pepper are essential for seasoning. You can pick either penne or fusilli pasta for this recipe. Both hold the creamy sauce well. Fresh basil leaves add brightness and color to your dish. If you want a zesty touch, lemon zest is a perfect addition. When you gather these ingredients, you set the stage for a simple yet delightful meal. Each component plays a role in making your baked feta pasta a creamy delight. Be sure to look at the full recipe for all the details! First, set your oven temperature to 400°F (200°C). This temperature works well for baking the feta and tomatoes. Next, choose a baking dish that fits all your ingredients. A medium-sized dish works best, allowing enough space for everything. Now it’s time to create your dish. Place the block of feta cheese in the center of the baking dish. Surround it with the halved cherry tomatoes. This colorful mix makes the dish look inviting. Drizzle olive oil over the feta and tomatoes. Then, add minced garlic, dried oregano, red pepper flakes, salt, and pepper. This step adds a burst of flavor to the dish. Place the dish in your preheated oven. Bake for about 30 minutes. Look for the tomatoes to blister and the feta to soften. When it’s ready, the feta should turn a lovely golden color. While that bakes, boil salted water in a pot for the pasta. Cook the pasta according to the package instructions until it is al dente. After cooking, drain the pasta and set it aside. After 30 minutes, carefully take the baking dish out of the oven. Use a fork to mash the softened feta and blistered tomatoes. This creates a creamy sauce. Now, gently fold the cooked pasta into your baking dish. Toss everything together to coat the pasta well. Finally, taste your dish and adjust the seasoning. You can add more salt, pepper, or red pepper flakes for extra flavor. Serve the dish right away, garnished with fresh basil leaves. If you like, add a sprinkle of grated lemon zest for a refreshing twist. Enjoy your simple and creamy delight! For more details, check the Full Recipe. To get the best baked feta pasta, know your oven. Every oven heats a little differently. If yours runs hot, lower the temp by 25°F. Check on the dish after 25 minutes. Look for blistered tomatoes and soft feta. If the feta is golden and creamy, it’s ready! Cook your pasta to al dente. This means it should still have a slight bite. Follow the package directions, but check it a minute early. Save some starchy pasta water when draining. This water helps the sauce stick to the pasta. Want to boost flavor? Try adding a pinch of lemon zest or a dash of balsamic vinegar. Fresh herbs like parsley or thyme can brighten the dish too. If you like heat, toss in more red pepper flakes. You can mix and match spices to fit your taste! {{image_4}} You can easily make Baked Feta Pasta gluten-free. Just use gluten-free pasta instead of regular pasta. Many brands offer tasty options that work well. If you want a vegan version, substitute feta cheese with a plant-based alternative. Look for brands that make creamy vegan feta. These options still give that tangy flavor you love. To add some color and nutrition, toss in vegetables. Spinach wilts nicely and adds a fresh taste. Zucchini can also work well; just chop it into small pieces. For protein, you can add cooked chicken or shrimp. Both will make your dish more filling. Cook the protein separately, then mix it in right before serving. While penne and fusilli are great, you can use other pasta types too. Bowtie or rotini can hold the creamy sauce well. For a lighter option, serve the dish over zoodles or spiralized veggies. You’ll get a fresh twist while keeping it healthy. For the full recipe, check out [Full Recipe]. After you enjoy your baked feta pasta, store any leftovers in the fridge. Use a tight container to keep it fresh. Make sure to cool it down before sealing. It will stay good for about three to four days. This dish tastes great the next day, too. You can reheat your pasta in two ways: the microwave or the oven. If you use the microwave, heat in short bursts. Stir it after each burst to keep it creamy. For the oven, preheat to 350°F (175°C). Place the pasta in an oven-safe dish, cover it, and heat for about 15 minutes. This way, you maintain the texture of the sauce. Yes, you can freeze this dish, but it’s best to freeze it before baking. Place the unbaked dish in a freezer-safe container. It will last around two to three months. When ready to eat, thaw it overnight in the fridge and bake as normal. If you freeze it after baking, the texture might change, but it’s still tasty. Just be careful when reheating to avoid drying it out. Baked Feta Pasta started in Finland. It became popular on social media in 2020. The dish caught on for its simple steps and great taste. People enjoyed the creaminess of feta mixed with tomatoes. It became a fun way to cook pasta. Now, it's a favorite in many homes worldwide. Yes, you can prep Baked Feta Pasta ahead of time. You can bake the feta and tomatoes the night before. Store them in the fridge after cooling. When ready to eat, cook the pasta and mix it in. Just be sure to adjust the baking time as needed. Baked Feta Pasta has some healthy aspects. Feta cheese offers protein and calcium. Tomatoes provide vitamins and antioxidants. However, it also has olive oil and pasta, which add calories. Balance is key. You can add veggies for extra nutrients. This dish pairs well with many sides. A fresh salad with greens is great. Garlic bread adds a nice crunch. You can also serve it with roasted vegetables. For a light option, try steamed broccoli or green beans. To add heat, use more red pepper flakes. You can also try adding sliced jalapeños. For a smoky flavor, mix in some smoked paprika. Taste as you go, so it's just right for your spice level. In this blog post, we explored how to create baked feta pasta. We covered the ingredients, step-by-step instructions, and tips for the perfect dish. Remember to select fresh ingredients for the best flavor. You can personalize the recipe with your choice of pasta and optional add-ins. This dish is simple, satisfying, and perfect for any meal. Enjoy experimenting with flavors and variations to make it your own. With these steps, you'll serve a delightful meal that family and friends will love.](https://joymealplan.com/wp-content/uploads/2025/07/e04698b2-b085-49cc-98ed-107e8e7c4045-768x768.webp)


![- Sirloin steak - Unsalted butter - Garlic - Fresh herbs (rosemary and thyme) - Seasonings (salt, pepper, red pepper flakes) The star of this dish is the sirloin steak. I love using sirloin because it’s tender and flavorful. Cut it into 1-inch cubes for the perfect bite. Next, you need unsalted butter. This adds richness to the dish without being too salty. Garlic is key for that bold flavor; four cloves will do the trick. Fresh herbs like rosemary and thyme elevate the taste. Seasoning is important; use salt, pepper, and red pepper flakes for a bit of heat. - Fresh parsley Garnishing with fresh parsley adds color and freshness. It also brightens the dish visually and taste-wise. - Large skillet - Knife and cutting board - Measuring spoons You will need a large skillet to cook the steak bites evenly. A sharp knife and cutting board help when cutting the steak into cubes. Measuring spoons ensure you get the right amount of butter and spices. For the full recipe, check out the [Full Recipe]. Start by cutting the sirloin steak into 1-inch cubes. Use a sharp knife for clean cuts. Next, season the steak pieces with salt and black pepper. Make sure each piece is well-coated. This step helps enhance the steak’s flavor. Heat a large skillet on medium-high heat. Add 2 tablespoons of unsalted butter. Wait until it sizzles and foams. Once the butter is ready, add the steak cubes in a single layer. Avoid crowding the pan to let them sear well. Cook the steak for 2-3 minutes on each side. Aim for a medium-rare doneness, or cook longer if you prefer it more done. Remove the steak bites from the skillet and set them aside on a plate. In the same skillet, lower the heat to medium. Add the remaining 2 tablespoons of butter and let it melt completely. When the butter melts, add the minced garlic, fresh rosemary, and thyme. Sauté these for 1-2 minutes. Stir constantly to avoid burning the garlic. If it burns, it can taste bitter. Now, return the cooked steak bites to the skillet. Toss them in the garlic butter sauce to coat evenly. If you like heat, sprinkle in red pepper flakes and mix well. This adds a nice kick to the dish. Carefully transfer the garlic butter steak bites to a serving platter. For a nice touch, garnish with freshly chopped parsley. This adds color and freshness to the dish. You can serve these bites with toothpicks for easy eating or pair them with crusty bread. This way, everyone can enjoy the tasty garlic butter sauce. For the full recipe, check the link above. When making garlic butter steak bites, the cut of steak matters. I recommend using sirloin. It is tender and has great flavor. Other cuts like ribeye or filet mignon are good too. Ribeye is rich and juicy, while filet mignon is super tender. Think about your taste and budget when choosing. Garlic butter sauce makes these bites special. First, avoid burnt garlic. Burnt garlic tastes bitter. To keep it nice, cook garlic on medium heat. Watch it closely for about 1-2 minutes. If you want to change the flavor, add fresh herbs. Rosemary and thyme are great, but you can try other herbs too. To get juicy steak bites, searing is key. Heat your skillet until it’s hot. This helps form a nice crust and seals in juices. Cook the steak for about 2-3 minutes per side. After cooking, let the steak rest for a few minutes. This helps keep the juices inside the meat. For the full recipe, check the link. {{image_4}} You can add fun flavors to your garlic butter steak bites by mixing in different spices. Try paprika for a mild smokiness or cumin for a warm twist. These spices enhance the taste without overpowering the garlic. You can also use alternative herbs like oregano or basil. These herbs add a fresh taste and can change the whole vibe of the dish. For a new twist, incorporate soy sauce or Worcestershire sauce into your garlic butter. This gives the dish a savory depth. If you love bright flavors, try adding some lemon zest. The zest adds a nice zing that balances the rich garlic butter. When it comes to sides, think of colorful vegetables like roasted asparagus or sautéed green beans. These add nutrition and color to your meal. You could also serve the steak bites over rice for a filling option. Pair with your favorite sauces or dips, like a creamy ranch or spicy aioli, to elevate the meal even more. For the full experience, check out the Full Recipe. To keep your garlic butter steak bites fresh, store them in an airtight container. Make sure to let the steak bites cool completely before sealing them. They can stay in the fridge for up to three days. This helps preserve their flavor and texture. If you want to keep them longer, freezing is a great option. Place the cooled steak bites in a freezer bag. Remove as much air as possible to prevent freezer burn. They can last up to three months in the freezer. When you’re ready to eat, thaw them in the fridge overnight for best results. To reheat, use a skillet on low heat. This method warms the steak bites evenly. Stir occasionally to avoid hot spots. If you want a crispy outside, sear them for a minute on each side. Avoid the microwave as it can overcook the steak and make it tough. Enjoy your garlic butter steak bites just as delicious as when they were first made! You cook garlic butter steak bites for about 6 to 8 minutes. For medium-rare steak, aim for 2 to 3 minutes per side. If you like it medium, cook for about 3 to 4 minutes per side. Always check the center for your preferred doneness. Yes, you can use frozen steak, but thaw it first. Place the steak in the fridge overnight for best results. If short on time, submerge it in cold water for about an hour. Once thawed, cut and season it as you would fresh steak. Serve garlic butter steak bites with a side of roasted vegetables. Mashed potatoes or a fresh salad also pair well. For drinks, red wine or a cold beer complements the flavors nicely. Yes, this recipe is great for meal prep. Cook the steak bites and store them in airtight containers. They last up to 4 days in the fridge. Reheat them in a skillet for the best taste. To keep steak tender, marinate it for a few hours. Use a mixture of oil, acid, and spices. You can also use a meat tenderizer before cooking. Always slice the steak against the grain for the best texture. You now have a simple, tasty recipe for garlic butter steak bites. Remember the main steps: prepare your steak, cook it well, and make a rich garlic butter sauce. Feel free to customize with new flavors and serve with your favorite sides. Keep your leftovers fresh by following the storage tips. Cooking can be fun! Enjoy this dish and impress others with your skills. Happy cooking!](https://joymealplan.com/wp-content/uploads/2025/06/92db3657-03ac-4854-ae42-b3d18b0eb765-768x768.webp)


![- 2 cups cooked white or brown rice - 2 cups fresh broccoli florets, steamed until tender - 1 cup sharp cheddar cheese, shredded - 1 cup cream of mushroom soup - 1 cup milk - 1 teaspoon garlic powder - 1 teaspoon onion powder - Salt and freshly ground black pepper to taste - 1/2 cup breadcrumbs (for a crispy topping) - 2 tablespoons olive oil - Preheat oven to 350°F (175°C) - Combine rice and broccoli in a mixing bowl - Add soup, milk, spices, and cheese; mix thoroughly - Transfer to a greased baking dish and top with breadcrumbs and cheese - Cover with foil; bake for 25 minutes - Remove foil; bake for an additional 15-20 minutes Making Cheesy Broccoli Rice Casserole is simple and fun. You start with the main ingredients, mixing cooked rice with steamed broccoli. This gives you a great base. The cheddar cheese adds a rich, creamy taste. The cream of mushroom soup and milk make the mix smooth. Next, we add some seasoning. Garlic powder and onion powder give the dish a nice flavor. Salt and pepper allow you to adjust the taste just how you like it. For a crunchy topping, breadcrumbs mixed with olive oil work great. Once you have everything mixed, pour it into a greased baking dish. This keeps it from sticking. Spread it out evenly. Then comes the fun part—topping it with more cheese and breadcrumbs! Now, cover the dish with foil. This keeps the moisture in while it cooks. Bake it for 25 minutes, then remove the foil. Bake for another 15-20 minutes until the cheese is melted and the top is golden. You can find the complete recipe [Full Recipe] for more detailed steps if needed. Enjoy this tasty, warm casserole. It’s perfect for dinner or as a side dish! To boost the taste of your Cheesy Broccoli Rice Casserole, I recommend using homemade cream of mushroom soup. It adds freshness and depth that store-bought versions can't match. You can easily make it by sautéing mushrooms with butter and mixing in some cream. Another fun tip is to experiment with different cheeses. Try gouda or pepper jack for a unique twist. Each cheese brings its own flavor, making each bite exciting. To make your casserole look beautiful, garnish it with fresh parsley or chives. The green color brightens the dish and gives it a fresh taste. For an extra touch of flavor, drizzle some balsamic glaze over the top just before serving. This adds a sweet and tangy contrast that pairs well with cheesy goodness. Make sure your broccoli is steamed evenly. This ensures every piece is tender and not overcooked. If some pieces are hard, they won't blend well with the rice. After baking, let the casserole rest for about five minutes. This simple step helps it set and makes slicing easier. You will have perfect portions for serving! You can easily switch the main veggies in this dish. Swap broccoli for cauliflower or spinach. Both options taste great and add different flavors. You can also try brown rice or quinoa instead of white rice. This makes the meal healthier and adds more fiber. If you need a gluten-free option, use gluten-free breadcrumbs. This keeps the crispy topping but makes it safe for gluten-sensitive folks. For a vegan version, substitute cheese and milk with plant-based choices. Almond milk and vegan cheese work well here. Want to add more taste? Cooked chicken or turkey is a great protein boost. This makes the meal heartier. You can also sprinkle in spices like paprika or cayenne for some heat. These little changes make a big difference in flavor. {{image_4}} After enjoying your cheesy broccoli rice casserole, store any leftovers in an airtight container. This keeps the flavors fresh for up to 4 days. I recommend letting it cool down before sealing. This way, it won’t steam and get soggy. You can freeze the casserole before baking it. This method lets you enjoy it later without losing taste. Just wrap it well in plastic wrap or foil and store it in the freezer for up to 3 months. When you are ready to bake, thaw it in the fridge overnight. Adjust the baking time since it will be cold. To reheat, the oven is your best bet. It helps keep the texture nice and creamy. Just cover it with foil and heat at 350°F (175°C) until warmed through. You can also use the microwave for a quicker option. It’s great for busy days when you want a tasty meal fast. Yes, you can prepare the casserole and refrigerate or freeze it before baking. This makes it easy to have a warm meal ready when you need it. Just remember to let it thaw before baking if frozen. You can use homemade cream soup or a different canned soup option, like cream of chicken or celery. This gives you flexibility based on what you have at home. To lighten it up, use reduced-fat cheese. You can also substitute whole milk with low-fat or unsweetened almond milk. These changes still keep the dish creamy and tasty. Absolutely! It stores well and can be portioned for easy meal prepping. Just make sure to use airtight containers for freshness. Enjoy it throughout the week! - 2 cups cooked white or brown rice - 2 cups fresh broccoli florets, steamed until tender - 1 cup sharp cheddar cheese, shredded - 1 cup cream of mushroom soup (store-bought or homemade) - 1 cup milk - 1 teaspoon garlic powder - 1 teaspoon onion powder - Salt and freshly ground black pepper to taste - 1/2 cup breadcrumbs (for a crispy topping) - 2 tablespoons olive oil 1. Preheat your oven to 350°F (175°C). 2. Mix the cooked rice and steamed broccoli in a large bowl. 3. Add cream of mushroom soup, milk, garlic powder, onion powder, and half the cheese. Season with salt and pepper. Stir well. 4. Grease a 9x13 inch baking dish with olive oil. Transfer the mixture into the dish and spread evenly. 5. In a small bowl, mix breadcrumbs with olive oil. Sprinkle over the casserole. 6. Add the remaining cheese on top of the breadcrumbs. 7. Cover the dish with aluminum foil, shiny side down. Bake for 25 minutes. 8. Remove the foil and bake for another 15-20 minutes. Watch for bubbling cheese and golden breadcrumbs. 9. Let the casserole rest for 5 minutes before serving. - Serving Size: 1/6 of the casserole - Calories: Approximately 320 - Total Fat: 12g - Saturated Fat: 5g - Carbohydrates: 42g - Protein: 12g - Fiber: 3g - Sugars: 2g This blog showed you how to make a tasty Cheesy Broccoli Rice Casserole. We covered all the main ingredients, from rice and cheese to spices. You learned step-by-step how to mix and bake it perfectly. I also shared tips to enhance flavor and fun variations. Finally, you got key storage info and answers to common questions. Enjoy making this dish! It’s simple, delicious, and adaptable for everyone.](https://joymealplan.com/wp-content/uploads/2025/06/63660ef9-884f-40e9-9c69-6c7b156d354b-768x768.webp)
![To create a delicious Lemon Herb Grilled Salmon, you need fresh and simple ingredients. Here’s what you will gather: - 4 salmon fillets (approximately 6 ounces each) - 1/4 cup extra virgin olive oil - Zest from 1 large lemon - Juice of 2 fresh lemons - 3 cloves garlic, finely minced - 2 tablespoons fresh parsley, finely chopped - 2 tablespoons fresh dill, finely chopped - 1 tablespoon fresh thyme, finely chopped - Salt and freshly ground black pepper to taste - Lemon wedges, for garnishing These ingredients work together to bring out the bright and zesty flavor of the salmon. The fresh herbs add depth, while the lemon provides a refreshing kick. When you combine these elements, you create a dish that looks and tastes amazing. If you want to explore the complete process, check out the Full Recipe. To start, grab a medium bowl. Mix together: - 1/4 cup extra virgin olive oil - Zest from 1 large lemon - Juice from 2 fresh lemons - 3 cloves garlic, finely minced - 2 tablespoons fresh parsley, chopped - 2 tablespoons fresh dill, chopped - 1 tablespoon fresh thyme, chopped - Salt and pepper to taste Whisk all these ingredients together until they blend well. This mix will be your flavorful marinade. Now, take your salmon fillets. Place them in a resealable bag or shallow dish. Pour the marinade over the salmon. Make sure each piece is well coated. Seal the bag or cover the dish. Let it chill in the fridge for 30 minutes up to 2 hours. The longer it sits, the stronger the flavor will be. Preheat your grill to medium-high heat. If using a grill pan, set it to medium heat. Lightly coat the surface with olive oil to stop the fish from sticking. After marinating, remove the salmon from the bag. Let any extra marinade drip off. Discard the leftover marinade. Place the salmon skin-side down on the hot grill. Cook for about 5-6 minutes without touching it. Then, flip the salmon gently with a spatula. Grill for another 4-5 minutes. The fish should be opaque and flake easily with a fork. Once it’s done, let the salmon rest for a few minutes. This helps improve the flavor and texture. Serve the grilled salmon with fresh lemon wedges. Add a pop of citrus to enhance your dish. Enjoy your meal! For the complete recipe, check the [Full Recipe]. To grill salmon just right, aim for medium-high heat. This usually means around 375°F to 400°F. The salmon needs about 5-6 minutes on the first side. Flip it gently and grill for another 4-5 minutes. To check for doneness, use a fork. The fish should easily flake apart and look opaque. If it’s still shiny, it needs more time. For more flavors, try adding a pinch of smoked paprika or a dash of cayenne pepper. These spices can add a nice kick. Pair the salmon with sides like roasted veggies, quinoa, or a fresh salad. These dishes complement the salmon well and balance its rich taste. When plating the salmon, add a bright touch with fresh herbs. A sprinkle of parsley or dill makes it pop. Serve with lemon wedges for an extra zing. For drinks, a crisp white wine, like Sauvignon Blanc, pairs well. It enhances the meal and makes it feel special. For a non-alcoholic option, try sparkling water with lemon. It refreshes the palate and adds a lovely touch to your dinner. For the full recipe, check out the detailed steps above. {{image_4}} You can switch up the marinade to keep things fresh. Try using lime or orange juice instead of lemon. These fruits add a different twist to your salmon. You can also add spices like cayenne pepper for some heat. A touch of heat makes the dish more exciting. Grilling is great, but you have other choices too. Baking or broiling the salmon works well and keeps it moist. If it’s raining or too cold outside, use a stovetop grill pan. Just make sure it’s hot before adding the salmon for even cooking. You can make this dish fit your diet needs. For a gluten-free version, check that your spices are gluten-free. You can also skip dairy by using olive oil instead of butter. If you want to lower calories, use less oil in the marinade. These small changes keep the meal healthy while still tasting great. Try these variations to make lemon herb grilled salmon fit your taste and lifestyle. For the full recipe, check out the earlier sections! To keep your grilled salmon fresh, store it in the fridge. Place the salmon in an airtight container. This helps keep it from drying out. It should last for up to three days in the fridge. If you want to save it longer, freezing is a good option. Wrap the salmon tightly in plastic wrap, then put it in a freezer bag. You can freeze it for up to three months. Label the bag with the date so you know when to use it. When you reheat grilled salmon, you want to keep it moist. The best way is to use the oven. Preheat the oven to 275°F (135°C). Place the salmon on a baking sheet, cover it with foil, and heat for about 15 minutes. This method helps avoid drying out the fish. You can also use a microwave, but be careful. Heat it in short bursts of 30 seconds on low power. Check often to keep the flavor and texture. A splash of lemon juice can help refresh the taste. Grilling time depends on the thickness of the salmon. For fillets about 1 inch thick, grill for 5-6 minutes on one side. Flip and grill for another 4-5 minutes. Thicker fillets may need more time, so check for doneness. When the salmon is opaque and flakes easily, it's ready to eat. Yes, you can use frozen salmon. To cook it, thaw the salmon first. Place it in the fridge overnight or submerge it in cold water for about an hour. Once thawed, pat it dry and marinate as in the Full Recipe. This will help keep it moist while grilling. Lemon herb grilled salmon pairs well with fresh salads and veggies. Try serving it with: - Mixed green salad with a light vinaigrette - Steamed asparagus or green beans - Roasted potatoes seasoned with herbs - Quinoa or rice pilaf for a hearty side These dishes complement the fresh flavors of the salmon and make a complete meal. Grilling lemon herb salmon is simple and rewarding. You start with fresh salmon and a tasty marinade of olive oil, lemon, garlic, and herbs. Marinate for a short time to boost flavor. Grill it right and serve with sides for a complete meal. Experiment with different flavors and cooking methods to find your favorite. Always store leftovers properly to enjoy them later. With these tips, you’ll impress everyone at the table. Now, get ready to grill and enjoy this delicious dish!](https://joymealplan.com/wp-content/uploads/2025/06/94675a3f-7fd4-4f6d-bbd0-da6b916d26a4-768x768.webp)