Skip to content
About
Contact
Cookie Policy
Copyright Policy
Disclaimer
Search
Home
Dinner
Appetizer
Desserts
Drinks
About
Contact
Privacy Policy
Toggle Menu
Home
/
Dinner
- Page 41
Dinner
One Pot Sausage and Rice Flavorful Dinner Recipe
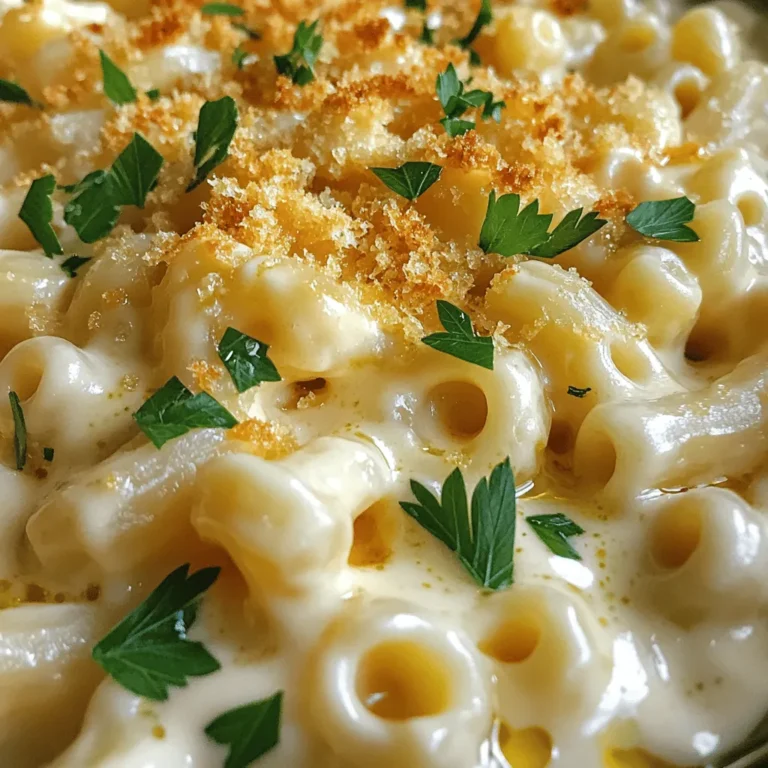
Homemade Mac and Cheese Creamy Flavorful Delight
Sheet Pan Chicken Fajitas Quick and Tasty Meal
Spicy Sriracha Noodles Quick and Flavorful Meal
One Pot Cajun Sausage Pasta Simple and Tasty Recipe
Garlic Butter Steak Bites Flavorful and Easy Recipe
Creamy Broccoli Cheddar Soup Flavorful and Simple Dish
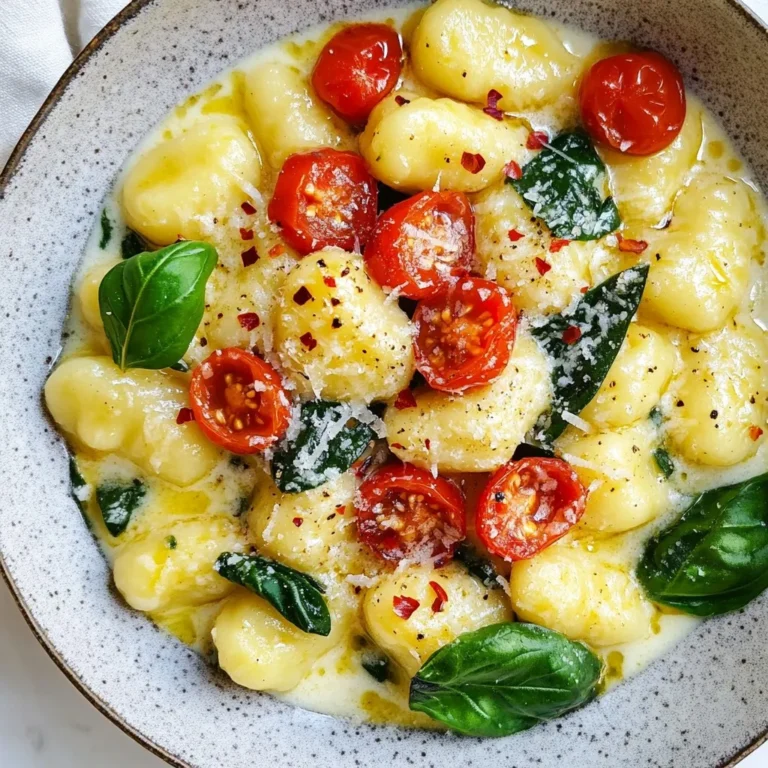
Marry Me Gnocchi Delicious and Creamy Recipe
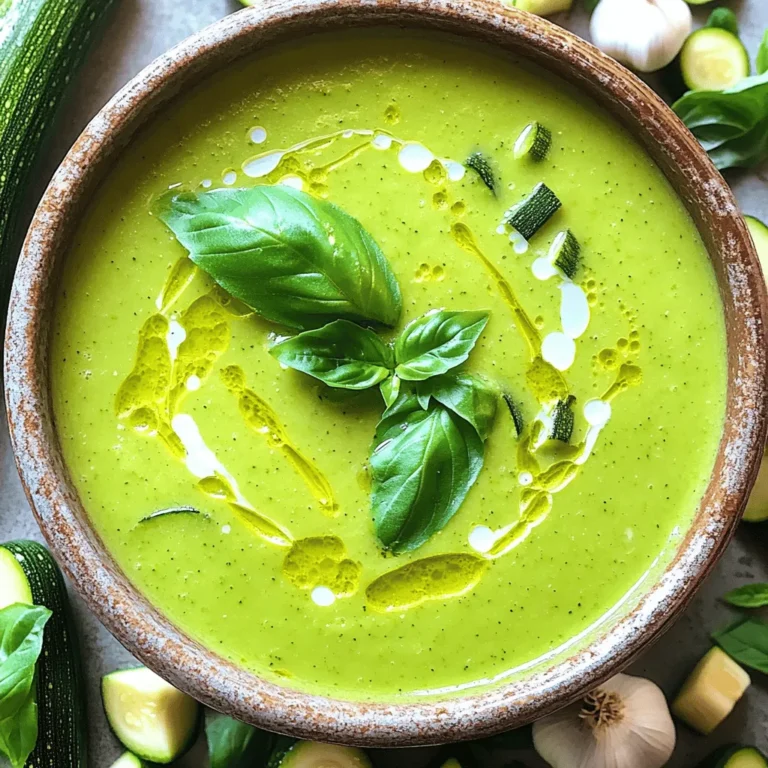
Creamy Zucchini Soup Simple and Hearty Recipe
Peach BBQ Chicken Skewers Tasty and Easy Recipe
Page navigation
Previous Page
Previous
1
…
39
40
41
42
43
…
65
Next Page
Next
Home
Dinner
Appetizer
Desserts
Drinks
About
Contact
Privacy Policy
Toggle Menu Close
Search for:
Search


![- 1 lb boneless, skinless chicken breasts - 2 bell peppers (red and green) - 1 medium yellow onion - Olive oil and spices The main ingredients are simple yet flavorful. I use boneless, skinless chicken breasts because they cook evenly. Bell peppers add color and sweetness, while the onion provides a tasty base. Olive oil helps the spices stick and adds richness. - Chili powder - Ground cumin - Garlic powder - Smoked paprika - Onion powder The seasoning blend makes this dish special. Chili powder gives a nice kick. Ground cumin adds warmth, while garlic and onion powders boost the flavor. Smoked paprika brings depth with its smoky taste. - Flour tortillas - Fresh cilantro - Lime wedges for serving To enjoy the fajitas, I use small flour tortillas that hold the filling well. Fresh cilantro adds a bright touch, and lime wedges bring a zesty finish. These extras make the meal even better. For the full recipe, check out the [Full Recipe]. - Set the oven to 425°F (220°C). - Line a sheet pan with parchment paper. - In a bowl, whisk together olive oil and spices. - Coat the chicken with the marinade well. - Add the sliced bell peppers and onion to the chicken. - Spread the mixture evenly across the sheet pan. - Bake for 20-25 minutes, stirring halfway through. This recipe makes it easy to prepare a tasty meal. You can enjoy it with warm tortillas. For the full recipe, check out the details provided earlier. To make the best sheet pan chicken fajitas, marinate the chicken longer if you can. Letting it soak in flavors for more time makes a big difference. A meat thermometer is also very handy. It helps you check if your chicken is fully cooked. Aim for 165°F (74°C) for safety. A fajita bar is a fun way to serve these. Lay out all the toppings for everyone to enjoy. Think about adding sour cream, salsa, or guacamole. To warm the tortillas, heat them in a dry skillet for about 30 seconds on each side. You can also wrap them in foil and place them in the oven for the last five minutes of cooking. Make your presentation pop with colorful toppings. Fresh avocado, diced tomatoes, and shredded cheese can make your dish look great. Don't forget to garnish with lime wedges and cilantro. These small touches bring out the flavors and make the dish more inviting. Enjoy the full recipe for more details on how to create this tasty meal! {{image_4}} You can switch the chicken for shrimp or tofu. Shrimp cooks fast and adds a nice flavor. Tofu is great for a plant-based option. If you want to use chicken, try different cuts like thighs. Thighs are juicy and full of flavor. If you want a meatless meal, replace chicken with mixed vegetables. Bell peppers, zucchini, and corn work well. Add beans for protein. Black beans or pinto beans add creaminess and taste. This keeps your meal hearty and filling. Want to spice things up? Add jalapeños for heat. They bring a nice kick that many love. You can also mix in different herbs and spices. Try oregano, cilantro, or smoked paprika for variety. Each adds unique flavors to your dish. Explore these options to find your favorite twist on this recipe! For the full recipe, check the link. After you enjoy your sheet pan chicken fajitas, store any leftovers in an airtight container. This keeps the flavors fresh. You can refrigerate them for up to 3 days. Make sure to let them cool before sealing to avoid steam buildup. To freeze the fajita mix, place it in a freezer-safe bag or container. Remove as much air as possible to prevent freezer burn. You can keep it frozen for up to 3 months. For thawing, move it to the fridge overnight. If you're in a hurry, use the microwave's defrost setting. To reheat without drying out your fajitas, use the oven. Preheat it to 350°F (175°C) and warm the fajitas in a covered dish for about 10-15 minutes. You can also use a skillet over low heat, adding a splash of water to create steam. This keeps everything juicy. Get creative with leftovers! Use them in tacos, wraps, or salads for a quick meal. You can even mix them into scrambled eggs for a tasty breakfast. For the full recipe, check it out above. Yes, you can use frozen chicken for this recipe. Just follow these guidelines: - Thawing: Always thaw the chicken before marinating. You can do this overnight in the fridge or use the microwave's defrost setting. - Cooking Time: If you skip thawing and bake from frozen, increase the cooking time by 5-10 minutes. - Check Doneness: Use a meat thermometer to ensure the chicken reaches 165°F (74°C). There are many tasty sides to pair with your fajitas. Here are some great options: - Rice: Cilantro lime rice adds a fresh touch. - Beans: Black beans or refried beans are both hearty and flavorful. - Salad: A simple green salad with lime vinaigrette complements the fajitas well. - Chips and Salsa: Serve with tortilla chips and your favorite salsa for a crunchy side. Want extra heat? Here are some tips to spice up your fajitas: - Add Jalapeños: Sliced fresh jalapeños can give a nice kick. - Use Hot Sauce: Drizzle your favorite hot sauce over the fajitas before serving. - Increase Spice Mix: Add more chili powder or a pinch of cayenne pepper to the marinade for more heat. For the complete recipe, check the Full Recipe section. In this blog post, we covered a tasty sheet pan chicken fajitas recipe. You learned about the key ingredients and how to prepare them. I shared tips to make your fajitas perfect, including variations for different diets. Storing leftovers and reheating them properly helps reduce waste. Remember, these fajitas are easy to customize and fun to serve. Enjoy making them with family or friends, and let your creativity shine. Your next meal can be delicious and simple!](https://joymealplan.com/wp-content/uploads/2025/06/bce38261-6b1a-4600-b2d8-c9c563997242-768x768.webp)
![To make the Spicy Sriracha Noodles, gather these ingredients: - 8 oz rice noodles - 2 tablespoons Sriracha sauce - 1 tablespoon soy sauce - 1 tablespoon sesame oil - 1 red bell pepper, thinly sliced - 1 cup snap peas, trimmed - 3 green onions, finely chopped - 2 cloves garlic, minced - 1 tablespoon fresh ginger, grated - ½ cup fresh cilantro, roughly chopped - Juice of 1 lime - Salt to taste - Sesame seeds for garnish This recipe serves about 2 to 3 people. Each serving contains: - Calories: Approximately 350 - Protein: 10g - Carbohydrates: 55g - Fats: 12g - Fiber: 5g These noodles are a great choice for a quick, flavorful meal. They balance carbs and protein while being low in calories. You can customize this recipe easily. Here are some swaps: - Rice noodles: Use whole grain or egg noodles if you prefer. - Sriracha sauce: Try chili paste or hot sauce for a different heat. - Soy sauce: Use tamari for a gluten-free option. - Sesame oil: Olive oil or coconut oil can work too. - Red bell pepper: Any bell pepper or even carrots will add crunch. - Snap peas: You can swap these for green beans or broccoli. These substitutions keep your dish exciting while still delivering great flavor. For the full recipe, check out the complete guide. Start by boiling water in a large pot. Add the rice noodles and cook them for about 4-6 minutes, or until they are soft but still firm. Drain the noodles and rinse them with cold water. This stops the cooking process and keeps them from getting sticky. Set them aside to cool. Grab a large skillet or wok and pour in the sesame oil. Heat it on medium until it shimmers. Add minced garlic and grated ginger, stirring for about 30 seconds. The smell should make your mouth water! This step adds a tasty base to your noodles. Now, toss in the sliced red bell pepper and snap peas. Stir-fry these veggies for about 3-4 minutes. They should be bright and slightly tender. In a small bowl, mix Sriracha, soy sauce, and lime juice. Pour this sauce over the veggies, stirring well. Then, gently fold in the cooked noodles, making sure everything is coated evenly. Season with salt to taste. Stir-fry for another 1-2 minutes. Finally, add chopped green onions and cilantro for a fresh kick. Serve your spicy Sriracha noodles hot, garnished with sesame seeds from the recipe provided! To get the best texture for your noodles, cook them until they are al dente. This means they should be firm to the bite. Follow the package instructions closely. After cooking, drain and rinse them with cold water. This stops the cooking process and keeps them from getting too soft. Want to adjust the spice? You can! Add more Sriracha for a hotter dish. If you prefer it milder, use less Sriracha or mix in a little soy sauce. You can also add sugar to balance the heat. Taste as you go to find your perfect level of spice. Garnishing makes your dish pop! Use fresh cilantro and green onions for color. A sprinkle of sesame seeds adds a nice crunch too. You can also add lime wedges on the side. This gives a fresh touch and looks great on the plate. Serve your noodles hot to enjoy all the flavors! {{image_4}} You can add proteins to your spicy Sriracha noodles for extra flavor and nutrition. Tofu is a great choice for a vegetarian option. Cut firm tofu into small cubes, then sauté it until golden. Add it to the noodles at the end for a satisfying bite. If you like chicken, use thinly sliced breast. Cook it in the skillet before the veggies. Shrimp is another tasty option. Toss it in after the veggies cook. Shrimp only takes a few minutes to cook. This way, you get a quick and hearty meal. Feel free to swap in different vegetables for variety. Zucchini adds a nice crunch. Slice it into thin rounds and add it to the skillet with the bell pepper. Broccoli is another great option. Cut it into small florets and steam it slightly before adding to your dish. This keeps it bright and tender. You can mix and match any veggies you have. Spinach, carrots, or bell peppers work well too. The more colors, the better your dish looks and tastes. Making this dish vegetarian or vegan is easy. Just use vegetable broth instead of chicken broth. You can also swap out the honey or sugar for maple syrup. Many store-bought Sriracha sauces are vegan, but check the label. You want to keep the flavors bold and spicy while ensuring it fits your diet. Try adding more herbs or spices, like basil or cilantro, for extra depth. The main goal is to keep it fresh and flavorful. This dish can fit any diet with simple swaps. For the full recipe, check above. After enjoying your spicy Sriracha noodles, store any leftovers in an airtight container. Make sure to let them cool first. This helps keep the noodles fresh and tasty. Refrigerate them right away. They will stay good for up to three days. If you want to enjoy them later, it’s best to eat them within this time frame. When you’re ready to eat your leftovers, there are a few ways to reheat them. You can use a microwave or a skillet. For the microwave, place the noodles in a bowl. Add a splash of water to keep them moist. Heat them for about 1-2 minutes, stirring halfway through. If you choose the skillet, warm it over medium heat. Add a little oil and toss the noodles until they are hot. This method helps keep the texture nice. You can freeze these noodles if you want to save them for later. First, let them cool completely. Then pack them in a freezer-safe container or bag. Make sure to remove as much air as possible. The noodles can last up to two months in the freezer. When you’re ready to eat, thaw them in the fridge overnight. Reheat as mentioned above. This way, you can enjoy your spicy Sriracha noodles even after some time. For the full recipe, check out the previous section. You can easily make Spicy Sriracha Noodles vegetarian. Just skip any meat or seafood. Use vegetables like bell peppers, snap peas, and carrots. You can also add tofu for extra protein. Tofu soaks up the sauce well and adds a nice texture. Make sure to use soy sauce that is vegetarian to keep it meat-free. These noodles pair well with many sides. You could serve a light salad, like a cucumber salad, for a refreshing crunch. Spring rolls or dumplings also make great sides. You can also try some grilled veggies for a hearty touch. If you want something warm, a bowl of miso soup works wonderfully too. Yes, you can use different types of noodles. Rice noodles are great, but you can try egg noodles or udon noodles too. Each type will bring its own flavor and texture. Just cook them according to the package instructions. For the best results, pick a noodle that absorbs the sauce well. Check the [Full Recipe] for cooking tips. In this blog post, we explored key steps to make delicious spicy Sriracha noodles. We discussed ingredients, including nutritional info and possible swaps. You learned how to cook the noodles and sauté the aromatics for great flavor. Tips helped you achieve the perfect texture and customize spice levels. You can even add proteins or veggies for extra variety. Now, you can enjoy a tasty meal that fits your taste and needs. Happy cooking!](https://joymealplan.com/wp-content/uploads/2025/06/8df2442a-c8e4-418c-8d77-15c525c42243-768x768.webp)

![To make garlic butter steak bites, you need a few key ingredients: - 1 pound sirloin steak, cut into bite-sized pieces - 4 tablespoons unsalted butter, divided - 4 cloves garlic, minced - 1 teaspoon smoked paprika - 1 teaspoon salt - 1/2 teaspoon black pepper - 1 tablespoon fresh parsley, finely chopped (for garnish) - Lemon wedges, for serving The sirloin steak is tender and has great flavor. Cut it into small pieces to cook quickly. The unsalted butter adds richness, while garlic gives a wonderful aroma. Smoked paprika adds a nice touch of warmth. Salt and pepper enhance the taste. Fresh parsley brightens the dish, and lemon wedges give a zesty kick. You can add a few optional items to elevate your meal: - Fresh parsley - Lemon wedges - Side dish suggestions Fresh parsley not only looks nice but also adds a fresh taste. Lemon wedges balance the richness of the steak. For sides, consider serving with a salad, rice, or roasted veggies. These add texture and flavor to your plate. You can find the full recipe for garlic butter steak bites to help guide you in creating this dish. First, pat the steak pieces dry with a paper towel. This step helps the steak sear well, giving it a nice crust. Next, cut the steak into bite-sized pieces. Aim for uniform chunks, so they cook evenly. This makes each bite tender and flavorful. Now, let’s melt the butter. In a large skillet, heat 2 tablespoons of unsalted butter over medium-high heat. Wait until it starts to sizzle. This means it's hot enough. Once ready, add the steak bites to the skillet. Spread them in a single layer. Avoid overcrowding; this helps them sear nicely. Next, sprinkle smoked paprika, salt, and black pepper over the steak. These spices add great flavor. Cook the steak bites for about 2-3 minutes on each side. Adjust the time based on how you like your steak. Remove them when they reach your desired doneness. In the same skillet, lower the heat to medium. Add the remaining butter and minced garlic. Sauté for about 30 seconds. Keep stirring until the garlic smells good but doesn't brown. This step creates a rich garlic butter sauce. It’s time to combine the steak and sauce. Return the cooked steak bites to the skillet. Toss them in the garlic butter sauce, coating each piece well. The sauce adds moisture and flavor. To finish, remove the skillet from heat. Garnish the steak bites with finely chopped parsley. This adds color and freshness. Serve them with lemon wedges. The juice from the lemon adds a zesty touch that brightens the dish. Enjoy your delicious garlic butter steak bites! For the detailed recipe, check the Full Recipe section. To get a great sear on your steak bites, space is key. Do not overcrowd the pan. When the pieces are too close, they steam instead of sear. This step makes a big difference in taste. Aim for a single layer in your skillet. For doneness, cook about 2-3 minutes per side for medium-rare. Adjust the time if you like it more or less done. Use a meat thermometer for best results. A medium steak should reach 145°F. If you want to switch things up, try different cuts of steak. Ribeye or tenderloin works well too. Both offer a nice fat content for flavor. You can also use dairy-free butter if you need it. Look for plant-based options that melt well. They give you that creamy taste without dairy. Want to add more flavor? Consider adding a pinch of cayenne pepper or fresh thyme. Both enhance the taste and give an extra kick. For a pretty plate, stack the steak bites neatly. Drizzle some garlic butter sauce over them. Then, add fresh parsley on top. Serve with lemon wedges on the side. The citrus adds a bright burst that pairs nicely with the richness of the steak. This makes your dish both tasty and beautiful. For the full recipe, check out the [Full Recipe]. {{image_4}} You can cook garlic butter steak bites in different ways. Grilling steak bites: Grilling adds a nice smoky flavor. Preheat your grill to medium-high. Thread the steak pieces onto skewers for easy handling. Grill them for about 2-3 minutes on each side. Always check for your desired doneness. The grill marks will make them look great! Air frying steak bites: The air fryer is a quick option. Set it to 400°F. Toss the steak pieces with garlic butter and spices. Place them in the air fryer basket in a single layer. Cook for about 8-10 minutes, shaking halfway. You’ll achieve a crispy outside and tender inside. You can make garlic butter steak bites even better with some fun flavors. Adding herbs and spices: Fresh herbs like thyme or rosemary can bring depth. Add them to the garlic butter while it cooks. A sprinkle of red pepper flakes can add heat if you like spice. Incorporating vegetables: You can add veggies for color and nutrition. Bell peppers or mushrooms work well. Just toss them in the skillet with the steak bites. They soak up that rich garlic butter flavor too. Serving your steak bites can be both fun and creative. Pairing with different sauces: Experiment with sauces like chimichurri or barbecue. A rich steak sauce also complements the bites well. Drizzle the sauce on top or serve it on the side for dipping. Creative side dishes: Think about sides that balance the rich flavor. A fresh salad or roasted veggies can work nicely. For something heartier, serve with mashed potatoes or rice. These will soak up the leftover garlic butter sauce too! For the full recipe, check out the [Full Recipe]. After you make garlic butter steak bites, let them cool to room temperature. Store the leftovers in an airtight container. This helps keep the flavor fresh. You can store them in the fridge for up to three days. To reheat, use a skillet over medium heat. Add a little butter to the pan. This will help bring back the juicy flavor. Heat for about 5 minutes, turning the steak bites occasionally. For meal prep, you can freeze steak bites. First, let them cool completely. Place them in a freezer-safe bag or container. Remove as much air as possible to prevent freezer burn. They can stay fresh in the freezer for about three months. To thaw, move them to the fridge the night before you want to eat them. This keeps them safe and tasty. You can also thaw them in the microwave if you’re in a hurry. Garlic butter steak bites last about three days in the fridge. If you freeze them, they last for about three months. Always check for any off smells or changes in color before eating. This will help ensure you enjoy every bite safely. The best steak for steak bites is sirloin. It has great flavor and is tender. Other good choices include ribeye and tenderloin. Both cuts provide a rich taste. They also remain juicy when cooked. If you can, choose grass-fed steak for better flavor and health. Yes, you can make steak bites without garlic. Try using shallots for a mild onion flavor. You can also use herbs like rosemary or thyme for taste. They add fresh notes to the dish. Consider using lemon zest for brightness in the sauce too. To make garlic butter steak bites low-carb, skip the butter and use olive oil. Focus on fresh herbs and spices for flavor. Serve with low-carb veggies like zucchini or bell peppers. You can also pair it with a salad for a balanced meal. Enjoying this dish without bread or rice keeps it low in carbs. Garlic butter steak bites are simple and delicious. You learned about the best ingredients. I shared tips for cooking and storing them. You can customize with different flavors and sides. These bites shine as a hearty meal or snack. Try various cooking methods to find your favorite. Enjoy making this dish your own!](https://joymealplan.com/wp-content/uploads/2025/06/b02e02a2-a549-4d39-b201-7a4183f1f1f0-768x768.webp)
. Enjoy preparing this delightful meal! - Heat 2 tablespoons of olive oil in a large pot over medium heat. - Once hot, add 1 medium diced onion and 2 diced carrots. Sauté for about 5-7 minutes. - The onion should turn translucent, and the carrots will soften. - Now, add 3 cloves of minced garlic to the pot. Stir for 1 minute until fragrant. - Next, add 4 cups of fresh broccoli florets and pour in 4 cups of vegetable broth. - Raise the heat to bring the mix to a boil. - Once it boils, reduce the heat and let it simmer for 10-15 minutes. - You want the broccoli to become tender and bright green. - Carefully purée the soup using an immersion blender until smooth. - If you prefer, transfer it to a countertop blender, then back to the pot. - Stir in 1 cup of heavy cream and 1 teaspoon of Dijon mustard. - Heat through without boiling. - Gradually add 2 cups of grated sharp cheddar cheese. Stir until melted and creamy. - Taste the soup and season with salt and pepper as needed. This simple method leads to a rich, creamy soup. For the full recipe, refer to the main section. To boost the flavor of your creamy broccoli cheddar soup, I recommend using simple seasonings. A pinch of garlic powder or a dash of nutmeg can add depth. You can also try a bit of cayenne pepper for heat. Balance the creaminess with the broth by adjusting the amount of heavy cream. If you want it lighter, use a bit less cream and more broth. This keeps the soup rich but not too heavy. For a smooth and creamy soup, blending is key. Use an immersion blender to puree the soup right in the pot. This saves time and keeps cleanup easy. If you use a countertop blender, work in small batches. Be careful not to overblend; a little texture can be nice. When adding cheese, do it slowly. Stir continuously to avoid lumps. This helps the cheese melt evenly into the soup. Presentation matters! Ladle the soup into warm bowls for that cozy feel. Garnish with fresh parsley and a sprinkle of cheddar cheese on top. This adds a lovely pop of color. For serving, crusty bread is a great choice. It’s perfect for dipping and enhances the meal. Check out the Full Recipe for more details on making this delicious dish! {{image_4}} You can switch the cheese in this soup. Gouda or mozzarella works well. They give a different taste and melt nicely. If you want extra flavor, try adding proteins. Cooked chicken or crispy bacon can make it heartier. Just chop them small and stir them in at the end. Making this soup gluten-free is easy. Just ensure the broth is gluten-free. For a vegan version, swap the heavy cream for coconut cream. It keeps the richness while adding a hint of sweetness. You can also use vegan cheese for melting. Low-calorie options are possible too. Replace heavy cream with light cream for fewer calories. This soup pairs well with many sides. Crusty bread is a favorite. It’s perfect for dipping into the creamy soup. You can also serve a side salad. A fresh green salad with a tangy dressing adds a nice crunch. It gives you a complete meal that feels special. Check out the full recipe for more ideas and tips. To store leftover soup, let it cool first. Pour it into airtight containers. Glass or plastic containers work well. Make sure to leave some space at the top. This allows for expansion during freezing. You can keep your soup in the fridge for up to three days. For long-term storage, freezing is a great option. Use freezer-safe containers or heavy-duty bags. Remove as much air as you can. This helps prevent freezer burn. Label the containers with the date. When you want to enjoy it again, thaw it overnight in the fridge. Reheat the soup gently on the stove. Stir often to keep it smooth. Creamy Broccoli Cheddar Soup lasts about three days in the fridge. If you freeze it, it can last up to three months. Check for any signs of spoilage. If it looks or smells off, it's best to discard it. Enjoy your delicious soup while it's fresh! For the full recipe, check out the details above. To thicken Creamy Broccoli Cheddar Soup, you can use flour or cornstarch. Start by making a roux with equal parts flour and butter. Cook it for a minute, then slowly add it to the soup while stirring. This adds a smooth texture. Alternatively, mix cornstarch with cold water to make a slurry. Stir this into the soup and heat until it thickens. Both methods work well for this creamy delight. Yes, you can use frozen broccoli in this soup. Frozen broccoli is often picked at peak freshness, making it a great option. It cooks faster than fresh broccoli, so add it during the last few minutes of cooking. This saves time while still giving you tasty results. Just remember, frozen broccoli can be softer than fresh, which may change the soup's texture slightly. To make your soup dairy-free, swap out the heavy cream and cheddar cheese. Use coconut milk or almond milk for the cream. For the cheese, try nutritional yeast or a dairy-free cheese alternative. These swaps keep the soup creamy and flavorful. You won’t miss the dairy, and you can enjoy this soup without worries. For the full recipe, check out the links provided in the article. This blog post covers a delicious creamy broccoli cheddar soup. We explored fresh ingredients, broth, and seasonings that bring rich flavor. You learned step-by-step instructions, tips for perfect texture, and creative variations. Remember, you can adjust the recipe to fit dietary needs and presentation styles. Enjoy making this soup, whether you stick to the classic or try your own spin. The warmth and taste will satisfy everyone. Happy cooking!](https://joymealplan.com/wp-content/uploads/2025/06/abcb4099-a710-4d30-8f5d-fd35193da389-768x768.webp)