Skip to content
About
Contact
Cookie Policy
Copyright Policy
Disclaimer
Search
Home
Dinner
Appetizer
Desserts
Drinks
About
Contact
Privacy Policy
Toggle Menu
Home
/
Dinner
- Page 46
Dinner
Rosemary Garlic Butter Chicken Thighs Simple Recipe
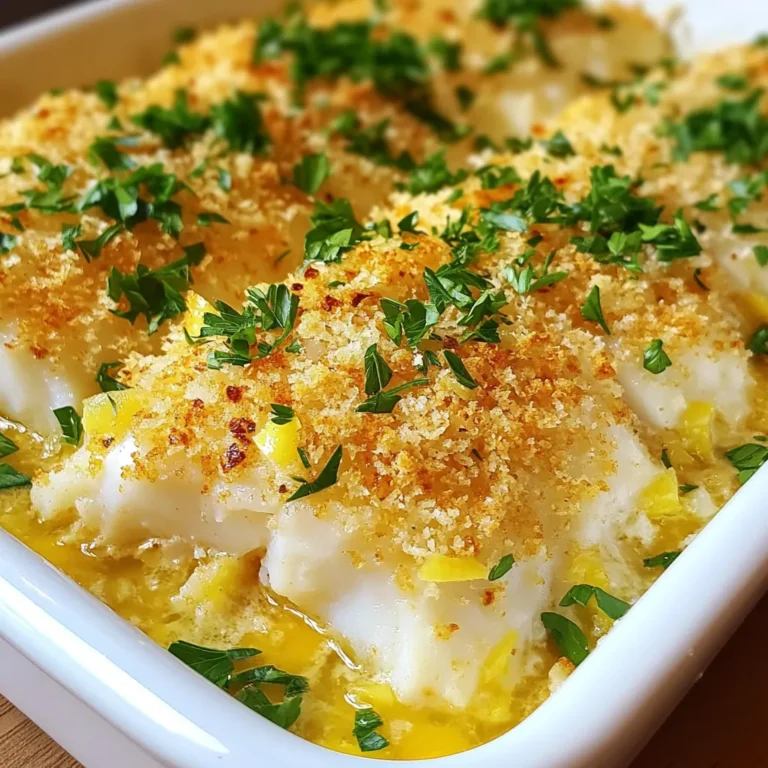
Boston Baked Cod Simple and Flavorful Recipe
Crispy Orange Chicken Flavorful Recipe for Dinner
Tomato Basil Soup Easy and Flavorful Recipe Guide
Quinoa Stuffed Peppers Flavorful and Healthy Meal
Margherita Pizza Simple and Classic Recipe Guide
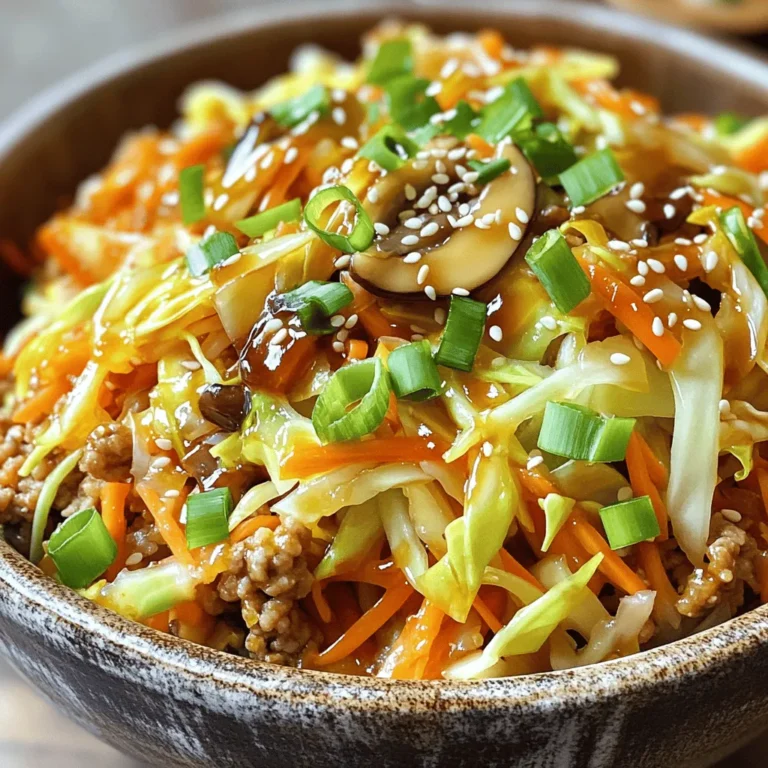
Egg Roll in a Bowl Flavorful and Simple Recipe
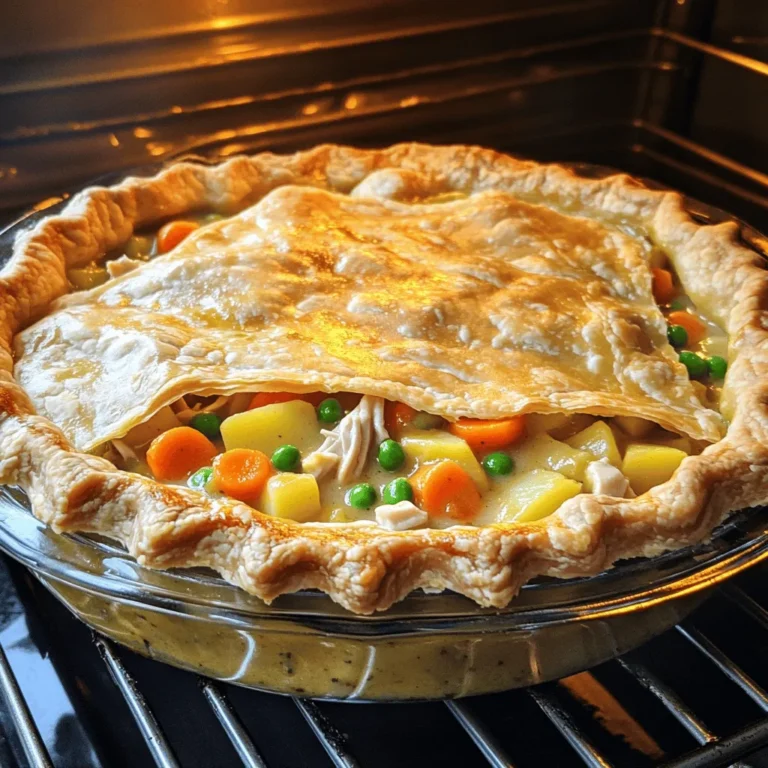
Classic Chicken Pot Pie Comforting Family Dish
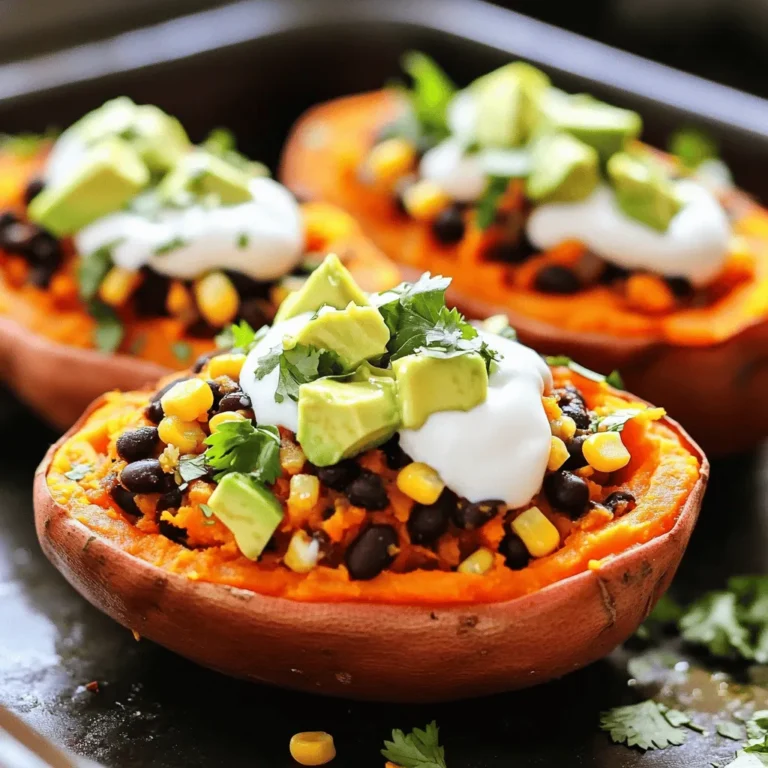
Stuffed Sweet Potatoes Flavorful and Easy Recipe
Easy Shrimp Scampi Quick and Flavorful Delight
Page navigation
Previous Page
Previous
1
…
44
45
46
47
48
…
65
Next Page
Next
Home
Dinner
Appetizer
Desserts
Drinks
About
Contact
Privacy Policy
Toggle Menu Close
Search for:
Search


![- 1 pound boneless chicken thighs, cut into bite-sized pieces - 1 cup all-purpose flour - 2 large eggs, beaten - 1 cup panko breadcrumbs - 1 cup freshly squeezed orange juice - Zest of 1 medium orange - 1/4 cup honey - 2 tablespoons soy sauce - Salt and freshly ground pepper to taste - Oil for frying - 1 tablespoon cornstarch I love using chicken thighs for this dish. They stay juicy and tender. The all-purpose flour creates a great base for the breading. Beating the eggs helps the breadcrumbs stick. Panko breadcrumbs give that extra crunch. For the orange sauce, fresh juice is the best choice. It gives a bright flavor. The zest adds even more orange goodness. Honey brings a nice sweetness. Low-sodium soy sauce keeps the salt level balanced. Don’t forget the salt and pepper! They enhance the chicken's taste. Oil is key for frying; it makes everything crispy. Cornstarch helps thicken the sauce so it coats the chicken well. If you want the full recipe, you can find it above. Enjoy making this dish! First, season the chicken pieces with salt and pepper. This adds flavor and enhances the dish. Next, create a breading station. Set up three bowls: one with all-purpose flour, another with beaten eggs, and the last with panko breadcrumbs mixed with cornstarch. The cornstarch adds extra crispiness to the coating. Now it's time for the fun part. Take a piece of chicken and dredge it in the flour. Make sure to shake off any extra flour. After that, dip it into the beaten eggs, ensuring it is fully coated. Then roll the chicken in the panko breadcrumbs. Press gently to help the crumbs stick. Place the breaded chicken on a wire rack to rest for at least ten minutes. This resting time is crucial. It helps the coating stay on during frying. In a medium saucepan, pour in the fresh orange juice. Then add the orange zest, honey, soy sauce, rice vinegar, minced ginger, and minced garlic. Stir everything together. Heat the pan over medium heat until it simmers. This allows the flavors to blend nicely. To thicken the sauce, stir in the cornstarch mixed with cold water. Keep stirring for two to three minutes. You'll notice the sauce thickens and gets shiny. Once it's just right, remove the saucepan from heat. Set the orange sauce aside for later. For the complete recipe, check out the [Full Recipe]. To get that perfect crispy texture, start by picking the right frying oil. Use oils with high smoke points like canola or peanut oil. These oils can handle high heat without burning. Double frying is also key. After the first fry, let the chicken rest. Then, fry it again for a few minutes. This makes the chicken extra crunchy. When it comes to orange juice, always choose fresh over bottled. Fresh juice has a bright taste that really shines. Adding orange zest gives your dish an extra zing. Zest is the outer peel of the orange. It holds a lot of flavor, so don’t skip it! For garnishes, sesame seeds and chopped green onions are great choices. They add color and a nice crunch. Pair your crispy orange chicken with steamed rice or stir-fried veggies. These sides balance the dish and make it even more satisfying. For the full recipe, check out the details above! {{image_4}} You can bake the chicken instead of frying it. Baking reduces oil and calories. To bake, coat the chicken as usual, then place it on a lined baking sheet. Bake at 400°F for about 20-25 minutes. This method gives a crispy texture without frying. Adjust the sauce for a low-sodium option. Use low-sodium soy sauce to cut the salt. This change keeps the flavor but makes it healthier. You can use tofu or shrimp instead of chicken. For tofu, press it to remove moisture, then cut it into cubes. Coat and cook it the same way as chicken. Shrimp cooks quickly, so reduce the frying time to 2-3 minutes until they turn pink. For vegetarians, replace chicken with veggies. Bell peppers, broccoli, or snap peas work well. Coat these in the same way and fry until crispy. Want some heat? Add chili flakes or hot sauce to the orange sauce. Start with a teaspoon and adjust to your taste. You can also use different peppers. Try jalapeños or serranos for a fresh kick. These peppers add flavor and heat to the dish. To keep your crispy orange chicken fresh, refrigerate it promptly. Place the chicken in an airtight container. This method helps prevent moisture loss and keeps the chicken tasty. Make sure to cool the chicken to room temperature before sealing. This step avoids condensation that can make the chicken soggy. When it’s time to enjoy leftovers, you have two main options: oven or microwave. The oven is best for keeping the chicken crispy. Preheat it to 350°F (175°C). Spread the chicken on a baking sheet and heat for about 10-15 minutes. For a quicker method, use the microwave but be cautious. Heat in short bursts to prevent sogginess. If you choose this method, you can add a paper towel on top to absorb moisture. Freezing is a great option for long-term storage. To freeze, first allow the chicken to cool completely. Then place it in a freezer-safe bag or container. Remove as much air as possible to avoid freezer burn. The chicken stays good for about 2-3 months. When you're ready to eat it, thaw in the fridge overnight. Reheat as mentioned above for the best results. Yes, you can use chicken breast. However, thighs have more fat. This fat gives extra flavor. Chicken thighs stay juicy, while breasts can dry out. If you use breasts, be careful not to overcook them. They cook faster than thighs. To thicken the sauce, add more cornstarch. Mix one tablespoon of cornstarch with two tablespoons of cold water. Stir this mixture into the sauce while it simmers. Cook for a few minutes until thick. For a thinner sauce, add more orange juice or water. Just remember to adjust the flavor as needed. You can use maple syrup or agave nectar instead of honey. Brown sugar is another option. If you want a sugar-free choice, try stevia or monk fruit sweetener. These alternatives change the taste slightly, but they work. Yes, you can make it ahead. Cook the chicken and sauce separately. Store them in the fridge in airtight containers. When you’re ready to eat, reheat the chicken in the oven. This keeps it crispy. Then, heat the sauce on the stove. Toss them together just before serving. Crispy Orange Chicken is a popular dish in Chinese-American cuisine. It combines sweet and savory flavors. The dish likely came from Hunan cuisine, which uses oranges in cooking. It gained fame in the U.S. in the 1980s. Many enjoy its crunchy texture and bright taste. This blog post covered the key steps to making Crispy Orange Chicken. We discussed the main ingredients, such as chicken, flour, and a tasty orange sauce. I shared tips to achieve a crispy texture and offered serving ideas. You learned about healthier options and variations like spicy orange chicken. Proper storage and reheating tips were also included for your convenience. In summary, this dish is fun to make and enjoy. Don't hesitate to get creative with flavors and substitutions. Happy cooking!](https://joymealplan.com/wp-content/uploads/2025/06/e5d29336-8dbd-4ed1-97b7-adaf34762187-768x768.webp)
![To make a tasty tomato basil soup, gather these ingredients: - 2 tablespoons extra virgin olive oil - 1 medium yellow onion, finely diced - 3 cloves garlic, minced - 2 cans (14 oz each) diced tomatoes in juice - 2 cups low-sodium vegetable broth - 1 teaspoon granulated sugar - 1 teaspoon dried oregano - Salt and freshly ground black pepper, to taste - 1 cup fresh basil leaves, roughly chopped - 1/2 cup heavy cream (optional for added creaminess) - Crusty bread or homemade croutons, for serving You can change up the flavor of your soup by adding: - A pinch of red pepper flakes for heat - Fresh lemon juice for brightness - A sprinkle of Parmesan cheese for richness - Other herbs like thyme or parsley Fresh basil and tomatoes make a big difference. Here’s how to choose the best: - Basil: Look for bright green leaves. They should be firm, not wilted. Smell the leaves; they should have a strong, sweet aroma. - Tomatoes: Choose ripe tomatoes with no bruises. They should feel heavy and firm. The color should be bright and even, depending on the type. Using high-quality ingredients will enhance the soup's flavor. Enjoy the vibrant taste of fresh basil and tomatoes in your cooking! For the full recipe, check out the [Full Recipe]. First, gather all your ingredients. You will need olive oil, onion, garlic, diced tomatoes, vegetable broth, and spices. Also, have fresh basil and cream ready if you want a richer soup. Start by chopping the onion and mincing the garlic. Dice them small for even cooking. This helps build the soup's flavor from the start. Measure out your diced tomatoes and vegetable broth, so you have them ready. In a large saucepan, heat the olive oil on medium heat. Once hot, add the diced onion. Cook it for about five minutes until it turns soft and clear. Then, add the minced garlic. Stir it for one minute. Be careful not to let it burn. Next, pour in the diced tomatoes and vegetable broth. Stir well to mix everything. Add the sugar, oregano, salt, and pepper. Let the soup come to a gentle boil. Then, reduce the heat to low. Let it simmer for 20 minutes. This helps the flavors mix together nicely. After simmering, take the saucepan off the heat. Let it cool for a few minutes. For a smooth soup, use an immersion blender to blend the soup until it's silky. If you don’t have one, transfer it in batches to a blender. Blend until smooth. Once blended, return the soup to the saucepan. Stir in the chopped basil and cream if you want it creamy. Heat it gently on low for about five minutes. This will let the basil's flavor shine through. Taste your soup before serving. Adjust the salt, pepper, or sugar to your liking. Serve it warm with bread or croutons for a tasty meal. Enjoy your delicious tomato basil soup! For a complete recipe, check the Full Recipe. To make your tomato basil soup extra tasty, focus on fresh herbs. Fresh basil adds a bright touch. You can also use other herbs, like thyme or parsley, for a twist. Seasoning is key! Start with salt and pepper to bring out the flavors. A dash of sugar balances the acidity of the tomatoes. Don’t forget to taste as you go. One common mistake is overcooking the garlic. If it burns, it can turn bitter. Add it just before the tomatoes for the best flavor. Another mistake is skipping the simmering step. This helps the flavors blend well. A quick boil won't do the trick. Lastly, don’t forget to blend the soup well. A chunky texture can be nice, but a smooth soup feels luxurious. Keep your heat at medium for sautéing the onions. This allows them to soften without burning. When it’s time to simmer, lower the heat. A gentle simmer for 20 minutes works best. If you want a silky texture, blend the soup until smooth. A few minutes of gentle heating after blending helps the basil infuse nicely. For the full recipe, check the complete guide above. Enjoy your cooking! {{image_4}} To make a creamy version of tomato basil soup, add heavy cream. This gives the soup a rich and smooth texture. Follow the original recipe and simply stir in 1/2 cup of heavy cream after blending the soup. Heat it gently over low heat for a few minutes. The cream balances the acidity from the tomatoes and adds depth. You can also use coconut cream for a dairy-free option. If you like a chunkier soup, add fresh veggies. Dice up some zucchini, bell peppers, or carrots. Sauté these with the onion at the start. This adds more color and nutrients to your dish. Keep the diced tomatoes, but don’t blend the soup completely. Just stir in the chopped fresh basil at the end for extra flavor. This version is hearty and satisfying. To make a vegan version, skip the heavy cream and use coconut milk instead. It gives a creamy texture and a hint of sweetness. Use vegetable broth and fresh basil as usual. This version keeps the dish plant-based and delicious. You’ll still enjoy all the flavors without animal products. For a kick, add crushed red pepper flakes when cooking. These variations show just how versatile tomato basil soup can be. Each version brings its own twist while keeping that classic flavor. For the full recipe, check out the complete guide. To store your tomato basil soup, let it cool first. Pour it into an airtight container. You can keep it in the fridge for 3 to 4 days. Make sure the lid seals tightly to keep it fresh. If you want to save it longer, freezing is a great option. For freezing, use freezer-safe containers. Leave some space at the top, as the soup will expand when it freezes. You can store it in the freezer for up to 3 months. Label the container with the date, so you know when you made it. It helps to freeze it in portion sizes for easy use later. When you're ready to eat, thaw the soup in the fridge overnight. To reheat, pour it into a pot over low heat. Stir often to prevent sticking. If you want a creamier texture, add a splash of cream while heating. You can also use a microwave, but stir halfway through to heat evenly. Enjoy your delicious soup! You can serve many tasty sides with Tomato Basil Soup. Here are some great options: - Crusty bread - Grilled cheese sandwiches - Homemade croutons - A fresh salad These choices add texture and flavor. For a fun twist, try a cheesy garlic bread. It pairs well with the soup's warmth. Tomato Basil Soup lasts about 3 to 5 days in the fridge. Store it in an airtight container to keep it fresh. To enjoy it longer, you can freeze it. Yes, you can make Tomato Basil Soup in advance. It tastes even better the next day! Just cook the soup, let it cool, and store it in the fridge. You can also freeze it for later use. When ready to serve, simply reheat it on the stove or in the microwave. For a full recipe, check out the Hearty Tomato Basil Delight. Making Tomato Basil Soup is simple and rewarding. We covered the key ingredients, preparation steps, and cooking tips. You can choose fresh basil and ripe tomatoes for the best taste. Variations like creamy or vegan options add more fun. Remember to store leftovers properly to keep them fresh. By avoiding common mistakes, you can create a perfect soup each time. I hope these insights inspire you to enjoy this classic dish all year round.](https://joymealplan.com/wp-content/uploads/2025/06/73c8b43a-025c-4169-ae99-725afa6fdd07-768x768.webp)
![- 4 large bell peppers (any color of your choice) - 1 cup quinoa, thoroughly rinsed - 2 cups vegetable broth - 1 can (15 oz) black beans, drained and rinsed - 1 cup corn kernels - 1 small red onion, finely chopped - 2 cloves garlic, minced - 1 teaspoon ground cumin - 1 teaspoon smoked paprika - 1 teaspoon chili powder - Salt and freshly cracked black pepper, to taste - 1 cup diced tomatoes - 1 cup shredded cheese - Fresh cilantro or parsley for garnish This recipe is full of vibrant colors and flavors. The bell peppers add sweetness and crunch. Quinoa provides protein, making it a healthy meal choice. I love using black beans for their creaminess and fiber. Corn adds a nice sweetness and texture too. You can choose any color of bell pepper you like. Each color brings a unique taste. Red, yellow, and green all work well. The quinoa must be rinsed to remove saponin, a bitter coating. This step makes the quinoa taste better. Using vegetable broth instead of water boosts flavor. The spices, like cumin and smoked paprika, add warmth and depth. Garlic and onion give a great base flavor. Don't forget to adjust salt and pepper to your taste. I recommend adding cheese on top for a nice finish. It melts beautifully and adds richness. You can use cheddar or a Mexican blend, based on your preference. For a pop of color, garnish with fresh cilantro or parsley. For the complete recipe, check out the [Full Recipe]. - Preheat your oven to 375°F (190°C). - Slice the tops off four large bell peppers. Remove the seeds and membranes. - Stand the peppers upright in a baking dish. This keeps them stable while cooking. - In a saucepan, add one cup of rinsed quinoa and two cups of vegetable broth. - Bring the mixture to a boil over medium heat. - Once boiling, lower the heat and cover the pot. Simmer for about 15 minutes. - Fluff the quinoa with a fork when it’s done. - In a large bowl, combine the cooked quinoa with one can of black beans, one cup of corn, and one small chopped red onion. - Add two minced garlic cloves, one teaspoon of cumin, smoked paprika, and chili powder. - Season with salt and pepper to taste. - Fold in one cup of diced tomatoes before stuffing the peppers. - Carefully spoon the quinoa mixture into each pepper. Pack it down gently. - Top each stuffed pepper with one cup of shredded cheese. - Cover the dish with aluminum foil to keep the moisture in. - Place the covered dish in the preheated oven. Bake for 25 to 30 minutes. - Remove the foil and bake for another 10-15 minutes until the cheese is golden. This recipe brings together flavors and nutrition in a fun way. You’ll enjoy the vibrant colors and tastes! For the complete recipe, check out the Full Recipe. To get the best quinoa, start by rinsing it well. This removes any bitter coating. Use a fine mesh strainer for this step. Next, combine one part quinoa with two parts vegetable broth. This adds flavor. Cook on medium heat until it boils, then lower the heat and cover. Let it simmer for about 15 minutes. The quinoa should be fluffy and all the liquid gone. Spices make a big difference. I love adding ground cumin, smoked paprika, and chili powder for warmth. You can also mix in fresh herbs like cilantro or parsley for freshness. If you want more kick, add chopped jalapeños. Olives give a nice briny taste too. Feel free to get creative with your flavors! Make your dish pop! Serve the stuffed peppers on a bed of fresh greens. This adds color and crunch. You can sprinkle extra cheese on top before serving. A squeeze of lime over the peppers brightens the dish. Consider drizzling with a creamy sauce, like ranch or yogurt, for added richness. For the full recipe, check the details above. {{image_4}} You can make quinoa stuffed peppers vegan by swapping out cheese and broth. Use a plant-based cheese or skip it entirely. For broth, substitute with water or vegetable stock. Add more flavor by mixing in nutritional yeast. For protein, try lentils or chickpeas. Add veggies like spinach, kale, or mushrooms for extra nutrients. Quinoa isn't your only option. You can use rice or couscous. Both grains offer a nice texture. If you want to add meat, chicken, turkey, or even crumbled tofu work great. Just cook the proteins before mixing them into the filling. You can also add diced olives or sun-dried tomatoes for a flavor boost. Feel free to experiment with various pepper types. Bell peppers are common, but try poblano or jalapeño for a kick. Sweet peppers make the dish mild, while spicy peppers add heat. Using different sizes can change your serving style. Smaller peppers can be appetizers, while larger ones can be main dishes. To store your quinoa stuffed peppers after cooking, let them cool first. Place them in an airtight container. This keeps them fresh and tasty. You can store them in the fridge for up to four days. If you want to enjoy them later, be sure to keep the peppers whole. This helps them stay moist. If you want to freeze your stuffed peppers, wrap each one in plastic wrap. Then, place them in a freezer-safe bag or container. This method helps prevent freezer burn. You can freeze them for up to three months. When you are ready to eat, take them out and thaw them overnight in the fridge. Reheat them in the oven at 350°F (175°C) for about 20-25 minutes. This keeps the peppers nice and warm. You can also microwave them for faster results but be careful not to overcook. Enjoy your meal with a burst of flavor! For the full recipe, check out the earlier sections. Yes, you can prepare quinoa stuffed peppers ahead. Cook the quinoa and mix it with the other ingredients. You can stuff the peppers and store them in the fridge for up to 24 hours. If you want, you can bake them later. This saves time on busy days. Look for a few signs. The peppers should be tender but still firm. The filling inside should be hot and bubbly. The cheese on top should melt and turn golden brown. These are good signs your stuffed peppers are ready to enjoy. Yes, you can use other grains. Brown rice, couscous, or farro work well. Each grain has its own cooking time. For brown rice, cook it for about 40-45 minutes. Couscous cooks quickly in about 5 minutes. Adjust cooking times based on the grain you choose. I suggest a few side dishes. A simple salad with mixed greens adds freshness. You can also serve rice or a grain like quinoa on the side. If you want a warm side, consider roasted veggies. These pair well with the stuffed peppers and add color to your plate. Absolutely! This recipe uses quinoa, which is gluten-free. The other ingredients, like beans and veggies, are also gluten-free. Just make sure to check labels on canned goods. This helps ensure no gluten sneaks in. Enjoy this healthy meal worry-free! Quinoa stuffed peppers offer a balanced meal using simple, fresh ingredients. We explored the preparation, cooking tips, and variations. Remember to rinse your quinoa for the best flavor and texture. You can easily adjust the recipe for different diets or flavor profiles. Feel free to experiment with other grains or proteins. Enjoy these tasty peppers now or save some for later. Your kitchen adventures can lead to satisfying meals that everyone loves.](https://joymealplan.com/wp-content/uploads/2025/06/105cb204-6c23-4ed0-80a6-bb54efeb7f27-768x768.webp)

. To cook shrimp just right, start with fresh shrimp. Look for shrimp that smell like the ocean, not fishy. When you heat your skillet, make sure it’s hot before adding the shrimp. This helps create a nice sear. Cook the shrimp in a single layer. This way, they cook evenly. Flip them when they turn pink, and they will be ready in about 2-3 minutes per side. Overcooking shrimp makes them tough, so watch closely! To make your shrimp scampi burst with flavor, use quality ingredients. Fresh garlic creates a rich taste. You can also add lemon zest for a bright kick. Try adding capers or sun-dried tomatoes for a twist. Herbs like parsley and basil add freshness. If you like heat, adjust red pepper flakes to your taste. You can also finish with a squeeze of fresh lemon juice for a zesty touch. Timing is key for a great shrimp scampi dish. Start by boiling the pasta first. While it cooks, prepare your shrimp and sauce. This keeps everything fresh and hot. Drain the pasta once it’s al dente, and don’t forget to save some pasta water. This water helps the sauce stick to the pasta. Combine everything right away for the best flavor. Serve your dish immediately to enjoy the vibrant tastes. For more ideas, check the Full Recipe. {{image_4}} You can add fresh vegetables to your shrimp scampi. This adds flavor and color. Try using bell peppers, zucchini, or spinach. They cook quickly and blend well with shrimp. Simply sauté them with garlic before adding shrimp. This way, you get a healthy twist on the classic dish. If you want a gluten-free option, you have choices. Look for gluten-free pasta made from rice or quinoa. These options taste great and hold the sauce well. You can also use spiralized vegetables, like zucchini or carrots. They are fun to eat and low in carbs. Both options keep the dish light and flavorful. Do you like heat? You can easily spice up your shrimp scampi. Add more red pepper flakes for extra kick. You could also include diced jalapeños or a dash of hot sauce. Mix in some cayenne pepper for another layer of flavor. Just remember to adjust to your taste. Enjoy the heat while keeping the dish balanced. These variations let you customize your shrimp scampi. They make it fun and unique every time you cook. For the full recipe, check out the details above! Store any leftover shrimp scampi in an airtight container. Place it in the fridge. It stays fresh for 2-3 days. Make sure it cools down before sealing. This keeps the flavors intact. When you reheat shrimp scampi, use low heat. A skillet works best. Add a splash of broth or water to keep it moist. Stir often to heat evenly. You can also use the microwave. Heat in short bursts to avoid overcooking the shrimp. You can freeze shrimp scampi too! Just place it in a freezer-safe container. Use it within three months for best flavor. Thaw it overnight in the fridge before reheating. Avoid freezing it with pasta; they don't hold up well. Instead, cook fresh pasta when you're ready to eat. For the full recipe, check the earlier section. Making Easy Shrimp Scampi takes about 20 minutes. You need 10 minutes to prep and 10 minutes to cook. This fast dish fits well into any busy schedule. You can enjoy a tasty meal in no time. Yes, you can use frozen shrimp. Just remember to thaw them first. Place the shrimp in the fridge overnight or run them under cold water. Using frozen shrimp may add a few extra minutes to your cook time. Shrimp Scampi pairs well with many sides. Here are some great options: - Garlic bread for dipping in the sauce - A fresh green salad for a light touch - Steamed vegetables for extra color and flavor - A glass of white wine to enhance the meal Yes, you can safely reheat shrimp leftovers. Just make sure to heat them gently. Use low heat on the stove or in the microwave. This helps keep the shrimp tender and tasty. Be careful not to overcook them, as they can become tough. This blog post covered easy shrimp scampi from start to finish. We looked at key ingredients, substitutions, and tools. You learned step-by-step cooking instructions and helpful tips to elevate your dish. Variations give you room to tailor it to your taste, while storage tips ensure nothing goes to waste. As you make your shrimp scampi, remember these insights to create a delicious meal every time. Enjoy your cooking adventure!](https://joymealplan.com/wp-content/uploads/2025/06/da480725-ca76-4dc0-87ac-7692f8ecae54-768x768.webp)