Cherry Limeade Bars Refreshing and Easy Treat

Get ready to beat the heat with my Cherry Limeade Bars! These sweet and tangy treats are not just easy to make, but they’ll also leave you feeling refreshed. If you love bright flavors and simple recipes, you’ll want to stick around. I’ll reveal my favorite ingredients, step-by-step instructions, and some fun variations to try. Let’s dive into this delicious summer dessert!
Ingredients
Detailed Ingredient List
To make Cherry Limeade Bars, you need these simple ingredients:
– 1 cup graham cracker crumbs
– 1/2 cup unsalted butter, melted
– 1 cup granulated sugar
– Zest of 2 limes
– 1/2 cup fresh lime juice (about 4 limes)
– 2 cups fresh or frozen cherries, pitted and chopped
– 3 large eggs
– 1/4 teaspoon salt
These items come together to create a sweet and tart treat. The graham cracker crumbs form a tasty crust. The cherries and lime juice give a bright flavor.
Optional Ingredient Substitutions
You can make swaps if you need. Instead of graham crackers, try vanilla wafers for a different crust. Coconut flour works well if you want a gluten-free base. For sugar, you can use honey or maple syrup, but adjust the amount. You can also use bottled lime juice, but fresh juice tastes best. If cherries are out of season, use frozen ones. Just make sure to thaw and drain them first.
Tips for Fresh vs. Frozen Ingredients
Fresh ingredients can enhance flavor and texture. Use fresh limes for the best juice and zest. Fresh cherries add a nice bite to the bars. However, frozen cherries are fine if you can’t find fresh ones. They save time and can still taste great. Just make sure to thaw them out. This way, your Cherry Limeade Bars will be just as refreshing!
Step-by-Step Instructions
Preparation Steps
Start by preheating your oven to 350°F (175°C). This ensures even cooking. Next, prepare an 8×8 inch baking pan. You can grease it or line it with parchment paper. This helps with easy removal later on. In a medium bowl, mix 1 cup of graham cracker crumbs with 1/2 cup of melted butter. Stir until the crumbs are coated and look wet. Then, press this mixture into the bottom of your pan. Make sure it’s packed tightly for a solid crust. Bake this for about 10 minutes. You want it to turn a light golden color before removing it to cool.
Baking Guidelines
In a different bowl, whisk together 1 cup of granulated sugar, the zest of 2 limes, 1/2 cup of fresh lime juice, 3 large eggs, and 1/4 teaspoon of salt. Mix until it’s smooth and well-blended. Now, gently fold in 2 cups of chopped cherries. Be careful not to break them. Pour this cherry-lime mixture over your cooled crust. Spread it evenly so every bite has flavor. Bake for another 25-30 minutes. The center should look set, and the edges will puff up a little.
Cooling and Serving Instructions
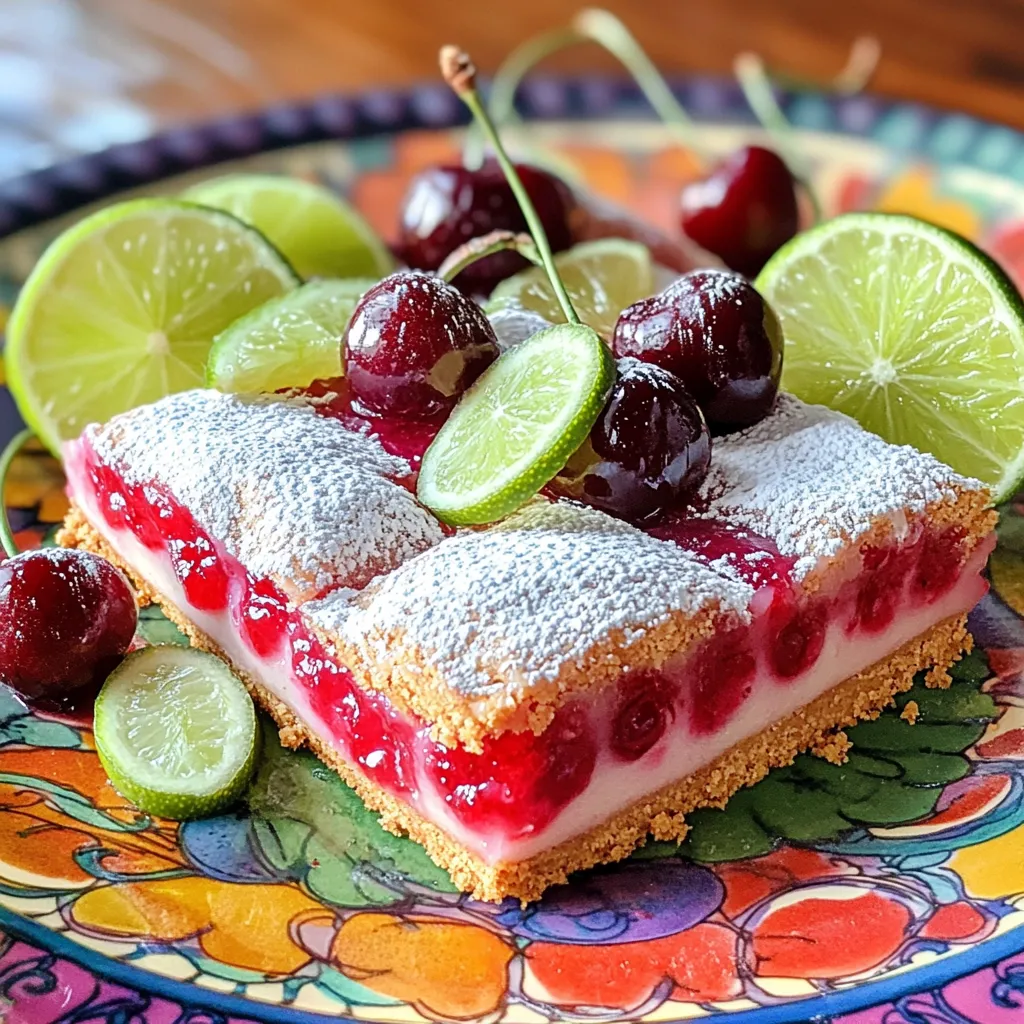
After baking, take the pan out and let it cool at room temperature. This is crucial for setting the bars. Once cool, place the pan in the fridge for at least 2 hours. This chilling step is key for the bars to hold their shape. When ready, cut them into squares. For a fun touch, dust the tops with powdered sugar. You can serve them on a bright plate with lime slices and whole cherries. It makes for a beautiful display that will impress your guests!
Tips & Tricks
Common Mistakes to Avoid
When making Cherry Limeade Bars, avoid overmixing the batter. This can make the texture tough. Also, watch the baking time closely. If you bake too long, the bars may become dry. Lastly, remember to let the crust cool before adding the filling. This helps keep the layers separate.
How to Enhance Flavor
To boost the flavor of your Cherry Limeade Bars, try adding a pinch of lime zest to the filling. This gives a nice, bright taste. You can also mix in a bit of almond extract for a sweet twist. If you like more tartness, add extra lime juice. Fresh cherries are best, but frozen ones work too. Just let them thaw and drain excess liquid.
Presentation Tips
Presentation matters! Cut the bars into even squares for a neat look. Place them on a colorful plate. Garnish with lime slices and whole cherries for fun. A light dusting of powdered sugar adds elegance. Serve them chilled for a refreshing treat.

Variations
Alternative Fruit Combinations
You can switch up the cherries for other fruits. Try fresh strawberries, blueberries, or raspberries. Each fruit adds its own twist. For example, strawberries give a sweet taste, while blueberries add a nice tartness. You can mix fruits for a fun flavor blend. Just keep the same amount as the cherries in the recipe.
Low-Sugar or Healthier Options
To make these bars healthier, you can reduce the sugar. Use a sugar substitute or honey instead. You can also use less butter by swapping it with applesauce. This keeps the bars moist without all the fat. You might also choose to use yogurt instead of some eggs for a creamier texture.
Gluten-Free Adaptations
If you need a gluten-free treat, swap the graham cracker crumbs for gluten-free ones. Look for brands that use almond or coconut flour. These options give a nice flavor without gluten. Be sure to check labels for any hidden gluten. This way, everyone can enjoy your cherry limeade bars!
Storage Info
How to Store Cherry Limeade Bars
To keep your Cherry Limeade Bars fresh, store them in the fridge. Place the bars in an airtight container. This helps to keep them moist. If you don’t have a container, wrap them tightly in plastic wrap. They will stay fresh for up to five days.
Freezing Instructions
You can freeze Cherry Limeade Bars if you want to save some for later. First, cut the bars into squares. Place the squares on a baking sheet lined with parchment paper. Freeze them for about two hours until firm. Then, transfer them to a freezer-safe bag or container. They will last for up to three months in the freezer. Just thaw them in the fridge before serving.
Best Containers for Storage
Use a glass or plastic container with a lid for the best storage. These containers help keep the bars fresh and prevent them from drying out. Avoid metal containers, as they can react with the lime juice. If you freeze the bars, make sure the container is labeled and dated. This way, you can track how long they have been stored.
FAQs
How long do Cherry Limeade Bars last?
Cherry Limeade Bars stay fresh for about a week in the fridge. I keep them in an airtight container. This helps keep them moist and tasty. If you want them to last longer, you can freeze them. They will stay good for up to three months in the freezer.
Can I make these bars ahead of time?
Yes, you can make these bars a day or two ahead of time. Just bake them and let them cool. Then, store them in the fridge. This way, the flavors will blend and get even better. They are perfect for parties or family gatherings.
What can I serve with Cherry Limeade Bars?
These bars taste great on their own, but you can add fun sides. Try serving them with whipped cream or vanilla ice cream. Fresh mint leaves or lime slices also make a nice touch. You can even pair them with a refreshing drink like lemonade or iced tea.It includes all the ingredients and steps to make this sweet and tangy treat. Enjoy making these delicious bars!
In this article, we covered everything about Cherry Limeade Bars. We explored vital ingredients, step-by-step instructions, helpful tips, and tasty variations. Each section aimed to guide you through every stage, from baking to storage. Remember, avoiding common mistakes is key to success. You can also mix flavors to make it unique. Keep this recipe handy for future sweet treats. With just a few simple steps, you can enjoy delicious bars that impress. Happy baking!


![The ingredients for Raspberry Almond Thumbprint Cookies are simple and delightful. Each one plays a key role in creating the perfect cookie. - 1 cup unsalted butter, softened to room temperature - 3/4 cup granulated sugar - 1 cup almond flour - 2 cups all-purpose flour - 1/2 teaspoon fine sea salt - 1 teaspoon pure vanilla extract - 1/4 teaspoon pure almond extract - 1/2 cup raspberry jam - Optional: Sliced almonds for garnish Using high-quality ingredients makes a big difference. The unsalted butter gives a rich flavor and smooth texture. Granulated sugar adds sweetness and helps the cookies spread just right. Almond flour brings a nutty taste that pairs well with raspberry jam. The fine sea salt balances the sweetness and enhances all the flavors. Vanilla and almond extracts add depth to the cookies. Raspberry jam gives that burst of fruity goodness, making each bite a treat. If you want a bit of crunch, sliced almonds add a lovely touch. For the complete recipe, check out the Full Recipe. Make sure you have everything ready before you start. Happy baking! - Preheat the oven to 350°F (175°C). This step ensures your cookies bake evenly and rise well. While the oven heats, line two baking sheets with parchment paper. This prevents cookies from sticking. - Cream the butter and sugar. In a large bowl, mix the softened butter and sugar until light and fluffy. This takes about 2-3 minutes. - Combine the dry ingredients and mix in the flavorings. Gradually add almond flour, all-purpose flour, and sea salt. Stir until a soft dough forms. Then, pour in vanilla and almond extracts and mix until smooth. - Roll the dough into balls. Use your hands to shape 1-inch balls and place them on the baking sheets. Make sure to space them about 2 inches apart, so they have room to spread. - Create indentations in each ball. Use your thumb or a small spoon to press down in the center of each dough ball. This creates a well for the jam. - Fill each indentation with raspberry jam. Carefully add about 1 teaspoon of jam to each well. Be careful not to overfill, or it may spill during baking. - Optional: For a crunchy texture, press sliced almonds around the edges of the filled indentations. - Bake the cookies. Place the baking sheets in the oven and bake for 12 to 15 minutes. Look for lightly golden edges. - Cooling instructions: After baking, let the cookies sit for about 5 minutes on the baking sheets. This helps them firm up. Then, transfer them to a wire rack to cool completely. - Presentation tips: Once cooled, dust the cookies lightly with powdered sugar. Arrange them on a decorative platter with fresh raspberries and mint leaves for a vibrant look. Check out the Full Recipe for more details and tips! Achieving the perfect texture To get soft and chewy cookies, use softened butter. This helps create the right mix of air and fat. Make sure to cream it well with the sugar. Mixing should take about 2 to 3 minutes. If you want a slight crunch, use finely ground almond flour. This gives the cookies a nice bite. Ensuring even cooking For even baking, space the cookie balls well on the baking sheet. Place them about 2 inches apart. This helps prevent them from sticking together. Additionally, rotate the baking sheets halfway through the baking time. This ensures all cookies bake evenly. Recommended amendments for enhanced flavor To boost the almond flavor, add a bit more almond extract. Just a few extra drops can make a big difference. You can also add a pinch of cinnamon for warmth. It pairs well with the raspberry jam and adds depth to the taste. Alternative fillings for the thumbprint While raspberry jam is great, try other flavors too! Strawberry, apricot, or even lemon curd can work well. Each jam gives a unique twist to the cookies. You can also use chocolate ganache for a rich, sweet center. Avoiding overfilling the jam When filling the cookie indentations, use about 1 teaspoon of jam. If you add too much, it can overflow during baking. This can make a mess on your baking sheet. Stick to the recommended amount for best results. Preventing dough from spreading too much in the oven If your dough spreads too much, try chilling it for about 30 minutes before baking. This helps firm up the butter. You can also bake on parchment paper, which helps maintain shape. Keeping your dough cold is key to keeping those lovely thumbprint shapes! {{image_4}} You can play with flavors in Raspberry Almond Thumbprint Cookies. Using different fruit jams can change the taste. Try strawberry, apricot, or blueberry jam for a fun twist. Each jam brings its unique flavor, making each bite special. You can also add chocolate or citrus flavors. Mix in some cocoa powder for a chocolatey touch. Or, add a hint of lemon zest for a fresh kick. These small changes can give your cookies a new vibe. Making these cookies gluten-free is easy. Substitute regular flour with gluten-free flour blends. Look for blends that include almond or coconut flour. These options keep the cookies soft and chewy. To maintain the right texture, watch the moisture levels. Gluten-free flour often absorbs more liquid. You may need to adjust the butter or add a bit of milk. This keeps the cookies from being too dry or crumbly. You can make these cookies vegan too. Replace butter with coconut oil or vegan butter. Both options keep the cookies rich and tasty. For eggs, use flaxseed meal or applesauce. These act as great binding agents. Flaxseed meal is simple to use. Mix one tablespoon with three tablespoons of water. Let it sit for a few minutes until it thickens. This blend works well and keeps the cookies together. To keep your Raspberry Almond Thumbprint Cookies fresh, store them in an airtight container at room temperature. This helps prevent them from getting stale. I recommend enjoying them within 5 to 7 days for the best taste. If you want to save some cookies for later, you can freeze them. For baked cookies, let them cool completely. Then, place them in a freezer-safe bag or container. They will stay good for up to three months. If you prefer to freeze the dough, wrap it tightly in plastic wrap, then place it in a freezer bag. When ready, thaw the dough in the fridge overnight for the best results. Reheating your cookies is easy! To keep their soft texture, preheat your oven to 300°F (150°C). Place the cookies on a baking sheet and warm them for about 5 to 8 minutes. This method helps restore their fresh-baked taste. Enjoy them warm, and they will feel like new! To make these cookies, follow these key steps: 1. Preheat your oven to 350°F (175°C). 2. Cream butter and sugar until fluffy in a bowl. 3. Combine dry ingredients: mix almond flour, all-purpose flour, and salt. 4. Add extracts: stir in vanilla and almond extracts. 5. Shape dough into 1-inch balls and place on a baking sheet. 6. Create indentations in the dough using your thumb. 7. Fill with jam: add raspberry jam to each well. 8. Bake cookies for 12 to 15 minutes until edges are golden. 9. Cool cookies on a wire rack after baking. This simple process leads to delicious treats. For the full recipe with detailed instructions, check the [Full Recipe]. Yes, you can use different nuts! If you are allergic to almonds, consider these options: - Pecans: Their rich flavor pairs well with fruit jams. - Walnuts: They add a nice crunch and depth to the cookies. - Cashews: These nuts give a creamy texture and mild taste. Feel free to experiment with your favorite nuts. Just chop them finely to mix into the dough or use them as a garnish. Many fun variations exist for thumbprint cookies. Here are some popular adaptations: - Different jams: Try strawberry, apricot, or blueberry for a twist. - Chocolate filling: Use chocolate ganache instead of jam for a rich flavor. - Citrus zest: Add lemon or orange zest to the dough for a fresh taste. These variations keep the recipe interesting. Mixing flavors can lead to delightful surprises! This blog post covered how to make delicious Raspberry Almond Thumbprint Cookies. We explored the ingredients, preparation steps, and tips for the best results. You learned about variations, storage methods, and common mistakes to avoid. Remember, baking is fun and rewarding. Try these cookies with different jams or flavors for new twists. Keep practicing to refine your skills. Enjoy baking and sharing these tasty treats with others. You now have the tools to impress your friends and family with your cookie-making expertise.](https://joymealplan.com/wp-content/uploads/2025/07/587afd51-3098-4c90-9a32-308dc83d9cb5-768x768.webp)


