Crispy Air Fryer Chicken Wings Flavorful Delight Recipe
![For this crispy air fryer chicken wings recipe, you'll need: - 2 pounds of chicken wings The key to great flavor comes from these seasoning ingredients: - 1 tablespoon baking powder - 1 teaspoon garlic powder - 1 teaspoon onion powder - 1 teaspoon smoked paprika - 1 teaspoon salt - ½ teaspoon black pepper - ½ teaspoon cayenne pepper (adjust to your spice preference) - 1 tablespoon olive oil These spices create a delicious mix. The baking powder helps the skin get crispy. The garlic and onion powders add nice depth. The smoked paprika brings warmth and color. Salt and pepper enhance all the flavors. If you like heat, add more cayenne! To make your wings even more appealing, consider this optional garnish: - Fresh herbs (such as parsley or cilantro) Fresh herbs add color and a burst of freshness. You can sprinkle them on top right before serving. This small touch makes a big difference in presentation. For the full recipe, check out the entire article! Start with fresh chicken wings. You need about 2 pounds for this recipe. Pat them dry with paper towels. This step helps remove moisture. Less moisture means crispier skin. Make sure to get every wing dry. In a large bowl, mix your seasonings. Use 1 tablespoon of baking powder. Add 1 teaspoon each of garlic powder, onion powder, and smoked paprika. Toss in 1 teaspoon of salt, ½ teaspoon of black pepper, and ½ teaspoon of cayenne pepper. Mix well. This blend gives the wings great flavor. Next, place the chicken wings in the bowl with the seasoning. Drizzle 1 tablespoon of olive oil over them. Toss everything together. Make sure each wing is coated well. Preheat your air fryer to 390°F (200°C) for about 5 minutes. Once it's hot, arrange the wings in a single layer in the basket. If your air fryer is small, cook them in batches. Cook the wings for 25-30 minutes. Halfway through, shake the basket gently. This helps them cook evenly and get crispy. For extra crispiness, raise the temperature to 400°F (204°C) for the last 5 minutes. When done, the wings should be golden brown and crispy. Carefully take them out and let them rest for a few minutes. Enjoy your crispy air fryer chicken wings right away! For the full recipe, check the earlier sections. To make your wings extra crispy, ensure they are very dry before cooking. Pat them dry with paper towels to remove moisture. Adding baking powder helps create a crunchy texture. It raises the pH of the skin, allowing it to brown better. For even more crispiness, increase the air fryer temperature to 400°F for the last five minutes. Cooking time can change based on wing size and air fryer model. For small wings, 25 minutes should be enough. Larger wings may need 30 to 35 minutes. Always check for doneness. The internal temperature should reach 165°F for safe eating. You can adjust cooking times slightly for your personal preference on crispiness. Avoid overcrowding the air fryer basket. This helps air circulate around each wing, ensuring even cooking. If you have many wings, cook them in batches. Shaking the basket halfway through cooking promotes even browning. Always preheat your air fryer for better results. Following these steps will help you get the best crispy wings. For the [Full Recipe], refer to the earlier section. {{image_4}} If you love heat, try making spicy Buffalo wings. Start with the base recipe. Before seasoning, toss the wings in hot sauce. You can use your favorite brand. After cooking, toss the wings in more hot sauce for an extra kick. Serve with blue cheese or ranch dressing. This adds a cool contrast to the spice. For a unique twist, go Asian-inspired. Mix soy sauce, ginger, and garlic into the seasoning. Instead of cayenne, use five-spice powder. This will give your wings a sweet and savory taste. After frying, drizzle with sesame oil and sprinkle sesame seeds. This adds a nice crunch and flavor pop. If you prefer fresh flavors, try this herb and lemon zest infusion. Add fresh herbs like thyme or rosemary to the seasoning mix. Zest one lemon and mix it in for brightness. This will make the wings taste light and refreshing. Serve with a lemon wedge for extra zing. These variations make it easy to switch things up. Enjoy your crispy air fryer chicken wings with these fun flavors! For the complete recipe, check out the Full Recipe section above. You can store leftover crispy air fryer chicken wings in the fridge. Place them in an airtight container. They will stay fresh for up to three days. To keep them crispy, avoid stacking them too high. To reheat, use your air fryer. Set it to 350°F (175°C). Heat the wings for about 5-7 minutes. This method will help retain their crispiness. You can also use a microwave, but they may lose some crunch. You can freeze the wings if you have extra. Place them in a freezer-safe bag or container. They can last for up to three months in the freezer. To thaw, move them to the fridge overnight. Reheat them in the air fryer when ready to enjoy again. For the full recipe, check out the section above! To make air fryer chicken wings extra crispy, start by drying them well. Pat them with paper towels to remove moisture. Next, use baking powder in your seasoning mix. This ingredient helps create that crunchy skin. Air fry them at a high temperature, and remember to shake the basket halfway through. For even more crispiness, raise the temperature in the last few minutes. The best temperature for cooking chicken wings in an air fryer is 390°F (200°C). This heat cooks the wings evenly and helps them become crispy. If you want them super crispy, boost the temperature to 400°F (204°C) for the final few minutes. This method ensures delicious, golden brown wings every time. Yes, you can cook frozen chicken wings in the air fryer. It’s easy and a real time-saver. Just add a few extra minutes to the cooking time. Start by cooking them at 400°F (204°C) for about 30-35 minutes. Shake the basket halfway to ensure even cooking. This method gives you crispy wings straight from the freezer! For the full recipe, check out the previous section. In this blog post, we covered how to make tasty air fryer chicken wings. We discussed ingredients, seasoning, and cooking steps. I shared tips to make your wings extra crispy and how to store them. You can even try different flavors like buffalo or Asian-inspired wings. To wrap up, air frying is a fun, easy way to enjoy wings. Now, get cooking and enjoy your delicious wings!](https://joymealplan.com/wp-content/uploads/2025/06/f7d8b647-e810-4c45-9fe8-50cd60d2e295.webp)
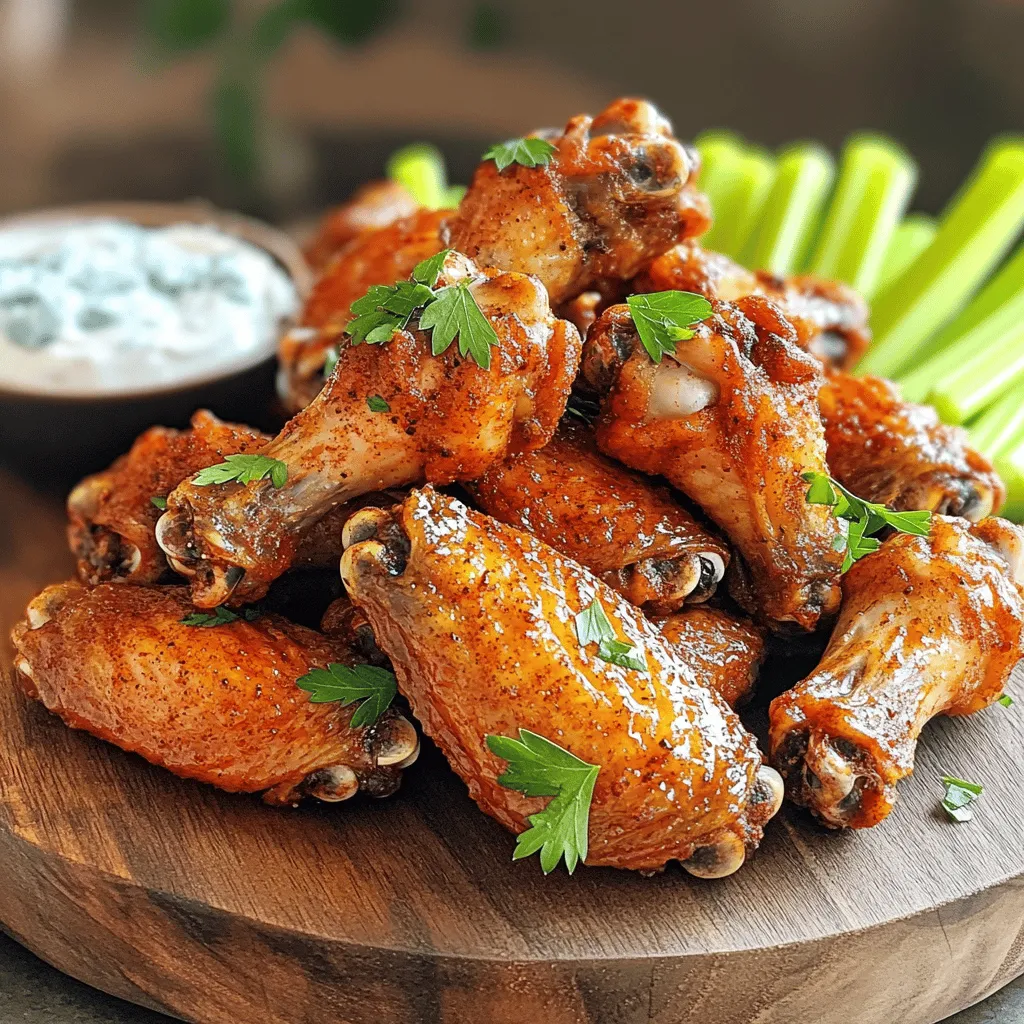
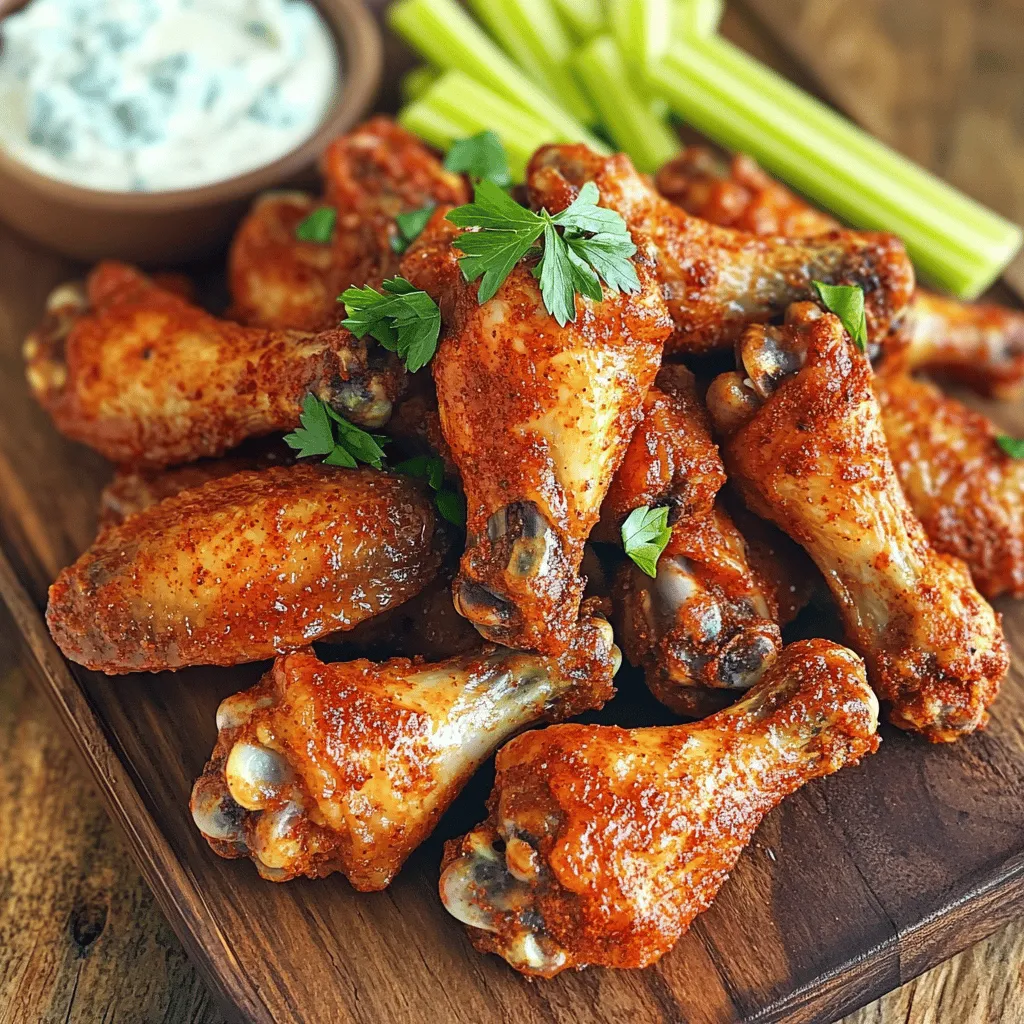
Are you ready to enjoy crispy, flavorful chicken wings without the guilt? In this recipe for Crispy Air Fryer Chicken Wings, I’ll show you how to achieve that perfect crunch while keeping things easy and light. With simple ingredients and clear steps, you can impress your friends and family in no time. Let’s dive into this delicious flavor adventure together!
Ingredients
Chicken Wings
For this crispy air fryer chicken wings recipe, you’ll need:
– 2 pounds of chicken wings
Seasoning Ingredients
The key to great flavor comes from these seasoning ingredients:
– 1 tablespoon baking powder
– 1 teaspoon garlic powder
– 1 teaspoon onion powder
– 1 teaspoon smoked paprika
– 1 teaspoon salt
– ½ teaspoon black pepper
– ½ teaspoon cayenne pepper (adjust to your spice preference)
– 1 tablespoon olive oil
These spices create a delicious mix. The baking powder helps the skin get crispy. The garlic and onion powders add nice depth. The smoked paprika brings warmth and color. Salt and pepper enhance all the flavors. If you like heat, add more cayenne!
Optional Garnish
To make your wings even more appealing, consider this optional garnish:
– Fresh herbs (such as parsley or cilantro)
Fresh herbs add color and a burst of freshness. You can sprinkle them on top right before serving. This small touch makes a big difference in presentation.
Step-by-Step Instructions
Preparing the Wings
Start with fresh chicken wings. You need about 2 pounds for this recipe. Pat them dry with paper towels. This step helps remove moisture. Less moisture means crispier skin. Make sure to get every wing dry.
Seasoning the Wings
In a large bowl, mix your seasonings. Use 1 tablespoon of baking powder. Add 1 teaspoon each of garlic powder, onion powder, and smoked paprika. Toss in 1 teaspoon of salt, ½ teaspoon of black pepper, and ½ teaspoon of cayenne pepper. Mix well. This blend gives the wings great flavor.
Next, place the chicken wings in the bowl with the seasoning. Drizzle 1 tablespoon of olive oil over them. Toss everything together. Make sure each wing is coated well.
Cooking in the Air Fryer
Preheat your air fryer to 390°F (200°C) for about 5 minutes. Once it’s hot, arrange the wings in a single layer in the basket. If your air fryer is small, cook them in batches.
Cook the wings for 25-30 minutes. Halfway through, shake the basket gently. This helps them cook evenly and get crispy. For extra crispiness, raise the temperature to 400°F (204°C) for the last 5 minutes.
When done, the wings should be golden brown and crispy. Carefully take them out and let them rest for a few minutes. Enjoy your crispy air fryer chicken wings right away!
Tips & Tricks
Achieving Extra Crispiness
To make your wings extra crispy, ensure they are very dry before cooking. Pat them dry with paper towels to remove moisture. Adding baking powder helps create a crunchy texture. It raises the pH of the skin, allowing it to brown better. For even more crispiness, increase the air fryer temperature to 400°F for the last five minutes.
Cooking Time Adjustments
Cooking time can change based on wing size and air fryer model. For small wings, 25 minutes should be enough. Larger wings may need 30 to 35 minutes. Always check for doneness. The internal temperature should reach 165°F for safe eating. You can adjust cooking times slightly for your personal preference on crispiness.
Best Practices for Air Fryer Use
Avoid overcrowding the air fryer basket. This helps air circulate around each wing, ensuring even cooking. If you have many wings, cook them in batches. Shaking the basket halfway through cooking promotes even browning. Always preheat your air fryer for better results. Following these steps will help you get the best crispy wings.

Variations
Spicy Buffalo Wings
If you love heat, try making spicy Buffalo wings. Start with the base recipe. Before seasoning, toss the wings in hot sauce. You can use your favorite brand. After cooking, toss the wings in more hot sauce for an extra kick. Serve with blue cheese or ranch dressing. This adds a cool contrast to the spice.
Asian-Inspired Flavor
For a unique twist, go Asian-inspired. Mix soy sauce, ginger, and garlic into the seasoning. Instead of cayenne, use five-spice powder. This will give your wings a sweet and savory taste. After frying, drizzle with sesame oil and sprinkle sesame seeds. This adds a nice crunch and flavor pop.
Herb and Lemon Zest Infusion
If you prefer fresh flavors, try this herb and lemon zest infusion. Add fresh herbs like thyme or rosemary to the seasoning mix. Zest one lemon and mix it in for brightness. This will make the wings taste light and refreshing. Serve with a lemon wedge for extra zing.
These variations make it easy to switch things up. Enjoy your crispy air fryer chicken wings with these fun flavors!
Storage Info
Refrigeration Tips
You can store leftover crispy air fryer chicken wings in the fridge. Place them in an airtight container. They will stay fresh for up to three days. To keep them crispy, avoid stacking them too high.
Reheating Instructions
To reheat, use your air fryer. Set it to 350°F (175°C). Heat the wings for about 5-7 minutes. This method will help retain their crispiness. You can also use a microwave, but they may lose some crunch.
Freezing and Thawing
You can freeze the wings if you have extra. Place them in a freezer-safe bag or container. They can last for up to three months in the freezer. To thaw, move them to the fridge overnight. Reheat them in the air fryer when ready to enjoy again.
FAQs
How to Make Air Fryer Chicken Wings Extra Crispy?
To make air fryer chicken wings extra crispy, start by drying them well. Pat them with paper towels to remove moisture. Next, use baking powder in your seasoning mix. This ingredient helps create that crunchy skin. Air fry them at a high temperature, and remember to shake the basket halfway through. For even more crispiness, raise the temperature in the last few minutes.
What is the Best Temperature for Cooking Chicken Wings in an Air Fryer?
The best temperature for cooking chicken wings in an air fryer is 390°F (200°C). This heat cooks the wings evenly and helps them become crispy. If you want them super crispy, boost the temperature to 400°F (204°C) for the final few minutes. This method ensures delicious, golden brown wings every time.
Can I Cook Frozen Chicken Wings in the Air Fryer?
Yes, you can cook frozen chicken wings in the air fryer. It’s easy and a real time-saver. Just add a few extra minutes to the cooking time. Start by cooking them at 400°F (204°C) for about 30-35 minutes. Shake the basket halfway to ensure even cooking. This method gives you crispy wings straight from the freezer!
In this blog post, we covered how to make tasty air fryer chicken wings. We discussed ingredients, seasoning, and cooking steps. I shared tips to make your wings extra crispy and how to store them. You can even try different flavors like buffalo or Asian-inspired wings.
To wrap up, air frying is a fun, easy way to enjoy wings. Now, get cooking and enjoy your delicious wings!
![For this crispy air fryer chicken wings recipe, you'll need: - 2 pounds of chicken wings The key to great flavor comes from these seasoning ingredients: - 1 tablespoon baking powder - 1 teaspoon garlic powder - 1 teaspoon onion powder - 1 teaspoon smoked paprika - 1 teaspoon salt - ½ teaspoon black pepper - ½ teaspoon cayenne pepper (adjust to your spice preference) - 1 tablespoon olive oil These spices create a delicious mix. The baking powder helps the skin get crispy. The garlic and onion powders add nice depth. The smoked paprika brings warmth and color. Salt and pepper enhance all the flavors. If you like heat, add more cayenne! To make your wings even more appealing, consider this optional garnish: - Fresh herbs (such as parsley or cilantro) Fresh herbs add color and a burst of freshness. You can sprinkle them on top right before serving. This small touch makes a big difference in presentation. For the full recipe, check out the entire article! Start with fresh chicken wings. You need about 2 pounds for this recipe. Pat them dry with paper towels. This step helps remove moisture. Less moisture means crispier skin. Make sure to get every wing dry. In a large bowl, mix your seasonings. Use 1 tablespoon of baking powder. Add 1 teaspoon each of garlic powder, onion powder, and smoked paprika. Toss in 1 teaspoon of salt, ½ teaspoon of black pepper, and ½ teaspoon of cayenne pepper. Mix well. This blend gives the wings great flavor. Next, place the chicken wings in the bowl with the seasoning. Drizzle 1 tablespoon of olive oil over them. Toss everything together. Make sure each wing is coated well. Preheat your air fryer to 390°F (200°C) for about 5 minutes. Once it's hot, arrange the wings in a single layer in the basket. If your air fryer is small, cook them in batches. Cook the wings for 25-30 minutes. Halfway through, shake the basket gently. This helps them cook evenly and get crispy. For extra crispiness, raise the temperature to 400°F (204°C) for the last 5 minutes. When done, the wings should be golden brown and crispy. Carefully take them out and let them rest for a few minutes. Enjoy your crispy air fryer chicken wings right away! For the full recipe, check the earlier sections. To make your wings extra crispy, ensure they are very dry before cooking. Pat them dry with paper towels to remove moisture. Adding baking powder helps create a crunchy texture. It raises the pH of the skin, allowing it to brown better. For even more crispiness, increase the air fryer temperature to 400°F for the last five minutes. Cooking time can change based on wing size and air fryer model. For small wings, 25 minutes should be enough. Larger wings may need 30 to 35 minutes. Always check for doneness. The internal temperature should reach 165°F for safe eating. You can adjust cooking times slightly for your personal preference on crispiness. Avoid overcrowding the air fryer basket. This helps air circulate around each wing, ensuring even cooking. If you have many wings, cook them in batches. Shaking the basket halfway through cooking promotes even browning. Always preheat your air fryer for better results. Following these steps will help you get the best crispy wings. For the [Full Recipe], refer to the earlier section. {{image_4}} If you love heat, try making spicy Buffalo wings. Start with the base recipe. Before seasoning, toss the wings in hot sauce. You can use your favorite brand. After cooking, toss the wings in more hot sauce for an extra kick. Serve with blue cheese or ranch dressing. This adds a cool contrast to the spice. For a unique twist, go Asian-inspired. Mix soy sauce, ginger, and garlic into the seasoning. Instead of cayenne, use five-spice powder. This will give your wings a sweet and savory taste. After frying, drizzle with sesame oil and sprinkle sesame seeds. This adds a nice crunch and flavor pop. If you prefer fresh flavors, try this herb and lemon zest infusion. Add fresh herbs like thyme or rosemary to the seasoning mix. Zest one lemon and mix it in for brightness. This will make the wings taste light and refreshing. Serve with a lemon wedge for extra zing. These variations make it easy to switch things up. Enjoy your crispy air fryer chicken wings with these fun flavors! For the complete recipe, check out the Full Recipe section above. You can store leftover crispy air fryer chicken wings in the fridge. Place them in an airtight container. They will stay fresh for up to three days. To keep them crispy, avoid stacking them too high. To reheat, use your air fryer. Set it to 350°F (175°C). Heat the wings for about 5-7 minutes. This method will help retain their crispiness. You can also use a microwave, but they may lose some crunch. You can freeze the wings if you have extra. Place them in a freezer-safe bag or container. They can last for up to three months in the freezer. To thaw, move them to the fridge overnight. Reheat them in the air fryer when ready to enjoy again. For the full recipe, check out the section above! To make air fryer chicken wings extra crispy, start by drying them well. Pat them with paper towels to remove moisture. Next, use baking powder in your seasoning mix. This ingredient helps create that crunchy skin. Air fry them at a high temperature, and remember to shake the basket halfway through. For even more crispiness, raise the temperature in the last few minutes. The best temperature for cooking chicken wings in an air fryer is 390°F (200°C). This heat cooks the wings evenly and helps them become crispy. If you want them super crispy, boost the temperature to 400°F (204°C) for the final few minutes. This method ensures delicious, golden brown wings every time. Yes, you can cook frozen chicken wings in the air fryer. It’s easy and a real time-saver. Just add a few extra minutes to the cooking time. Start by cooking them at 400°F (204°C) for about 30-35 minutes. Shake the basket halfway to ensure even cooking. This method gives you crispy wings straight from the freezer! For the full recipe, check out the previous section. In this blog post, we covered how to make tasty air fryer chicken wings. We discussed ingredients, seasoning, and cooking steps. I shared tips to make your wings extra crispy and how to store them. You can even try different flavors like buffalo or Asian-inspired wings. To wrap up, air frying is a fun, easy way to enjoy wings. Now, get cooking and enjoy your delicious wings!](https://joymealplan.com/wp-content/uploads/2025/06/f7d8b647-e810-4c45-9fe8-50cd60d2e295-300x300.webp)


![To make a tasty loaded baked potato salad, you need the right mix of ingredients. Here’s the list you’ll need: - 4 large Russet potatoes - ½ cup sour cream - ½ cup mayonnaise - 1 cup shredded sharp cheddar cheese - 1 cup cooked and crumbled turkey bacon or turkey sausage - 4 green onions, chopped - ½ teaspoon garlic powder - ½ teaspoon onion powder - Salt and pepper to taste - Optional: 1 cup diced tomatoes Russet potatoes are great because they are fluffy and hold up well. The sour cream and mayonnaise create a creamy base that brings all the flavors together. Cheese adds richness, while turkey bacon or sausage gives a nice savory touch. Don’t forget the seasonings! Garlic powder and onion powder add depth. You can adjust the salt and pepper to fit your taste. If you want a fresh bite, toss in some diced tomatoes. For the full recipe, check out the [Full Recipe]. Enjoy making your loaded baked potato salad! You can cook your potatoes in two ways: using a microwave or an oven. The microwave is quick. It takes about 10-15 minutes. Just wash the potatoes well and poke holes in them. This helps steam escape. If you choose the oven, it takes longer, about 45-60 minutes. Preheat it to 200°C (400°F). For the best texture, let the potatoes cool a bit after cooking. This way, they stay firm when you cut them. Cut the potatoes into bite-sized cubes, leaving the skin on. The skin adds a nice texture and flavor. Now, let’s make the dressing. Start with ½ cup of sour cream and ½ cup of mayonnaise. Combine them in a large bowl. These two create a creamy base. Then, add ½ teaspoon each of garlic powder and onion powder. Mix well. Taste the dressing and adjust the salt and pepper to your liking. You can also add more spices if you wish. It’s time to put it all together. Add the cubed potatoes to the bowl with the dressing. Now, add 1 cup of shredded sharp cheddar cheese and 1 cup of cooked, crumbled turkey bacon. If you want some fresh flavor, toss in half of the chopped green onions. Gently mix everything so that the potatoes get coated well with the dressing. Make sure all flavors spread evenly throughout. If you like, you can add 1 cup of diced tomatoes for extra freshness. Transfer the salad to a serving bowl and sprinkle the rest of the green onions on top. Cover the salad and chill it in the fridge for at least an hour. This allows the flavors to meld together nicely. You can find the Full Recipe in the earlier section. To make the best loaded baked potato salad, avoid common mistakes. First, don’t rush the cooking of your potatoes. If undercooked, they remain hard. Overcooked potatoes turn mushy. Test them with a fork; they should be tender but firm. Another mistake is not adjusting seasonings. Everyone has different tastes. Start with the basic amounts, then taste as you mix. Add more salt, pepper, or garlic powder until it feels just right. You want a balance that brings out the flavors. Serving your salad well makes it even more enjoyable. Use a bright bowl to attract the eye. You can line the bowl with crisp lettuce leaves. This adds color and freshness. Garnishes enhance visual appeal. Try sprinkling extra cheese on top. Chopped green onions add a nice touch. For a burst of color, diced tomatoes look great too. These small details make your dish pop and impress guests. {{image_4}} You can easily adapt this recipe for different diets. For a dairy-free option, use vegan sour cream and mayo. There are many brands that taste great and work well. For a gluten-free version, just check that all your ingredients are certified gluten-free. Most potatoes, sour creams, and cheeses are already gluten-free. This way, you can enjoy this dish without worry. You can change the flavors of your Loaded Baked Potato Salad by adding new ingredients. Try adding cooked chicken, shrimp, or even tofu for protein. You can also toss in different veggies, like bell peppers or corn, for extra crunch. Thinking outside the box can inspire new tastes. For a spicy kick, add jalapeños or hot sauce. If you love herbs, mix in fresh dill or parsley for a fresh twist. You can also explore flavors from other cuisines. Imagine a barbecue twist with smoked paprika or a Mediterranean flair with olives and feta. The options are endless, so get creative and make it your own! For the complete recipe, check out the Full Recipe section above. To keep your Loaded Baked Potato Salad fresh, store it in the fridge. Use an airtight container to keep moisture in and odors out. This salad will stay good for about 3 to 5 days. It’s best to eat it within this time for optimal flavor and texture. If you have leftovers, you can enjoy them cold or warm. If you prefer to reheat, the best way is to use the microwave. Heat it in short bursts, about 30 seconds at a time. Stir it well after each burst to ensure even heating. Always check that the salad is hot all the way through. When reheating, avoid letting it sit out too long to keep it safe to eat. You can easily prepare this salad in advance. First, cook and cool the potatoes. Then, mix the dressing and store it separately. Combine them just before serving. This keeps the potatoes fresh and firm. You can store the salad in the fridge for up to three days. Just remember to cover it tightly to keep it fresh. Yes, you can! While Russet potatoes are classic, you can use Yukon Gold or red potatoes. These options add a different texture and flavor. Yukon Golds are creamy, while red potatoes hold their shape well. Experimenting with different types can bring new life to your salad. Loaded Baked Potato Salad pairs well with grilled meats, like chicken or steak. You can also serve it with burgers or hot dogs for a fun cookout. For a lighter meal, try it with a fresh garden salad or grilled veggies. The flavors complement each other nicely, creating a balanced plate. Absolutely! To add heat, you can stir in diced jalapeños or a splash of hot sauce. Adding spicy cheese, like pepper jack, can also kick up the flavor. If you want a smoky touch, try adding chipotle powder. Feel free to adjust the heat to suit your taste! For the full recipe, check out [Full Recipe]. You’ve learned how to make a great Loaded Baked Potato Salad. We covered the right ingredients, preparation methods, and unique variations. Remember, that making this dish is all about balance—flavors, textures, and presentation. Keep experimenting with new ideas and tips to create your perfect salad. Don’t hesitate to adjust ingredients to fit your diet or spice it up. Enjoy every bite, and share your results!](https://joymealplan.com/wp-content/uploads/2025/06/ae05b21a-4cc0-4914-b0ca-5616115dbf5d-768x768.webp)


