%20(1).png)

If you're craving a quick, tasty meal, you’ll love this Cheese & Herb Omelette recipe. In just 15 minutes, you can whip up a fluffy, satisfying dish that has great flavor and texture. I’ll share essential tips, flavorful choices, and even storage advice so you can enjoy this omelette anytime. Ready to impress your taste buds? Let’s dive into this simple recipe!
Why I Love This Recipe
- Quick and Easy: This omelette can be whipped up in just 15 minutes, making it a perfect choice for busy mornings.
- Customizable: With options for different cheeses and the addition of fresh veggies, you can easily tailor it to your taste.
- Healthy and Wholesome: Packed with protein and fresh herbs, it’s a nutritious way to start your day.
- Delicious Flavor: The combination of melted cheese and fresh herbs creates a rich, savory experience that’s hard to resist.
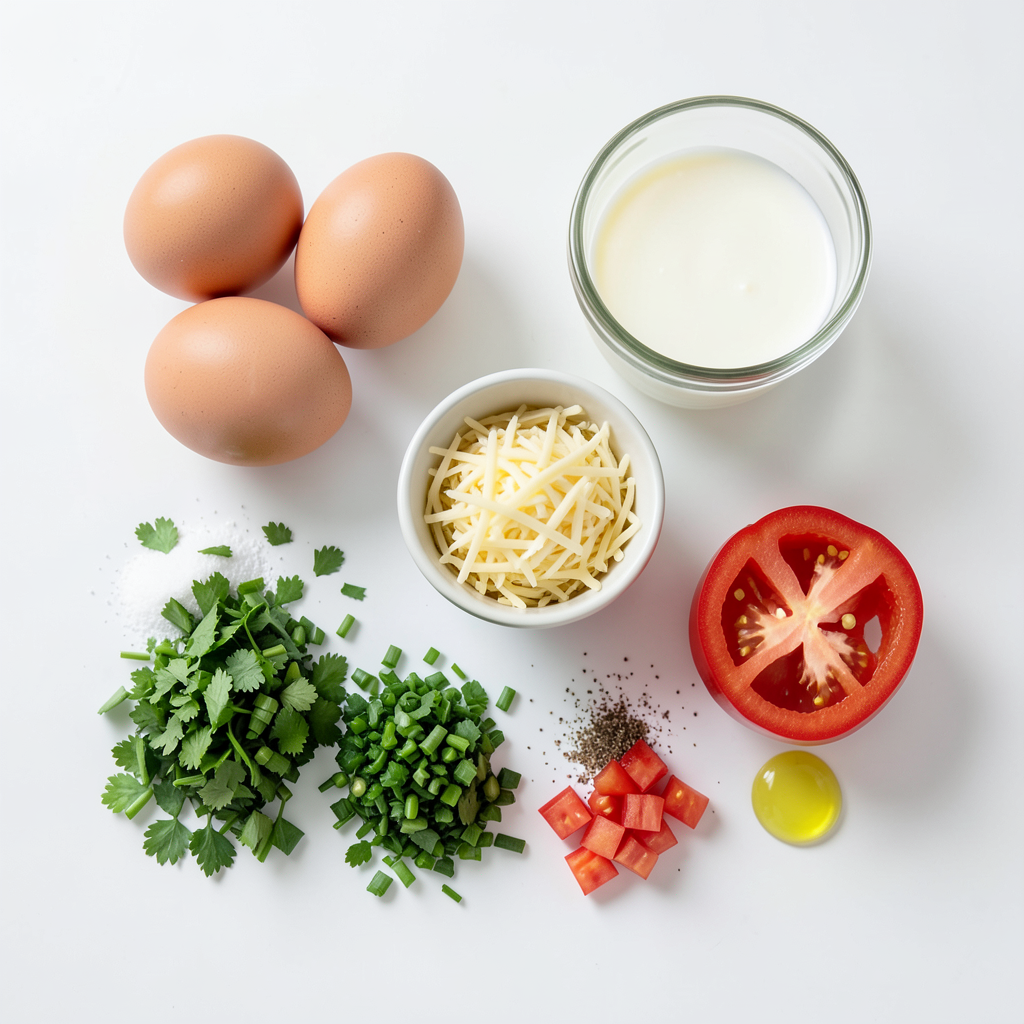
Ingredients
Essential Ingredients for the Cheese & Herb Omelette
To make a great cheese and herb omelette, you need a few key items:
- 3 large eggs
- 2 tablespoons milk
- 1/4 cup shredded cheese (cheddar, mozzarella, or a mix)
- 1 tablespoon fresh parsley, finely chopped
- 1 tablespoon fresh chives, finely chopped
- Salt and freshly cracked pepper, to taste
- 1 tablespoon butter or olive oil
These ingredients work together to create a fluffy and tasty omelette. The eggs and milk form the base, while the cheese and herbs add flavor and texture.
Recommended Cheese Options
When it comes to cheese, you have some fun choices. Here are my top picks:
- Cheddar: This classic cheese adds a sharp flavor.
- Mozzarella: A mild cheese that melts beautifully.
- A mix: Combine both for a richer taste.
Feel free to experiment with other cheeses too! Just remember, the creamier the cheese, the better it melts.
Optional Ingredients for Flavor Enhancement
If you want to boost the flavor, consider adding some of these items:
- 1/4 cup diced tomatoes
- 1/4 cup diced bell peppers
These ingredients add color and taste. They also make your omelette look more appealing. Just toss them in with the cheese before folding the omelette.
Step-by-Step Instructions
Preparing the Egg Mixture
To start, crack 3 large eggs into a medium bowl. Add 2 tablespoons of milk. Whisk the mix until it’s well blended and frothy. This step adds air for fluffiness. Next, add 1 tablespoon of finely chopped parsley and 1 tablespoon of chives. Season with a pinch of salt and a few cracks of pepper. Mix gently until the herbs are well spread throughout.
Cooking the Omelette to Perfect Fluffiness
Heat a non-stick skillet over medium heat. Add 1 tablespoon of butter or olive oil. Allow it to melt and coat the pan. Pour in the egg mixture, tilting the pan slightly. Cook it undisturbed for 1-2 minutes. You want the edges to firm up. Once the edges look set, sprinkle 1/4 cup of shredded cheese on top. If you like, add diced tomatoes or bell peppers for extra flavor. Watch for the center to set, but remain slightly runny. Use a spatula to lift one edge and fold the omelette in half. Cook for another minute to melt the cheese.
Final Touches for Presentation
When the omelette is done, carefully slide it onto a plate. You can fold it again for a neat look. For an appealing touch, sprinkle fresh herbs on top. Serve it with whole-grain toast or a light salad for balance. Enjoy your fluffy cheese and herb omelette!
Tips & Tricks
How to Achieve Maximum Fluffiness
To make your omelette fluffy, whisk the eggs well. I recommend using a fork or whisk to mix the eggs and milk until frothy. This adds air, which makes the omelette rise. Another tip is to cook it on medium heat. High heat will cook the outside too fast and leave the inside runny.
Common Mistakes to Avoid
One common mistake is not using enough fat. Always grease your pan well with butter or oil. This helps the omelette slide out easily. Another mistake is not folding it at the right time. Wait until the center is nearly set. If you fold it too early, it may look messy and not cook properly.
Suggested Cooking Tools for Best Results
Use a good non-stick skillet for the best results. A 10-inch skillet is perfect for a fluffy omelette. You’ll also need a mixing bowl and a whisk. A spatula is essential for flipping the omelette. For serving, a nice plate makes your dish look appetizing.
Pro Tips
- Choose Quality Eggs: Opt for fresh, organic eggs if possible. They enhance the flavor and texture of your omelette, making it extra delicious.
- Whisk Well: Ensure you whisk the eggs and milk until frothy to incorporate air, which will give your omelette a light and fluffy texture.
- Low and Slow: Cooking your omelette over medium-low heat allows for even cooking and prevents the eggs from becoming rubbery.
- Experiment with Fillings: Don't be afraid to mix in different cheeses, vegetables, or even cooked meats for added flavor and variety in your omelette.
Variations
Different Cheese Flavors
You can switch up the cheese in your omelette for new tastes. Cheddar gives a sharp kick. Mozzarella brings a creamy texture. A mix of cheeses adds depth. Try feta for a tangy surprise. Each cheese melts differently, so choose one that fits your mood.
Adding Vegetables for Extra Nutrition
Want to boost your omelette? Adding veggies is the way to go! Diced tomatoes add sweetness. Bell peppers give a crunchy bite. Spinach adds color and nutrients. Mushrooms offer an earthy flavor. Just chop them small and toss them in with the eggs.
Herb Alternatives and Combinations
Herbs can change your omelette game. Basil gives a sweet, fragrant touch. Thyme adds a hint of earthiness. You can mix herbs too! Try parsley with chives for a fresh combo. Experiment with what you have at home to find your favorite mix.
Storage Info
How to Store Leftover Omelette
To store leftover omelette, let it cool first. Place it in an airtight container. You can keep it in the fridge for 2 to 3 days. If you want to keep it longer, consider freezing.
Best Practices for Reheating
When you reheat your omelette, do it gently. Use a non-stick skillet over low heat. This helps keep it fluffy. You can also warm it in the microwave. Cover it with a damp paper towel to prevent drying out. Heat for 30 seconds, check, and repeat if needed.
Freezing Omelette: Is It Possible?
Yes, you can freeze an omelette. However, some textures may change. Let the omelette cool, then wrap it tightly in plastic wrap. Place it in a freezer bag for extra protection. It can stay in the freezer for up to 2 months. When ready to eat, thaw it in the fridge overnight before reheating.
FAQs
How to make a cheese omelette without sticking?
To keep your omelette from sticking, start with a good non-stick skillet. Heat it on medium before adding butter or oil. Let the fat melt and cover the pan fully. This helps create a non-stick surface. When you pour in the eggs, tilt the pan to spread them evenly. Avoid moving the eggs too soon; let them set for a minute. This gives them time to firm up and helps prevent sticking.
What is the best cheese for omelettes?
The best cheese for omelettes is one that melts well and has great taste. Cheddar and mozzarella are popular choices. They add a nice creamy texture. You can also try a mix of cheeses for more flavor. A bit of feta or goat cheese can add a tangy twist. Choose what you like best; there are no wrong answers!
Can I make a cheese omelette in advance?
You can make a cheese omelette in advance, but it won’t be as fluffy. If you want to prepare it early, cook it fully and let it cool. Store it in an airtight container in the fridge. To reheat, use a skillet on low heat. Add a little water and cover it to create steam. This helps keep the omelette moist. Enjoy it within a day or two for the best flavor!
Making a cheese and herb omelette is easy and fun. We covered key ingredients, cooking steps, tips, and tasty variations. Remember to choose the right cheese and herbs for flavor. Avoid common mistakes to ensure fluffiness. Store leftovers properly for later use. With practice, your omelette will impress everyone. Enjoy the process of making your perfect omelette!