
Looking for a tasty and healthy snack? Homemade granola bars are your answer! They’re easy to make and packed with goodness. You can mix in your favorite nuts and fruits, or even add a touch of sweetness with honey. With just a few simple steps, you can enjoy a delicious snack that fuels your day. Let’s dive into how to create your perfect batch of homemade granola bars!
Ingredients
Dry Ingredients
– 2 cups rolled oats
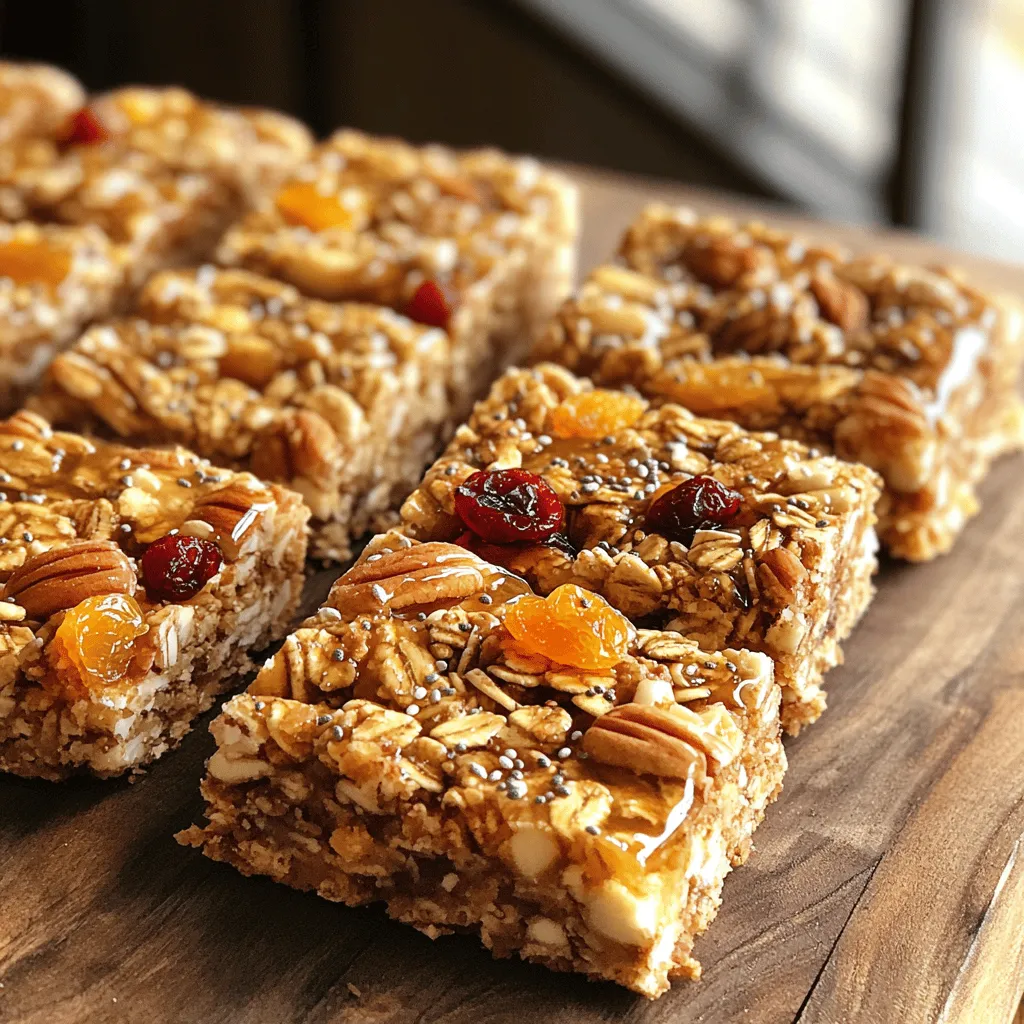
– 1 cup mixed nuts (almonds, walnuts, pecans), roughly chopped
– 1/2 cup dried fruits (cranberries, apricots, or raisins)
– 1/4 cup chia seeds
– 1/2 teaspoon ground cinnamon
– A pinch of salt
Wet Ingredients
– 1/2 cup honey or maple syrup
– 1/4 cup coconut oil, melted
– 1 teaspoon vanilla extract
Equipment Needed
– Baking pan (9×9 inches)
– Parchment paper
– Mixing bowls
– Spatula
When I create homemade granola bars, I start with these simple ingredients. The dry ingredients add texture and crunch. Rolled oats are the base. They give a hearty feel. Nuts add healthy fats and protein. I like using a mix, but you can stick to one type if you prefer. Dried fruits add sweetness and a chewy bite. Chia seeds boost nutrition. They are tiny but pack a punch. Ground cinnamon brings warmth and flavor. A pinch of salt balances the sweetness.
Next, I move to the wet ingredients. Honey or maple syrup gives a sticky sweetness. Coconut oil helps bind everything together. It adds a nice flavor and richness. Finally, vanilla extract perks up the taste.
For equipment, a 9×9-inch baking pan is key. Parchment paper makes it easy to lift the bars out. Mixing bowls help keep things organized. A spatula is essential for mixing and spreading.Enjoy making your healthy snacks!
Step-by-Step Instructions
Preparation
– Preheat the oven to 350°F (175°C).
– Line the baking pan with parchment paper.
Mixing Ingredients
– Combine the dry ingredients in a large bowl.
– Whisk the wet ingredients in a separate small bowl.
Baking Process
– Pour the wet mixture over the dry ingredients and mix.
– Press the mixture into the prepared pan and bake for 15-20 minutes.
– Allow cooling and cut into bars.
To make homemade granola bars, start by preheating your oven. This helps them bake evenly. I usually set my oven to 350°F (175°C). Next, prepare a 9×9 inch baking pan. Line it with parchment paper. This step makes it easy to lift the bars out later.
In a large bowl, add your dry ingredients: rolled oats, mixed nuts, dried fruits, chia seeds, ground cinnamon, and a pinch of salt. Mix these well with a big spoon. In another small bowl, whisk together the wet ingredients: melted coconut oil, honey, and vanilla extract. Make sure they blend nicely.
Now, pour the wet mixture over the dry ingredients. Use a spatula to mix everything together. Ensure that all the dry ingredients get coated well. After mixing, transfer this mixture to the prepared pan. Press it down firmly. This helps the bars hold their shape.
Place the pan in the preheated oven. Bake for 15 to 20 minutes. Keep an eye on them. You want the edges to turn a light golden brown. Once they are done baking, remove the pan from the oven. Allow the granola to cool in the pan for about 10 minutes.
After cooling slightly, lift the mixture out of the pan using the parchment paper. Transfer it to a wire rack to cool completely. Once cool, use a sharp knife to cut into bars or squares. Store your homemade granola bars in an airtight container. They will stay fresh for up to a week. For longer storage, keep them in the fridge.
Tips & Tricks
Perfecting the Recipe
To ensure even baking, spread the mixture out flat in the pan. Use a spatula to smooth it down. This helps it cook evenly. Check it after 15 minutes. The edges should be golden brown. If not, bake a few more minutes.
Press the mixture down firmly before baking. This step is key for sturdy bars. Use your hands or a spatula to compact it well. The more you press, the better the texture.
Flavor Enhancements
You can add chocolate chips for a sweet twist. Just fold them in after mixing. For a spiced touch, try adding a pinch of nutmeg or ginger. These flavors elevate the bars.
Think about nuts and fruits, too. Combine almonds with dried apricots for a tasty mix. Walnuts go great with cranberries. Don’t be afraid to mix and match!
Serving Suggestions
For a pleasing display, stack the bars on a wooden board. You can garnish with extra nuts or fruits. This adds color and texture to your plate.
Pair your bars with yogurt or nut butter. Dip them in your favorite spreads for extra flavor. These simple touches make a great snack even better!
Variations
Dietary Options
You can easily adapt granola bars to fit your diet. For a vegan option, replace honey with maple syrup or agave nectar. This keeps the bars sweet and plant-based. Make sure to check other ingredients, too. Use nuts and seeds that fit your vegan lifestyle.
If you need gluten-free granola bars, choose certified gluten-free oats. Most nuts and seeds are naturally gluten-free. You can also swap in gluten-free grains like quinoa flakes or puffed rice. This way, you can enjoy a tasty snack without any gluten.
Flavor Combinations
Granola bars can be a canvas for flavors. Try tropical granola bars by adding coconut and pineapple. Toast the coconut for extra depth. Chop fresh or dried pineapple to add that sweet, tangy note. This combo brings a slice of summer to your snack.
Another fun twist is to make spiced granola bars with pumpkin spice. Mix in cinnamon, nutmeg, and ginger for a warm flavor. Add pumpkin purée for a creamy texture. This creates a cozy snack perfect for fall.
Texture Adjustments
Texture can make or break your granola bars. For a satisfying crunch, add crispy rice. Fold it in at the end to keep it airy. This adds a fun bite to your bars.
To bring creaminess, use nut butters like almond or peanut. Mix it with the wet ingredients for a rich taste. Nut butters also help hold the bars together. This will give your granola bars a lovely, smooth texture.
Storage Info
Short-term Storage
To keep your granola bars fresh, store them in an airtight container. Place the container at room temperature. They will stay good for about one week. If you see any signs of moisture, it’s best to eat them quickly.
Long-term Storage
For longer storage, refrigeration works well. You can also freeze granola bars. Wrap each bar in plastic wrap or foil. Then, store them in a freezer bag. They can last up to three months when frozen.
Reheating and Softening
If your bars become hard after refrigeration or freezing, don’t worry. Just let them sit out for a few minutes. You can also microwave them for about 10-15 seconds. This will help restore their soft texture. Enjoy your crunchy nutty homemade granola bars!
FAQs
How long do homemade granola bars last?
Homemade granola bars last about a week at room temperature. Keep them in an airtight container. If you want them to stay fresh longer, store them in the fridge for up to two weeks.
Can I customize the ingredients in my granola bars?
Yes, you can customize your granola bars! Swap out nuts, seeds, or dried fruits based on your taste. You can also add chocolate chips or nut butter for extra flavor. Just keep the basic ratios the same to ensure they hold together well.
What can I substitute for honey in this recipe?
If you need a substitute for honey, use maple syrup or agave nectar. Both options work well and still provide sweetness. You can also try brown rice syrup, but it may change the texture slightly.
Is it okay to use quick oats instead of rolled oats?
Yes, you can use quick oats instead of rolled oats. Quick oats will make the bars softer. If you prefer a chewier texture, stick with rolled oats. They help create a better structure for the bars.
How many servings does this recipe make?
This recipe makes about 10 to 12 bars. You can cut them into larger or smaller pieces, depending on your needs. For snacks on the go, smaller bars work best!
In this blog post, we covered how to make healthy and tasty granola bars. You learned about the dry and wet ingredients, along with essential equipment. We discussed easy step-by-step instructions for baking and enjoyed some helpful tips. You also explored variations for different diets and flavor options.
Now, you can make your own granola bars with confidence! Enjoy this fun and tasty project to share with friends and family.


