Mouthwatering Chicken Alfredo Stuffed Shells Recipe
 for all the details! {{image_4}} You can switch up the protein in Chicken Alfredo Stuffed Shells easily. Ground turkey or beef works well. Both give a rich taste and fit well in the shells. If you want a lighter option, ground chicken is great too. For vegetarian options, you can use mushrooms or spinach. They add flavor and nutrients without meat. Tofu is also a good choice. It soaks up the sauce nicely and adds protein. You can play with the sauce to create different flavors. Try adding garlic or herbs to the Alfredo sauce. This gives it a fresh taste. You might also enjoy a white wine cream sauce for a twist. Adding roasted vegetables to the sauce works wonders too. Think peppers, zucchini, or even spinach. This makes the dish colorful and healthy. Cheese can change the whole vibe of your dish. You can mix in different cheeses like fontina or gouda. These cheeses melt beautifully and add a new flavor. If you want a lighter option, try part-skim mozzarella. For those who avoid dairy, vegan cheese is a great alternative. Look for brands made from nuts or soy. They can also melt well and taste great. To store Chicken Alfredo stuffed shells in the fridge, let them cool first. Place them in an airtight container. Keep them in the fridge for up to three days. For best freshness, cover the top with a bit of extra Alfredo sauce. This keeps the shells moist and tasty. To freeze stuffed shells, first let them cool completely. Then, place them in a single layer on a baking sheet. Freeze until solid, about two hours. After that, pack them in a freezer-safe container or bag. They can last for up to three months in the freezer. When you’re ready to eat, thaw them in the fridge overnight. Reheat in the oven at 350°F (175°C) for about 25 minutes. Cover with foil to avoid drying out. Enjoy your delicious meal again! Can I use non-dairy substitutes? Yes, you can! Use non-dairy cheese and a plant-based Alfredo sauce. This keeps the dish creamy without dairy. How long does it take to cook from frozen? If you cook from frozen, add about 15 to 20 minutes to the baking time. This ensures everything heats through well. What can I serve with Chicken Alfredo Stuffed Shells? These shells pair great with a fresh green salad or warm garlic bread. Both options add balance to your meal. Why are my shells falling apart? Overcooking the pasta shells can cause this. Make sure to cook them just until al dente. How can I prevent the filling from spilling out? Don’t overfill the shells. Fill them just enough, but leave some space at the top. This helps keep the filling secure. What's the best way to know when it's fully cooked? Check if the cheese on top is bubbly and golden brown. You can also insert a knife to see if it’s hot inside. Can I make this dish ahead of time? Absolutely! You can prepare the shells and store them in the fridge. Just bake them when you're ready to eat. For details, check the Full Recipe. In this article, we explored how to make Chicken Alfredo Stuffed Shells. We covered the key ingredients, including pasta shells, chicken, and cheeses. I shared clear steps for preparation, filling, and baking. We also discussed tips for perfecting your dish and variations to suit your taste. Remember, cooking is fun and can be creative. Don't hesitate to try new flavors or ingredients. Enjoy your delicious stuffed shells and share them with friends and family!](https://joymealplan.com/wp-content/uploads/2025/07/ca290995-1373-40bc-abd5-a22e15d03aa0.webp)
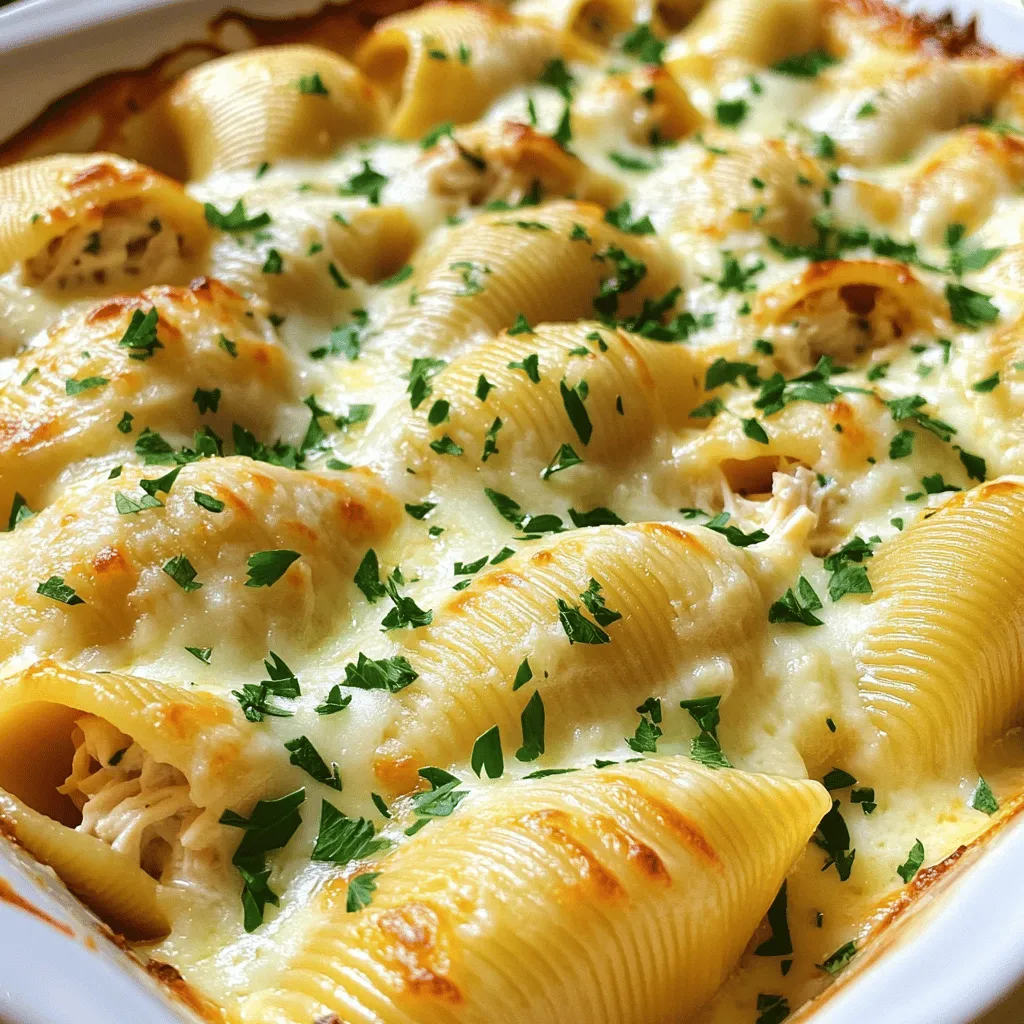
Get ready to impress your family with my Mouthwatering Chicken Alfredo Stuffed Shells recipe! This dish combines tender pasta shells with a creamy Alfredo filling packed with chicken and three types of cheese. It’s simple enough for a weeknight dinner and tasty enough for special occasions. Follow my step-by-step guide to create a warm, cheesy meal that everyone will love. Let’s dive in!
Ingredients
Main Ingredients
– 12 large pasta shells
– 2 cups cooked chicken, shredded
– 1 cup ricotta cheese
– 1 cup shredded mozzarella cheese (plus additional for topping)
– 1/2 cup grated Parmesan cheese
– 2 cups Alfredo sauce (store-bought or homemade)
Seasoning and Garnish
– 1 teaspoon garlic powder
– 1 teaspoon Italian seasoning
– Salt and pepper to taste
– Fresh parsley, chopped (for garnish)
For this Chicken Alfredo stuffed shells recipe, you need a few key ingredients. First, the large pasta shells are the perfect size to hold all that creamy goodness. You also need cooked chicken. I usually use rotisserie chicken because it saves time. The ricotta cheese gives a nice, creamy texture.
Next, add shredded mozzarella and grated Parmesan for that cheesy flavor. The Alfredo sauce, which you can buy or make, is a must for that rich taste.
For seasoning, garlic powder and Italian seasoning bring out the flavors. Don’t forget to add a bit of salt and pepper to taste. Finally, sprinkle fresh parsley on top for a pop of color.
Step-by-Step Instructions
Preparation
– Preheat the oven: Set your oven to 375°F (190°C). This step helps cook the dish evenly.
– Cook the pasta shells: Boil a pot of salted water. Add the large pasta shells carefully. Follow the package’s cooking time until they are just slightly firm, or al dente. Drain them in a colander and let them cool for a bit.
Filling the Shells
– Prepare the filling mixture: In a big bowl, mix together shredded chicken, ricotta cheese, 1 cup of shredded mozzarella, grated Parmesan, garlic powder, and Italian seasoning. Add salt and pepper to taste. Stir until the mix is smooth and well blended.
– Stuff the shells with filling: Take a spoon and gently fill each pasta shell with the chicken and cheese mix. Place them in a greased 9×13 inch baking dish. Make sure they are in a single layer to help them cook right.
Baking Instructions
– Add the sauce: Pour the creamy Alfredo sauce over the stuffed shells. Cover each shell well to keep them moist during baking.
– Top with cheese: Sprinkle the remaining mozzarella cheese over the sauce. This adds a nice cheesy finish.
– Bake the dish: Cover the dish with aluminum foil. This helps prevent the cheese from burning. Bake for 20 minutes. After that, take off the foil and bake for another 10 minutes, or until the cheese is bubbly and golden brown.
After baking, let the dish cool for a few minutes. Enjoy your delicious Chicken Alfredo Stuffed Shells!
Tips & Tricks
Perfecting Your Stuffed Shells
To make stuffed shells right, you need the best pasta. I like large pasta shells. They hold lots of filling and look great on the plate. When cooking the shells, aim for al dente. This means they should be firm but not hard. Overcooked shells will break when you stuff them.
Enhancing Flavor
For a great taste, you can make your own Alfredo sauce. It’s simple and fresh. You just need butter, cream, and cheese. If you want extra flavor, add garlic or nutmeg. You can also mix in fresh herbs like basil or parsley. A sprinkle of red pepper flakes adds a nice kick too.
Serving Recommendations
Pair your Chicken Alfredo stuffed shells with a fresh green salad. The crispness of the salad balances the creamy pasta. Garlic bread is another great side; it’s perfect for scooping up any extra sauce. For a nice touch, serve the shells on a large platter. Add some chopped parsley on top for color. This makes the dish look even more appetizing.

Variations
Protein Alternatives
You can switch up the protein in Chicken Alfredo Stuffed Shells easily. Ground turkey or beef works well. Both give a rich taste and fit well in the shells. If you want a lighter option, ground chicken is great too. For vegetarian options, you can use mushrooms or spinach. They add flavor and nutrients without meat. Tofu is also a good choice. It soaks up the sauce nicely and adds protein.
Sauce Variations
You can play with the sauce to create different flavors. Try adding garlic or herbs to the Alfredo sauce. This gives it a fresh taste. You might also enjoy a white wine cream sauce for a twist. Adding roasted vegetables to the sauce works wonders too. Think peppers, zucchini, or even spinach. This makes the dish colorful and healthy.
Cheese Choices
Cheese can change the whole vibe of your dish. You can mix in different cheeses like fontina or gouda. These cheeses melt beautifully and add a new flavor. If you want a lighter option, try part-skim mozzarella. For those who avoid dairy, vegan cheese is a great alternative. Look for brands made from nuts or soy. They can also melt well and taste great.
Storage Info
Refrigerating Leftovers
To store Chicken Alfredo stuffed shells in the fridge, let them cool first. Place them in an airtight container. Keep them in the fridge for up to three days. For best freshness, cover the top with a bit of extra Alfredo sauce. This keeps the shells moist and tasty.
Freezing Instructions
To freeze stuffed shells, first let them cool completely. Then, place them in a single layer on a baking sheet. Freeze until solid, about two hours. After that, pack them in a freezer-safe container or bag. They can last for up to three months in the freezer.
When you’re ready to eat, thaw them in the fridge overnight. Reheat in the oven at 350°F (175°C) for about 25 minutes. Cover with foil to avoid drying out. Enjoy your delicious meal again!
FAQs
Common Questions
Can I use non-dairy substitutes?
Yes, you can! Use non-dairy cheese and a plant-based Alfredo sauce. This keeps the dish creamy without dairy.
How long does it take to cook from frozen?
If you cook from frozen, add about 15 to 20 minutes to the baking time. This ensures everything heats through well.
What can I serve with Chicken Alfredo Stuffed Shells?
These shells pair great with a fresh green salad or warm garlic bread. Both options add balance to your meal.
Troubleshooting
Why are my shells falling apart?
Overcooking the pasta shells can cause this. Make sure to cook them just until al dente.
How can I prevent the filling from spilling out?
Don’t overfill the shells. Fill them just enough, but leave some space at the top. This helps keep the filling secure.
Cooking Time Clarifications
What’s the best way to know when it’s fully cooked?
Check if the cheese on top is bubbly and golden brown. You can also insert a knife to see if it’s hot inside.
Can I make this dish ahead of time?
Absolutely! You can prepare the shells and store them in the fridge. Just bake them when you’re ready to eat.
In this article, we explored how to make Chicken Alfredo Stuffed Shells. We covered the key ingredients, including pasta shells, chicken, and cheeses. I shared clear steps for preparation, filling, and baking. We also discussed tips for perfecting your dish and variations to suit your taste.
Remember, cooking is fun and can be creative. Don’t hesitate to try new flavors or ingredients. Enjoy your delicious stuffed shells and share them with friends and family!
 for all the details! {{image_4}} You can switch up the protein in Chicken Alfredo Stuffed Shells easily. Ground turkey or beef works well. Both give a rich taste and fit well in the shells. If you want a lighter option, ground chicken is great too. For vegetarian options, you can use mushrooms or spinach. They add flavor and nutrients without meat. Tofu is also a good choice. It soaks up the sauce nicely and adds protein. You can play with the sauce to create different flavors. Try adding garlic or herbs to the Alfredo sauce. This gives it a fresh taste. You might also enjoy a white wine cream sauce for a twist. Adding roasted vegetables to the sauce works wonders too. Think peppers, zucchini, or even spinach. This makes the dish colorful and healthy. Cheese can change the whole vibe of your dish. You can mix in different cheeses like fontina or gouda. These cheeses melt beautifully and add a new flavor. If you want a lighter option, try part-skim mozzarella. For those who avoid dairy, vegan cheese is a great alternative. Look for brands made from nuts or soy. They can also melt well and taste great. To store Chicken Alfredo stuffed shells in the fridge, let them cool first. Place them in an airtight container. Keep them in the fridge for up to three days. For best freshness, cover the top with a bit of extra Alfredo sauce. This keeps the shells moist and tasty. To freeze stuffed shells, first let them cool completely. Then, place them in a single layer on a baking sheet. Freeze until solid, about two hours. After that, pack them in a freezer-safe container or bag. They can last for up to three months in the freezer. When you’re ready to eat, thaw them in the fridge overnight. Reheat in the oven at 350°F (175°C) for about 25 minutes. Cover with foil to avoid drying out. Enjoy your delicious meal again! Can I use non-dairy substitutes? Yes, you can! Use non-dairy cheese and a plant-based Alfredo sauce. This keeps the dish creamy without dairy. How long does it take to cook from frozen? If you cook from frozen, add about 15 to 20 minutes to the baking time. This ensures everything heats through well. What can I serve with Chicken Alfredo Stuffed Shells? These shells pair great with a fresh green salad or warm garlic bread. Both options add balance to your meal. Why are my shells falling apart? Overcooking the pasta shells can cause this. Make sure to cook them just until al dente. How can I prevent the filling from spilling out? Don’t overfill the shells. Fill them just enough, but leave some space at the top. This helps keep the filling secure. What's the best way to know when it's fully cooked? Check if the cheese on top is bubbly and golden brown. You can also insert a knife to see if it’s hot inside. Can I make this dish ahead of time? Absolutely! You can prepare the shells and store them in the fridge. Just bake them when you're ready to eat. For details, check the Full Recipe. In this article, we explored how to make Chicken Alfredo Stuffed Shells. We covered the key ingredients, including pasta shells, chicken, and cheeses. I shared clear steps for preparation, filling, and baking. We also discussed tips for perfecting your dish and variations to suit your taste. Remember, cooking is fun and can be creative. Don't hesitate to try new flavors or ingredients. Enjoy your delicious stuffed shells and share them with friends and family!](https://joymealplan.com/wp-content/uploads/2025/07/ca290995-1373-40bc-abd5-a22e15d03aa0-300x300.webp)


![To make the Spicy Sriracha Noodles, gather these ingredients: - 8 oz rice noodles - 2 tablespoons Sriracha sauce - 1 tablespoon soy sauce - 1 tablespoon sesame oil - 1 red bell pepper, thinly sliced - 1 cup snap peas, trimmed - 3 green onions, finely chopped - 2 cloves garlic, minced - 1 tablespoon fresh ginger, grated - ½ cup fresh cilantro, roughly chopped - Juice of 1 lime - Salt to taste - Sesame seeds for garnish This recipe serves about 2 to 3 people. Each serving contains: - Calories: Approximately 350 - Protein: 10g - Carbohydrates: 55g - Fats: 12g - Fiber: 5g These noodles are a great choice for a quick, flavorful meal. They balance carbs and protein while being low in calories. You can customize this recipe easily. Here are some swaps: - Rice noodles: Use whole grain or egg noodles if you prefer. - Sriracha sauce: Try chili paste or hot sauce for a different heat. - Soy sauce: Use tamari for a gluten-free option. - Sesame oil: Olive oil or coconut oil can work too. - Red bell pepper: Any bell pepper or even carrots will add crunch. - Snap peas: You can swap these for green beans or broccoli. These substitutions keep your dish exciting while still delivering great flavor. For the full recipe, check out the complete guide. Start by boiling water in a large pot. Add the rice noodles and cook them for about 4-6 minutes, or until they are soft but still firm. Drain the noodles and rinse them with cold water. This stops the cooking process and keeps them from getting sticky. Set them aside to cool. Grab a large skillet or wok and pour in the sesame oil. Heat it on medium until it shimmers. Add minced garlic and grated ginger, stirring for about 30 seconds. The smell should make your mouth water! This step adds a tasty base to your noodles. Now, toss in the sliced red bell pepper and snap peas. Stir-fry these veggies for about 3-4 minutes. They should be bright and slightly tender. In a small bowl, mix Sriracha, soy sauce, and lime juice. Pour this sauce over the veggies, stirring well. Then, gently fold in the cooked noodles, making sure everything is coated evenly. Season with salt to taste. Stir-fry for another 1-2 minutes. Finally, add chopped green onions and cilantro for a fresh kick. Serve your spicy Sriracha noodles hot, garnished with sesame seeds from the recipe provided! To get the best texture for your noodles, cook them until they are al dente. This means they should be firm to the bite. Follow the package instructions closely. After cooking, drain and rinse them with cold water. This stops the cooking process and keeps them from getting too soft. Want to adjust the spice? You can! Add more Sriracha for a hotter dish. If you prefer it milder, use less Sriracha or mix in a little soy sauce. You can also add sugar to balance the heat. Taste as you go to find your perfect level of spice. Garnishing makes your dish pop! Use fresh cilantro and green onions for color. A sprinkle of sesame seeds adds a nice crunch too. You can also add lime wedges on the side. This gives a fresh touch and looks great on the plate. Serve your noodles hot to enjoy all the flavors! {{image_4}} You can add proteins to your spicy Sriracha noodles for extra flavor and nutrition. Tofu is a great choice for a vegetarian option. Cut firm tofu into small cubes, then sauté it until golden. Add it to the noodles at the end for a satisfying bite. If you like chicken, use thinly sliced breast. Cook it in the skillet before the veggies. Shrimp is another tasty option. Toss it in after the veggies cook. Shrimp only takes a few minutes to cook. This way, you get a quick and hearty meal. Feel free to swap in different vegetables for variety. Zucchini adds a nice crunch. Slice it into thin rounds and add it to the skillet with the bell pepper. Broccoli is another great option. Cut it into small florets and steam it slightly before adding to your dish. This keeps it bright and tender. You can mix and match any veggies you have. Spinach, carrots, or bell peppers work well too. The more colors, the better your dish looks and tastes. Making this dish vegetarian or vegan is easy. Just use vegetable broth instead of chicken broth. You can also swap out the honey or sugar for maple syrup. Many store-bought Sriracha sauces are vegan, but check the label. You want to keep the flavors bold and spicy while ensuring it fits your diet. Try adding more herbs or spices, like basil or cilantro, for extra depth. The main goal is to keep it fresh and flavorful. This dish can fit any diet with simple swaps. For the full recipe, check above. After enjoying your spicy Sriracha noodles, store any leftovers in an airtight container. Make sure to let them cool first. This helps keep the noodles fresh and tasty. Refrigerate them right away. They will stay good for up to three days. If you want to enjoy them later, it’s best to eat them within this time frame. When you’re ready to eat your leftovers, there are a few ways to reheat them. You can use a microwave or a skillet. For the microwave, place the noodles in a bowl. Add a splash of water to keep them moist. Heat them for about 1-2 minutes, stirring halfway through. If you choose the skillet, warm it over medium heat. Add a little oil and toss the noodles until they are hot. This method helps keep the texture nice. You can freeze these noodles if you want to save them for later. First, let them cool completely. Then pack them in a freezer-safe container or bag. Make sure to remove as much air as possible. The noodles can last up to two months in the freezer. When you’re ready to eat, thaw them in the fridge overnight. Reheat as mentioned above. This way, you can enjoy your spicy Sriracha noodles even after some time. For the full recipe, check out the previous section. You can easily make Spicy Sriracha Noodles vegetarian. Just skip any meat or seafood. Use vegetables like bell peppers, snap peas, and carrots. You can also add tofu for extra protein. Tofu soaks up the sauce well and adds a nice texture. Make sure to use soy sauce that is vegetarian to keep it meat-free. These noodles pair well with many sides. You could serve a light salad, like a cucumber salad, for a refreshing crunch. Spring rolls or dumplings also make great sides. You can also try some grilled veggies for a hearty touch. If you want something warm, a bowl of miso soup works wonderfully too. Yes, you can use different types of noodles. Rice noodles are great, but you can try egg noodles or udon noodles too. Each type will bring its own flavor and texture. Just cook them according to the package instructions. For the best results, pick a noodle that absorbs the sauce well. Check the [Full Recipe] for cooking tips. In this blog post, we explored key steps to make delicious spicy Sriracha noodles. We discussed ingredients, including nutritional info and possible swaps. You learned how to cook the noodles and sauté the aromatics for great flavor. Tips helped you achieve the perfect texture and customize spice levels. You can even add proteins or veggies for extra variety. Now, you can enjoy a tasty meal that fits your taste and needs. Happy cooking!](https://joymealplan.com/wp-content/uploads/2025/06/8df2442a-c8e4-418c-8d77-15c525c42243-768x768.webp)
![For this recipe, you will need: - 2 cups zucchini, sliced into rounds - 2 cups mixed bell peppers (red, yellow, and orange), chopped into bite-sized pieces - 1 cup cherry tomatoes, halved - 1 cup red onion, thinly sliced - 3 cloves garlic, minced These fresh vegetables shine when roasted. They bring color and taste to your dish. You can mix any summer vegetables you love. Try eggplant or asparagus for variety. To enhance the taste, gather: - 1 teaspoon dried oregano - 1 teaspoon dried thyme - 1/2 teaspoon smoked paprika - Salt and freshly cracked pepper to taste - Fresh basil leaves for garnish These herbs add depth and aroma. Oregano and thyme pair well with the sweetness of the veggies. Smoked paprika adds a lovely warmth and a hint of smokiness. Fresh basil leaves at the end brighten the dish. For roasting, you want to use the right oil. - 1/4 cup extra-virgin olive oil is my go-to choice. This oil adds richness and helps the veggies crisp up. You can also use avocado oil for a neutral taste. Avoid oils with low smoke points. Besides the herbs mentioned, consider: - A squeeze of fresh lemon juice for brightness - A sprinkle of chili flakes if you like heat These seasonings can lift the dish and make it even more exciting. A little acidity from lemon balances the flavors nicely. Start by washing all your vegetables well. This step removes dirt and pesticides. Next, chop the zucchini into rounds, bell peppers into bite-sized pieces, and halve the cherry tomatoes. Slice the red onion thinly. Then, mince the garlic. In a large bowl, combine all the chopped vegetables. Drizzle the olive oil evenly over the mix. Sprinkle in the dried oregano, dried thyme, smoked paprika, salt, and pepper. Use a large spoon to toss everything together. Make sure each piece gets coated with oil and seasoning. This ensures maximum flavor in every bite. Preheat your oven to 425°F (220°C). This temperature helps the vegetables roast perfectly. Spread your seasoned vegetables in a single layer on a large, rimmed baking sheet. This way, they roast evenly. Place the baking sheet in the oven. Roast the vegetables for about 25-30 minutes. Halfway through, stir the vegetables. This step is key for even cooking. You want them tender and slightly caramelized. Once your vegetables are done, remove them from the oven. Let them cool for a few minutes to enhance the flavors. For a fresh touch, garnish with basil leaves. Serve the roasted vegetables warm. You can place them over a bed of quinoa or alongside grilled chicken. Drizzle with more olive oil, and add extra herbs for a beautiful look. This dish is not only tasty but also healthy and colorful! To pick ripe summer vegetables, look for bright colors and firm textures. Zucchini should feel solid, while bell peppers should have smooth skin. When choosing cherry tomatoes, opt for those that are deep red and plump. For organic versus conventionally grown produce, organic options often have fewer pesticides. They can be a bit pricier but are great if you want to avoid chemicals. If you buy conventionally grown, wash them well to remove any residues. Set your oven to 425°F (220°C). This high heat helps the veggies caramelize. Spread them in a single layer on the baking sheet. Crowding them can make them steam instead of roast. Look for a golden brown color on the edges. This shows they are done. The veggies should be tender when pierced with a fork. Stir halfway through cooking to ensure even roasting, so all sides get that nice flavor. For the full recipe, check out the complete guide on making these vibrant roasted summer vegetables. {{image_4}} You can easily change the vegetables in this recipe. If you have other veggies, use them! Here are some ideas: - Swap zucchini for yellow squash. - Replace bell peppers with carrots or eggplant. - Use broccoli or cauliflower for a crunchy twist. - Try asparagus or green beans for a fresh bite. If you follow a special diet, you can make changes too. For a vegan option, this recipe is already perfect. If you need gluten-free, all ingredients work well. To switch up the flavor, try different spices. Here are some great ideas: - Add cumin for a warm, earthy taste. - Use curry powder for an exotic twist. - Sprinkle chili powder for a bit of heat. - For sweetness, mix in honey or maple syrup. These spices can change the whole meal. You can make it fit any cuisine you love. Enjoy exploring these flavors in your cooking! After you enjoy your roasted summer vegetables, let them cool first. This step helps keep them fresh. Store leftovers in an airtight container. This keeps moisture in and flavors safe. Roasted vegetables can last in the fridge for about 3 to 5 days. Always check for any signs of spoilage before eating. To reheat, use your oven or a skillet. Preheat your oven to 350°F (175°C). Spread the vegetables on a baking sheet and heat for about 10 minutes. This method keeps them crispy. In a skillet, add a splash of oil and heat over medium heat. Stir them gently until they warm up. You can also use leftover roasted vegetables creatively. Toss them in salads for a warm touch. Add them to pasta or grain bowls for more flavor. Mix them into omelets for a delicious breakfast. The options are endless! For the full recipe, check out [Full Recipe]. What are the best vegetables for roasting? The best vegetables for roasting are those that hold their shape and flavor. I love using: - Zucchini - Bell peppers - Cherry tomatoes - Red onion These veggies caramelize well and taste sweet when roasted. Feel free to mix in others like carrots or eggplant for variety. Can roasted vegetables be made ahead of time? Yes, you can make roasted vegetables ahead of time. Just roast them, let them cool, and store them in the fridge. They stay fresh for up to three days. When you’re ready to enjoy them, reheat in the oven for the best taste. How do I make roasted vegetables crispy? To make roasted vegetables crispy, follow these tips: - Spread them out on the baking sheet without crowding. - Use enough olive oil to coat each piece. - Stir halfway through cooking. These steps help achieve that crispy, golden finish. For the full recipe, check out the vibrant roasted summer vegetables recipe. Roasting summer vegetables is simple and rewarding. We learned how to choose fresh produce and seasonings. The blog covered easy step-by-step instructions for prepping and cooking. I shared tips for perfect roasting and ways to store and reheat leftovers. Incorporate these methods to enjoy tasty vegetables all season. Experiment with flavors and have fun. Your meals will shine with roasted veggies!](https://joymealplan.com/wp-content/uploads/2025/07/5b4132f7-a86e-4702-8661-8c8da9db132d-768x768.webp)
