One Pan Lemon Asparagus Chicken Quick and Easy Meal

Looking for a quick and easy meal that bursts with flavor? Try my One Pan Lemon Asparagus Chicken! This delicious dish combines juicy chicken breasts with fresh asparagus and zesty lemons. In just a few simple steps, you’ll create a meal that is both healthy and satisfying. Let’s dive into the ingredients and get cooking! You won’t want to miss out on this easy recipe.
Ingredients
Main Ingredients
– 4 boneless, skinless chicken breasts
– 1 bunch of fresh asparagus, trimmed
– 2 lemons (one for juicing and one sliced for garnish)
Pantry Staples
– 1 tablespoon olive oil
– 1 teaspoon dried oregano
– 1 teaspoon garlic powder
Seasoning Essentials
– Salt and pepper to taste
– Fresh parsley, finely chopped (for garnish)
When I whip up One Pan Lemon Asparagus Chicken, I focus on using fresh, simple ingredients. The chicken breasts provide lean protein, while asparagus adds a bright crunch. Lemons bring a zesty touch that ties everything together.
Keep pantry staples handy, like olive oil and dried oregano. They help create a quick marinade that packs flavor. Garlic powder also plays a key role, adding depth without extra work.
For seasoning, use salt and pepper to enhance the dish. Fresh parsley adds a lovely pop of color and a hint of freshness at the end.
With these ingredients, you can easily prepare a delicious meal that pleases everyone.
Step-by-Step Instructions
Preheat Your Oven
Start by preheating your oven to 400°F (200°C). This step is key for cooking the chicken and asparagus evenly. A hot oven helps the chicken brown nicely and keeps the asparagus crisp.
Marinating the Chicken
In a large bowl, mix together olive oil, juice from one lemon, minced garlic, dried oregano, garlic powder, salt, and pepper. Whisk it until all ingredients blend well. Then, add the chicken breasts. Make sure each piece is coated in the marinade. Cover the bowl and let it sit for about 15 minutes. This time allows the flavors to soak into the chicken.
Preparing the Asparagus and Chicken
While the chicken marinates, get the asparagus ready. Spread the trimmed asparagus on a baking sheet. Drizzle a bit of olive oil on top. Season it with salt and pepper, then toss to coat. After that, place the marinated chicken breasts among the asparagus. Ensure there’s enough space for everything to cook well.
Baking Instructions
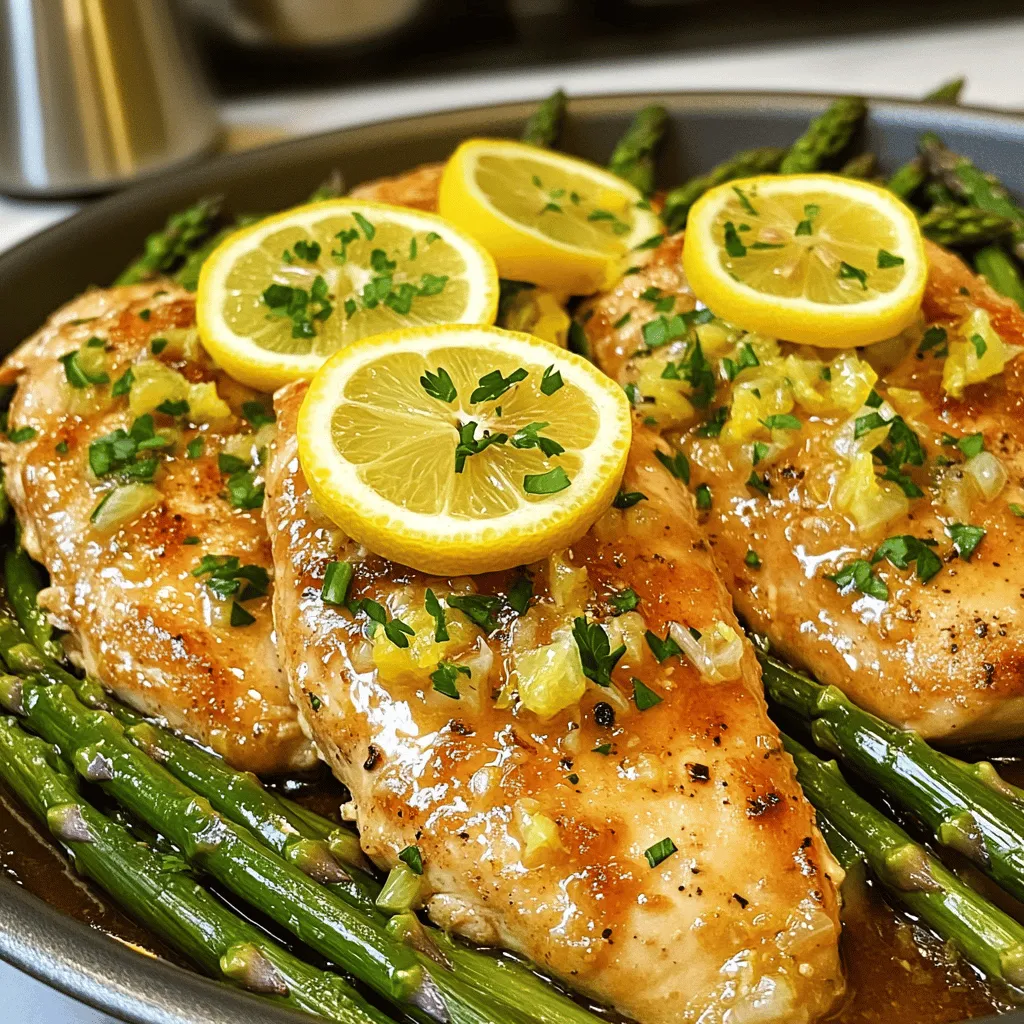
Now, slice the second lemon into rounds. Scatter these slices over the chicken. This adds extra flavor as it bakes. Slide the baking sheet into your preheated oven. Bake for about 25 to 30 minutes. To check for doneness, use a meat thermometer. The chicken should reach 165°F (75°C), and the asparagus should be tender but not mushy. Once done, take it out and let it rest for 5 minutes. This helps the juices settle in the chicken. Before serving, sprinkle with fresh parsley for a bright touch.
Tips & Tricks
Achieving the Best Flavor
Marinating the chicken is key for great taste. I recommend you let the chicken soak for at least 15 minutes. This short wait helps the flavors blend well. The lemon juice adds a bright, zesty taste. For extra zing, use lemon slices. Place these slices on top of the chicken before baking. This lets the juice drip down and infuses the meat with flavor.
Serving Suggestions
For sides, I love pairing this dish with rice or quinoa. The grains soak up the sauce nicely. You can also serve it with a fresh salad or crusty bread. To present the dish, transfer everything to a large platter. Drizzle the pan juices over the chicken and asparagus. This makes your meal look much more inviting and delicious.
Making it Healthier
If you want a lighter meal, try using skinless chicken thighs. They have a bit more fat, but they are still tasty. You can also reduce the olive oil in the marinade. Adding extra veggies boosts the nutrients. Consider bell peppers, zucchini, or cherry tomatoes. Toss them with the asparagus for a colorful plate.

Variations
Different Seasonal Vegetables
You can switch asparagus for other veggies. Try green beans, zucchini, or bell peppers. These choices add color and flavor. Each season brings new veggies. In winter, use Brussels sprouts or carrots. In fall, consider roasted butternut squash. Mix and match for fun tastes.
Combining flavors is key. Add cherry tomatoes for sweetness. Toss in some mushrooms for earthiness. The more colors, the more fun your plate looks. Different veggies can also change the cooking time. Keep an eye on them while baking.
Protein Alternatives
You can use different chicken cuts too. Chicken thighs are juicy and tender. They can add rich flavor to this dish. If you want leaner meat, chicken breasts work great. Both options cook well with lemon and garlic.
For vegetarian alternatives, consider chickpeas or tofu. Both options soak up flavors nicely. You can also use tempeh for a nutty taste. Just make sure to adjust cooking times for these proteins.
Herb and Spice Substitutions
Explore different herbs to change the dish. Thyme adds a savory taste. Rosemary gives a warm, earthy flavor. You can even mix herbs for a unique twist.
Adding spices can boost the dish. A pinch of red pepper flakes adds heat. Cumin or smoked paprika brings depth. Don’t be afraid to experiment with what you love.
Storage Info
Storing Leftovers
To store leftovers, place the chicken and asparagus in an airtight container. Let the dish cool to room temperature before sealing. This helps keep it fresh. I recommend using glass containers for better flavor retention. Store in the fridge for up to three days.
Reheating Instructions
When it’s time to eat, reheating is key. You can use the oven or microwave. For the oven, preheat to 350°F (175°C). Place your dish in an oven-safe pan and cover it with foil. This keeps moisture in. Heat for about 15 minutes or until warm. If you use the microwave, heat in short bursts of one minute. Stir in between to avoid hot spots.
Freezing the Dish
If you want to freeze it, let it cool first. Place the chicken and asparagus in a freezer-safe bag. Remove as much air as you can to prevent freezer burn. You can freeze it for up to three months. To thaw, move it to the fridge overnight. This keeps the texture nice. Reheat as mentioned above for the best results. Enjoy your tasty meal anytime!
FAQs
How long does it take to cook chicken in the oven?
Cooking chicken in the oven usually takes 25 to 30 minutes. For best results, set your oven to 400°F (200°C). Check the chicken’s internal temperature. It should reach 165°F (75°C) to be safe to eat. Always use a meat thermometer for accuracy.
Can I make this dish ahead of time?
Yes, you can prepare this dish ahead. Marinate the chicken and store it in the fridge for up to 24 hours. This helps the flavors soak in. You can also chop the asparagus a day before. Just keep it in a sealed bag. On cooking day, spread the chicken and asparagus on the baking sheet. Bake when ready.
What should I serve with One Pan Lemon Asparagus Chicken?
This dish pairs well with many sides. Consider serving it with rice or quinoa for a hearty meal. A fresh salad can add crunch and balance. Garlic bread complements the flavors nicely, too. Try roasted potatoes for a filling side. Each option enhances your One Pan Lemon Asparagus Chicken.
This blog post covers a simple yet delightful recipe for One Pan Lemon Asparagus Chicken. We discussed essential ingredients, like chicken and asparagus, and pantry staples you likely have. The step-by-step instructions make cooking stress-free, while tips enhance flavor and presentation. You can easily experiment with different vegetables and proteins, adding your personal touch. Storing leftovers properly helps maintain taste. With this guide, you can create a tasty meal that impresses. Enjoy cooking and sharing this dish with family and friends!


![To make Easy Chicken Tikka Masala, gather these key ingredients: - 500g boneless chicken thighs, cut into bite-sized pieces - 1 cup plain yogurt - 2 tablespoons garam masala - 1 tablespoon ground cumin - 1 teaspoon ground coriander - 1 teaspoon paprika - 1 teaspoon turmeric - 1 tablespoon ginger, minced - 3 cloves garlic, minced - 1 onion, finely chopped - 1 can (400g) crushed tomatoes - 1 cup coconut milk - 2 tablespoons vegetable oil - Salt to taste - Fresh cilantro for garnish These ingredients create a rich, creamy sauce that brings the dish to life. The yogurt is key for tender chicken. The spices add depth and warmth, making every bite flavorful. You can customize your Chicken Tikka Masala with these optional ingredients: - Lemon juice for brightness - Green chili for heat - Bell peppers for crunch - Peas for color Adding these extras can change the flavor profile and make it your own. Feel free to mix and match based on your taste. If you have allergies, there are simple swaps you can use: - Use almond or soy yogurt instead of dairy yogurt. - Swap coconut milk for almond milk for a nut-free option. - Replace chicken with tofu or chickpeas for a vegan dish. These substitutions keep the dish delicious while catering to your dietary needs. Enjoy your cooking adventure! For the complete recipe, check out the Full Recipe link. First, grab a large bowl. Mix 1 cup of plain yogurt, 2 tablespoons of garam masala, 1 tablespoon of ground cumin, 1 teaspoon of ground coriander, 1 teaspoon of paprika, 1 teaspoon of turmeric, 1 tablespoon of minced ginger, 3 cloves of minced garlic, and a pinch of salt. Stir well until it’s smooth. Now, add 500g of bite-sized chicken thighs. Make sure each piece is coated well with the marinade. Cover the bowl with plastic wrap. Pop it in the fridge for at least 30 minutes. For the best taste, let it sit overnight. Next, heat 2 tablespoons of vegetable oil in a large skillet over medium-high heat. Once hot, add 1 finely chopped onion. Cook the onion for 5-7 minutes. You want it to turn golden brown and soft. This step adds a sweet flavor. After the onion is ready, add the marinated chicken. Cook it for about 8-10 minutes. Stir it occasionally to brown all sides evenly. Once the chicken is browned, it’s time to add more flavor. Pour in 1 can of crushed tomatoes. Stir gently to mix everything. Bring the mixture to a gentle simmer. Let it simmer for about 10 minutes. Stir it now and then to stop it from sticking. After that, slowly pour in 1 cup of coconut milk. Stir again to combine. Simmer for another 10 minutes. This makes the sauce thick and creamy. Taste and add more salt if needed. Finish by garnishing with fresh cilantro for a pop of color and taste. To get the best flavor in your Chicken Tikka Masala, start with fresh spices. Fresh spices give a robust taste that dried spices lack. Use whole spices when possible, and grind them yourself. This step unleashes their natural oils and aromas. Another key is the yogurt marinade. It adds tenderness and tang. Marinate your chicken for at least 30 minutes, but overnight is best. This waiting time allows the spices to soak in fully. For perfect chicken, cook it in batches. Overcrowding the pan steams the meat instead of browning it. Use medium-high heat to get a nice sear on the chicken. This creates a deep flavor that you want. Once you add the crushed tomatoes and coconut milk, let it simmer gently. This step helps the flavors meld together beautifully. You can make Chicken Tikka Masala ahead of time. Cook it fully, then let it cool. Store it in an airtight container in the fridge for up to three days. Reheat it on low heat, adding a splash of water if needed. This dish also freezes well. Portion it out and freeze it for up to three months. When you're ready, thaw it overnight in the fridge and reheat. For more details, check the Full Recipe. {{image_4}} You can easily make a vegetarian version of Chicken Tikka Masala. Replace the chicken with firm tofu or vegetables like bell peppers and zucchini. Tofu soaks up flavors well. Marinate it the same way as chicken. Cook it in the same sauce for that rich taste. This way, you keep the essence of the dish while making it meat-free. If you enjoy spicy food, add some heat to your Chicken Tikka Masala. You can include chopped green chilies or a pinch of cayenne pepper in the marinade. Adjust the spice level to your liking. Just remember, a little heat goes a long way! You can also serve it with a side of spicy chutney for an extra kick. You can swap chicken for other proteins too. Paneer, a fresh cheese, works great in this dish. Cut the paneer into cubes and marinate it just like the chicken. Cook it in the same way for a rich and creamy meal. Tofu and paneer both add their own unique texture and flavor to the dish. This makes it more exciting and diverse for your taste buds. For the complete recipe, check out the [Full Recipe]. To keep your Chicken Tikka Masala fresh, let it cool down first. Use an airtight container for storage. Place it in the fridge. It will stay good for about three to four days. For best results, store it without the rice or naan. To enjoy your Chicken Tikka Masala again, use the stove or microwave. If using the stove, heat it over low heat. Stir often to prevent sticking. If using the microwave, cover the dish and heat in short bursts. This way, it warms evenly. Always check the temperature to ensure it is hot throughout. You can freeze Chicken Tikka Masala if you want to save some for later. Place it in a freezer-safe container or bag. Make sure to leave some space for expansion. It can stay good for up to three months. When you’re ready to eat, thaw it in the fridge overnight. Reheat it on the stove or microwave, and enjoy this rich flavor again! For the full recipe, check the section above. You should marinate chicken for at least 30 minutes. For the best taste, let it sit overnight. This allows the spices to soak in deeply. The yogurt keeps the chicken tender while adding flavor. Yes, you can use bone-in chicken. It will add more flavor to your dish. Just be aware that it may take longer to cook. Adjust your cooking time to ensure the chicken is fully cooked. Serve Chicken Tikka Masala with fluffy basmati rice or warm naan. Both options soak up the rich sauce well. You can also add a side of cucumber salad for a fresh crunch. For the complete recipe, check out the Full Recipe section. You’ll find all the steps to make this rich, flavorful dish in no time! In this post, we covered the key ingredients for easy Chicken Tikka Masala, from marinade to sauce. I shared tips for perfect flavor and cooking techniques. You can even explore vegetarian options or different proteins like tofu. Storing leftovers properly ensures you enjoy this dish later. Remember, marinating the chicken is key, and you can customize it to your taste. With these steps, you’ll cook a delicious meal that’s sure to impress!](https://joymealplan.com/wp-content/uploads/2025/07/18c11e8b-b17f-4eb1-983f-851954d1111b-768x768.webp)

![- 4 large bell peppers (any color of your choice) - 1 cup quinoa, thoroughly rinsed - 2 cups vegetable broth - 1 can (15 oz) black beans, drained and rinsed - 1 cup corn kernels - 1 small red onion, finely chopped - 2 cloves garlic, minced - 1 teaspoon ground cumin - 1 teaspoon smoked paprika - 1 teaspoon chili powder - Salt and freshly cracked black pepper, to taste - 1 cup diced tomatoes - 1 cup shredded cheese - Fresh cilantro or parsley for garnish This recipe is full of vibrant colors and flavors. The bell peppers add sweetness and crunch. Quinoa provides protein, making it a healthy meal choice. I love using black beans for their creaminess and fiber. Corn adds a nice sweetness and texture too. You can choose any color of bell pepper you like. Each color brings a unique taste. Red, yellow, and green all work well. The quinoa must be rinsed to remove saponin, a bitter coating. This step makes the quinoa taste better. Using vegetable broth instead of water boosts flavor. The spices, like cumin and smoked paprika, add warmth and depth. Garlic and onion give a great base flavor. Don't forget to adjust salt and pepper to your taste. I recommend adding cheese on top for a nice finish. It melts beautifully and adds richness. You can use cheddar or a Mexican blend, based on your preference. For a pop of color, garnish with fresh cilantro or parsley. For the complete recipe, check out the [Full Recipe]. - Preheat your oven to 375°F (190°C). - Slice the tops off four large bell peppers. Remove the seeds and membranes. - Stand the peppers upright in a baking dish. This keeps them stable while cooking. - In a saucepan, add one cup of rinsed quinoa and two cups of vegetable broth. - Bring the mixture to a boil over medium heat. - Once boiling, lower the heat and cover the pot. Simmer for about 15 minutes. - Fluff the quinoa with a fork when it’s done. - In a large bowl, combine the cooked quinoa with one can of black beans, one cup of corn, and one small chopped red onion. - Add two minced garlic cloves, one teaspoon of cumin, smoked paprika, and chili powder. - Season with salt and pepper to taste. - Fold in one cup of diced tomatoes before stuffing the peppers. - Carefully spoon the quinoa mixture into each pepper. Pack it down gently. - Top each stuffed pepper with one cup of shredded cheese. - Cover the dish with aluminum foil to keep the moisture in. - Place the covered dish in the preheated oven. Bake for 25 to 30 minutes. - Remove the foil and bake for another 10-15 minutes until the cheese is golden. This recipe brings together flavors and nutrition in a fun way. You’ll enjoy the vibrant colors and tastes! For the complete recipe, check out the Full Recipe. To get the best quinoa, start by rinsing it well. This removes any bitter coating. Use a fine mesh strainer for this step. Next, combine one part quinoa with two parts vegetable broth. This adds flavor. Cook on medium heat until it boils, then lower the heat and cover. Let it simmer for about 15 minutes. The quinoa should be fluffy and all the liquid gone. Spices make a big difference. I love adding ground cumin, smoked paprika, and chili powder for warmth. You can also mix in fresh herbs like cilantro or parsley for freshness. If you want more kick, add chopped jalapeños. Olives give a nice briny taste too. Feel free to get creative with your flavors! Make your dish pop! Serve the stuffed peppers on a bed of fresh greens. This adds color and crunch. You can sprinkle extra cheese on top before serving. A squeeze of lime over the peppers brightens the dish. Consider drizzling with a creamy sauce, like ranch or yogurt, for added richness. For the full recipe, check the details above. {{image_4}} You can make quinoa stuffed peppers vegan by swapping out cheese and broth. Use a plant-based cheese or skip it entirely. For broth, substitute with water or vegetable stock. Add more flavor by mixing in nutritional yeast. For protein, try lentils or chickpeas. Add veggies like spinach, kale, or mushrooms for extra nutrients. Quinoa isn't your only option. You can use rice or couscous. Both grains offer a nice texture. If you want to add meat, chicken, turkey, or even crumbled tofu work great. Just cook the proteins before mixing them into the filling. You can also add diced olives or sun-dried tomatoes for a flavor boost. Feel free to experiment with various pepper types. Bell peppers are common, but try poblano or jalapeño for a kick. Sweet peppers make the dish mild, while spicy peppers add heat. Using different sizes can change your serving style. Smaller peppers can be appetizers, while larger ones can be main dishes. To store your quinoa stuffed peppers after cooking, let them cool first. Place them in an airtight container. This keeps them fresh and tasty. You can store them in the fridge for up to four days. If you want to enjoy them later, be sure to keep the peppers whole. This helps them stay moist. If you want to freeze your stuffed peppers, wrap each one in plastic wrap. Then, place them in a freezer-safe bag or container. This method helps prevent freezer burn. You can freeze them for up to three months. When you are ready to eat, take them out and thaw them overnight in the fridge. Reheat them in the oven at 350°F (175°C) for about 20-25 minutes. This keeps the peppers nice and warm. You can also microwave them for faster results but be careful not to overcook. Enjoy your meal with a burst of flavor! For the full recipe, check out the earlier sections. Yes, you can prepare quinoa stuffed peppers ahead. Cook the quinoa and mix it with the other ingredients. You can stuff the peppers and store them in the fridge for up to 24 hours. If you want, you can bake them later. This saves time on busy days. Look for a few signs. The peppers should be tender but still firm. The filling inside should be hot and bubbly. The cheese on top should melt and turn golden brown. These are good signs your stuffed peppers are ready to enjoy. Yes, you can use other grains. Brown rice, couscous, or farro work well. Each grain has its own cooking time. For brown rice, cook it for about 40-45 minutes. Couscous cooks quickly in about 5 minutes. Adjust cooking times based on the grain you choose. I suggest a few side dishes. A simple salad with mixed greens adds freshness. You can also serve rice or a grain like quinoa on the side. If you want a warm side, consider roasted veggies. These pair well with the stuffed peppers and add color to your plate. Absolutely! This recipe uses quinoa, which is gluten-free. The other ingredients, like beans and veggies, are also gluten-free. Just make sure to check labels on canned goods. This helps ensure no gluten sneaks in. Enjoy this healthy meal worry-free! Quinoa stuffed peppers offer a balanced meal using simple, fresh ingredients. We explored the preparation, cooking tips, and variations. Remember to rinse your quinoa for the best flavor and texture. You can easily adjust the recipe for different diets or flavor profiles. Feel free to experiment with other grains or proteins. Enjoy these tasty peppers now or save some for later. Your kitchen adventures can lead to satisfying meals that everyone loves.](https://joymealplan.com/wp-content/uploads/2025/06/105cb204-6c23-4ed0-80a6-bb54efeb7f27-768x768.webp)

