Savory BLT Pasta Salad Fresh and Flavorful Recipe
![For a tasty BLT pasta salad, you need a few key ingredients. Here’s what you will use: - 8 oz fusilli pasta - 1 cup cherry tomatoes, halved - 1 cup fresh spinach, roughly chopped - 1 cup cooked turkey bacon, finely chopped - 1/2 cup red onion, diced These ingredients give your salad great flavor and texture. The fusilli pasta holds dressing well. Cherry tomatoes add a burst of sweetness. Fresh spinach adds color and nutrients. Turkey bacon gives a nice crunch. Now, let’s talk about the dressing. The right seasoning makes a big difference. Here’s what you need: - 1/2 cup mayonnaise - 2 tablespoons Greek yogurt - 1 tablespoon apple cider vinegar - 1 teaspoon garlic powder - Salt and black pepper to taste This creamy dressing balances the salad. Mayonnaise and yogurt add richness. Apple cider vinegar brings a tangy touch. Garlic powder enhances the flavors, while salt and pepper season everything just right. To make your salad even better, you can add some fun toppings. Consider these options: - Fresh basil leaves, for garnish Basil adds a fresh aroma and flavor. You can also use extra cherry tomatoes or some nuts for crunch. These extras can make your dish more colorful and appealing. For the full recipe, check out the details to create this delightful dish! To start, bring a large pot of salted water to a boil. The salt helps add flavor to the pasta. Add 8 oz of fusilli pasta to the pot. Cook it according to the package instructions. You want it to be al dente, which means it should be firm but not hard. This usually takes around 8 to 10 minutes. Once the pasta is done, drain it in a colander. Rinse it under cold water to stop the cooking. This step cools the pasta down and helps it not stick together. In a large mixing bowl, combine the cooled pasta with the salad ingredients. Add 1 cup of halved cherry tomatoes and 1 cup of roughly chopped fresh spinach. Then, mix in 1 cup of finely chopped cooked turkey bacon and 1/2 cup of diced red onion. Gently stir everything together until well mixed. This will create a colorful and tasty base for your salad. Now, it’s time to make the dressing. In a separate bowl, whisk together 1/2 cup of mayonnaise, 2 tablespoons of Greek yogurt, and 1 tablespoon of apple cider vinegar. Then, add 1 teaspoon of garlic powder along with salt and black pepper to taste. Mix until the dressing is smooth and creamy. This dressing adds richness and flavor to your salad. Pour it over the pasta mixture and carefully fold it in. Make sure every bite gets some dressing. Taste your salad and adjust the seasoning if needed. Cover the bowl and refrigerate for at least 30 minutes. This will help the flavors blend nicely. You can find the full recipe at [Full Recipe]. To cook pasta just right, start with a large pot. Fill it with water and add salt. The salt gives flavor to the pasta. Bring the water to a boil before adding your fusilli. Stir the pasta right away to prevent sticking. Cook it according to the package time until it's al dente, which means firm but not hard. After cooking, drain the pasta and rinse it under cold water. This stops the cooking and cools it down for the salad. To make your salad burst with flavor, use fresh herbs. Fresh basil works great, adding a sweet and peppery taste. You can also try adding a pinch of crushed red pepper for heat. Garlic powder gives a nice depth, but fresh garlic can add a sharper taste. Don’t forget to taste your salad as you season. This way, you can adjust the flavors to your liking. Making your salad ahead of time is smart. It allows the flavors to mix well. I suggest making it at least 30 minutes before serving. Just cover the bowl and chill it in the fridge. If you want to prep even earlier, you can cook the pasta and chop the veggies a day ahead. Keep the dressing separate until you’re ready to serve. This keeps everything fresh and crunchy. For the full recipe, check out the detailed instructions. {{image_4}} You can make simple swaps to boost nutrition. Use whole wheat pasta instead of regular. This adds fiber and keeps you full longer. Try Greek yogurt in place of mayonnaise for a lighter dressing. You can also add more fresh veggies, like bell peppers or cucumbers, for extra crunch and vitamins. To make this salad vegan, swap turkey bacon for tempeh or crispy chickpeas. Both options give great flavor and texture. Use vegan mayonnaise for the dressing. You can also add avocado for creaminess and healthy fats. This keeps the salad rich and satisfying without animal products. Adding ingredients can make your salad more exciting. Toss in fresh herbs like parsley or chives for brightness. You could also add nuts, like walnuts or pine nuts, for a crunchy bite. Cheese lovers can sprinkle in feta or goat cheese for a tangy twist. These additions elevate the taste and make each bite special. For the full recipe, check out the complete guide. After making your BLT pasta salad, let it cool. Transfer it to an airtight container. Cover it tightly to keep air out. This helps maintain freshness. Place it in the fridge right away. Avoid leaving it out for too long. Your pasta salad will stay fresh for about three days. After that, it may lose its flavor and texture. Check for any signs of spoilage. If it smells off or looks strange, it’s best to toss it. Freezing BLT pasta salad is not recommended. The creamy dressing can separate when thawed. The texture of pasta and veggies may change, too. If you want to save it, consider freezing the pasta and dressing separately. This way, you can enjoy fresh flavors when you reassemble it. For the full recipe, check out the details provided above. Fusilli pasta works great for this salad. Its spiral shape holds the dressing well. You can also use rotini or penne if you prefer. Both types add texture to the dish. Choose any pasta that you enjoy. Just make sure it's cooked al dente for the best bite. Yes, you can use regular bacon. It will add a rich flavor to your salad. Just cook it until crispy and chop it finely. However, turkey bacon is a lighter option. It keeps the salad healthier without losing taste. To make this salad gluten-free, use gluten-free pasta. Many brands offer great options made from rice or quinoa. Always check the label to ensure it's certified gluten-free. This way, everyone can enjoy the dish without worry. Serve this salad chilled as a side dish. It pairs well with grilled meats or sandwiches. You can also enjoy it as a light main dish. For a fun twist, serve it in lettuce cups or avocado halves for added crunch. Absolutely! This salad tastes even better after chilling. You can prepare it up to a day ahead. Just store it in the fridge until ready to serve. The flavors will blend nicely, making each bite delicious. Store any leftovers in an airtight container. Keep it in the fridge for up to three days. If it seems dry, add a bit more dressing before eating. This will help refresh the flavor and texture. For the full recipe, check out the details above! This post covers all you need for making a tasty BLT pasta salad. We explored the key ingredients, step-by-step cooking, and helpful tips. You learned about variations and storage methods to keep your salad fresh. Enjoy your own twist on this dish. Whether you want to make it healthier or add more flavor, the options are yours. Now, gather your ingredients and have fun cooking!](https://joymealplan.com/wp-content/uploads/2025/07/ece4661f-932b-46ab-84ac-afef4fdb42e9.webp)
Looking for a quick and tasty dish that balances savory and fresh? My Savory BLT Pasta Salad is just what you need! This recipe combines the classic flavors of a BLT sandwich with pasta for a satisfying meal. With simple ingredients and an easy-to-follow guide, you’ll impress friends and family in no time. Ready to get cooking? Let’s dive into the delicious details!
Ingredients
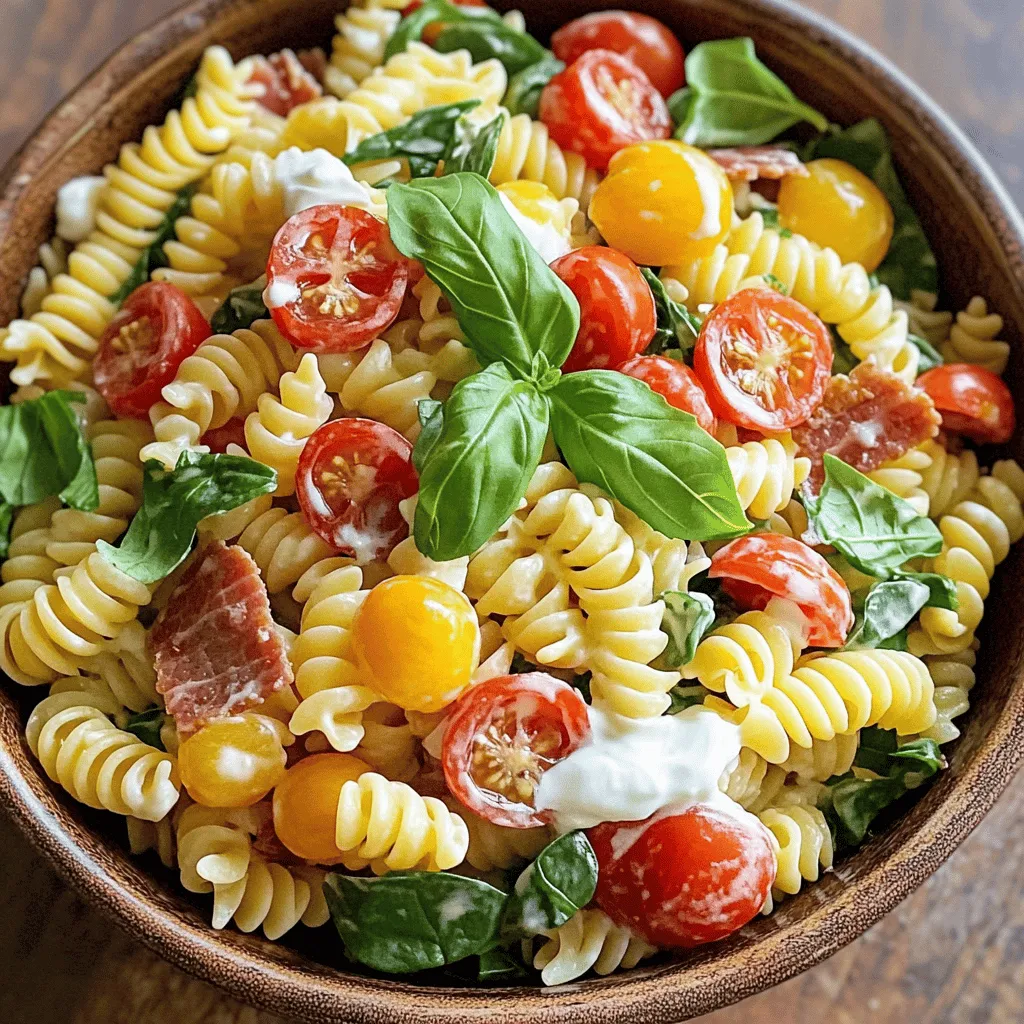
Main Ingredients for BLT Pasta Salad
For a tasty BLT pasta salad, you need a few key ingredients. Here’s what you will use:
– 8 oz fusilli pasta
– 1 cup cherry tomatoes, halved
– 1 cup fresh spinach, roughly chopped
– 1 cup cooked turkey bacon, finely chopped
– 1/2 cup red onion, diced
These ingredients give your salad great flavor and texture. The fusilli pasta holds dressing well. Cherry tomatoes add a burst of sweetness. Fresh spinach adds color and nutrients. Turkey bacon gives a nice crunch.
Seasoning and Dressing Components
Now, let’s talk about the dressing. The right seasoning makes a big difference. Here’s what you need:
– 1/2 cup mayonnaise
– 2 tablespoons Greek yogurt
– 1 tablespoon apple cider vinegar
– 1 teaspoon garlic powder
– Salt and black pepper to taste
This creamy dressing balances the salad. Mayonnaise and yogurt add richness. Apple cider vinegar brings a tangy touch. Garlic powder enhances the flavors, while salt and pepper season everything just right.
Optional Toppings and Garnishes
To make your salad even better, you can add some fun toppings. Consider these options:
– Fresh basil leaves, for garnish
Basil adds a fresh aroma and flavor. You can also use extra cherry tomatoes or some nuts for crunch. These extras can make your dish more colorful and appealing.
Step-by-Step Instructions
Cooking the Pasta
To start, bring a large pot of salted water to a boil. The salt helps add flavor to the pasta. Add 8 oz of fusilli pasta to the pot. Cook it according to the package instructions. You want it to be al dente, which means it should be firm but not hard. This usually takes around 8 to 10 minutes. Once the pasta is done, drain it in a colander. Rinse it under cold water to stop the cooking. This step cools the pasta down and helps it not stick together.
Preparing the Salad Mixture
In a large mixing bowl, combine the cooled pasta with the salad ingredients. Add 1 cup of halved cherry tomatoes and 1 cup of roughly chopped fresh spinach. Then, mix in 1 cup of finely chopped cooked turkey bacon and 1/2 cup of diced red onion. Gently stir everything together until well mixed. This will create a colorful and tasty base for your salad.
Making the Creamy Dressing
Now, it’s time to make the dressing. In a separate bowl, whisk together 1/2 cup of mayonnaise, 2 tablespoons of Greek yogurt, and 1 tablespoon of apple cider vinegar. Then, add 1 teaspoon of garlic powder along with salt and black pepper to taste. Mix until the dressing is smooth and creamy. This dressing adds richness and flavor to your salad. Pour it over the pasta mixture and carefully fold it in. Make sure every bite gets some dressing. Taste your salad and adjust the seasoning if needed. Cover the bowl and refrigerate for at least 30 minutes. This will help the flavors blend nicely.
Tips & Tricks
How to Cook Pasta Perfectly
To cook pasta just right, start with a large pot. Fill it with water and add salt. The salt gives flavor to the pasta. Bring the water to a boil before adding your fusilli. Stir the pasta right away to prevent sticking. Cook it according to the package time until it’s al dente, which means firm but not hard. After cooking, drain the pasta and rinse it under cold water. This stops the cooking and cools it down for the salad.
Enhancing Flavor with Herbs and Spices
To make your salad burst with flavor, use fresh herbs. Fresh basil works great, adding a sweet and peppery taste. You can also try adding a pinch of crushed red pepper for heat. Garlic powder gives a nice depth, but fresh garlic can add a sharper taste. Don’t forget to taste your salad as you season. This way, you can adjust the flavors to your liking.
Making Ahead: Tips for Best Results
Making your salad ahead of time is smart. It allows the flavors to mix well. I suggest making it at least 30 minutes before serving. Just cover the bowl and chill it in the fridge. If you want to prep even earlier, you can cook the pasta and chop the veggies a day ahead. Keep the dressing separate until you’re ready to serve. This keeps everything fresh and crunchy.

Variations
Substitutions for Healthier Options
You can make simple swaps to boost nutrition. Use whole wheat pasta instead of regular. This adds fiber and keeps you full longer. Try Greek yogurt in place of mayonnaise for a lighter dressing. You can also add more fresh veggies, like bell peppers or cucumbers, for extra crunch and vitamins.
Vegan or Vegetarian Adaptations
To make this salad vegan, swap turkey bacon for tempeh or crispy chickpeas. Both options give great flavor and texture. Use vegan mayonnaise for the dressing. You can also add avocado for creaminess and healthy fats. This keeps the salad rich and satisfying without animal products.
Adding Extra Ingredients for Texture and Flavor
Adding ingredients can make your salad more exciting. Toss in fresh herbs like parsley or chives for brightness. You could also add nuts, like walnuts or pine nuts, for a crunchy bite. Cheese lovers can sprinkle in feta or goat cheese for a tangy twist. These additions elevate the taste and make each bite special.
Storage Info
Best Practices for Refrigeration
After making your BLT pasta salad, let it cool. Transfer it to an airtight container. Cover it tightly to keep air out. This helps maintain freshness. Place it in the fridge right away. Avoid leaving it out for too long.
How Long Does it Last?
Your pasta salad will stay fresh for about three days. After that, it may lose its flavor and texture. Check for any signs of spoilage. If it smells off or looks strange, it’s best to toss it.
Freezing BLT Pasta Salad: Is it Possible?
Freezing BLT pasta salad is not recommended. The creamy dressing can separate when thawed. The texture of pasta and veggies may change, too. If you want to save it, consider freezing the pasta and dressing separately. This way, you can enjoy fresh flavors when you reassemble it.
FAQs
What type of pasta works best for BLT Pasta Salad?
Fusilli pasta works great for this salad. Its spiral shape holds the dressing well. You can also use rotini or penne if you prefer. Both types add texture to the dish. Choose any pasta that you enjoy. Just make sure it’s cooked al dente for the best bite.
Can I use regular bacon instead of turkey bacon?
Yes, you can use regular bacon. It will add a rich flavor to your salad. Just cook it until crispy and chop it finely. However, turkey bacon is a lighter option. It keeps the salad healthier without losing taste.
How can I make this a gluten-free dish?
To make this salad gluten-free, use gluten-free pasta. Many brands offer great options made from rice or quinoa. Always check the label to ensure it’s certified gluten-free. This way, everyone can enjoy the dish without worry.
What are some serving suggestions for BLT Pasta Salad?
Serve this salad chilled as a side dish. It pairs well with grilled meats or sandwiches. You can also enjoy it as a light main dish. For a fun twist, serve it in lettuce cups or avocado halves for added crunch.
Can I make this recipe in advance?
Absolutely! This salad tastes even better after chilling. You can prepare it up to a day ahead. Just store it in the fridge until ready to serve. The flavors will blend nicely, making each bite delicious.
How do I store leftovers?
Store any leftovers in an airtight container. Keep it in the fridge for up to three days. If it seems dry, add a bit more dressing before eating. This will help refresh the flavor and texture.
This post covers all you need for making a tasty BLT pasta salad. We explored the key ingredients, step-by-step cooking, and helpful tips. You learned about variations and storage methods to keep your salad fresh.
Enjoy your own twist on this dish. Whether you want to make it healthier or add more flavor, the options are yours. Now, gather your ingredients and have fun cooking!
![For a tasty BLT pasta salad, you need a few key ingredients. Here’s what you will use: - 8 oz fusilli pasta - 1 cup cherry tomatoes, halved - 1 cup fresh spinach, roughly chopped - 1 cup cooked turkey bacon, finely chopped - 1/2 cup red onion, diced These ingredients give your salad great flavor and texture. The fusilli pasta holds dressing well. Cherry tomatoes add a burst of sweetness. Fresh spinach adds color and nutrients. Turkey bacon gives a nice crunch. Now, let’s talk about the dressing. The right seasoning makes a big difference. Here’s what you need: - 1/2 cup mayonnaise - 2 tablespoons Greek yogurt - 1 tablespoon apple cider vinegar - 1 teaspoon garlic powder - Salt and black pepper to taste This creamy dressing balances the salad. Mayonnaise and yogurt add richness. Apple cider vinegar brings a tangy touch. Garlic powder enhances the flavors, while salt and pepper season everything just right. To make your salad even better, you can add some fun toppings. Consider these options: - Fresh basil leaves, for garnish Basil adds a fresh aroma and flavor. You can also use extra cherry tomatoes or some nuts for crunch. These extras can make your dish more colorful and appealing. For the full recipe, check out the details to create this delightful dish! To start, bring a large pot of salted water to a boil. The salt helps add flavor to the pasta. Add 8 oz of fusilli pasta to the pot. Cook it according to the package instructions. You want it to be al dente, which means it should be firm but not hard. This usually takes around 8 to 10 minutes. Once the pasta is done, drain it in a colander. Rinse it under cold water to stop the cooking. This step cools the pasta down and helps it not stick together. In a large mixing bowl, combine the cooled pasta with the salad ingredients. Add 1 cup of halved cherry tomatoes and 1 cup of roughly chopped fresh spinach. Then, mix in 1 cup of finely chopped cooked turkey bacon and 1/2 cup of diced red onion. Gently stir everything together until well mixed. This will create a colorful and tasty base for your salad. Now, it’s time to make the dressing. In a separate bowl, whisk together 1/2 cup of mayonnaise, 2 tablespoons of Greek yogurt, and 1 tablespoon of apple cider vinegar. Then, add 1 teaspoon of garlic powder along with salt and black pepper to taste. Mix until the dressing is smooth and creamy. This dressing adds richness and flavor to your salad. Pour it over the pasta mixture and carefully fold it in. Make sure every bite gets some dressing. Taste your salad and adjust the seasoning if needed. Cover the bowl and refrigerate for at least 30 minutes. This will help the flavors blend nicely. You can find the full recipe at [Full Recipe]. To cook pasta just right, start with a large pot. Fill it with water and add salt. The salt gives flavor to the pasta. Bring the water to a boil before adding your fusilli. Stir the pasta right away to prevent sticking. Cook it according to the package time until it's al dente, which means firm but not hard. After cooking, drain the pasta and rinse it under cold water. This stops the cooking and cools it down for the salad. To make your salad burst with flavor, use fresh herbs. Fresh basil works great, adding a sweet and peppery taste. You can also try adding a pinch of crushed red pepper for heat. Garlic powder gives a nice depth, but fresh garlic can add a sharper taste. Don’t forget to taste your salad as you season. This way, you can adjust the flavors to your liking. Making your salad ahead of time is smart. It allows the flavors to mix well. I suggest making it at least 30 minutes before serving. Just cover the bowl and chill it in the fridge. If you want to prep even earlier, you can cook the pasta and chop the veggies a day ahead. Keep the dressing separate until you’re ready to serve. This keeps everything fresh and crunchy. For the full recipe, check out the detailed instructions. {{image_4}} You can make simple swaps to boost nutrition. Use whole wheat pasta instead of regular. This adds fiber and keeps you full longer. Try Greek yogurt in place of mayonnaise for a lighter dressing. You can also add more fresh veggies, like bell peppers or cucumbers, for extra crunch and vitamins. To make this salad vegan, swap turkey bacon for tempeh or crispy chickpeas. Both options give great flavor and texture. Use vegan mayonnaise for the dressing. You can also add avocado for creaminess and healthy fats. This keeps the salad rich and satisfying without animal products. Adding ingredients can make your salad more exciting. Toss in fresh herbs like parsley or chives for brightness. You could also add nuts, like walnuts or pine nuts, for a crunchy bite. Cheese lovers can sprinkle in feta or goat cheese for a tangy twist. These additions elevate the taste and make each bite special. For the full recipe, check out the complete guide. After making your BLT pasta salad, let it cool. Transfer it to an airtight container. Cover it tightly to keep air out. This helps maintain freshness. Place it in the fridge right away. Avoid leaving it out for too long. Your pasta salad will stay fresh for about three days. After that, it may lose its flavor and texture. Check for any signs of spoilage. If it smells off or looks strange, it’s best to toss it. Freezing BLT pasta salad is not recommended. The creamy dressing can separate when thawed. The texture of pasta and veggies may change, too. If you want to save it, consider freezing the pasta and dressing separately. This way, you can enjoy fresh flavors when you reassemble it. For the full recipe, check out the details provided above. Fusilli pasta works great for this salad. Its spiral shape holds the dressing well. You can also use rotini or penne if you prefer. Both types add texture to the dish. Choose any pasta that you enjoy. Just make sure it's cooked al dente for the best bite. Yes, you can use regular bacon. It will add a rich flavor to your salad. Just cook it until crispy and chop it finely. However, turkey bacon is a lighter option. It keeps the salad healthier without losing taste. To make this salad gluten-free, use gluten-free pasta. Many brands offer great options made from rice or quinoa. Always check the label to ensure it's certified gluten-free. This way, everyone can enjoy the dish without worry. Serve this salad chilled as a side dish. It pairs well with grilled meats or sandwiches. You can also enjoy it as a light main dish. For a fun twist, serve it in lettuce cups or avocado halves for added crunch. Absolutely! This salad tastes even better after chilling. You can prepare it up to a day ahead. Just store it in the fridge until ready to serve. The flavors will blend nicely, making each bite delicious. Store any leftovers in an airtight container. Keep it in the fridge for up to three days. If it seems dry, add a bit more dressing before eating. This will help refresh the flavor and texture. For the full recipe, check out the details above! This post covers all you need for making a tasty BLT pasta salad. We explored the key ingredients, step-by-step cooking, and helpful tips. You learned about variations and storage methods to keep your salad fresh. Enjoy your own twist on this dish. Whether you want to make it healthier or add more flavor, the options are yours. Now, gather your ingredients and have fun cooking!](https://joymealplan.com/wp-content/uploads/2025/07/ece4661f-932b-46ab-84ac-afef4fdb42e9-300x300.webp)


 for more details! Start by cooking the rice noodles. Follow the package instructions. Make sure to cook them until they are al dente. This means they should have a slight bite. After cooking, drain the noodles and place them in a large bowl. Set them aside as you prepare the other ingredients. For the best texture, rinse the noodles with cold water. This helps stop the cooking process and keeps them from sticking together. In a large frying pan or wok, heat the vegetable oil over medium heat. First, add the minced garlic and sliced onion. Sauté them for about 2-3 minutes. You want the onion to become translucent and fragrant. Next, add the sliced red bell pepper and julienned carrot. Stir-fry these veggies for about 3-4 minutes. You want them to soften but still have some crunch. This adds great texture to your dish. If you want to use eggs, push the veggie mix to one side of the pan. Crack the eggs into the open space and scramble them. Cook until they are fully set. Once cooked, mix the eggs back into the veggie blend. Now, carefully add the cooked rice noodles to the pan. Gently toss everything together to combine it well. In a small bowl, mix the soy sauce, lime juice, and brown sugar. Pour this sauce over the noodle mixture and stir well. Cook for another 2-3 minutes to let the flavors meld. Finally, add fresh bean sprouts and chopped green onions. Cook for just one more minute. Your Easy Veggie Pad Thai is ready to serve hot, garnished with crushed peanuts and fresh cilantro. Enjoy it with lime wedges on the side for extra flavor! Fresh ingredients make all the difference in Easy Veggie Pad Thai. Use crisp vegetables for the best taste. Look for bright bell peppers, firm carrots, and fresh bean sprouts. The right soy sauce also boosts flavor. I prefer low-sodium soy sauce, which adds depth without too much salt. You can also try tamari for a gluten-free option. Stir-frying is key for this dish. Heat your pan well before adding oil to avoid sticking. Keep the heat high, and don’t overcrowd the pan. This helps all the veggies cook evenly and stay crunchy. Stir-fry each type of veggie separately if you want to control their doneness. Add them back together later for the best texture. How you serve your Pad Thai can make it more fun. Use a large plate or bowl to show off those colorful veggies. You can also layer your ingredients for a nice look. Pair it with spring rolls or a fresh salad to round out the meal. For drinks, a light iced tea or lemonade works great with this dish. For the full recipe, visit the Easy Veggie Pad Thai section. {{image_4}} To make this dish vegan, simply skip the eggs. You can add plant-based proteins instead. Tofu works well and adds great texture. Tempeh is another tasty choice. Both options soak up flavor and make your meal filling. If you don’t have all the ingredients, don’t worry. You can swap in what you have. For example, use zucchini instead of carrots. Snap peas can replace bell peppers. In winter, try adding Brussels sprouts or kale for a seasonal touch. Do you like heat? To make your Pad Thai spicier, add red pepper flakes or Sriracha. Start with a little, then taste as you go. If you prefer a milder dish, reduce the soy sauce. You can also add more lime juice for a zesty flavor without spice. For the full recipe, check out Easy Veggie Pad Thai. To keep your Easy Veggie Pad Thai fresh, let it cool first. Spread it out in a shallow dish. This helps the heat escape quickly. Avoid stacking it in a deep bowl. When it cools to room temperature, cover it tightly. Use plastic wrap or a lid. This keeps it from drying out. In the fridge, your Pad Thai lasts about 3-4 days. Make sure it is in an airtight container. For longer storage, you can freeze it. It stays good for about 1-2 months. To freeze, place it in freezer bags. Remove as much air as possible before sealing. When you're ready to eat, just thaw it overnight in the fridge. When reheating, I recommend using a pan or a wok. This helps keep the noodles from getting mushy. Add a splash of water or soy sauce to keep it moist. Heat on medium, stirring gently. You can also use a microwave, but do it in short bursts. Stir between heating to keep it even. This way, your Easy Veggie Pad Thai stays tasty and enjoyable! Many people make a few mistakes when making Pad Thai. First, overcooking the rice noodles is common. They should be al dente, not mushy. Second, using too much sauce can make the dish too salty. Start with a small amount and taste as you go. Lastly, don’t forget to use fresh vegetables. They add crunch and color, making your dish vibrant and healthy. Yes, you can make Easy Veggie Pad Thai ahead of time. Cook the noodles and veggies, then store them separately. You can mix them with sauce when you are ready to serve. This helps keep everything fresh and tasty. Just reheat in a pan on low heat until warm. You can serve Easy Veggie Pad Thai with many sides. Try spring rolls for a crunchy treat. A light cucumber salad adds freshness. If you want more protein, add tofu or edamame on the side. You can also serve it with a refreshing drink, like iced tea or lemonade. To make Easy Veggie Pad Thai gluten-free, use gluten-free soy sauce. Most rice noodles are gluten-free, but check the package to be sure. This way, everyone can enjoy this tasty dish without worry. Customizing Easy Veggie Pad Thai is easy. If someone doesn’t like a veggie, swap it for one they enjoy. You can also adjust the sauce to suit their taste. Start with less sauce, then add more later. If they don’t want eggs, skip them. This dish is flexible, so everyone can love it! Easy Veggie Pad Thai is a fun and tasty dish. You learned the key ingredients like rice noodles and fresh veggies. We went through the steps to make it right, from cooking noodles to sautéing vegetables. I shared tips to boost flavors and ideas for serving it up. You can even explore variations to suit your taste. In conclusion, this recipe is flexible and simple. You can enjoy it in many ways. Now, it's time to try making your own Easy Veggie Pad Thai!](https://joymealplan.com/wp-content/uploads/2025/07/b6d480dc-093e-4ee9-84ae-64c3c7fdf555-768x768.webp)


