Savory Sweet Potato Black Bean Tacos Easy Recipe

Craving a fun, tasty meal? Let’s make Sweet Potato Black Bean Tacos! This easy recipe is packed with flavor and nutrition. You’ll love how simple it is to prepare these delicious tacos at home. From fresh ingredients to helpful tips, I’ll guide you every step of the way. Whether you’re a taco lover or just want to try something new, this dish is for you. Let’s dive in!
Ingredients
List of Required Ingredients
To make savory sweet potato black bean tacos, gather these ingredients:
– 2 medium sweet potatoes, peeled and diced into 1-inch cubes
– 1 can (15 oz) black beans, thoroughly drained and rinsed
– 1 tablespoon extra-virgin olive oil
– 1 teaspoon ground cumin
– 1 teaspoon chili powder
– 1/2 teaspoon smoked paprika
– Sea salt and freshly cracked black pepper, to taste
– 8 small corn tortillas
– 1 ripe avocado, sliced into thin pieces
– 1/2 cup red cabbage, finely shredded
– Fresh cilantro leaves, for garnish
– Lime wedges, for serving
Ingredient Substitutions
You can swap some ingredients if you need to. Here are a few ideas:
– Use butternut squash instead of sweet potatoes for a different flavor.
– Any canned beans work, like pinto or kidney beans.
– If you don’t have olive oil, try avocado oil or coconut oil.
– For a smoky taste, you can use smoked salt instead of regular salt.
– You can use flour tortillas if corn tortillas are not your favorite.
Nutritional Information Breakdown
These tacos are not just tasty; they are good for you! Here’s a quick look at the nutrition:
– Sweet Potatoes: High in fiber and vitamins A and C.
– Black Beans: Great source of protein and iron.
– Avocado: Packed with healthy fats and potassium.
– Red Cabbage: Rich in antioxidants and vitamins K and C.
Each serving has around 400 calories, making them a healthy meal option. You get a good mix of carbs, protein, and fats in every bite. Enjoy these tacos knowing you are eating well!
Step-by-Step Instructions
Preparation Steps
1. Preheat your oven to 400°F (200°C). This heat helps the sweet potatoes cook well.
2. Peel and cut 2 medium sweet potatoes into 1-inch cubes. Place them in a large bowl.
3. Add 1 tablespoon of olive oil, 1 teaspoon of cumin, 1 teaspoon of chili powder, 1/2 teaspoon of smoked paprika, and salt and pepper to taste.
4. Mix well so the sweet potatoes are evenly coated with oil and spices.
Cooking Procedures
1. Spread the sweet potatoes on a baking sheet in a single layer. This helps them roast evenly.
2. Roast in the oven for 25-30 minutes. Stir halfway through to ensure they brown well.
3. While the sweet potatoes roast, heat 8 small corn tortillas in a dry skillet over medium heat for about 1 minute on each side.
4. Keep the warm tortillas wrapped in a clean towel to stay soft and warm.
5. In another bowl, drain and rinse 1 can of black beans. Lightly mash the beans with a fork, leaving some whole for texture.
Assembly Instructions
1. Once the sweet potatoes are ready, combine them gently with the black beans.
2. Take a warm tortilla and spoon the sweet potato and black bean mixture into the center.
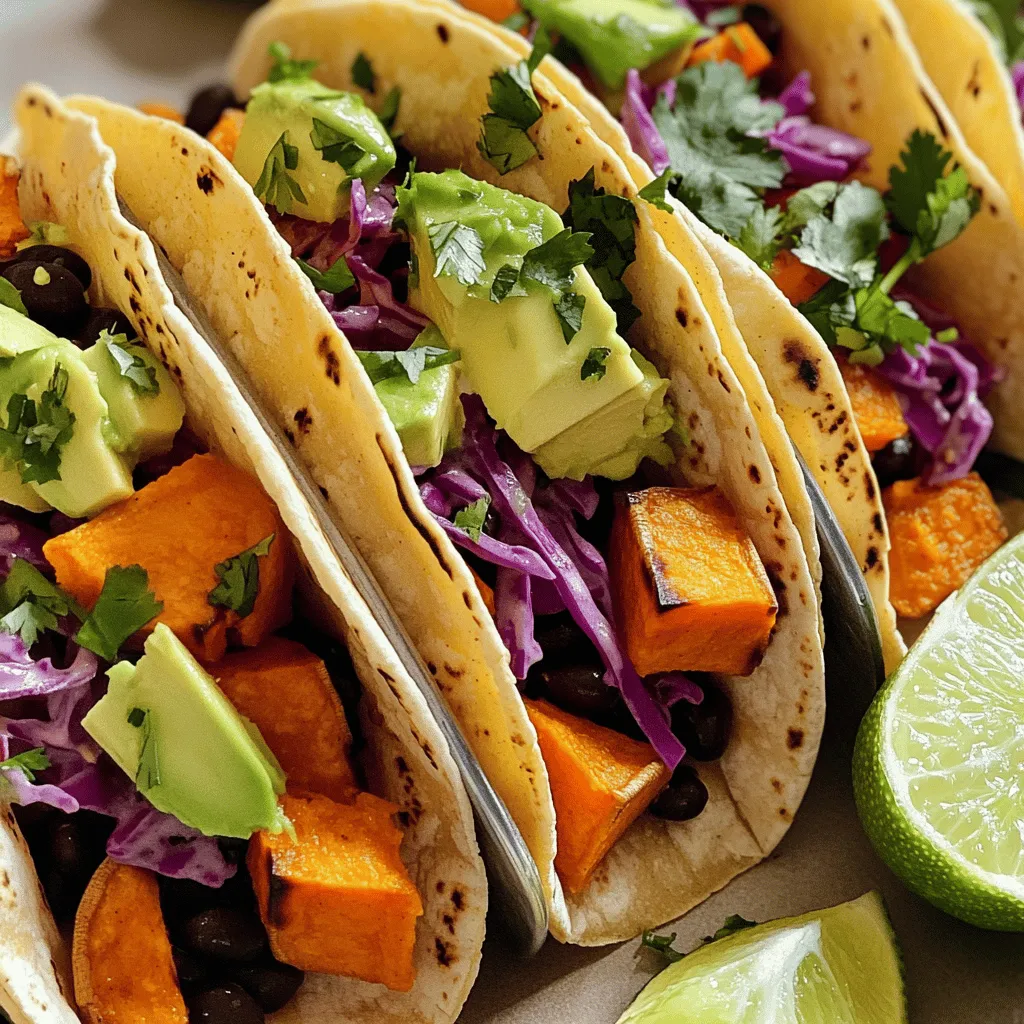
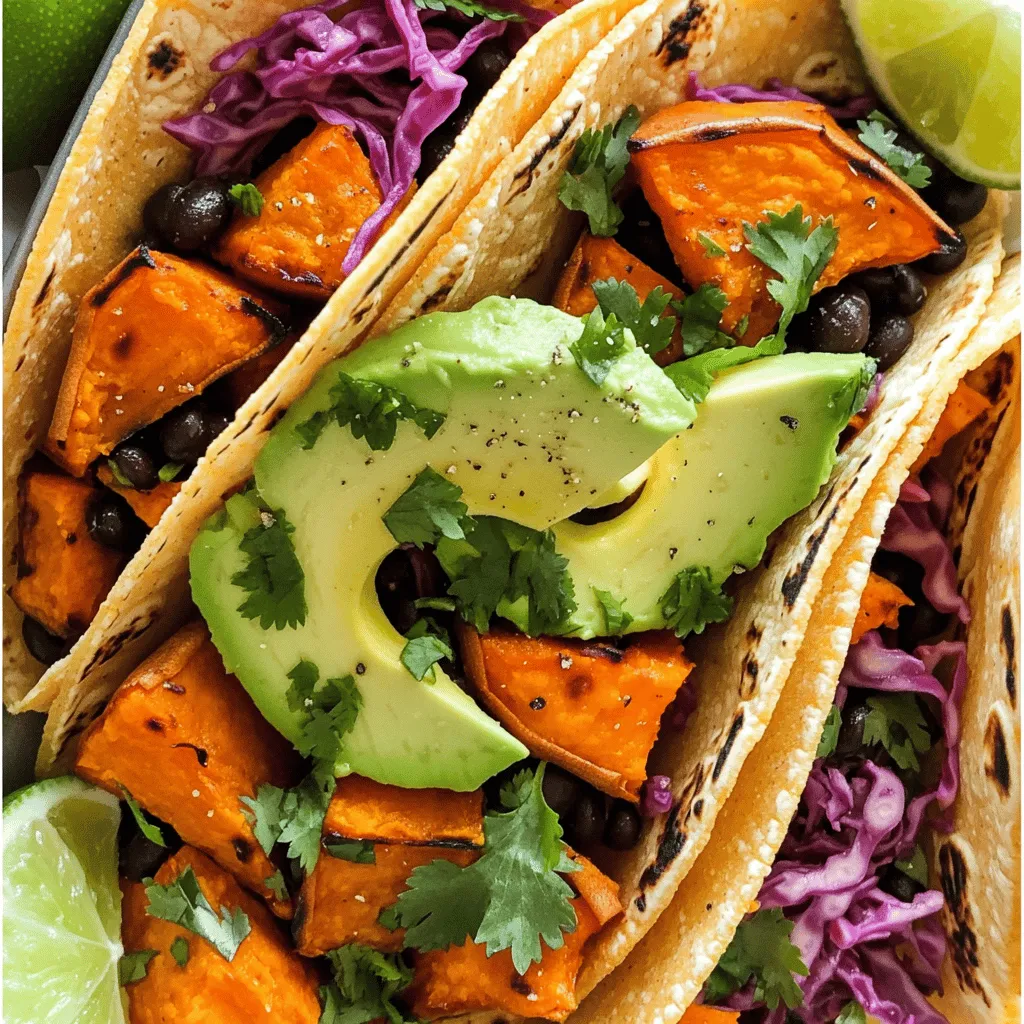
3. Add slices of 1 ripe avocado, a handful of shredded red cabbage, and fresh cilantro leaves on top.
4. Serve the tacos right away with lime wedges on the side for a zesty touch.
Tips & Tricks
Best Practices for Roasting Sweet Potatoes
To get the best sweet potatoes, start by cutting them evenly. This helps them cook at the same time. Use a good amount of olive oil. It adds flavor and helps them brown nicely. Don’t forget the spices! Cumin, chili powder, and smoked paprika bring out the sweet potato’s natural taste. Stir them halfway through cooking to make sure they roast evenly. You want them soft and slightly caramelized for the best flavor.
How to Keep Tortillas Warm
Keeping your tortillas warm is key for tasty tacos. After you warm each tortilla in a skillet, stack them on a plate. Cover the stack with a clean kitchen towel. This keeps them soft and warm until you’re ready to serve. You can also place the covered plate in a low oven if you need to keep them warm for a while.
Flavor Enhancements and Serving Suggestions
Want to make these tacos even better? Try adding some lime juice over the top. It adds a zesty kick that pairs well with the sweet potatoes. You can also add hot sauce for a spicy twist. For crunch, top with finely shredded cabbage or fresh radishes. Fresh cilantro gives a bright flavor and a lovely touch. Serve your tacos on a platter with lime wedges to share.

Variations
Different Protein Additions
You can add different proteins to your sweet potato black bean tacos. For meat lovers, chicken or beef work well. Cook the meat with the same spices you use for the sweet potatoes. This way, you keep the flavors bold and rich. If you want a quick option, try shredded rotisserie chicken. It saves time and still tastes great. For plant-based protein, consider adding quinoa or lentils. Both are nutritious and filling options that blend seamlessly with the sweet potatoes and beans.
Vegan Modifications
These tacos are already vegan-friendly, but you can make a few tweaks for variety. Use a dairy-free yogurt instead of sour cream as a topping. You can also experiment with different plant-based cheeses. A sprinkle of nutritional yeast adds a cheesy flavor without dairy. If you want a kick, add some diced jalapeños or hot sauce to the mix. This gives you an extra layer of flavor without sacrificing your vegan goals.
Alternative Toppings and Sides
The toppings can transform your tacos. Try pickled onions for a zesty bite. They add a nice crunch too. You can also use fresh corn salsa for sweetness and texture. If you love heat, add a drizzle of chipotle sauce. For sides, consider serving with a fresh salad or some roasted veggies. A side of black bean soup complements these tacos perfectly. Explore these options to elevate your meal and impress your guests.
Storage Info
How to Store Leftover Tacos
To keep your tacos fresh, you need to store them right. Place any leftover tacos in an airtight container. If you have extra filling, store it separately. This helps keep the tortillas from getting soggy. You can keep them in the fridge for 2-3 days.
Reheating Instructions
When you’re ready to enjoy your leftover tacos, here’s how to reheat them. If they are in a container, take them out and place them on a plate. Cover with a damp paper towel to keep them moist. Heat in the microwave for 30 to 60 seconds. If you prefer a crispy tortilla, use a skillet. Warm them over medium heat for 1-2 minutes on each side.
Freezing Options
Freezing your sweet potato black bean tacos is easy. First, let the filling cool completely. Then, place it in a freezer-safe bag. Squeeze out the air and seal it tight. You can freeze the filling for up to 3 months. For best results, freeze the tortillas separately. When you want to eat them, let them thaw in the fridge overnight before reheating. This way, you can enjoy your tacos anytime!
FAQs
Can I use other beans instead of black beans?
Yes, you can use other beans. Pinto beans work well too. You might try kidney beans for a different taste. Chickpeas can add a nice texture, too. Each bean brings its unique flavor, so feel free to experiment.
What other vegetables can I add to the tacos?
You can add many veggies to your tacos. Bell peppers add color and crunch. Zucchini or corn can be tasty options. Onions can bring sweetness when cooked. Just chop them small and mix them in with the sweet potatoes.
How can I make these tacos spicier?
To spice up your tacos, add more chili powder. You can also use jalapeños or hot sauce. A sprinkle of cayenne pepper adds heat without altering the flavor. If you like it hot, try chipotle peppers for a smoky kick.
We covered the key ingredients and steps to make delicious tacos. You learned about substitutions and nutritional info, plus how to store and reheat leftovers. Adapting this recipe to your taste is easy with different proteins and toppings. Don’t forget the helpful tips for perfecting your dish. So, gather your ingredients and get cooking. Enjoy your tasty tacos and make them your own!


![- 2 cups cooked brown rice - 1 lb boneless, skinless chicken breast, diced - 1 can (15 oz) black beans, rinsed and drained - 1 cup corn (fresh, frozen, or canned) - 1 ripe avocado, diced - 1/2 cup shredded cheddar cheese - 1 tablespoon taco seasoning - Salt and black pepper to taste - Optional toppings: sour cream, salsa, sliced jalapeños For these Loaded Chicken Burrito Bowls, I focus on simple, fresh ingredients. The brown rice serves as a wholesome base. It adds fiber and nutrients. I choose boneless, skinless chicken breast for lean protein. It cooks up juicy and tender. Black beans bring extra protein and a creamy texture. Rinsing them helps remove excess sodium, making them healthier. Corn adds sweetness and a pop of color. You can use fresh, frozen, or canned, based on your preference. Avocado is a delightful addition. It brings creaminess and healthy fats. The shredded cheddar cheese adds richness and flavor. For seasoning, I use taco seasoning. It gives a bold taste without extra effort. I also add salt and black pepper to enhance the flavors. Toppings are where you can get creative. I suggest sour cream for creaminess. Salsa adds zest, and sliced jalapeños bring heat. Feel free to mix and match as you like. You can find the Full Recipe for all these delicious ingredients and how to prepare them. - Heat olive oil in a skillet over medium heat. - Add diced chicken and season with taco seasoning. First, I heat a tablespoon of olive oil in a skillet over medium heat. I want the oil to shimmer before adding the chicken. Once it’s hot, I toss in the diced chicken breast. I sprinkle it with taco seasoning, along with a pinch of salt and black pepper. I cook this for about 6 to 8 minutes. I stir often to ensure even cooking. The chicken should turn a lovely golden brown and reach an internal temperature of 165°F. - Prepare brown rice according to package instructions. - Fluff rice once cooked. While the chicken cooks, I prepare brown rice. I follow the package instructions closely. This step is key for fluffy rice. Once it’s cooked, I use a fork to fluff the rice. Fluffy rice makes a great base for my burrito bowls. - Mix black beans, corn, and tomatoes in a bowl. - Combine with cooked chicken and layer on rice. Next, I grab a large mixing bowl. I combine the rinsed black beans, corn, and halved cherry tomatoes. I gently toss them together until they mix well. Once the chicken is done, I add it to the bowl. I stir everything together to let the flavors blend. Now it's time to build the burrito bowls! I divide the fluffy brown rice into four serving bowls. I spoon the chicken mixture on top of the rice in each bowl. Next, I add diced avocado, shredded cheese, and fresh cilantro. For a zesty finish, I serve lime wedges on the side. You can also add sour cream or salsa if you want. For the full recipe, check the complete instructions and ingredient list. Enjoy making your loaded chicken burrito bowls! How to ensure chicken is cooked thoroughly To cook chicken safely, use a meat thermometer. The internal temperature should reach 165°F. Cook chicken pieces until they are golden brown and no longer pink inside. This ensures it is juicy and safe to eat. Best practices for fluffy rice For fluffy rice, rinse it well before cooking. This removes extra starch that makes it sticky. Cook it with the right water ratio, usually 2 cups of water for every cup of rice. After cooking, fluff it gently with a fork. This keeps the grains separate and light. Colorful arrangement ideas for the toppings To make your burrito bowls pop, layer the toppings by color. Place bright tomatoes, vibrant corn, and green avocado on top. This adds visual interest. You can also create small sections on the bowl for each topping. This way, each bite looks and tastes amazing. Using garnishes to enhance visual appeal Fresh herbs like cilantro can elevate your dish. Sprinkle them on top for a burst of color. Lime wedges can add a zesty touch. Place them artfully around the bowl for that extra flair. Suggestions for extra spices or ingredients to add To boost the flavor, try adding cumin or smoked paprika. These spices add warmth and depth. You can also mix in jalapeños for heat or lime juice for brightness. Freshly chopped garlic can also add a punch of flavor. Alternative cooking methods for chicken If you want to switch it up, grill or bake the chicken instead of pan-frying. Grilling adds a nice smoky flavor. Baking can keep it tender and juicy. You can marinate the chicken beforehand to infuse even more flavor. For the Full Recipe, check the earlier section for all the details! {{image_4}} You can easily make Loaded Chicken Burrito Bowls vegetarian or vegan. To do this, simply replace the chicken with a plant-based protein. Options include lentils, tempeh, or tofu. For a vegan cheese option, try cashew cheese or nutritional yeast. For gluten-free options, make sure to check your taco seasoning. Some brands add gluten. You can also swap brown rice for quinoa or cauliflower rice. If you like heat, add jalapeños or hot sauce to your bowl. This gives a spicy kick that enhances the flavors. You can also try different beans like pinto or kidney beans. Each type adds a unique taste and texture to your dish. Feel free to adjust your ingredients based on what is in season or what you like best. You can swap corn for bell peppers or zucchini for a fresh twist. For cheese, consider using feta or goat cheese for a different flavor. If you want a creamy topping, try Greek yogurt instead of sour cream. These swaps keep your bowls exciting! For the full recipe, check out the complete details in the recipe section. To keep your loaded chicken burrito bowls fresh, store them in airtight containers. This helps preserve flavor and texture. Place all components in separate containers if possible. This way, the rice, chicken, and toppings stay fresh longer. Generally, leftovers last about 3 to 4 days in the fridge. Make sure to check for any signs of spoilage before eating. If the chicken looks or smells off, it's best to toss it. When reheating, use the microwave for quick warmth. Place the food in a microwave-safe bowl, cover it with a damp paper towel, and heat it in 30-second intervals until warm. This method keeps the rice moist and prevents it from drying out. For the best texture, consider reheating in a skillet. Add a splash of water, cover, and cook on low heat until everything is warmed through. This method helps maintain flavor and texture. To freeze components, let them cool completely first. Portion the rice, chicken, and toppings into freezer-safe containers. Label them with the date. This makes it easy to track freshness. You can freeze cooked chicken and rice for up to 3 months. When ready to eat, thaw them overnight in the fridge. Reheat them as mentioned above to enjoy your delicious meal again. You can add many tasty toppings to your burrito bowls. Here are some great ideas: - Sour cream: Adds creaminess and a tangy flavor. - Salsa: Choose your favorite type, from mild to spicy. - Sliced jalapeños: For some heat and crunch. - Chopped green onions: Adds freshness and color. - Lettuce: A nice crunch and extra nutrients. - Black olives: For a salty, savory touch. - Cheese: Try a different cheese like queso fresco or pepper jack. Mix and match these options to find your favorite combination. Each topping can change the flavor and texture of the dish. Yes, you can prepare Loaded Chicken Burrito Bowls ahead of time. Here are some tips for meal prep: - Cook the chicken and rice: You can cook and store these in separate containers in the fridge. - Prep toppings: Chop your vegetables and store them in airtight containers. - Assemble before serving: When ready to eat, layer the rice, chicken, and toppings in a bowl. This keeps everything fresh. When stored properly, the ingredients can last for about 3 to 4 days in the fridge. You can easily customize your burrito bowls to fit your needs. Here are some tips: - Dietary needs: If you're vegetarian, use beans instead of chicken. For vegan, skip cheese and sour cream. - Flavor preferences: Add different spices or sauces to change the flavor. - Vegetable swaps: Use seasonal vegetables, like bell peppers or zucchini. - Grain choices: Try quinoa, cauliflower rice, or even lettuce wraps instead of brown rice. Get creative and make the dish your own! For the complete ingredients and instructions for Loaded Chicken Burrito Bowls, check out the [Full Recipe]. This post shared how to make tasty Loaded Chicken Burrito Bowls. You learned about main and optional ingredients. I explained step-by-step instructions, helpful tips, and fun variations. You can customize the bowls to your liking and store leftovers easily. Making these burrito bowls is fun and flexible. Enjoy your meal and get creative with flavors. The possibilities are endless, so dive in and make it your own!](https://joymealplan.com/wp-content/uploads/2025/07/a2d38b5a-a8a2-4e80-9f96-ef24cf5264b7-768x768.webp)


![To make a tasty sweet potato hash, gather these simple ingredients: - 2 medium sweet potatoes, peeled and diced into 1/2-inch cubes - 1 red bell pepper, finely diced - 1 green bell pepper, finely diced - 1 small red onion, finely diced - 2 cloves garlic, minced - 1 teaspoon smoked paprika - 1/2 teaspoon ground cumin - Salt and freshly ground black pepper to taste - 3 tablespoons extra-virgin olive oil - 4 large eggs (optional, for serving) - Fresh parsley, chopped (for garnish) Fresh herbs can brighten your hash. Try adding: - Chopped cilantro for a fresh kick - Thyme for an earthy flavor - Chives for a mild onion taste - Oregano for a hint of sweetness Experiment with spices too. You can add chili powder for heat or turmeric for color. Choosing the right cooking oil is key. I recommend: - Extra-virgin olive oil: Rich in healthy fats and flavor. - Avocado oil: Great for high heat and packed with vitamins. - Coconut oil: Adds a unique taste and is good for cooking. Each oil brings its own benefits, making your sweet potato hash even better. For the best result, use extra-virgin olive oil in this recipe. You will love the flavor! For the full recipe, check out the details above. 1. Start by heating 2 tablespoons of olive oil in a large skillet over medium heat. Wait until the oil shimmers. 2. Carefully add the diced sweet potatoes to the skillet. Season them with salt, pepper, smoked paprika, and cumin. Stir to coat the sweet potatoes evenly. 3. Let the sweet potatoes cook for 10-12 minutes. Stir them occasionally. They should soften and turn golden-brown on the edges. 4. Next, add the diced red onion and bell peppers to the skillet. Cook while stirring for another 5-7 minutes. All the veggies should become tender and slightly caramelized. 5. In the last minute, add the minced garlic to the skillet. Stir well and cook until the garlic smells great, about 30 seconds. Taste and adjust seasoning if needed. 6. If you want to add eggs, heat the last tablespoon of olive oil in another pan over medium heat. Cook the eggs to your liking, either fried sunny-side-up or poached. 7. Serve by spooning the sweet potato hash onto plates or bowls. Top with a cooked egg and sprinkle fresh parsley for color. This recipe uses several key cooking techniques: - Sautéing: This method cooks the sweet potatoes and veggies quickly, creating a nice browning effect. - Seasoning: Adding spices like smoked paprika and cumin enhances the flavor. - Layering: Cooking veggies in stages helps build depth in taste and texture. - Garnishing: Adding fresh parsley brightens up the dish visually and adds freshness. - Use medium heat to ensure even cooking. High heat can burn the sweet potatoes. - Stir often, especially after adding the onions and bell peppers. This keeps them from sticking and burning. - Keep an eye on the garlic. It can burn quickly, so add it last. - If you see the veggies getting too dark, lower the heat and add a splash of water to steam them. For more details, check the Full Recipe. To achieve the best texture for your sweet potato hash, follow these tips: - Cut sweet potatoes into even 1/2-inch cubes. This helps them cook evenly. - Pre-cook sweet potatoes in the microwave for 3-4 minutes. This speeds up cooking. - Cook on medium heat. This prevents burning while allowing them to crisp up. - Stir occasionally, so they don’t stick to the pan. This keeps a nice texture. You can elevate the flavors of your sweet potato hash with these ideas: - Add fresh herbs like thyme or rosemary for a burst of freshness. - Include a splash of lime juice or vinegar for extra zing. - Experiment with different spices, like chili powder or turmeric, for warmth. - Top with avocado or feta cheese for creaminess and richness. Avoid these common mistakes for a perfect sweet potato hash: - Don’t overcrowd the skillet. This can lead to steaming instead of browning. - Avoid using old or dry sweet potatoes. Fresh ones yield better flavor and texture. - Don’t skip the seasoning early on. It helps build flavor from the start. - Be careful not to overcook the garlic. It can turn bitter if burned. For the full recipe, check out Savory Sweet Potato Hash . {{image_4}} You can change up your sweet potato hash with many vegetables. Adding spinach gives it a nice green touch. Kale is another great choice; it adds a hearty bite. Try zucchini for a mild taste. You can even toss in some corn for sweetness. Each vegetable adds its own flavor and texture. To make your hash more filling, add protein. Cooked bacon or sausage provides a savory kick. If you want a leaner option, try diced chicken. For a meatless choice, black beans work well. They add protein and a creamy texture. You can even sprinkle feta cheese on top for a salty finish. Making your hash vegan is easy. Simply skip the eggs and use olive oil for cooking. You can also add nutritional yeast for a cheesy flavor. For gluten-free, all the ingredients in the recipe are safe. Just ensure any added condiments are gluten-free. This way, everyone can enjoy your delicious sweet potato hash! For the complete recipe, check out the [Full Recipe]. To keep your sweet potato hash fresh, let it cool first. Place it in an airtight container. Store it in the fridge for up to four days. This keeps the flavors intact. Be sure to label the container with the date. This helps you track how long it has been stored. If you want to save some for later, freezing is a great option. Use a freezer-safe container or bag. Portion it out to make reheating easier. Make sure to squeeze out as much air as possible. This helps prevent freezer burn. Sweet potato hash can freeze well for up to three months. When it’s time to eat your leftovers, reheating is easy. You can use a skillet or microwave. If using a skillet, add a splash of olive oil. Heat it on medium until warmed through. Stir occasionally to avoid sticking. If using a microwave, cover your dish to keep moisture in. Heat in short bursts, stirring in between. This helps keep the flavors fresh and vibrant. For more detailed instructions, check out the Full Recipe. Yes, you can make sweet potato hash in advance. Cook it fully and let it cool. Store it in an airtight container in the fridge. It stays fresh for up to three days. When ready to eat, just reheat it in a skillet. This keeps the flavors intact and makes serving easy. Sweet potato hash is super versatile. You can serve it for breakfast, lunch, or dinner. Top it with fried or poached eggs for a hearty breakfast. Add avocado slices for creaminess. For lunch, pair it with a green salad. You can also serve it as a side dish with grilled chicken or fish. The options are endless! You can customize your sweet potato hash in many fun ways. Try adding different vegetables like zucchini or mushrooms. For a spicy kick, toss in jalapeños. You can mix in cooked sausage or bacon for added flavor. If you prefer a vegan option, skip the eggs and add chickpeas. Use herbs like thyme or cilantro to enhance the taste. Get creative and make it your own! For the full recipe, check out the savory sweet potato hash section. This article covered how to make sweet potato hash. We discussed ingredients, cooking steps, and tips for perfect texture. You learned about variations, storage, and common questions. Each section helps you craft a tasty dish. As you make your hash, remember to experiment with flavors and textures. This dish is versatile and can fit many diets. Enjoy your cooking, and don't hesitate to make it your own!](https://joymealplan.com/wp-content/uploads/2025/06/a9a4856f-e5e6-4dd7-b1d4-7d775511eecc-768x768.webp)