Traditional Mexican Birria Flavorful and Authentic Dish

Are you ready to dive into the world of Traditional Mexican Birria? This flavorful and authentic dish will awaken your taste buds like never before. With its rich blend of spices, tender beef, and warm tortillas, birria is a feast for any occasion. In this guide, I’ll share my expert tips, detailed ingredients, and easy step-by-step instructions to help you create a delicious meal right at home. Let’s explore the art of birria together!
Why I Love This Recipe
- Rich Flavor: The combination of guajillo and ancho chilies creates a deep, complex flavor profile that is simply irresistible.
- Versatile Dish: These tacos can be served with various toppings, allowing everyone to customize their meal to their liking.
- Perfect for Gatherings: This recipe yields enough servings to feed a crowd, making it ideal for parties and family gatherings.
- Comfort Food: The tender, shredded beef wrapped in warm tortillas is the ultimate comfort food that warms the soul.
Ingredients
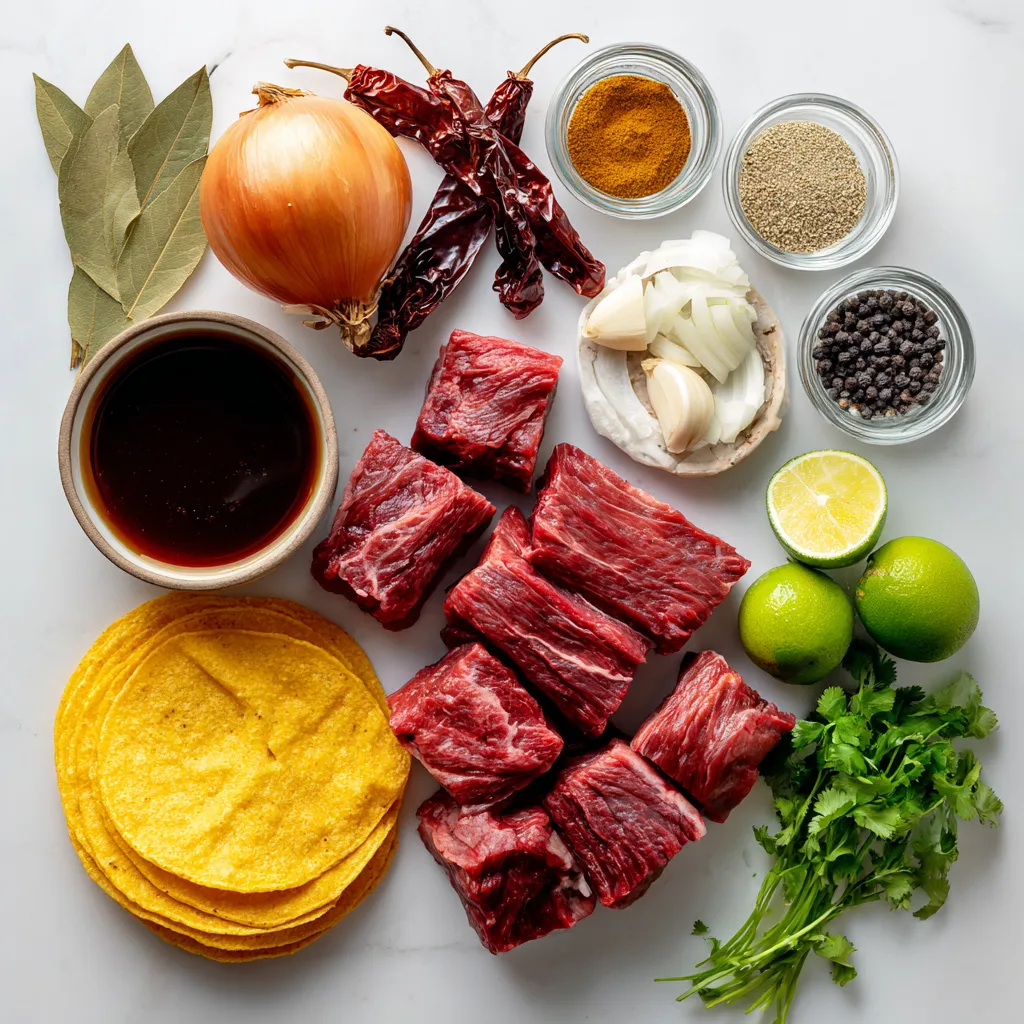
List of Ingredients for Traditional Mexican Birria
– 3 lbs beef chuck roast, cut into 1-2 inch chunks
– 4 dried guajillo chilies, stems and seeds removed
– 2 dried ancho chilies, stems and seeds removed
– 3 cloves garlic, peeled
– 1 medium onion, quartered
– 3 cups beef broth
– 2 teaspoons ground cumin
– 1 teaspoon ground coriander
– 1 teaspoon dried oregano
– 1 teaspoon freshly ground black pepper
– 1 bay leaf
– Salt, to taste
– 12 corn tortillas
– Fresh cilantro, chopped (for garnish)
– Diced onion (for garnish)
– Lime wedges (for serving)
As you gather these ingredients, think about the rich flavors each brings. The beef chuck roast acts as the heart of this dish. It becomes tender and flavorful after simmering for hours. The guajillo and ancho chilies add depth and a mild heat. Garlic and onion build a strong flavor base.
Don’t forget the spices. Ground cumin, coriander, and oregano add warmth and earthiness. The bay leaf enhances the overall taste. Fresh cilantro and diced onion will brighten your tacos. Lime wedges add a zesty touch when you serve.
Using fresh, high-quality ingredients makes a big difference. Each component plays an important role. This ensures your birria tastes just right. Happy cooking!

Step-by-Step Instructions
Preparing the Marinade
– Rehydrate the chilies: First, toast the dried guajillo and ancho chilies. Use a dry skillet over medium heat for about 2-3 minutes. Stir them often. This brings out their flavor. Once fragrant, move the chilies to a bowl. Cover them with hot water and let them sit for 15 minutes until they soften.
– Blend the marinade ingredients: After the chilies soften, drain any excess water. In a blender, combine the chilies, garlic, onion, ground cumin, ground coriander, oregano, black pepper, and 1 cup of beef broth. Blend until smooth and thick. This mixture will be the marinade.
Marinating and Cooking the Beef
– Season and marinate the beef: Take your beef chuck roast and cut it into 1-2 inch chunks. In a large bowl, season the beef with salt. Pour the chili marinade over the beef, making sure each piece is coated well. Cover with plastic wrap or a lid. Place it in the fridge for at least 2 hours, but overnight is best.
– Sear the beef in a pot: Heat a couple of tablespoons of oil in a large pot over medium-high heat. When the oil is hot, add the marinated beef in a single layer. Sear the beef for about 5-7 minutes until browned on all sides.
Long Cook Method
– Simmer the beef until tender: Pour in the remaining beef broth and add a bay leaf. Bring the pot to a boil. Then, reduce the heat to low. Cover the pot and let it simmer for 2-3 hours. The beef should become tender enough to shred easily with a fork.
– Shred the beef and prepare for tacos: After simmering, take the pot off the heat. Remove the beef and shred it using two forks. If you like, strain the liquid to remove solids. You can return the shredded beef to the pot to soak in the broth for more flavor.
Assembling the Tacos
– Toasting tortillas: In a separate skillet, set the heat over medium-high. Lightly toast the corn tortillas for about 30 seconds on each side. This makes them pliable but not too crispy.
– Filling and serving the tacos: Fill each tortilla with a generous amount of the shredded birria. Arrange the tacos on a platter. Garnish with chopped cilantro and diced onions. Add lime wedges on the side for a burst of flavor.
Tips & Tricks
Best Practices for Flavor
– Marination duration tips: Marinate your beef for at least two hours. For the best taste, leave it overnight. This soak lets the spices blend well into the meat.
– Achieving the right roasting texture: Sear the beef on high heat. This step locks in the juices and creates a nice crust. Aim for a golden-brown color on all sides.
Serving Suggestions
– Ideal accompaniments for birria tacos: Serve your tacos with diced onions and fresh cilantro. These add a nice crunch and fresh flavor. Don’t forget lime wedges for a zesty kick!
– Presentation tips for serving: Use a colorful platter to display your tacos. Include a bowl of the rich broth for dipping. Scatter lime wedges and garnishes around for a vibrant look. This makes your dish pop and taste even better!
Pro Tips
- Choose the Right Cut: Opt for well-marbled beef chuck roast for the best flavor and tenderness when shredded.
- Allow for Marination: For maximum flavor, let the beef marinate overnight. This allows the spices to penetrate deeper into the meat.
- Strain for Clarity: Strain the cooking liquid before returning the shredded beef to ensure a smooth, rich broth for dipping.
- Serving Temperature: Serve the tacos hot and the broth warm for an authentic and satisfying experience.

Variations
Different Meats for Birria
You can use different meats for birria. While beef is common, lamb and goat add unique flavors. Chicken is another great option if you prefer poultry. Each meat brings its own taste and texture to the dish. For those who want a meat-free meal, vegetarian adaptations exist. You can use mushrooms or jackfruit to mimic the texture of meat. These options still soak up the rich flavors of the spices and broth.
Regional Variations
Birria varies across Mexico. Each region puts its spin on this dish. In some areas, they serve it as a broth, while in others, it’s more solid. The Jalisco style is famous for its rich broth. People often dip tacos into it for extra flavor. In contrast, other regions might focus on a thicker stew. This adds a different texture to the dining experience. Each version tells a story about its origins and local tastes.
Storage Info
Storing Leftover Birria
To keep leftover birria fresh, use the right methods. First, let it cool down. Place it in an airtight container. Store it in the fridge for up to three days. Make sure to keep the broth with the beef. This keeps the meat moist.
If you want to save it for longer, freezing is a great option. Divide the birria into smaller portions. Use freezer-safe bags or containers. This way, you can thaw only what you need later. Properly stored, it can last for up to three months in the freezer.
Reheating Techniques
Reheating birria needs a gentle touch to keep the flavor. The best way is to use the stove. Place the birria in a pot with some broth. Heat over medium-low heat until warm. Stir occasionally to prevent burning.
For reheating tacos, use a skillet. Heat it on medium heat. Place the tacos in the skillet for a few minutes on each side. This will make them warm and a bit crispy. Enjoy your birria tacos just as delicious as when you first made them!
FAQs
What is Traditional Birria?
Traditional birria is a rich stew from Mexico. It originates from the state of Jalisco. This dish often uses goat, but beef is common too. Birria is more than food; it’s part of celebrations and family gatherings. People enjoy it during holidays and special events. The mix of spices, chilies, and slow cooking makes it unique. Each bite tells a story of culture and tradition.
How to make birria tacos?
To make birria tacos, start with cooked birria. Take a warm corn tortilla and fill it with shredded beef. Add diced onion and chopped cilantro for fresh taste. For a zesty kick, squeeze lime juice over the top. Lastly, serve the tacos with a bowl of the savory broth for dipping. This adds flavor and warmth to every bite.
Can I make birria in a slow cooker?
You can adapt birria for a slow cooker. Begin by following the same marinade steps. Instead of searing the beef, place it directly in the slow cooker. Pour in the marinade and broth. Set the cooker on low and let it cook for 6-8 hours. This method makes the beef very tender and flavorful. Just remember to check the beef for doneness.
How long does birria last in the fridge?
Birria can last in the fridge for about 3-4 days. Be sure to store it in an airtight container. For safety, always reheat it until steaming hot. If you want to keep birria longer, consider freezing it. It can stay fresh in the freezer for up to 3 months. Just remember to let it cool before storing.
Birria is a delicious dish made from tender beef, flavorful spices, and rich chilies. We’ve covered the key ingredients, from marinating to assembling perfect tacos. Remember to try different meats for variety and enjoy regional twists. Storing and reheating your birria properly will keep it tasty. This dish holds a special place in Mexican culture, and now, you can make it at home. Enjoy crafting birria that warms your heart and satisfies your taste bud

Savory Birria Tacos
Ingredients Â
- 3 lbs beef chuck roast, cut into 1-2 inch chunks
- 4 dried guajillo chilies, stems and seeds removed
- 2 dried ancho chilies, stems and seeds removed
- 3 cloves garlic, peeled
- 1 medium onion, quartered
- 3 cups beef broth
- 2 teaspoons ground cumin
- 1 teaspoon ground coriander
- 1 teaspoon dried oregano
- 1 teaspoon freshly ground black pepper
- 1 leaf bay leaf
- to taste salt
- 12 corn tortillas
- for garnish fresh cilantro, chopped
- for garnish diced onion
- for serving lime wedges
InstructionsÂ
- In a dry skillet over medium heat, toast the guajillo and ancho chilies for 2-3 minutes until fragrant, stirring occasionally to prevent burning. Once toasted, transfer the chilies to a bowl and cover them with hot water. Let them sit for 15 minutes, or until they soften.
- After the chilies have softened, drain any excess water. In a blender, combine the softened chilies, garlic, quartered onion, ground cumin, ground coriander, oregano, black pepper, and 1 cup of beef broth. Blend until the mixture reaches a smooth, thick consistency.
- In a large mixing bowl, season the beef chunks generously with salt. Pour the chili marinade over the beef, ensuring each piece is thoroughly coated. Cover with plastic wrap or a lid and refrigerate for a minimum of 2 hours, but ideally overnight for maximum flavor infusion.
- In a large pot or Dutch oven, heat a couple of tablespoons of oil over medium-high heat. Once the oil is shimmering, add the marinated beef in a single layer and sear it on all sides until browned, which should take about 5-7 minutes.
- Pour in the remaining beef broth and add the bay leaf. Bring the mixture to a boil, then reduce the heat to low. Cover the pot and let it simmer for 2-3 hours, or until the beef is tender enough to shred with a fork.
- After the simmering time, remove the pot from heat. Take out the beef and shred it using two forks, taking care to break apart any large pieces. If desired, strain the cooking liquid to remove solids and then return the shredded beef to the pot to soak in the flavorful broth.
- In a separate skillet, heat over medium-high heat. Lightly toast the corn tortillas for about 30 seconds on each side, making them pliable but not too crispy. Fill each tortilla with a generous amount of the shredded birria.
- Arrange the filled tacos on a serving platter. Garnish with freshly chopped cilantro and diced onions. Provide lime wedges on the side for squeezing over the tacos for added brightness and flavor.


![To make a hearty Sweet Potato Black Bean Chili, you will need: - 2 medium sweet potatoes, peeled and cut into ½-inch cubes - 1 can (15 oz) black beans, thoroughly drained and rinsed - 1 large onion, finely diced - 2 cloves garlic, finely minced - 1 red bell pepper, chopped into small pieces - 1 can (14.5 oz) diced tomatoes with their juices - 2 cups vegetable broth (preferably low-sodium) - 1 tablespoon chili powder - 1 teaspoon ground cumin - 1 teaspoon smoked paprika - ½ teaspoon cayenne pepper (adjust according to your spice preference) - Sea salt and freshly cracked black pepper, to taste - 2 tablespoons olive oil Adding toppings can enhance the chili's flavor and look. Here are some tasty options: - Diced avocado for creaminess - Fresh cilantro leaves for a pop of color - Lime wedges for a zesty touch Each ingredient brings unique health benefits: - Sweet potatoes are rich in vitamins A and C. They provide fiber and antioxidants. - Black beans are a great source of protein and fiber. They help keep you full longer. - Onions contain antioxidants and may help reduce inflammation. - Garlic has immune-boosting properties and adds flavor. - Bell peppers are high in vitamin C and help with skin health. This chili is not just filling; it also packs a nutritious punch, making it a well-rounded meal for any day. For the full recipe, check out the recipe section above. Start with a large pot. Heat 2 tablespoons of olive oil over medium heat. Wait until the oil shimmers. Add 1 finely diced onion and 1 chopped red bell pepper. Sauté for about 5 minutes. Stir often until the onion is soft and clear. Next, add 2 minced garlic cloves. Sauté for 1 more minute, just enough to let the garlic smell good. Now, it’s time for the sweet potatoes. Add 2 medium sweet potatoes, cut into ½-inch cubes. Sprinkle in 1 tablespoon chili powder, 1 teaspoon ground cumin, 1 teaspoon smoked paprika, and ½ teaspoon cayenne pepper. Don’t forget salt and pepper to taste! Stir well to coat the sweet potatoes in the spices. Pour in 1 can of diced tomatoes with juices and 2 cups of vegetable broth. Mix everything together and bring it to a boil. Once boiling, lower the heat. Cover the pot and let the chili simmer for 25 to 30 minutes. The sweet potatoes should be soft but not mushy when you poke them with a fork. After the sweet potatoes cook, stir in 1 can of black beans, drained and rinsed. Heat through for another 5 minutes. This gives the beans time to warm up. Taste the chili and add more salt or pepper if you want. - Sauté onion and bell pepper: 5 minutes - Sauté garlic: 1 minute - Simmer chili: 25 to 30 minutes - Heat black beans: 5 minutes - Cut sweet potatoes into even pieces for uniform cooking. - Stir the chili occasionally to prevent sticking. - Adjust the spice levels based on your taste. - Let the chili sit for a few minutes before serving; this helps the flavors blend. For the full recipe, check out [Full Recipe]. Enjoy creating this hearty dish! Many people rush the cooking. Take your time to sauté the onion and pepper. This step builds flavor. If you skip it, your chili may taste flat. Another mistake is adding too much spice at once. Start small, then adjust to your taste. Remember to drain the black beans well. This avoids a watery chili. Use fresh herbs like cilantro or parsley for a burst of freshness. A squeeze of lime juice adds brightness. You can also try adding a splash of soy sauce for depth. If you want more heat, add diced jalapeños or a dash of hot sauce. Lastly, consider a drizzle of olive oil before serving. This adds richness and a nice finish. For this chili, you need a sturdy large pot. A good pot helps with even cooking. A sharp knife and cutting board make prep easy. You also need measuring spoons for spices and a can opener for the beans and tomatoes. A wooden spoon works best for stirring. Having these tools ready will make your cooking smooth and fun. For the full recipe, refer back to the main article. {{image_4}} You can switch up beans in this chili. Try using kidney beans or pinto beans. Both add a different flavor and texture. If you want a creamier chili, use cannellini beans. Mixing beans can make your dish more fun and unique. Feel free to add more veggies. Corn adds sweetness and crunch. Zucchini or carrots can boost nutrition and color. For a protein boost, add cooked quinoa or lentils. You can even throw in some chopped kale or spinach for added greens. These additions can change your chili into a new dish each time. Want more heat? Add extra cayenne pepper or diced jalapeños. For a milder taste, reduce the cayenne or skip it altogether. You can also add a dash of hot sauce when serving for those who like it spicy. If you love smoky flavors, try adding chipotle peppers in adobo sauce. Adjust the spices to fit your taste and make it your own. For the full recipe, check out the Sweet Potato Black Bean Chili section above. To keep your Sweet Potato Black Bean Chili fresh, let it cool first. Once cool, transfer it to an airtight container. It’s best to refrigerate the chili within two hours of cooking. When stored correctly, it lasts in the fridge for about 4 to 5 days. Be sure to label the container with the date. This helps you track how long it has been stored. If you want to keep your chili for a longer time, consider freezing it. First, let the chili cool completely. Then, pour it into freezer-safe bags or containers. Make sure to leave some space for expansion. Seal them tightly to prevent freezer burn. You can freeze the chili for up to 3 months. When you’re ready to enjoy it, just thaw it overnight in the fridge. To reheat your chili, you have a few options. The microwave is quick, but it can heat unevenly. Stir the chili halfway through heating. For the stove, pour the chili into a pot and heat it over medium heat. Stir often until it’s hot. This method helps maintain flavor and texture. If it seems thick, add a splash of vegetable broth or water. Enjoy your chili just like the first time you made it! For the full recipe, check out the details above. You can use pinto beans or kidney beans instead of black beans. They have a similar texture and flavor. If you want a different taste, try chickpeas. They add a nutty flavor and work well in this chili. Just make sure to drain and rinse them, just like you do with black beans. Yes, you can make this chili in a slow cooker! Start by sautéing the onion, garlic, and bell pepper on the stove. Then, add all ingredients to the slow cooker. Cook on low for 6 to 8 hours or on high for 3 to 4 hours. This method lets the flavors blend over time. Leftovers can stay fresh in the fridge for about 4 to 5 days. Make sure to store the chili in an airtight container. This helps keep it flavorful and safe to eat. If you want to keep it longer, you can freeze it! Yes, this chili is perfect for vegans! All ingredients are plant-based and wholesome. You can enjoy it without any worries. It’s full of flavor and nutrients, making it a great choice for everyone. You can find the full recipe [here](#). In this blog post, we explored how to make Sweet Potato Black Bean Chili. We covered the full list of ingredients, cooking steps, and essential tips to avoid common mistakes. Remember to experiment with toppings and variations to make it your own. Proper storage ensures your leftovers stay tasty. This chili is not only delicious but also packed with nutrients. Enjoy this easy recipe that fits many diets, including vegan. Cooking it can be fun and rewarding. Try it out, and discover your new favorite dish!](https://joymealplan.com/wp-content/uploads/2025/07/8ade8b74-c48b-4df7-852e-5be035604d83-768x768.webp)


![- 2 cups cooked brown rice - 1 lb boneless, skinless chicken breast, diced - 1 can (15 oz) black beans, rinsed and drained - 1 cup corn (fresh, frozen, or canned) - 1 ripe avocado, diced - 1/2 cup shredded cheddar cheese - 1 tablespoon taco seasoning - Salt and black pepper to taste - Optional toppings: sour cream, salsa, sliced jalapeños For these Loaded Chicken Burrito Bowls, I focus on simple, fresh ingredients. The brown rice serves as a wholesome base. It adds fiber and nutrients. I choose boneless, skinless chicken breast for lean protein. It cooks up juicy and tender. Black beans bring extra protein and a creamy texture. Rinsing them helps remove excess sodium, making them healthier. Corn adds sweetness and a pop of color. You can use fresh, frozen, or canned, based on your preference. Avocado is a delightful addition. It brings creaminess and healthy fats. The shredded cheddar cheese adds richness and flavor. For seasoning, I use taco seasoning. It gives a bold taste without extra effort. I also add salt and black pepper to enhance the flavors. Toppings are where you can get creative. I suggest sour cream for creaminess. Salsa adds zest, and sliced jalapeños bring heat. Feel free to mix and match as you like. You can find the Full Recipe for all these delicious ingredients and how to prepare them. - Heat olive oil in a skillet over medium heat. - Add diced chicken and season with taco seasoning. First, I heat a tablespoon of olive oil in a skillet over medium heat. I want the oil to shimmer before adding the chicken. Once it’s hot, I toss in the diced chicken breast. I sprinkle it with taco seasoning, along with a pinch of salt and black pepper. I cook this for about 6 to 8 minutes. I stir often to ensure even cooking. The chicken should turn a lovely golden brown and reach an internal temperature of 165°F. - Prepare brown rice according to package instructions. - Fluff rice once cooked. While the chicken cooks, I prepare brown rice. I follow the package instructions closely. This step is key for fluffy rice. Once it’s cooked, I use a fork to fluff the rice. Fluffy rice makes a great base for my burrito bowls. - Mix black beans, corn, and tomatoes in a bowl. - Combine with cooked chicken and layer on rice. Next, I grab a large mixing bowl. I combine the rinsed black beans, corn, and halved cherry tomatoes. I gently toss them together until they mix well. Once the chicken is done, I add it to the bowl. I stir everything together to let the flavors blend. Now it's time to build the burrito bowls! I divide the fluffy brown rice into four serving bowls. I spoon the chicken mixture on top of the rice in each bowl. Next, I add diced avocado, shredded cheese, and fresh cilantro. For a zesty finish, I serve lime wedges on the side. You can also add sour cream or salsa if you want. For the full recipe, check the complete instructions and ingredient list. Enjoy making your loaded chicken burrito bowls! How to ensure chicken is cooked thoroughly To cook chicken safely, use a meat thermometer. The internal temperature should reach 165°F. Cook chicken pieces until they are golden brown and no longer pink inside. This ensures it is juicy and safe to eat. Best practices for fluffy rice For fluffy rice, rinse it well before cooking. This removes extra starch that makes it sticky. Cook it with the right water ratio, usually 2 cups of water for every cup of rice. After cooking, fluff it gently with a fork. This keeps the grains separate and light. Colorful arrangement ideas for the toppings To make your burrito bowls pop, layer the toppings by color. Place bright tomatoes, vibrant corn, and green avocado on top. This adds visual interest. You can also create small sections on the bowl for each topping. This way, each bite looks and tastes amazing. Using garnishes to enhance visual appeal Fresh herbs like cilantro can elevate your dish. Sprinkle them on top for a burst of color. Lime wedges can add a zesty touch. Place them artfully around the bowl for that extra flair. Suggestions for extra spices or ingredients to add To boost the flavor, try adding cumin or smoked paprika. These spices add warmth and depth. You can also mix in jalapeños for heat or lime juice for brightness. Freshly chopped garlic can also add a punch of flavor. Alternative cooking methods for chicken If you want to switch it up, grill or bake the chicken instead of pan-frying. Grilling adds a nice smoky flavor. Baking can keep it tender and juicy. You can marinate the chicken beforehand to infuse even more flavor. For the Full Recipe, check the earlier section for all the details! {{image_4}} You can easily make Loaded Chicken Burrito Bowls vegetarian or vegan. To do this, simply replace the chicken with a plant-based protein. Options include lentils, tempeh, or tofu. For a vegan cheese option, try cashew cheese or nutritional yeast. For gluten-free options, make sure to check your taco seasoning. Some brands add gluten. You can also swap brown rice for quinoa or cauliflower rice. If you like heat, add jalapeños or hot sauce to your bowl. This gives a spicy kick that enhances the flavors. You can also try different beans like pinto or kidney beans. Each type adds a unique taste and texture to your dish. Feel free to adjust your ingredients based on what is in season or what you like best. You can swap corn for bell peppers or zucchini for a fresh twist. For cheese, consider using feta or goat cheese for a different flavor. If you want a creamy topping, try Greek yogurt instead of sour cream. These swaps keep your bowls exciting! For the full recipe, check out the complete details in the recipe section. To keep your loaded chicken burrito bowls fresh, store them in airtight containers. This helps preserve flavor and texture. Place all components in separate containers if possible. This way, the rice, chicken, and toppings stay fresh longer. Generally, leftovers last about 3 to 4 days in the fridge. Make sure to check for any signs of spoilage before eating. If the chicken looks or smells off, it's best to toss it. When reheating, use the microwave for quick warmth. Place the food in a microwave-safe bowl, cover it with a damp paper towel, and heat it in 30-second intervals until warm. This method keeps the rice moist and prevents it from drying out. For the best texture, consider reheating in a skillet. Add a splash of water, cover, and cook on low heat until everything is warmed through. This method helps maintain flavor and texture. To freeze components, let them cool completely first. Portion the rice, chicken, and toppings into freezer-safe containers. Label them with the date. This makes it easy to track freshness. You can freeze cooked chicken and rice for up to 3 months. When ready to eat, thaw them overnight in the fridge. Reheat them as mentioned above to enjoy your delicious meal again. You can add many tasty toppings to your burrito bowls. Here are some great ideas: - Sour cream: Adds creaminess and a tangy flavor. - Salsa: Choose your favorite type, from mild to spicy. - Sliced jalapeños: For some heat and crunch. - Chopped green onions: Adds freshness and color. - Lettuce: A nice crunch and extra nutrients. - Black olives: For a salty, savory touch. - Cheese: Try a different cheese like queso fresco or pepper jack. Mix and match these options to find your favorite combination. Each topping can change the flavor and texture of the dish. Yes, you can prepare Loaded Chicken Burrito Bowls ahead of time. Here are some tips for meal prep: - Cook the chicken and rice: You can cook and store these in separate containers in the fridge. - Prep toppings: Chop your vegetables and store them in airtight containers. - Assemble before serving: When ready to eat, layer the rice, chicken, and toppings in a bowl. This keeps everything fresh. When stored properly, the ingredients can last for about 3 to 4 days in the fridge. You can easily customize your burrito bowls to fit your needs. Here are some tips: - Dietary needs: If you're vegetarian, use beans instead of chicken. For vegan, skip cheese and sour cream. - Flavor preferences: Add different spices or sauces to change the flavor. - Vegetable swaps: Use seasonal vegetables, like bell peppers or zucchini. - Grain choices: Try quinoa, cauliflower rice, or even lettuce wraps instead of brown rice. Get creative and make the dish your own! For the complete ingredients and instructions for Loaded Chicken Burrito Bowls, check out the [Full Recipe]. This post shared how to make tasty Loaded Chicken Burrito Bowls. You learned about main and optional ingredients. I explained step-by-step instructions, helpful tips, and fun variations. You can customize the bowls to your liking and store leftovers easily. Making these burrito bowls is fun and flexible. Enjoy your meal and get creative with flavors. The possibilities are endless, so dive in and make it your own!](https://joymealplan.com/wp-content/uploads/2025/07/a2d38b5a-a8a2-4e80-9f96-ef24cf5264b7-768x768.webp)