Air Fryer Honey Garlic Salmon Bites Quick and Tasty
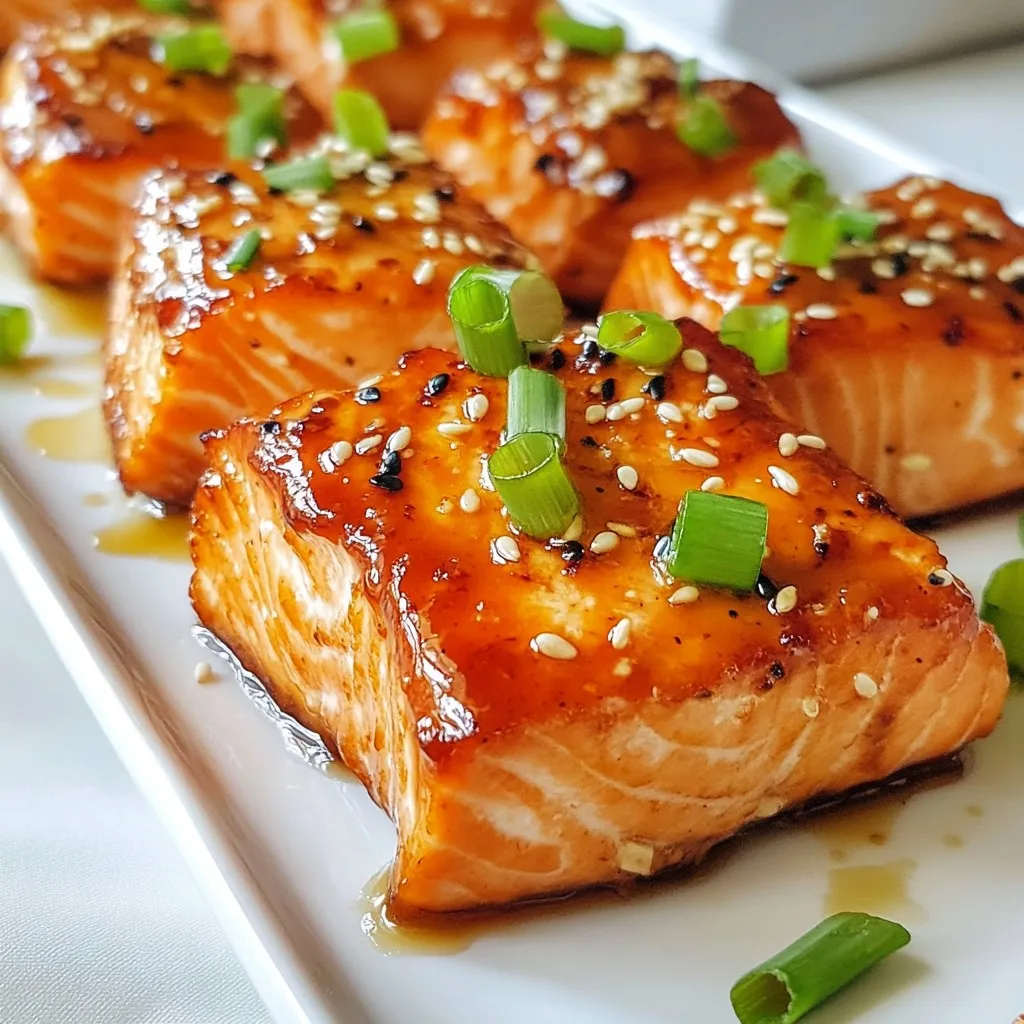

Looking for a quick and tasty meal? Look no further than these Air Fryer Honey Garlic Salmon Bites! With just a handful of simple ingredients, you can create a flavorful dish in under 15 minutes. This easy recipe combines the sweetness of honey with savory garlic for a meal that’s perfect for busy nights. Let’s dive into how to make these delicious bites that your family will love!
Why I Love This Recipe
- Quick and Easy: This recipe takes only 30 minutes from start to finish, making it perfect for busy weeknights.
- Flavorful Marinade: The combination of honey, soy sauce, garlic, and ginger creates a deliciously sweet and savory coating.
- Healthy Option: Salmon is packed with omega-3 fatty acids, making these bites a nutritious choice for any meal.
- Versatile Dish: These salmon bites can be served as an appetizer, main dish, or tossed in a salad for a fresh, light meal.
Ingredients
Main Ingredients
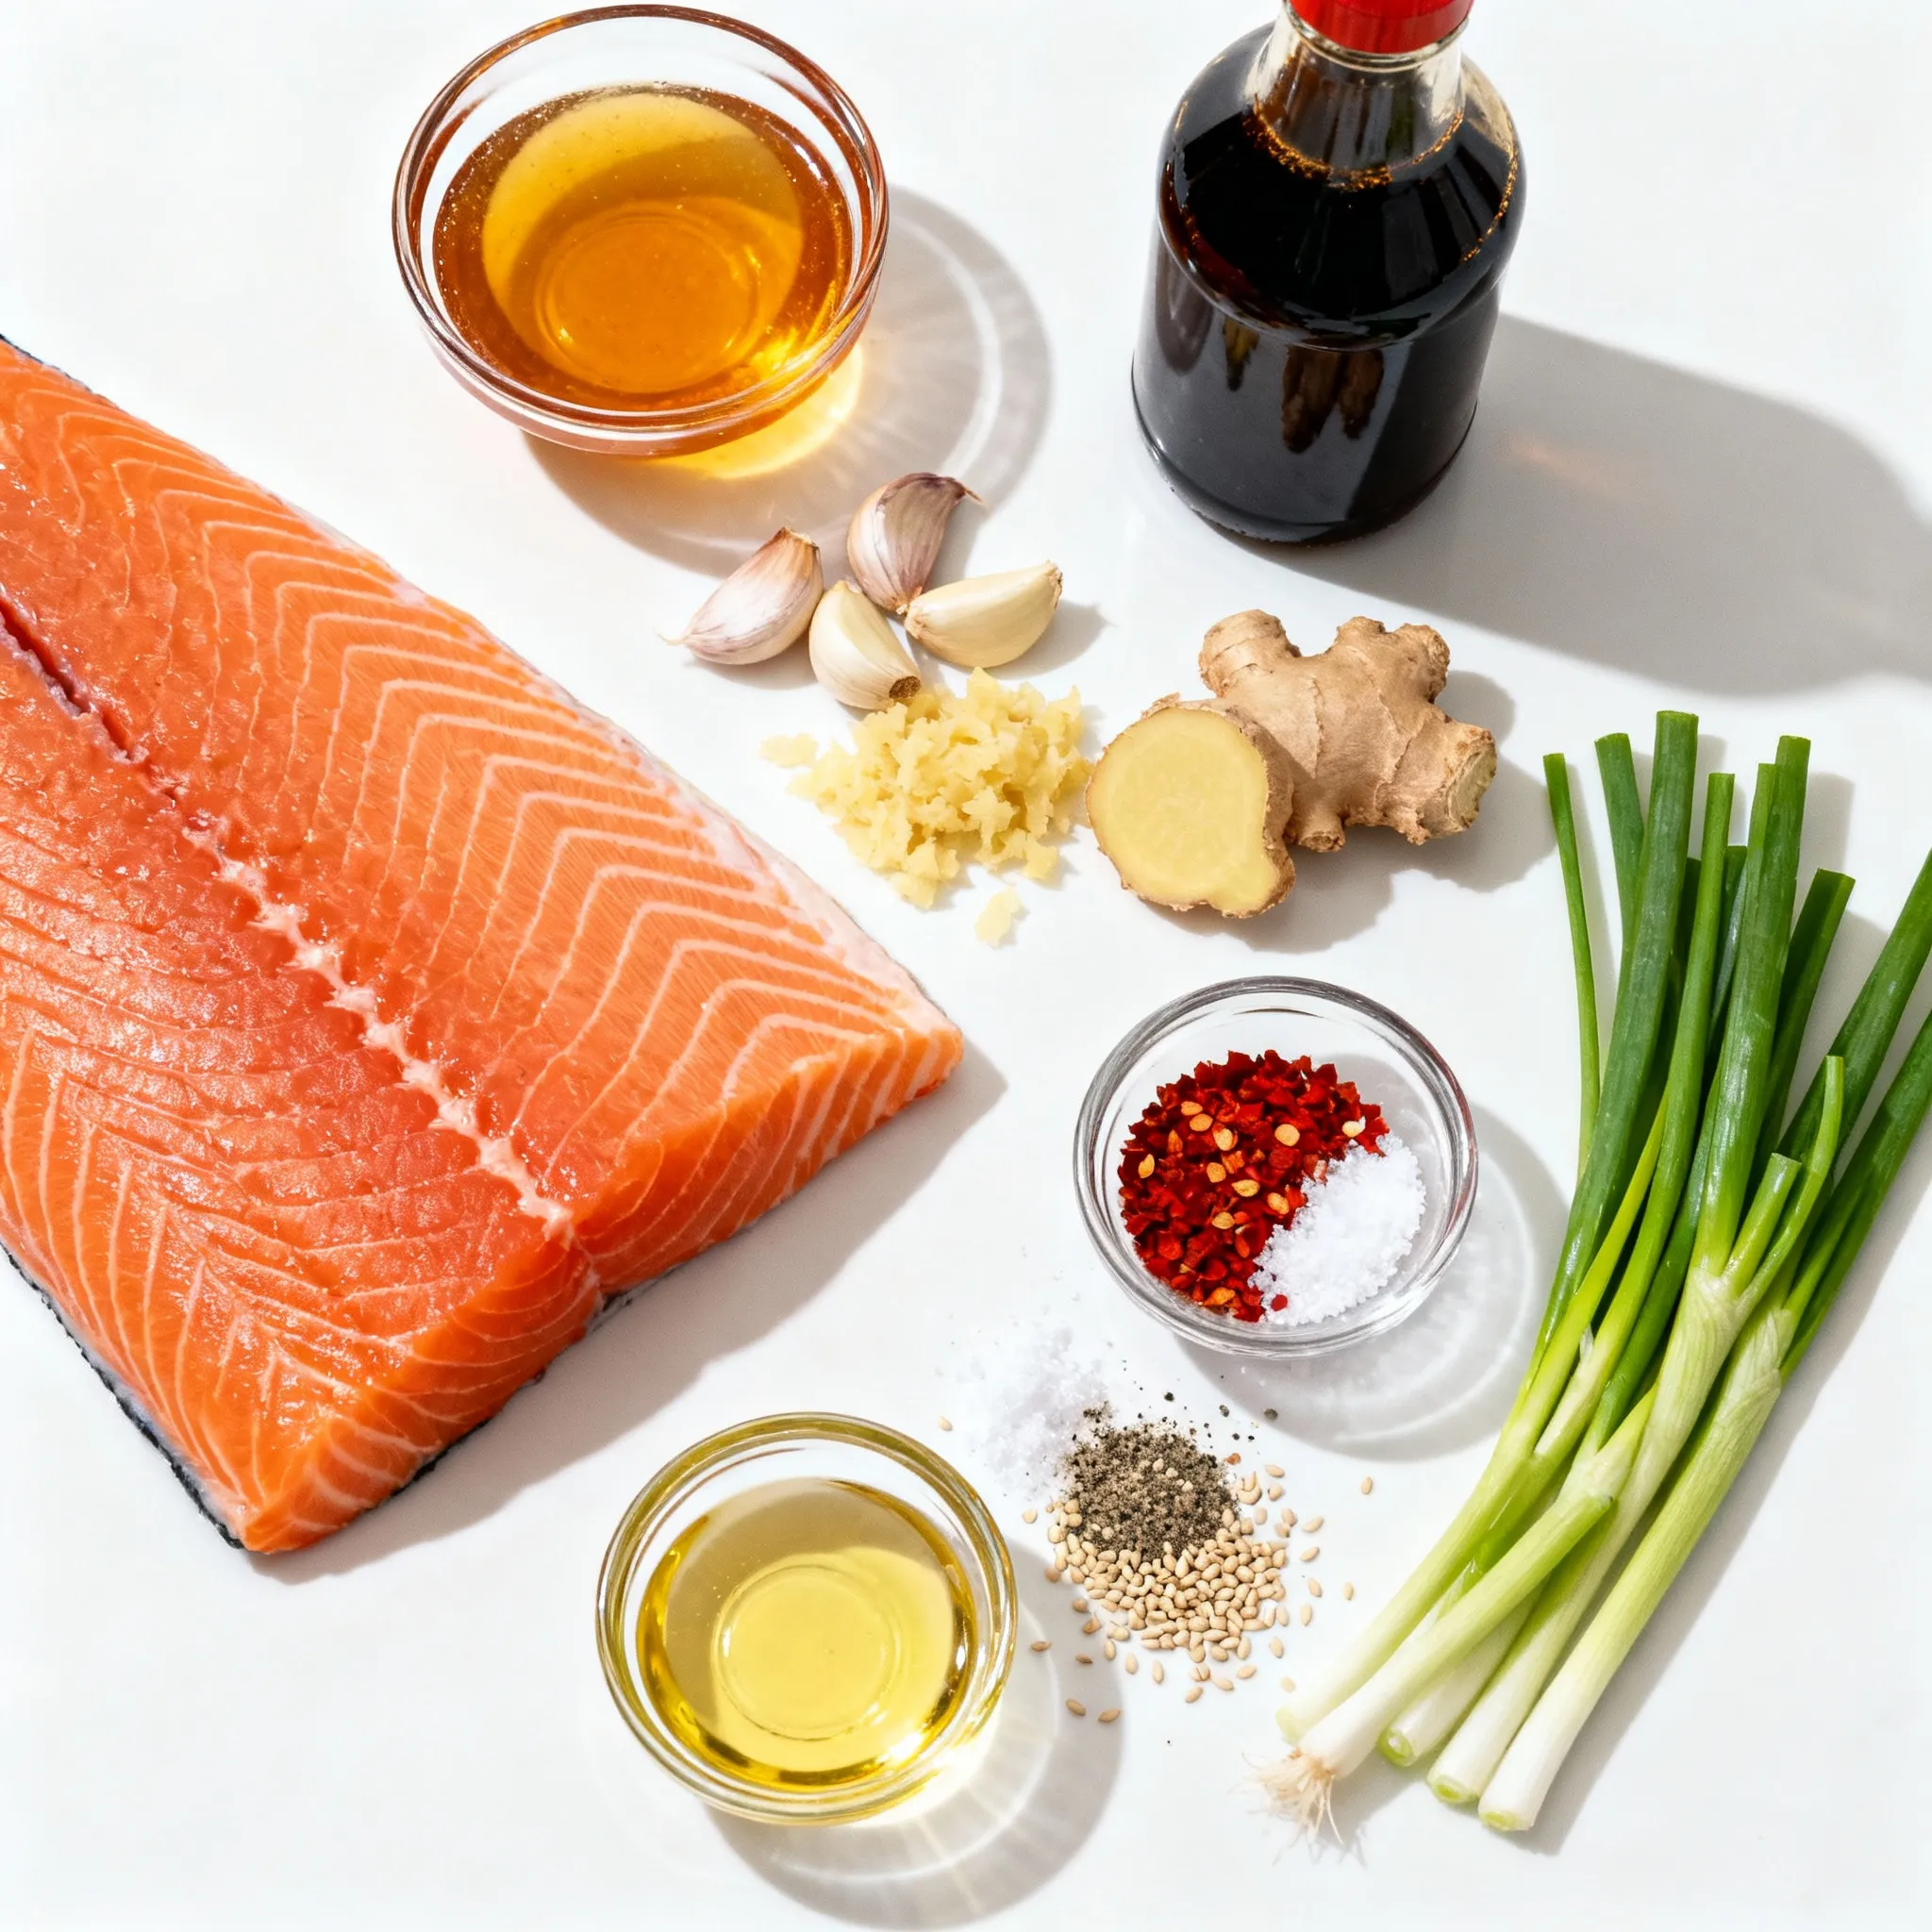
– 1 lb salmon fillet, skinless
– 3 tablespoons honey
– 2 tablespoons soy sauce
– 2 cloves garlic
Additional Flavoring Ingredients
– 1 teaspoon fresh ginger
– 1 tablespoon sesame oil
– Red pepper flakes (optional)
Garnishes
– Green onions
– Sesame seeds
– Salt and pepper
When making Air Fryer Honey Garlic Salmon Bites, choose fresh, high-quality salmon. The skinless fillet allows the marinade to soak in well. Honey adds sweetness, while soy sauce brings depth. Garlic gives a nice punch, and ginger adds warmth. Sesame oil rounds out the flavors, making each bite rich and satisfying.
For those who enjoy a bit of heat, adding red pepper flakes can elevate the dish. They give a spicy kick that balances the sweet and savory notes.
For garnishing, green onions and sesame seeds add color and texture. Salt and pepper enhance the natural flavors of the salmon. This simple yet delicious combination makes the dish shine.
Make sure to prep all ingredients before starting. It streamlines the cooking process and helps you stay organized. Enjoy this quick and tasty recipe!
Step-by-Step Instructions
Preparing the Marinade
To start, we need to make the marinade. In a medium bowl, combine these ingredients:
– 3 tablespoons honey
– 2 tablespoons soy sauce
– 2 cloves garlic, finely minced
– 1 teaspoon fresh ginger, freshly grated
– 1 tablespoon sesame oil
Whisk these together until they blend well. Now, add a pinch of red pepper flakes, salt, and pepper to taste. This mix brings sweet, salty, and spicy flavors that make the salmon bites shine.
Marinating the Salmon
Next, it’s time to marinate the salmon. Take 1 pound of skinless salmon fillet and cut it into 1-inch bite-sized pieces. Coat the salmon bites in the marinade. Ensure each piece is fully covered.
Cover the bowl and let it sit for at least 15 minutes. If you have extra time, you can let it marinate in the fridge for up to 1 hour. This step infuses the salmon with rich flavors, making every bite delicious.
Cooking in the Air Fryer
Now, we’re ready to cook! Preheat your air fryer to 400°F (200°C). This step usually takes about 5 minutes.
While it heats up, take the marinated salmon bites out of the bowl. Remember to save the marinade for later. Place the salmon bites in the air fryer basket. Arrange them in a single layer, giving them space for even cooking.
Cook the salmon for 8-10 minutes. Keep an eye on them. You want them to be cooked through with a lovely golden brown color. This quick cooking method keeps the salmon juicy and tender.
Tips & Tricks
Achieving the Best Flavor
– Marinate the salmon for at least 15 minutes. If you have time, let it sit for up to 1 hour. This helps the salmon absorb all the flavors.
– Always use fresh ingredients. Fresh garlic and ginger make a huge difference in taste.
Air Fryer Cooking Tips
– Space the salmon pieces well in the basket. This allows hot air to circulate and cook each piece evenly.
– Check if the salmon is done by using a fork. It should flake easily and look opaque.
Serving Suggestions
– Serve the salmon bites with lime wedges. A squeeze of lime adds a fresh zing.
– For a great presentation, plate the salmon on a platter lined with parchment paper. Scatter sesame seeds on top for a nice look.
Pro Tips
- Marinate for Maximum Flavor: Allow the salmon bites to marinate for at least 15 minutes, but ideally up to an hour in the refrigerator for a deeper flavor infusion.
- Check for Doneness: The salmon is perfectly cooked when it flakes easily with a fork and has a golden brown exterior. Keep an eye on it to avoid overcooking.
- Customize the Heat: Adjust the amount of red pepper flakes based on your spice preference. You can also add sriracha or chili oil for an extra kick.
- Presentation Matters: Serve the salmon bites on a beautiful platter and garnish with fresh green onions and sesame seeds for an appealing look.

Variations
Ingredient Swaps
You can change up the fish you use. Try trout or cod instead of salmon. Each fish adds its own taste. Also, if you want a new flavor, swap honey for maple syrup. This switch gives a rich, different sweetness.
Spice Level Adjustments
Want more heat? Add extra red pepper flakes to the marinade. This small change makes a big difference in taste. You can also use chili garlic sauce for even more flavor. It gives a nice kick that many love.
Serving with Side Dishes
These salmon bites pair well with many sides. Serve them with steamed vegetables for a healthy meal. You can also have them with rice or quinoa. Both options make the meal complete and filling. Enjoy them as a simple yet delicious dinner.
Storage Info
Storing Leftovers
To store your honey garlic salmon bites, first let them cool. Place them in an airtight container. Store them in the fridge for up to three days. If you want to keep them longer, freezing works well. Wrap the bites tightly in plastic wrap, then place them in a freezer bag. They can last up to three months in the freezer.
Reheating Tips
You can reheat salmon bites in the air fryer or oven. For the air fryer, set it to 350°F (175°C). Heat the bites for about 5-6 minutes. This keeps them crispy. If using the oven, preheat to 350°F (175°C), and bake for about 10 minutes. To avoid drying out the salmon, cover it with foil during reheating. This traps moisture, keeping the salmon juicy.
Shelf Life
Homemade salmon bites last about three days in the fridge. Always check for signs of spoilage. Look for a sour smell or a slimy texture. If either is present, it’s best to toss them out. Keeping an eye on your leftovers helps ensure safety and quality.
FAQs
Can I use frozen salmon?
Yes, you can use frozen salmon. First, you should thaw it before cooking. Place the salmon in the fridge overnight for safe thawing. If you need to thaw it faster, put the salmon in a sealed bag and submerge it in cold water. Change the water every 30 minutes until it is thawed. After thawing, pat it dry with a paper towel. This step helps the marinade stick better.
What can I substitute for soy sauce?
If you need a soy sauce substitute, you have options. Tamari is a great gluten-free choice. Coconut aminos work too and add a hint of sweetness. For a low-sodium option, look for reduced-sodium soy sauce. If you want a unique flavor, try miso paste mixed with water. Each of these options can fit different dietary needs while keeping the taste delicious.
How do I know when the salmon is done?
To check if the salmon is done, look for its color and texture. The salmon should be opaque and easy to flake with a fork. If it looks shiny and translucent, it needs more time. Typically, cooking salmon bites for 8-10 minutes at 400°F is perfect. If you have a meat thermometer, aim for an internal temperature of 145°F. This ensures the salmon is safe to eat and perfectly cooked.
This recipe shows how to make flavorful air-fried salmon bites. You learned to create a tasty marinade and how to prep the salmon. Remember, a longer marination time boosts flavor. You can also change ingredients for variety, like using trout or maple syrup. Proper storage and reheating keep your leftovers tasty and safe. Enjoy these bites as part of a healthy meal. Happy cookin

Air Fryer Honey Garlic Salmon Bites
Ingredients
- 1 lb salmon fillet, skinless, cut into 1-inch bite-sized pieces
- 3 tablespoons honey
- 2 tablespoons soy sauce (or tamari for gluten-free)
- 2 cloves garlic, finely minced
- 1 teaspoon fresh ginger, freshly grated
- 1 tablespoon sesame oil
- 1/2 teaspoon red pepper flakes (optional, for a spicy kick)
- to taste salt and pepper
- 2 green onions, finely sliced (for garnish)
- sesame seeds, for garnish
Instructions
- In a medium mixing bowl, combine the honey, soy sauce, minced garlic, freshly grated ginger, sesame oil, red pepper flakes (if using), and a pinch of salt and pepper. Whisk these ingredients together until they are thoroughly blended into a marinade.
- Carefully add the salmon bites to the marinade, ensuring each piece is fully coated. Cover the bowl and let it sit for a minimum of 15 minutes. For a more intense flavor, you can refrigerate it for up to 1 hour.
- Preheat your air fryer to 400°F (200°C) for about 5 minutes, allowing it to reach the right temperature for cooking.
- After the salmon has marinated, take the bites out of the marinade, saving the marinade for later. Arrange the salmon pieces in the air fryer basket in a single layer, ensuring they have some space between them for even cooking.
- Cook the salmon bites in the air fryer for 8-10 minutes at 400°F (200°C), or until they are beautifully cooked through and have achieved a golden brown color on the exterior.
- While the salmon is air frying, pour the reserved marinade into a small saucepan. Heat it over medium heat, bringing it to a gentle simmer. Let it cook for approximately 3-5 minutes, or until it has thickened slightly.
- Once the salmon bites are ready, carefully remove them from the air fryer and drizzle the thickened honey garlic sauce over the top. Toss the salmon gently to ensure each piece is well-coated in the sauce.
- For a vibrant finish, garnish the dish with finely sliced green onions and a sprinkle of sesame seeds before serving.


![To make garlic roasted green beans, you'll need these simple items: - 1 pound fresh green beans, trimmed and rinsed - 4 large cloves garlic, finely minced - 3 tablespoons extra virgin olive oil - 1 teaspoon freshly grated lemon zest - 1 teaspoon balsamic vinegar - ½ teaspoon red pepper flakes (optional for heat) - Sea salt and freshly ground black pepper to taste - 2 tablespoons finely grated Parmesan cheese (optional) I always prefer fresh green beans for this recipe. They taste better and have a nice crunch. Fresh beans roast evenly and soak up the flavors well. If you can’t find fresh ones, frozen beans work too. Just make sure to thaw and drain them first. They may not be as crisp, but they will still taste great. You can change some ingredients if you need to. If you don’t have garlic, try using garlic powder. Instead of lemon zest, you can use orange zest for a different flavor. If you want a different vinegar, try red wine vinegar. For a dairy-free option, skip the Parmesan cheese or use a vegan cheese instead. These swaps keep the dish tasty and fun! To start, gather your ingredients. You will need: - 1 pound fresh green beans, trimmed and rinsed - 4 large cloves garlic, finely minced - 3 tablespoons extra virgin olive oil - 1 teaspoon freshly grated lemon zest - 1 teaspoon balsamic vinegar - ½ teaspoon red pepper flakes (optional for heat) - Sea salt and freshly ground black pepper to taste - 2 tablespoons finely grated Parmesan cheese (optional) First, preheat your oven to 425°F (220°C). This step is key for crispy beans. Next, take a large mixing bowl and add the green beans. Toss in the minced garlic, olive oil, lemon zest, and balsamic vinegar. If you like a little heat, add red pepper flakes. Season with sea salt and black pepper to taste. Mix everything well. You want each bean coated with flavor. Now, it’s time to roast! Spread the green beans on a large baking sheet. Make sure they lie flat in a single layer. This helps them roast evenly. Place the baking sheet in the oven and roast for 15-20 minutes. Halfway through, give the beans a toss. This ensures they cook evenly. You’ll know they’re done when they’re tender but still have a slight crunch. Once out of the oven, if you like, sprinkle grated Parmesan cheese on top. The heat will melt it slightly, making it even better. Transfer the roasted green beans to a nice serving dish. Serve them warm to your family or guests. They pair well with many main dishes. Try them with grilled chicken or fish. You can also serve them as a stand-alone snack. For the full recipe, please see the earlier section. Enjoy your tasty green beans! To boost the taste of garlic roasted green beans, add a squeeze of lemon. Lemon brings brightness and freshness. You can also use fresh herbs like thyme or rosemary. These herbs add depth and aroma. If you love heat, try adding more red pepper flakes. Just be careful not to overdo it! For the best texture, spread the beans on the baking sheet. Make sure they are in a single layer. This helps them roast evenly. Toss them halfway through cooking to ensure all sides get crispy. If you want them extra crispy, leave them in for a few more minutes. Serve your garlic roasted green beans in a nice dish. You can sprinkle extra Parmesan cheese on top for a gourmet look. Adding a few lemon wedges next to the beans can enhance the presentation. It also invites your guests to add more flavor if they wish. For a pop of color, place fresh herbs on top before serving. This will make your meal look and taste amazing! You can find the full recipe for garlic roasted green beans [Full Recipe]. {{image_4}} You can mix in other veggies with garlic roasted green beans. Carrots, bell peppers, and zucchini work well. Just cut them into similar sizes. This way, they all cook evenly. Toss them with the green beans in the same mix for great flavor. You can also try adding cherry tomatoes for a pop of color and sweetness. Add herbs to change the taste of your garlic roasted green beans. Fresh thyme or rosemary adds a lovely aroma. A sprinkle of smoked paprika gives a warm, savory hint. You can also try a dash of cumin for a unique flavor. These twists make your dish exciting and fresh each time. This recipe is already vegetarian. To make it vegan, simply skip the Parmesan cheese. You can also add nutritional yeast for a cheesy flavor without dairy. It’s a great way to keep it creamy and flavorful. Enjoy these garlic roasted green beans as a side dish or main meal. Each variation keeps it fun and tasty! For the full recipe, check out the detailed instructions provided earlier. After enjoying your garlic roasted green beans, you might have leftovers. Cool the beans down first. Then, place them in an airtight container. They stay fresh in the fridge for about 3-4 days. When ready to eat, check for any signs of spoilage. If they look good, you can enjoy them again! If you have more leftovers than you can eat, freezing is a great option. First, let the beans cool completely. Then spread them on a baking sheet in a single layer. Freeze them for about an hour. This step helps the beans stay separate. After freezing, transfer them to a freezer-safe bag. They can last up to 3 months in the freezer. Label the bag with the date so you know when to use them. Reheating garlic roasted green beans is simple. You can use the oven or a microwave. For the oven, preheat it to 350°F (175°C). Spread the beans on a baking sheet and heat for about 10 minutes. If you use a microwave, place the beans in a safe dish. Heat them for 1-2 minutes, stirring halfway. This method keeps them tasty and warm. For extra flavor, add a splash of olive oil or a sprinkle of salt before serving. Enjoy your meal! To make garlic roasted green beans, start by preheating your oven to 425°F (220°C). In a big bowl, mix 1 pound of fresh green beans with 4 minced garlic cloves, 3 tablespoons of olive oil, 1 teaspoon of lemon zest, and 1 teaspoon of balsamic vinegar. If you like spice, add ½ teaspoon of red pepper flakes. Season with sea salt and black pepper. Toss everything until the beans are well coated. Spread the beans on a baking sheet in a single layer. Roast them for 15-20 minutes, tossing halfway. When they are tender and crisp, serve hot. You can find the Full Recipe for more details. Yes, you can prepare garlic roasted green beans ahead of time. You can trim and wash the green beans and mix them with the garlic and oil. Store this mix in the fridge for up to a day. When you’re ready to eat, just roast them as directed. This makes dinner prep easier, and you can enjoy more time with your guests. Garlic roasted green beans pair well with many dishes. You can serve them alongside grilled chicken or fish for a balanced meal. They also complement pasta dishes, like spaghetti or fettuccine. If you want a vegetarian option, try them with quinoa or rice. Their bright flavor adds a nice touch to any plate. This post covered garlic roasted green beans from ingredients to serving ideas. Fresh or frozen beans work well, and you can swap key ingredients easily. Roasting creates a rich flavor, and adding herbs boosts it even more. Don’t forget about storage; knowing how to keep leftovers can help. Remember, you can customize this dish with other veggies or herbs. Enjoy experimenting with flavors! Roasted green beans can fit any meal.](https://joymealplan.com/wp-content/uploads/2025/07/774fbef7-0e10-49a5-abc6-76b985870023-768x768.webp)