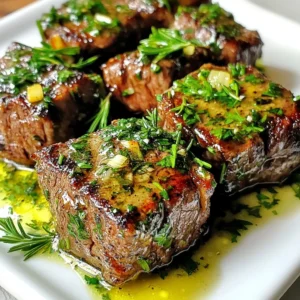
Garlic Butter Steak Bites Flavorful and Easy Recipe


Looking for a quick, tasty meal that impresses? Try my Garlic Butter Steak Bites! Made with tender sirloin, rich garlic butter, and fresh herbs, this dish is packed with flavor. It’s easy to prepare and perfect for any weeknight dinner. I’ll guide you step-by-step through the cooking process, plus share tips to make it even better. Ready to make your taste buds happy? Let’s dive in!
Why I Love This Recipe
- Simplicity: This recipe requires minimal ingredients and steps, allowing anyone to whip up a delicious meal in no time.
- Flavor Explosion: The combination of garlic, butter, and fresh herbs creates an irresistible flavor that elevates the steak bites.
- Versatile Serving: These steak bites can be served as an appetizer, main dish, or even in salads, making them perfect for any occasion.
- Quick Cooking: With a total time of just 20 minutes, this recipe is ideal for busy weeknights or spontaneous gatherings.
Ingredients
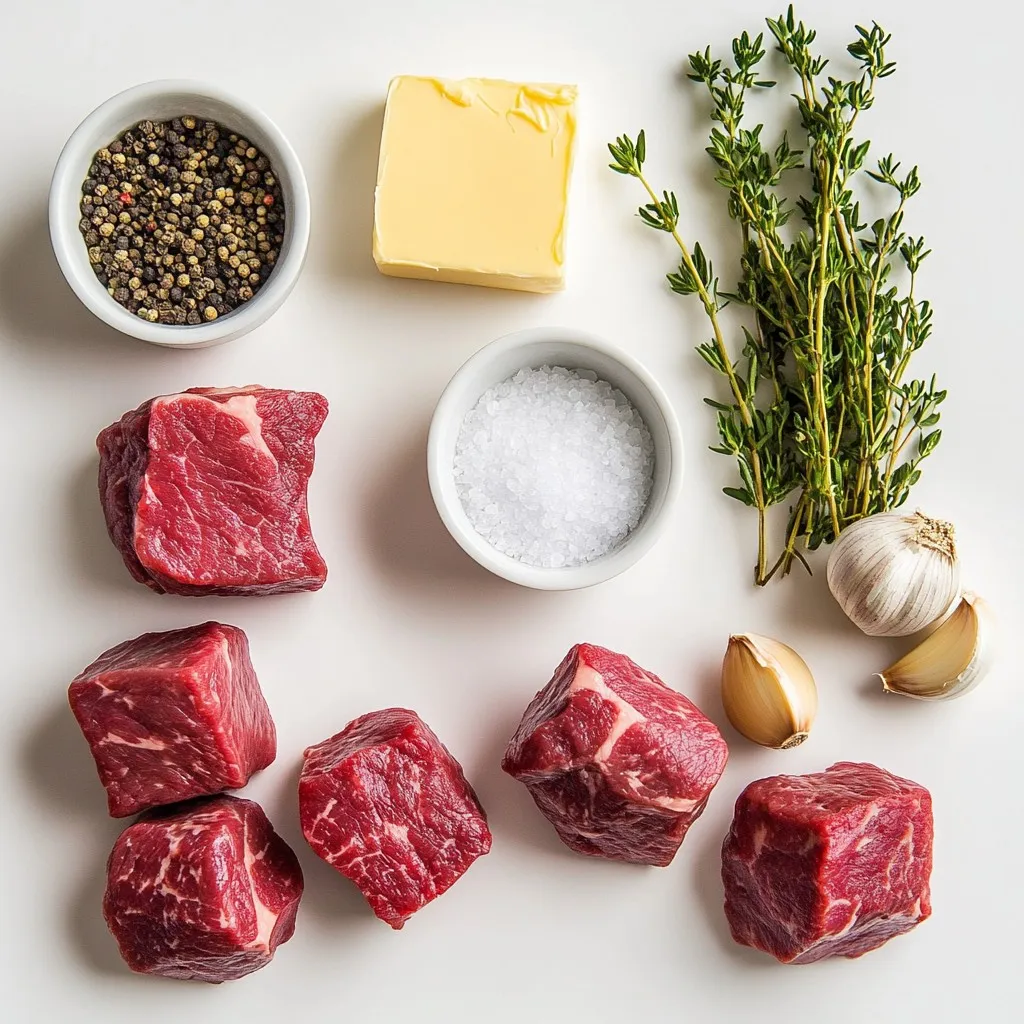
List of Ingredients
– 1 lb sirloin steak, cut into bite-sized cubes
– 4 tablespoons unsalted butter, divided
– 4 cloves garlic, finely minced
– 1 tablespoon fresh rosemary, finely chopped (or 1 teaspoon dried)
– 1 tablespoon fresh thyme leaves (or 1 teaspoon dried)
– Sea salt and freshly ground black pepper, to taste
– Fresh parsley, finely chopped, for garnish
To make garlic butter steak bites, you need simple, fresh ingredients. The sirloin steak gives a nice flavor and texture. Butter adds richness. Garlic makes the dish fragrant. Fresh herbs enhance the taste and aroma. Sea salt and black pepper are key for seasoning. Lastly, fresh parsley adds color when you serve. Each ingredient plays a role in making these bites delicious.
Step-by-Step Instructions
Preparation of Steak
First, dry the steak cubes with paper towels. This step helps create a nice sear. Next, season the steak cubes with sea salt and black pepper. Make sure to coat all sides.
Now, heat 2 tablespoons of unsalted butter in a large skillet over medium-high heat. Wait for the butter to melt and start sizzling. Carefully place the seasoned steak cubes in the skillet. Cook them for 2-3 minutes on each side. You want them to turn golden brown. If your skillet is small, cook in batches to avoid overcrowding. Once cooked, transfer the steak bites to a plate. Cover them loosely with foil to keep warm.
Making Garlic Butter Sauce
In the same skillet, lower the heat to medium. Add the rest of the butter and the minced garlic. Sauté for 1-2 minutes. Stir often until the garlic smells great but isn’t browned.
Next, add the finely chopped rosemary and thyme to the skillet. Then, return the seared steak bites to the skillet. Toss them well to coat in the fragrant garlic butter and herbs.
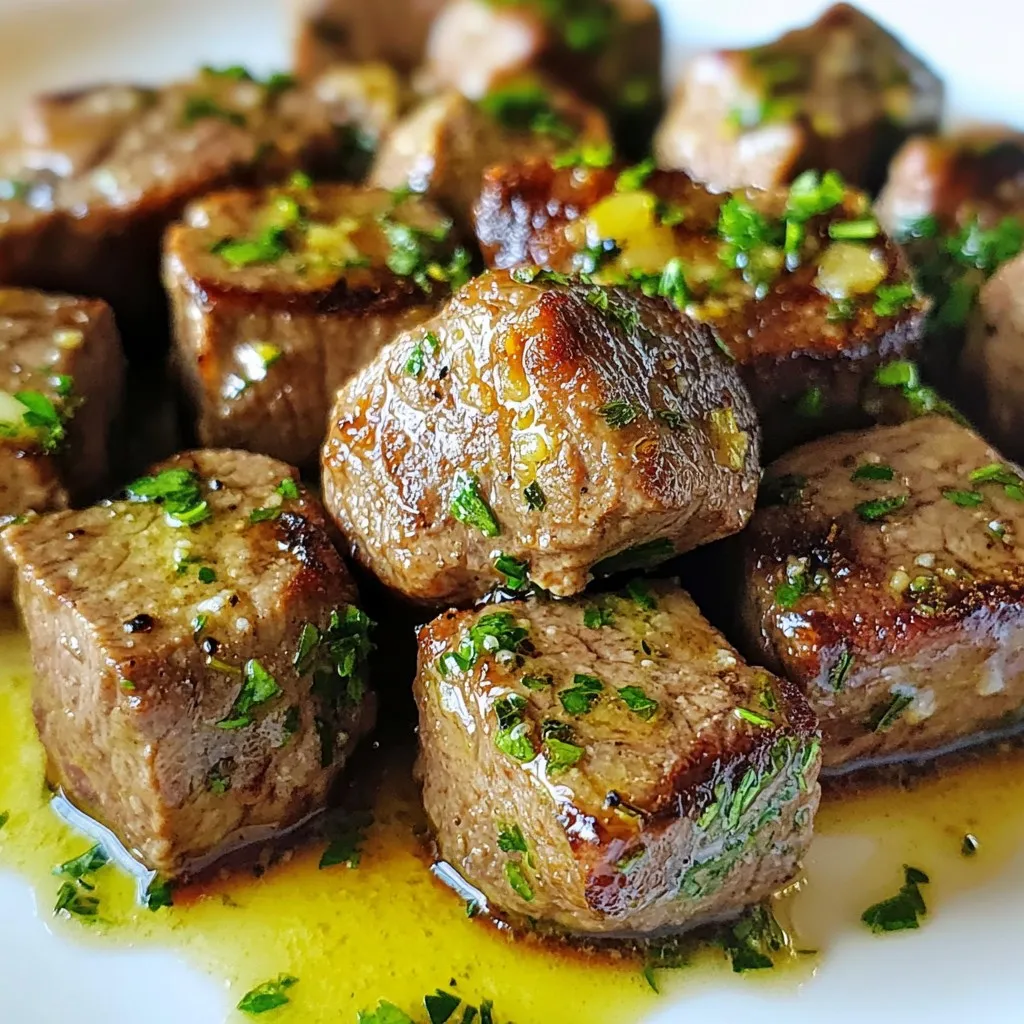
Final Cooking Process
Let the mixture cook for one more minute. This step helps blend the flavors nicely. Now, remove the skillet from the heat. Sprinkle freshly chopped parsley over the steak bites for a colorful touch.
Serve these steak bites right away for the best taste. Enjoy the rich flavors of garlic butter with each bite!
Tips & Tricks
Achieving the Best Sear
To get a great sear on your steak bites, always start by drying them well. Use paper towels to pat them dry. This step helps remove moisture, which can steam the meat. A good sear locks in flavor and gives a nice crust.
Also, avoid overcrowding the skillet. If you add too many pieces at once, they will steam instead of sear. Cook in batches if you need to. This keeps the heat high and ensures that each bite gets that beautiful golden crust.
Flavor Enhancements
To make your steak bites even better, consider adding some extra flavors. You can mix in a splash of Worcestershire sauce or a pinch of smoked paprika. Both add depth without changing the base recipe.
For tender steak, you might try marinating the cubes in olive oil and vinegar for about 30 minutes. This helps break down fibers, making the meat softer. If you have time, let the steak sit in the fridge for a few hours for even better results.
These tips will elevate your garlic butter steak bites, making them an even more enjoyable dish.
Pro Tips
- Pat the Steak Dry: Make sure to thoroughly dry the steak cubes with paper towels before seasoning. This will help achieve a better sear and crust on the steak.
- Don’t Overcrowd the Pan: Cook the steak bites in batches if necessary. Overcrowding the skillet can lower the temperature and prevent proper searing.
- Mind the Garlic: When sautéing the garlic, stir constantly and keep an eye on it to prevent burning. Burnt garlic can impart a bitter taste to the dish.
- Fresh Herbs Matter: Using fresh herbs like rosemary and thyme will elevate the flavor of the garlic butter significantly compared to dried herbs.
Variations
Different Cuts of Steak
You can use many cuts for steak bites. Sirloin is great, but ribeye adds more flavor. Tender cuts like filet mignon will be soft and juicy. For a leaner option, choose flank steak. Each cut needs different cooking times.
– Sirloin: Quick cooking, good flavor.
– Ribeye: Rich taste, juicy.
– Filet Mignon: Very tender, cooks fast.
– Flank Steak: Lean, but requires more care to stay tender.
Cooking time will change based on the cut. Thicker cuts need more time, while thinner cuts cook faster. Always check that the meat is cooked as you like.
Herb and Spices Variations
You can mix up the flavors with herbs and spices. Rosemary and thyme are my favorites, but you can try basil or oregano for a twist. Fresh herbs make the dish bright and fragrant.
– Basil: Sweet and aromatic.
– Oregano: Earthy and bold.
– Chili Flakes: Adds heat.
– Paprika: Gives a smoky flavor.
For spices, you can use a steak rub or even garlic powder. Mixing herbs and spices adds layers of taste. Don’t be afraid to experiment!
Serving Suggestions
Pair these steak bites with tasty sides. I love serving them with garlic mashed potatoes or roasted vegetables. You can also add a fresh salad for crunch.
– Garlic Mashed Potatoes: Creamy and rich.
– Roasted Vegetables: Sweet and caramelized.
– Fresh Salad: Light and refreshing.
For a fun presentation, serve the bites on skewers. Drizzle leftover garlic butter on top. This makes for an eye-catching dish that will impress your guests!
Storage Info
Refrigeration Guidelines
To store leftover steak bites, let them cool down first. Place the bites in an airtight container. This keeps them fresh and moist. In the fridge, they will last 3 to 4 days. You can enjoy the flavors even after a few days.
Reheating Instructions
When reheating steak bites, aim to keep them juicy. The best way is to use a skillet. Heat the skillet on medium heat and add a small amount of butter. Place the steak bites in the skillet. Cook for about 2 minutes, flipping them halfway through. This helps maintain their nice texture.
If you are short on time, you can use a microwave. Place the steak bites on a microwave-safe plate. Cover them with a damp paper towel. Heat them in short bursts, about 30 seconds at a time. Check often to avoid overcooking. This method works but may not keep the texture as good as the skillet.
FAQs
What is the best steak to use for steak bites?
The best steak for steak bites is sirloin. Sirloin is tender and full of flavor. You can also use ribeye, which has more fat for extra taste. Tenderloin is another great option but can be pricier. Always choose steaks that are fresh and well-marbled for the best results.
How do I make steak bites well-done?
To make steak bites well-done, cook them a bit longer. Start by searing them for 2-3 minutes on each side. After that, lower the heat and cook for an extra 1-2 minutes. Use a meat thermometer to check the doneness. Aim for about 160°F for well-done steak. Remember, cooking longer can make the steak tough, so watch closely!
Can I make garlic butter steak bites ahead of time?
Yes, you can make garlic butter steak bites ahead of time. Cook the steak bites and let them cool. Store them in an airtight container in the fridge for up to three days. To reheat, warm them in a skillet over medium heat. You can add a bit of butter or oil to keep them moist and tasty. This way, you can enjoy a quick meal without all the fuss.
In this post, we explored how to create delicious garlic butter steak bites. We covered everything, from choosing the right steak and searing it to making a tasty garlic butter sauce. You learned tips for the best cooking results and ways to personalize your dish with spices and herbs.
Remember, serving these bites fresh is key to great flavor. So, gather your ingredients and enjoy this simple yet satisfying mea
Garlic Butter Steak Bites
Ingredients
- 1 lb sirloin steak, cut into bite-sized cubes
- 4 tablespoons unsalted butter, divided
- 4 cloves garlic, finely minced
- 1 tablespoon fresh rosemary, finely chopped (or 1 teaspoon dried)
- 1 tablespoon fresh thyme leaves (or 1 teaspoon dried)
- to taste sea salt and freshly ground black pepper
- for garnish fresh parsley, finely chopped
Instructions
- Begin by patting the steak cubes dry using paper towels. This step is crucial for achieving a beautiful sear on the steak.
- Generously season the steak cubes with sea salt and freshly ground black pepper, making sure to coat all sides evenly.
- In a large skillet, add 2 tablespoons of unsalted butter and heat over medium-high heat. Allow the butter to melt and become sizzling before proceeding.
- Carefully add the seasoned steak cubes to the skillet in a single layer; avoid overcrowding to ensure proper searing. Cook the steak bites for about 2-3 minutes on each side, until they develop a beautiful golden-brown crust and reach your desired level of doneness. If necessary, cook the steak in batches to maintain space in the skillet.
- Once cooked to perfection, transfer the steak bites to a plate. Loosely cover them with aluminum foil to keep them warm while you prepare the garlic butter.
- In the same skillet, reduce the heat to medium. Add the remaining 2 tablespoons of butter along with the minced garlic. Sauté for 1-2 minutes, stirring frequently, until the garlic becomes aromatic but does not turn browned.
- Next, stir in the finely chopped rosemary and thyme. Introduce the seared steak bites back into the skillet. Toss everything together, ensuring that the steak bites are thoroughly coated with the fragrant garlic butter and herbs.
- Allow the mixture to cook for an additional minute, enabling the flavors to meld together beautifully.
- Remove the skillet from the heat and generously sprinkle freshly chopped parsley over the steak bites for a vibrant touch before serving.

. To make great sesame garlic green beans, avoid burnt garlic. Burnt garlic tastes bitter. Keep the heat at medium when you sauté it. Stir it often for about 30 seconds until it smells good. This way, you get all the flavor without the bad taste. For even flavor, coat every green bean with the oil and garlic. Toss them well in the skillet. This helps each bean absorb the yummy sauce. The right mix makes each bite tasty. Serving your green beans in colorful dishes makes them pop! Use a bright bowl to show off the green color. It makes the dish inviting and fun. You can add extra garnishes for flair. Try more sesame seeds or a drizzle of sesame oil on top. Fresh green onions also add a nice touch. These small details can make your dish look special. Prepping your ingredients in advance saves time. Trim the green beans and chop the garlic ahead of time. This way, you can cook quickly when you’re ready. Using frozen green beans is another great option. They are quick to cook and still taste good. Just follow the same steps as with fresh beans for a tasty dish. For the full recipe, check out the detailed steps and enjoy! {{image_4}} If you need to avoid nuts, sesame oil can be swapped. Try using olive oil or avocado oil. Both oils add a nice flavor without nuts. This makes the dish safe for those with nut allergies. To boost the taste, add crushed red pepper. It gives a spicy kick that many enjoy. You can also add other veggies. Carrots or bell peppers work well. They add color and extra nutrients. For a healthier option, consider coconut aminos. This sauce is lower in sodium than soy sauce. It works great in this recipe. You can also use a low-calorie sweetener instead of honey. This keeps the dish sweet without extra calories. For the full recipe, check out the [Full Recipe]. To store leftover sesame garlic green beans, let them cool first. Place them in an airtight container. You can refrigerate them for up to three days. This keeps the flavors fresh and tasty. When you're ready to eat, reheat the green beans carefully. I suggest using a skillet. Heat it over medium-low heat. Add a splash of water to keep them moist. Stir gently for about five minutes. This method helps maintain their crispness. You can also microwave them in short bursts. Cover the dish to keep the moisture in. If you want to freeze the green beans, do this before adding the sauce. Prepare as usual, then freeze them in a single layer on a baking sheet. Once they are frozen, transfer them to a zip-top bag. This way, they won’t clump together. To thaw, place the bag in the fridge overnight. When ready to use, sauté them with the sauce. Enjoy the fresh flavors from your freezer. For the full recipe, check out the details above. You can make this dish vegan by removing honey. Instead, use agave syrup. This keeps the sweetness while keeping it plant-based. Agave syrup is a great substitute and works well in this recipe. Yes, you can use canned green beans. However, fresh beans taste better. Canned beans save time, but they can be softer. If you use canned, rinse them well to remove extra sodium. Fresh beans will have a crunch that makes this dish shine. These green beans pair well with many dishes. Try serving them with grilled chicken or tofu. They also go great with rice or quinoa. For a full meal, add a side salad for fresh flavors. Yes, this dish can be gluten-free. Use tamari instead of soy sauce. Tamari is a gluten-free soy sauce that gives a rich taste. Always check labels to ensure your ingredients are gluten-free. Adding protein is easy! You can toss in cubed tofu or grilled chicken. Shrimp also works well. Just sauté them before adding the green beans. This will create a well-rounded meal, full of flavor and nutrients. For the full recipe, check out the details above. This post explored how to make tasty Sesame Garlic Green Beans. We covered key ingredients like fresh green beans, sesame oil, and garlic. You learned step-by-step instructions, tips for sautéing, and how to present your dish beautifully. We also discussed variations, storage methods, and common FAQs. These green beans are not just a side dish; they can shine on any table. With the skills you now have, feel confident to create this dish and impress your friends and family. Enjoy cooking!](https://joymealplan.com/wp-content/uploads/2025/07/aeac6747-6887-42be-b9f7-ffc1813a8658-768x768.webp)
. - Preheat the oven to 400°F (200°C). - Line the sheet pan with parchment paper. - Whisk together olive oil, garlic, lemon juice, lemon zest, dill, salt, and pepper. - This mix adds flavor and moisture to your salmon. - Coat salmon fillets with the marinade. - Arrange cherry tomatoes and asparagus on the sheet pan. - Make sure the veggies are spread out for even cooking. - Transfer the pan to the oven and bake for 15-20 minutes. - The salmon will be done when it flakes easily with a fork. - Check that the asparagus is tender but still crisp. - Let the dish rest for a few minutes before serving. - Garnish with lemon slices and optional dill for a fresh look. I love how easy this dish is to prepare. You can find the Full Recipe for more details. To ensure salmon is perfectly cooked, use a fork to test it. When it flakes easily, it’s done. Aim for an internal temperature of 145°F. This way, your salmon will be moist and tender. Resting time is key after cooking. Let the salmon sit for about 5 minutes before serving. This helps the juices redistribute, making each bite more flavorful. Serving directly from the pan gives a cozy feel. It makes the meal feel more relaxed and invites everyone to dig in. For plating, use a large plate. Place a salmon fillet in the center. Arrange the asparagus and tomatoes around it. A touch of fresh dill on top adds color and flavor. To boost flavor, consider adding spices like paprika or smoked sea salt. Fresh herbs like basil or parsley can also work well. For marinades, try mixing honey with soy sauce for a sweet twist. You can also use a splash of white wine to elevate the dish. For the full recipe, check the links above. {{image_4}} You can easily swap salmon for other fish like trout or cod. These fish cook similarly and absorb flavors well. If you want a different protein, try chicken breasts. They work great too. For vegetarian or vegan options, use tofu or tempeh. Both can soak up the lemon garlic marinade and bring great taste. Using seasonal vegetables can brighten your dish. In spring, try green beans or baby carrots. Summer is perfect for zucchini or bell peppers. In fall, consider sweet potatoes or Brussels sprouts. Winter brings root vegetables like parsnips and turnips. If you want to switch out asparagus or tomatoes, don't hesitate. Broccoli or cauliflower can add nice crunch and flavor. Experimenting with herbs and spices opens new doors. Try fresh basil or parsley for a bright twist. If you want a bolder taste, use smoked paprika or cumin. You can also play with sweet and savory. Adding fruits like pineapple or peaches can bring a fun contrast to the dish. Mixing flavors can create a memorable meal! For the full recipe, check out the [Full Recipe]. Store any leftover salmon and veggies in the fridge. Use airtight containers to keep them fresh. Make sure the lid fits tightly. This helps maintain flavor and texture. It's best to eat leftovers within two days for the best taste. To reheat salmon, use low heat to avoid drying it out. You can use the oven or microwave. For the oven, set it to 350°F (175°C) and warm for about 10 minutes. If using the microwave, place salmon on a plate and cover it with a damp paper towel. Heat in short bursts of 30 seconds until warmed through. You can freeze cooked salmon and veggies for later. Wrap each piece tightly in plastic wrap, then place in a freezer bag. Be sure to remove as much air as possible. For thawing, move them to the fridge for a few hours or overnight. This keeps the salmon tasty and moist. How long to bake salmon at different temperatures? For salmon, the general rule is to bake it at 400°F for 15-20 minutes. If you choose 375°F, it may take 20-25 minutes. At 425°F, check it after 12-15 minutes. Cooking time varies with thickness and oven accuracy. Always check for doneness to avoid overcooking. Can I use frozen salmon for this recipe? Yes, you can use frozen salmon. Just be sure to thaw it first. Place it in the fridge overnight or use cold water for quicker thawing. Pat the salmon dry before adding the marinade. This helps it absorb the flavors better. What temperature should salmon be cooked to? Salmon should reach an internal temperature of 145°F. Use a meat thermometer to check. When done, it should flake easily with a fork. The color will change from bright pink to opaque. How can I tell when the salmon is done? You can tell salmon is ready when it flakes easily. Press it gently with a fork. If it breaks apart, it's done. The color should be a light pink with a slightly opaque appearance. What sides pair well with lemon garlic salmon? Great sides include rice, quinoa, or a fresh salad. Roasted potatoes or steamed veggies also work well. These sides complement the salmon's bright flavors. You might want to add a squeeze of lemon on top. Is it okay to substitute any ingredients? Yes, you can substitute ingredients. Use any firm fish if you don't have salmon. For veggies, try broccoli or zucchini. You can swap fresh herbs with dried ones, but use less. Adjust the flavors to suit your taste! For the complete recipe, check out the Full Recipe section. This blog post showed you how to make a delicious lemon garlic salmon dish. We covered the main ingredients, easy steps for cooking, and tips for great results. You learned about variations and storing leftovers for later. Cooking should be fun, and this recipe is simple and tasty. Try it out and enjoy your meal. Once you master this dish, feel free to experiment with your own flavors and sides. Happy cooking!](https://joymealplan.com/wp-content/uploads/2025/07/8e928ca0-d1e7-48e9-9001-0d995acac6dc-768x768.webp)