
Banana Nutella Swirl Bread Irresistible Treat Recipe

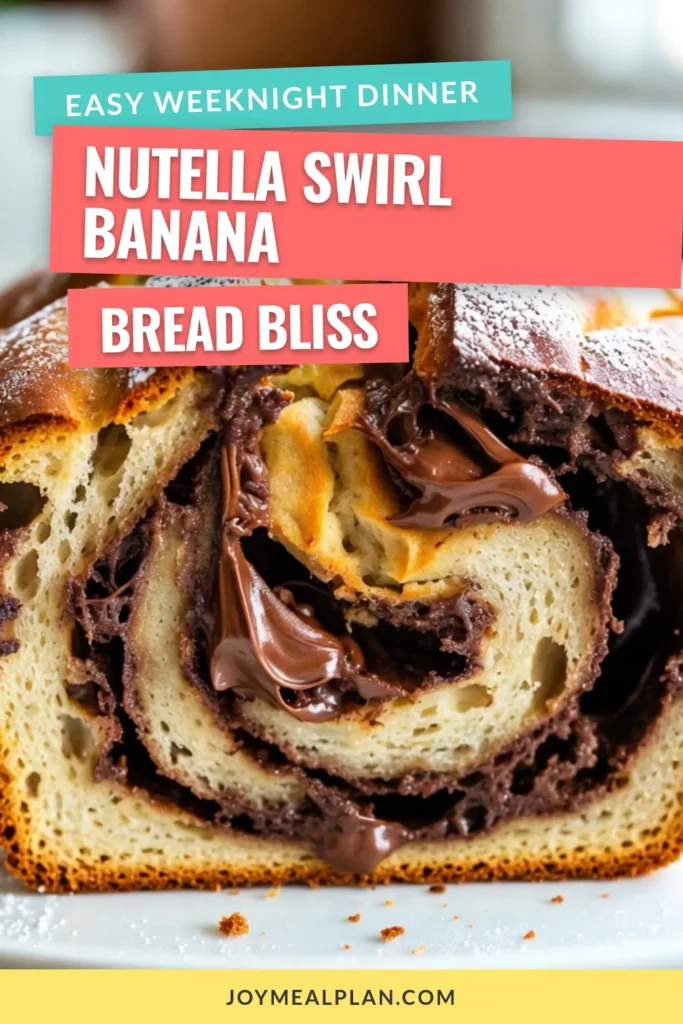
Are you ready to enjoy a delightful treat that’s quick and easy to make? This Banana Nutella Swirl Bread will become your new favorite dessert! It blends soft bananas with rich Nutella, creating a sweet swirl that tastes heavenly. In this post, I’ll share simple steps, tips, and fun variations for making the best Banana Nutella Swirl Bread. Grab your ingredients and let’s get baking!
Why I Love This Recipe
- Deliciously Indulgent: This banana Nutella swirl bread combines the rich flavor of Nutella with the natural sweetness of ripe bananas, creating a decadent treat that’s hard to resist.
- Easy to Make: With simple, everyday ingredients and straightforward steps, this recipe is perfect for bakers of all skill levels. It’s a quick and satisfying way to whip up something special!
- Perfect for Any Occasion: This bread is versatile enough to be enjoyed as a breakfast, snack, or dessert. It’s a great way to impress guests or simply treat yourself.
- Great for Leftover Bananas: Instead of letting overripe bananas go to waste, this recipe provides a delicious solution that transforms them into a delightful treat everyone will love.
Ingredients
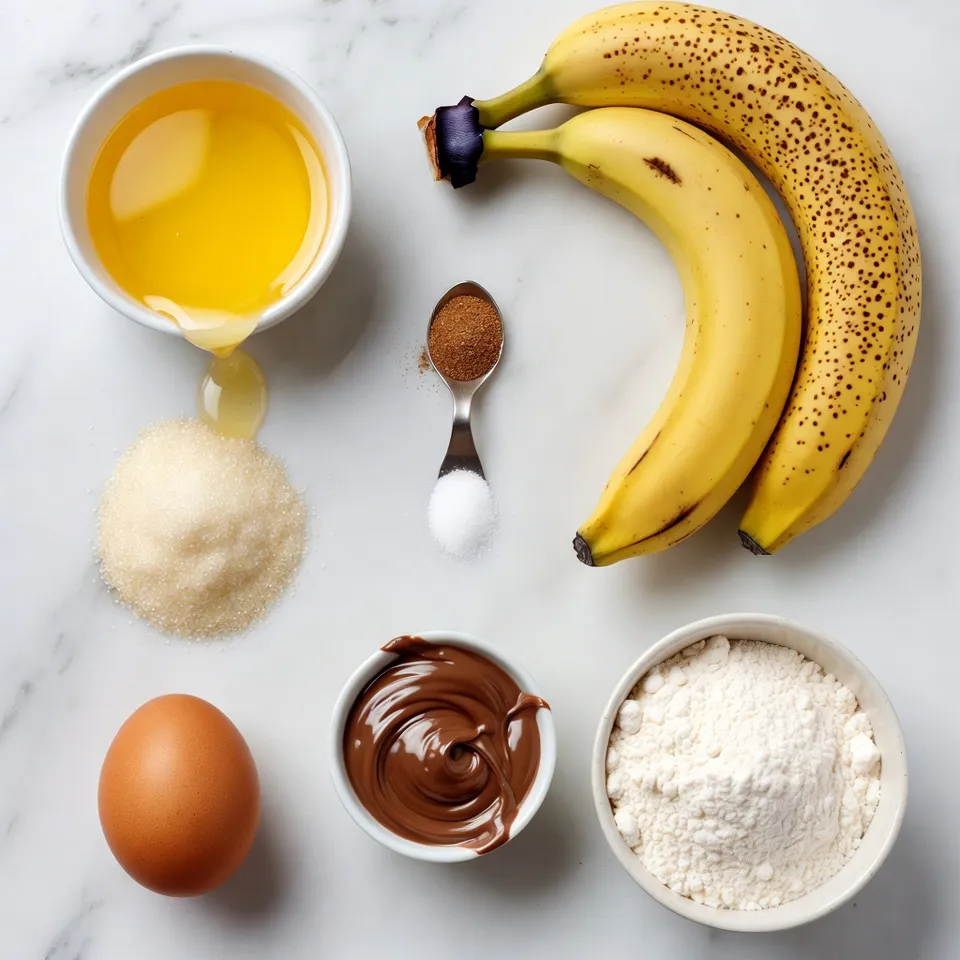
List of Ingredients
– 3 ripe bananas, mashed
– 1/3 cup melted unsalted butter
– 1 teaspoon baking soda
– A pinch of salt
– 3/4 cup granulated sugar
– 1 large egg, beaten
– 1 teaspoon pure vanilla extract
– 1 cup all-purpose flour
– 1/2 cup Nutella
Substitutions and Alternatives
You can swap ripe bananas for applesauce. This change keeps the bread moist. If you need a dairy-free option, use coconut oil instead of butter. For a gluten-free version, try almond flour or a gluten-free blend.
Tips for Choosing the Best Bananas
Look for bananas with brown spots. These bananas are sweeter and softer. If your bananas are green, let them ripen at room temperature. To speed up ripening, place them in a paper bag. The ethylene gas helps them ripen faster. Use ripe bananas for the best flavor and texture in your bread.
Step-by-Step Instructions
Prepping the Oven and Loaf Pan
First, you need to heat your oven. Set it to 350°F (175°C). This step is key for even baking. While the oven warms up, grab your 9×5 inch loaf pan. Generously grease it with butter or non-stick spray. This will help your bread slide out easily later.
Mixing the Batter
Now, let’s mix the batter. Start by taking your ripe bananas. Use a fork to mash them in a large bowl. You want them smooth and creamy. Next, pour in the melted butter and stir until they blend together. Then, add the baking soda and a pinch of salt. Mix this well to combine.
Add the sugar, beaten egg, and vanilla extract. Stir until everything is evenly mixed. Now it’s time to add the flour. Gradually fold it in with a spatula. Be gentle to keep some lumps in the batter.
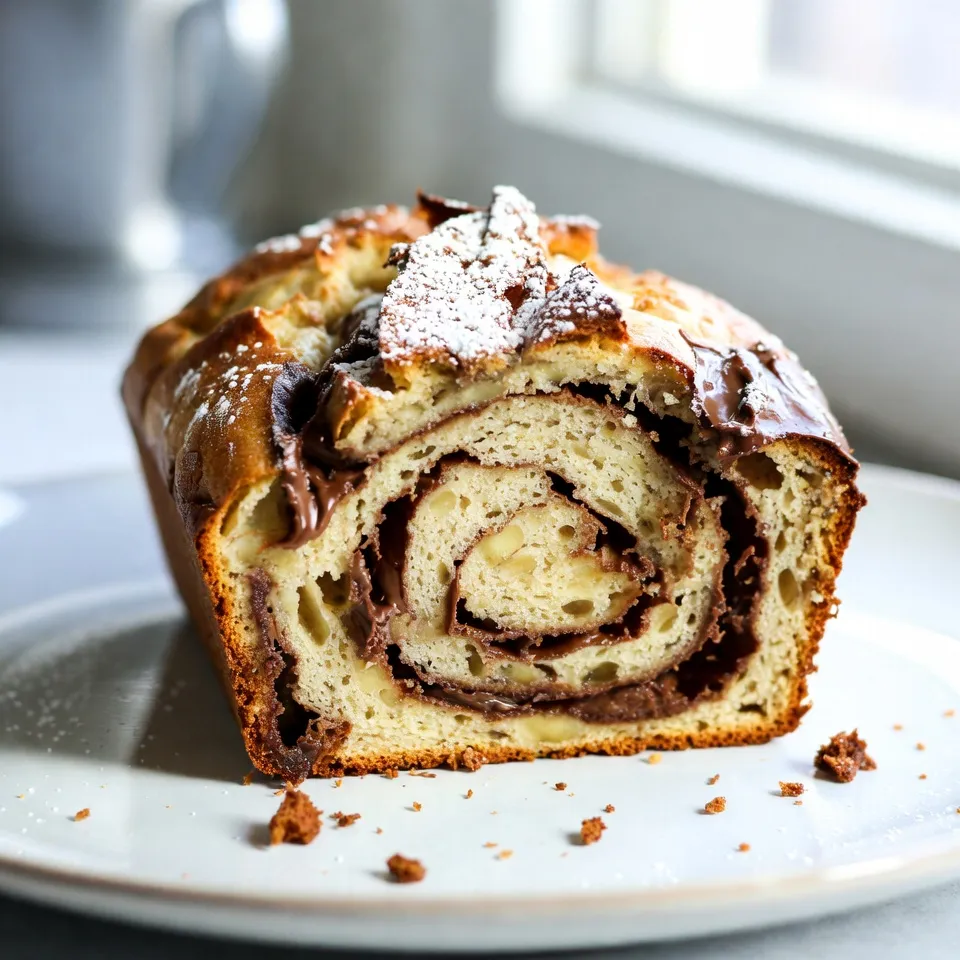
Creating the Nutella Swirl
Now comes the fun part: the Nutella swirl! Pour half of the banana batter into the prepared loaf pan. Spread it evenly. Then, spoon dollops of Nutella on top. Use a knife to swirl the Nutella into the batter for a marbled look.
Next, pour the rest of the banana batter over the Nutella layer. Add more dollops of Nutella on top. Again, use your knife to swirl it gently. This will create a beautiful pattern.
Finally, place the loaf pan in the center of your preheated oven. Bake for 50-60 minutes. When it’s done, a toothpick should come out clean or with a few moist crumbs. Enjoy the delightful smell that fills your kitchen!
Tips & Tricks
How to Achieve the Perfect Swirl
To make the best swirl, you need balance. Start with half the banana batter in the pan. Spread it evenly. Then, add dollops of Nutella on top. Use a knife to swirl gently. Don’t mix too much, or you’ll lose the pretty pattern. Aim for nice, defined swirls that show both banana and Nutella.
Common Baking Mistakes to Avoid
Baking banana Nutella swirl bread can be simple, but mistakes happen. Here are some to watch out for:
– Overmixing the batter: This can make your bread tough. Mix just until combined.
– Using unripe bananas: They won’t give you the sweet flavor you want. Use ripe, soft bananas.
– Not greasing the pan enough: This can make your bread stick. Generously grease it or use non-stick spray.
Ways to Enhance Flavor and Texture
You can boost the flavor and texture in several ways:
– Add nuts: Chopped walnuts or pecans add crunch and flavor.
– Incorporate spices: A sprinkle of cinnamon or nutmeg can elevate the taste.
– Use flavored extracts: Swap vanilla for almond extract for a unique twist.
These tips will help you create a delicious banana Nutella swirl bread that is sure to impress!
Pro Tips
- Use Overripe Bananas: The riper the bananas, the sweeter and more flavorful your bread will be. Look for bananas with brown spots for the best results.
- Don’t Overmix: When adding the flour, mix just until combined. Overmixing can lead to a dense bread, so keep it slightly lumpy.
- Swirl Effect: For a beautiful marbled effect, use a toothpick or a knife to gently swirl the Nutella into the batter without completely mixing it in.
- Storage Tips: Store the banana Nutella swirl bread in an airtight container at room temperature for up to 3 days, or refrigerate for longer freshness.
Variations
Adding Nuts or Chocolate Chips
You can make this bread even better by adding nuts or chocolate chips. Walnuts or pecans work great. They add a nice crunch and flavor. Just chop them up and mix them into the batter before pouring it into the pan. You can also add chocolate chips for extra sweetness. Stir in about half a cup to the batter. This change makes each bite exciting!
Making it Healthier: Ingredient Swaps
Want to make this treat a bit healthier? You can swap some ingredients. Use whole wheat flour instead of all-purpose flour. This adds fiber and nutrients. You can also reduce the sugar. Use only half a cup, or try a natural sweetener like honey or maple syrup. If you’re feeling bold, substitute mashed avocado for half the butter. It keeps the bread moist and adds healthy fats.
Seasonal Flavor Additions (e.g., Spices or Fruits)
Seasonal flavors can make this bread fun! In fall, add a teaspoon of cinnamon or nutmeg for warmth. In summer, mix in fresh berries like blueberries or strawberries. They pair well with banana and Nutella. You can even add a splash of orange juice for a bright twist. Each season brings new flavors to try. Enjoy getting creative with your banana Nutella swirl bread!
Storage Info
How to Store Leftover Bread
To keep your banana Nutella swirl bread fresh, wrap it well. Use plastic wrap or foil to cover the bread tightly. Store it at room temperature for up to three days. If you want it to last longer, place it in the fridge. Just remember, the fridge can dry it out a bit.
Freezing Tips for Long-term Storage
Freezing is a great way to keep banana Nutella swirl bread. First, let the bread cool completely. Then, slice it into pieces if you wish. Wrap each slice in plastic wrap, then place them in a freezer bag. Make sure to remove as much air as possible. This bread can last for up to three months in the freezer. When you’re ready to enjoy it, just thaw it at room temperature.
Best Ways to Reheat Banana Nutella Swirl Bread
To reheat your banana Nutella swirl bread, you have a few options. The oven works best. Preheat it to 350°F (175°C). Place the bread on a baking sheet for about 10 minutes. This warms it through and keeps it soft. You can also use a microwave. Heat a slice for about 15-20 seconds. Enjoy it warm, and maybe even add a bit more Nutella on top!
FAQs
Can I use frozen bananas?
Yes, you can use frozen bananas! Just thaw them first. Drain any excess liquid before mashing. This helps keep your bread from getting too wet. Frozen bananas often taste sweeter. They work great in banana bread.
How do I know when the banana bread is done?
You can check if the bread is done by using a toothpick. Insert it into the center of the loaf. If it comes out clean or with a few moist crumbs, it’s ready. The bread should also look golden brown and feel firm to the touch.
Can I substitute Nutella with another spread?
Yes, you can swap Nutella for other spreads. Try peanut butter, almond butter, or any chocolate spread you like. Each will give a different taste. Just remember, the texture may change a bit based on your choice.
In this post, we explored how to make delicious Banana Nutella Swirl Bread. We listed the best ingredients and offered swaps when needed. You learned the steps to prep your oven and mix the batter for a perfect swirl. I shared tips to avoid mistakes and how to store your loaf.
Now, with these insights, you can bake the perfect banana bread every time. Enjoy your tasty creatio
Banana Nutella Swirl Bread
Ingredients
- 3 pieces ripe bananas, mashed
- 1 third cup melted unsalted butter
- 1 teaspoon baking soda
- 1 pinch salt
- 3 fourth cup granulated sugar
- 1 large egg, beaten
- 1 teaspoon pure vanilla extract
- 1 cup all-purpose flour
- 1 half cup Nutella
Instructions
- Preheat your oven to 350°F (175°C). Generously grease a 9x5 inch loaf pan with butter or non-stick spray.
- In a large mixing bowl, use a fork to mash the ripe bananas until they are smooth and creamy.
- Pour the melted butter into the mashed bananas, stirring until completely blended together.
- Add in the baking soda and a pinch of salt; mix well to incorporate.
- Stir in the granulated sugar, beaten egg, and pure vanilla extract, mixing until all ingredients are evenly combined.
- Gradually add the all-purpose flour to the mixture, folding it in gently with a spatula to avoid overmixing; the batter should remain slightly lumpy.
- Pour half of the banana batter into the prepared loaf pan, spreading it evenly with a spatula.
- Spoon dollops of Nutella over the banana batter, then use a knife to gently swirl it throughout for a marbled effect.
- Carefully pour the remaining banana batter on top, followed by additional spoonfuls of Nutella. Use the knife again to create a gentle swirl on the surface.
- Place the loaf pan in the center of the preheated oven and bake for 50-60 minutes. The bread is done when a toothpick inserted into the center comes out clean or with a few moist crumbs attached.
- Once baked, allow the bread to cool in the pan for about 10 minutes before transferring it to a wire rack to cool completely.
![- 1 cup dark chocolate chips - 1 cup white chocolate chips - 1 cup freeze-dried strawberries, crushed - 1/2 cup roasted almonds, roughly chopped (optional) - Sea salt, for a finishing sprinkle To make chocolate covered strawberry bark, you need simple ingredients. Dark chocolate chips form the base, giving a rich taste. White chocolate chips add sweetness and a lovely contrast. Freeze-dried strawberries provide a fruity crunch. If you like, you can add roasted almonds for a nutty flavor. A sprinkle of sea salt at the end really enhances everything. - For chocolate alternatives, you can use milk chocolate or vegan chocolate. - Other nuts and toppings can include walnuts, pecans, or coconut flakes. If you want to switch things up, feel free to use different chocolates. Milk chocolate offers a sweeter note, while vegan chocolate works for plant-based diets. You can also play with toppings. Try different nuts or even dried fruits like apricots or raisins. These changes keep the bark fun and exciting. 1. Lining the baking sheet Start by lining a baking sheet with parchment paper. This paper helps the bark come off easily later. Without it, the chocolate might stick. 2. Melting the dark chocolate Next, take a microwave-safe bowl and add one cup of dark chocolate chips. Microwave the chips in 30-second bursts. Stir well after each round. Keep going until the chocolate is fully melted and smooth. Be careful; you don’t want to overheat the chocolate. 3. Spreading the dark chocolate Once your dark chocolate is melted, pour it onto the lined baking sheet. Use a spatula to spread it into an even layer. Make it as thick or thin as you like. A consistent layer looks great. 4. Melting and drizzling white chocolate In another bowl, melt one cup of white chocolate chips the same way. Use the microwave in 30-second increments until it’s silky smooth. Drizzle the melted white chocolate over the dark chocolate. To create a pretty marbled effect, take a toothpick or spatula and swirl the two chocolates together. 5. Adding toppings and sea salt Now, sprinkle the crushed freeze-dried strawberries on top. If you want, add chopped roasted almonds for crunch. Finally, lightly sprinkle sea salt over everything. This adds a nice balance to the sweetness. 6. Chilling the bark Carefully place the baking sheet in the refrigerator. Chill for about 30 minutes, or until the chocolate is firm. Once set, break the bark into pieces with your hands or a knife. This gives it a rustic look. For the [Full Recipe], check the earlier section. Enjoy your chocolate-covered strawberry bark! To melt chocolate correctly, avoid overheating it. Heat can turn chocolate into a grainy mess. Use short bursts in the microwave, about 30 seconds at a time. Stir well after each interval. If you notice the chocolate starting to seize, stop heating immediately. You can also use a double boiler as an alternative. Fill a pot with a bit of water and place a heat-safe bowl on top. This method helps keep the chocolate at a steady temperature. Stir gently as it melts for a silky smooth finish. For the best texture, aim for a thickness of about 1/4 inch when spreading the chocolate. This thickness will give your bark a nice bite. If you prefer thicker pieces, adjust accordingly. If you have leftover melted chocolate, store it in a sealed container. Keep it in the fridge for up to a week. When you want to use it again, gently reheat it in the microwave. To make your Chocolate Covered Strawberry Bark look stunning, use a decorative platter for serving. Arrange some whole strawberries next to the bark for a pop of color. You can also sprinkle some colorful garnish on top. Consider using edible flowers or nuts for added texture. These small touches make a big difference in presentation. For more creative ideas, check out the Full Recipe for inspiration. {{image_4}} You can easily change the taste of your chocolate bark. Adding flavors like peppermint or orange can make it special. Just mix in a few drops of peppermint extract or some orange zest with your melted chocolate. This twist can really freshen up the bark. You can also add dried fruits. Dried cherries, blueberries, or even mango give great flavor. These fruits add a sweet and chewy bite. Just sprinkle them on top along with the strawberries. If you need gluten-free options, worry not! Both dark and white chocolate can be gluten-free. Just check the labels to be sure. You can also skip the nuts if you have allergies. This bark stays delicious and fun to eat without them. For vegan adaptations, swap the chocolate for vegan chocolate. There are many brands that make dairy-free chocolate. This way, everyone can enjoy this treat! You can create themed bark for holidays, too. For Christmas, add crushed candy canes on top for a festive touch. For Valentine's Day, use pink or red sprinkles along with the strawberries. This can make your bark look lovely and cheerful for any celebration. Check out the Full Recipe for more details on making this delightful treat! To keep your chocolate covered strawberry bark fresh, use airtight containers. This keeps moisture out and prevents the bark from getting soft. The ideal temperature for storage is cool, around 60-70°F. Avoid placing the bark in warm areas, as heat can melt the chocolate. For best taste, enjoy your chocolate covered strawberry bark within two weeks. After that, the quality may decrease. Look for signs of spoilage like a white film or off smell. If you spot these, it’s best to throw it away. Always check for freshness before enjoying this treat. Enjoy your chocolate covered strawberry bark while it’s at its best! How do I make Chocolate Covered Strawberry Bark? Making Chocolate Covered Strawberry Bark is simple! First, gather your ingredients: - 1 cup dark chocolate chips - 1 cup white chocolate chips - 1 cup freeze-dried strawberries, crushed - 1/2 cup roasted almonds, roughly chopped (optional) - Sea salt, for a finishing sprinkle Follow the steps in the Full Recipe for smooth melting and perfect layering. This treat is fun to make and even better to eat! Can I use different types of chocolate? Yes, you can use different types of chocolate! Milk chocolate, dark chocolate, or even vegan chocolate work well. Each type brings its own flavor and sweetness. Feel free to mix and match based on your taste. Where to buy pre-made Chocolate Covered Strawberry Bark If you want to skip the prep, you can find pre-made Chocolate Covered Strawberry Bark at many specialty stores. Check local gourmet shops or online marketplaces for ready-made options. Recommended brands Some popular brands to try include: - Compartés Chocolatier - See's Candies - Godiva These brands offer quality products that can satisfy your chocolate cravings. Ideal pairings with beverages Chocolate Covered Strawberry Bark pairs well with many drinks! Consider serving it with a glass of milk, hot cocoa, or even a fruity tea. The flavors blend nicely and make for a tasty treat. Best occasions for serving this treat This bark is perfect for any occasion! Serve it at birthday parties, holiday gatherings, or as a sweet snack during movie nights. It always brings smiles and joy. In this blog post, we explored how to make Chocolate Covered Strawberry Bark. We discussed the main ingredients, including dark and white chocolate, strawberries, and optional almonds. You learned step-by-step instructions for preparation and assembly. I shared tips for melting chocolate safely and achieving the right texture. We also looked at variations and storage tips for this delightful treat. Enjoy making your own chocolate bark and get creative with flavors! It's simple, fun, and perfect for sharing.](https://joymealplan.com/wp-content/uploads/2025/07/8e3d9728-8bcd-40c4-9564-7af6a171388c-768x768.webp)
![- 1 ¾ cups all-purpose flour - 1 teaspoon baking soda - ½ teaspoon baking powder - ½ teaspoon salt - 1 teaspoon ground cinnamon - ½ teaspoon ground nutmeg - ½ teaspoon ground ginger - ½ cup granulated sugar - ½ cup brown sugar, packed firmly - 2 large eggs - 1 cup pumpkin puree - ½ cup vegetable oil - 1 teaspoon pure vanilla extract - 1 cup semi-sweet chocolate chips - ½ cup chopped walnuts (optional) To make Chocolate Chip Pumpkin Bread, you need simple ingredients. You’ll want to gather flour, sugars, eggs, and pumpkin puree. Pumpkin puree gives the bread moisture and flavor. The spices, like cinnamon and nutmeg, add warmth and depth. You can use canned pumpkin or make your own from fresh pumpkins. Using two types of sugar helps balance the flavor. Granulated sugar adds sweetness, while brown sugar adds a rich, caramel taste. Don’t forget the chocolate chips! They melt into gooey pockets of joy. If you like nuts, add walnuts for crunch. They complement the sweet and spicy flavors. - 9x5-inch loaf pan - Mixing bowls (medium & large) - Whisk or electric mixer - Spatula or wooden spoon - Parchment paper For baking, you’ll need some tools. A 9x5-inch loaf pan is perfect for this bread. Mixing bowls, both medium and large, will help you combine ingredients. A whisk or electric mixer makes it easy to blend. Use a spatula or wooden spoon to fold in the chocolate chips. Parchment paper is a must for easy removal after baking. This is your list of ingredients and tools to create a cozy fall treat. You can find the full recipe in the previous sections to guide you through the steps. Enjoy the process of baking and the delightful smell that fills your kitchen! - Preheat oven to 350°F (175°C). - Grease and line the loaf pan with parchment paper. To start, you need your oven hot. Preheating helps the bread rise well. Greasing the pan is key. It keeps the bread from sticking. Lining it with parchment paper makes removal easy. You’ll thank yourself later! - Whisk together flour, baking soda, baking powder, salt, and spices. - Set aside for later use. Next, grab a mixing bowl. Add the flour, baking soda, and baking powder. Toss in the salt, cinnamon, nutmeg, and ginger. Whisk them together until mixed well. This step ensures even flavors in your bread. Set this bowl aside for now. - Beat sugars and eggs until fluffy. - Stir in pumpkin puree, oil, and vanilla extract. In a large bowl, mix granulated and brown sugars with the eggs. Use an electric mixer or a whisk. Beat until it’s light and fluffy. Then, stir in the pumpkin puree, vegetable oil, and vanilla. Mix until it’s smooth. This creates the moist base for your bread. - Gradually add dry ingredients to wet mixture. - Fold gently to avoid overmixing. Now, slowly add the dry mix to the wet mix. Use a spatula for this step. Gently fold the ingredients together. Be careful not to overmix. This keeps your pumpkin bread light and airy. - Fold in chocolate chips and optional walnuts. Time for the fun part! Gently fold in the chocolate chips. If you like nuts, add the walnuts now. This gives your bread an amazing crunch and flavor. Ensure they are evenly distributed. - Pour batter into loaf pan and smooth the top. - Bake for 55-65 minutes and check for doneness. Pour your batter into the prepared loaf pan. Smooth the top with a spatula. Place it in the oven. Bake for 55 to 65 minutes. Check doneness with a toothpick. It should come out clean or with a few moist crumbs. Enjoy the aroma filling your kitchen! This step brings you closer to a delicious treat. For the full recipe, refer to the entire guide. Checking for doneness is easy. Insert a toothpick into the center of the bread. If it comes out clean or with a few moist crumbs, the bread is ready. This method helps ensure you don’t overbake. If you live at a high altitude, you may need to adjust the baking time. Start checking at the 50-minute mark to see if it is done. To keep your chocolate chip pumpkin bread light, avoid overmixing. Mix the wet and dry ingredients just until combined. This small tip makes a big difference! Also, using ingredients at room temperature helps them blend better. Eggs and oil mix more smoothly when they are warm. For a lovely presentation, serve the bread warm with butter. This adds a rich flavor that everyone loves. You can also dust the top with powdered sugar for a sweet touch. Fresh mint leaves make a nice garnish and add a pop of color. Arrange the slices on a wooden board for a rustic feel. This will impress your guests! {{image_4}} You can make this bread gluten-free. Just substitute all-purpose flour with a gluten-free flour blend. This change keeps the taste and texture similar. Look for a blend that contains xanthan gum to improve the bread's structure. Want a vegan option? You can replace the eggs with flaxseed meal or applesauce. For flaxseed, mix one tablespoon with three tablespoons of water. Let this sit until it thickens. Applesauce works well too; use ¼ cup instead of one egg. Also, choose plant-based oils and sugars for a fully vegan treat. Adding fruits like raisins or cranberries gives the bread a fruity twist. These add a burst of flavor and chewiness. You can also swap chocolate chips for white chocolate or caramel. These options create a different taste and make the bread even more exciting. Try mixing and matching for your perfect loaf! To keep your chocolate chip pumpkin bread fresh, store it in two ways. At room temperature, wrap the bread tightly in plastic wrap or place it in an airtight container. This method helps maintain its soft texture. You can also refrigerate it to extend its shelf life. In the fridge, it will stay good for about one week. If you want to save some for later, freezing is a great option! First, wrap the bread tightly in plastic wrap, then place it in a freezer-safe bag. This will help keep it fresh. When you’re ready to enjoy it, just take it out and let it thaw in the fridge overnight. To warm it up, pop slices in the microwave for a few seconds or use a toaster. Chocolate chip pumpkin bread tastes amazing with drinks! Pair it with coffee or tea for a cozy treat. The warm flavors of the bread go well with hot beverages, making it a perfect snack for fall. You can also serve it with a bit of butter or cream cheese for extra richness. Yes, you can use fresh pumpkin puree instead of canned. Using fresh pumpkin can add a deeper flavor. To make fresh puree, cut a pumpkin in half and remove the seeds. Bake the halves at 350°F for about 45 minutes, or until soft. Let them cool, then scoop out the flesh. Blend until smooth for your recipe. Look for a golden-brown top. The bread should spring back when touched gently. For the best test, insert a toothpick into the center. If it comes out clean or with a few moist crumbs, the bread is done. If it has wet batter, bake it a bit longer. Yes, you can add more chocolate chips! This will make the bread sweeter and richer. Just remember that too many chips can make the bread dense. Start with an extra half cup if you want more chocolate flavor. Use a sharp serrated knife for clean slices. Wait until the bread has cooled completely. This helps prevent the bread from squishing. Start at one end and slice straight down for even pieces. At room temperature, this bread lasts about 3 to 5 days. Keep it in an airtight container. If you put it in the fridge, it can last up to a week. Just remember that refrigeration can change the texture a bit. Sure! You can use nutmeg, allspice, or cardamom. Each spice brings a new twist to the flavor. Try mixing in a teaspoon of nutmeg for warmth or allspice for a hint of sweetness. Adjust the amount to your taste for a new fall delight. For the full recipe, check the [Full Recipe]. You now have a complete guide to making Chocolate Chip Pumpkin Bread. From the key ingredients to equipment and steps, you can easily whip up this tasty treat. Don't forget the tips for storage and variations to customize your bread. Whether you try a gluten-free version or add fruits, the options are endless. Enjoy your baking journey and share this delicious bread with family or friends!](https://joymealplan.com/wp-content/uploads/2025/06/f538d1de-de93-4194-9f26-14cc05263462-768x768.webp)