Crispy Baked Chicken Tenders Simple and Tasty Recipe
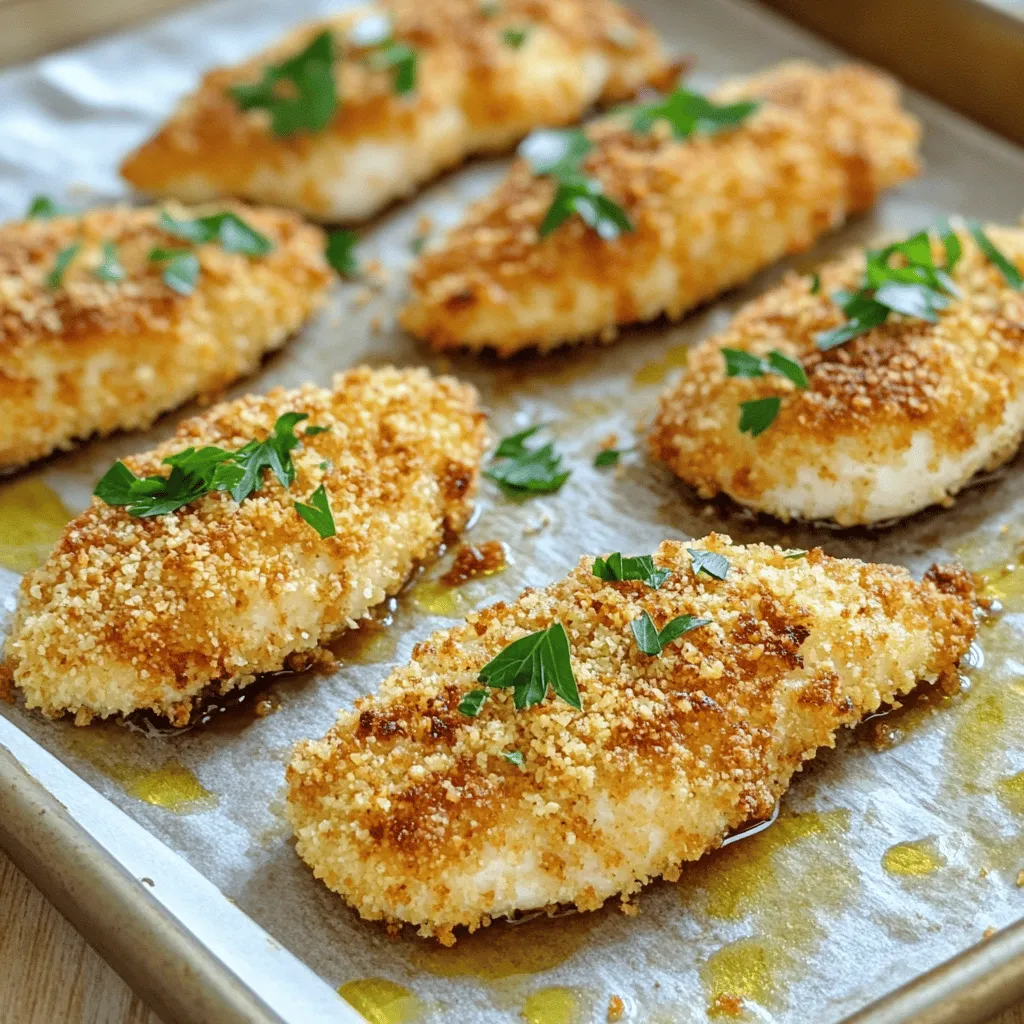
![- 1 pound boneless, skinless chicken breasts - Marinade: 1 cup buttermilk - Breading elements: 1 cup panko breadcrumbs, 1/2 cup all-purpose flour - Seasonings: 1 teaspoon garlic powder, 1 teaspoon onion powder, 1 teaspoon smoked paprika, 1/2 teaspoon salt, 1/2 teaspoon black pepper, 1/4 teaspoon cayenne pepper (optional) - Cooking oil: 2 tablespoons extra virgin olive oil - Garnish: Fresh parsley, finely chopped I love using fresh, simple ingredients for my crispy baked chicken tenders. The chicken breasts are the star here. I always choose boneless and skinless for easy handling. This keeps them juicy and tender. For the marinade, I use buttermilk. It helps to make the chicken soft and adds great flavor. Soak the chicken for at least 30 minutes. You can go up to two hours for the best taste. Next comes the breading. I prefer panko breadcrumbs because they give the best crunch. The all-purpose flour helps the breadcrumbs stick. Mixing garlic powder, onion powder, smoked paprika, salt, and pepper adds a nice depth of flavor. I add cayenne pepper for those who like a bit of heat. It’s optional, but it gives a great kick. Finally, a drizzle of extra virgin olive oil helps the tenders bake to a golden brown. You can finish with fresh parsley for a pop of color. Want the full recipe? Check out the [Full Recipe]. It’s a delicious way to enjoy chicken! First, set your oven to 425°F (220°C). While it heats up, grab a baking sheet. Line it with parchment paper. This will help the chicken not stick. It also makes cleanup easy. Take a big bowl and pour in the buttermilk. Add the chicken strips. Make sure they are all covered. Cover the bowl with plastic wrap. Let it sit for at least 30 minutes. For even more flavor, you can marinate it for up to 2 hours in the fridge. In another shallow dish, mix the flour, garlic powder, onion powder, smoked paprika, salt, black pepper, and cayenne pepper. Whisk it well. In a separate bowl, place the panko breadcrumbs. This is what will give your chicken that crunchy outside. After marinating, take the chicken out of the buttermilk. Let the excess drip off. Next, coat each piece in the flour mixture. Make sure each strip is covered. Gently shake off the extra flour. For extra crunch, dip the chicken back into the buttermilk. Then, roll it in the panko breadcrumbs. Press down a bit to help the crumbs stick. Arrange the coated chicken on the lined baking sheet. Drizzle a little olive oil on top. This helps it get golden brown. Bake the chicken for 20-25 minutes. Check with a meat thermometer. It should reach 165°F (75°C). Once the chicken is baked, take it out of the oven. Let it rest for about 5 minutes. This helps keep the juices in. Finally, garnish with fresh parsley. It adds a nice touch. Serve hot with your favorite sauces. Don't forget to check the Full Recipe for all the details! For the crispiest chicken tenders, use panko breadcrumbs. Panko adds a light and airy crunch that regular breadcrumbs can't match. Their larger flakes create a wonderful texture. To take it up a notch, use the double-dipping technique. First, coat the chicken in flour, then dip it back into the buttermilk before rolling it in panko. This extra layer of breading will give you an amazing crunch. To make your chicken tenders more flavorful, add spices to the breading mix. Garlic powder, onion powder, and smoked paprika all work great. Feel free to adjust the amounts to fit your taste. You can also try different marinades. A simple mix of lemon juice and herbs can change the flavor profile entirely. Experiment with your favorites to find the perfect taste. If you want a healthier option, consider using an air fryer. It cooks the chicken tenders with less oil while still keeping them crispy. Adjust the cooking time to about 12-15 minutes at 400°F (200°C). Another great tip is to place the chicken tenders on a wire rack. This allows hot air to circulate around the tenders, leading to even cooking and a crispier finish. {{image_4}} You can easily change the flavor of your chicken tenders. Here are two fun ideas: - Lemon pepper chicken tenders: Add lemon zest and black pepper to the flour mix. This gives a bright and zesty taste that wakes up your meal. - BBQ chicken tenders: Brush the tenders with your favorite BBQ sauce before baking. This adds a sweet and tangy flavor that kids love. If you have dietary needs, you can still enjoy these tenders: - Gluten-free options: Use gluten-free breadcrumbs instead of regular. This way, everyone can enjoy the meal without any worry. - Low-carb alternatives: Swap regular flour with almond flour or coconut flour. Both options give you a nice crunch while keeping carbs low. Pair your chicken tenders with tasty sides and dips: - Suggested dipping sauces: Try ranch dressing, honey mustard, or spicy sriracha. Each adds a unique kick to your tenders. - Side dish pairings: Serve them with a fresh salad, crispy fries, or steamed veggies. These sides complete your meal and add more nutrition. For more ideas, check out the Full Recipe to explore different flavors and tips! To keep your chicken tenders fresh, store them right. First, let the cooked tenders cool. Then, place them in an airtight container. You can store them in the fridge for up to three days. If you want to keep them longer, freezing is a great option. Use containers that seal tightly. Glass or plastic containers work well. If you use plastic wrap, make sure it hugs the tenders closely. This way, they won’t dry out. When you want to enjoy your leftovers, reheating is key. The best way to keep them crispy is to use the oven. Preheat your oven to 375°F (190°C) and bake for about 10 to 15 minutes. This method makes the chicken hot and crispy again. You can also use an air fryer. Set it to 375°F (190°C) and heat for about 5 to 7 minutes. This method is quick and gives great results. You can freeze both uncooked and cooked chicken tenders. For uncooked tenders, place them on a baking sheet to freeze individually first. Once they are frozen, transfer them to a freezer bag. This keeps them from sticking together. For cooked tenders, let them cool, then store them in an airtight container. They can last up to three months in the freezer. When you are ready to eat, just reheat them as mentioned earlier. For more detailed cooking methods, check the Full Recipe. Bake chicken tenders for 20 to 25 minutes at 425°F. This time gives them a golden color and keeps them juicy. Always check their internal temperature; it should reach 165°F for safety. Yes, you can make these chicken tenders ahead of time. Prepare them fully and store them in the fridge for up to 24 hours. When you're ready to eat, just pop them in the oven to reheat. This way, you save time while still enjoying a tasty meal. If you don't have buttermilk, use regular milk with a splash of vinegar or lemon juice. Let it sit for about five minutes. This method mimics buttermilk's acidity and helps tenderize the chicken just as well. Check chicken tenders with a meat thermometer. They are done when they hit 165°F inside. If you don’t have a thermometer, cut one open. The meat should be white, not pink, and the juices should run clear. Yes, chicken thighs work well in this recipe. They are more flavorful and juicy than breasts. Just cut them into strips like you would with the chicken breasts. The cooking time may be similar, so keep an eye on them. Crispy baked chicken tenders are easy and tasty. You start with simple ingredients, like chicken, buttermilk, and spices. The steps are clear, from marinating to baking. I shared tips for extra crunch and tasty flavors. Finally, you can personalize these tenders with countless variations and sides. Whether it's for a family dinner or meal prep, these tenders will impress. Enjoy making them and exploring your options!](https://joymealplan.com/wp-content/uploads/2025/06/4bfc5954-182f-42e7-9a90-e67bfbd9568b.webp)
Looking for a simple and tasty way to satisfy your cravings? These crispy baked chicken tenders are the answer! With just a few ingredients and easy steps, you can make a delicious meal that everyone will love. I’ll guide you through marinating, breading, and baking these tender bites to perfection. Plus, you’ll learn tips for adding flavor and even how to store leftovers. Let’s dive into this tasty recipe!
Ingredients
List of Ingredients for Crispy Baked Chicken Tenders
– 1 pound boneless, skinless chicken breasts
– Marinade: 1 cup buttermilk
– Breading elements: 1 cup panko breadcrumbs, 1/2 cup all-purpose flour
– Seasonings: 1 teaspoon garlic powder, 1 teaspoon onion powder, 1 teaspoon smoked paprika, 1/2 teaspoon salt, 1/2 teaspoon black pepper, 1/4 teaspoon cayenne pepper (optional)
– Cooking oil: 2 tablespoons extra virgin olive oil
– Garnish: Fresh parsley, finely chopped
I love using fresh, simple ingredients for my crispy baked chicken tenders. The chicken breasts are the star here. I always choose boneless and skinless for easy handling. This keeps them juicy and tender.
For the marinade, I use buttermilk. It helps to make the chicken soft and adds great flavor. Soak the chicken for at least 30 minutes. You can go up to two hours for the best taste.
Next comes the breading. I prefer panko breadcrumbs because they give the best crunch. The all-purpose flour helps the breadcrumbs stick. Mixing garlic powder, onion powder, smoked paprika, salt, and pepper adds a nice depth of flavor.
I add cayenne pepper for those who like a bit of heat. It’s optional, but it gives a great kick.
Finally, a drizzle of extra virgin olive oil helps the tenders bake to a golden brown. You can finish with fresh parsley for a pop of color.It’s a delicious way to enjoy chicken!
Step-by-Step Instructions
Preheat and Prepare Baking Sheet
First, set your oven to 425°F (220°C). While it heats up, grab a baking sheet. Line it with parchment paper. This will help the chicken not stick. It also makes cleanup easy.
Marinating the Chicken
Take a big bowl and pour in the buttermilk. Add the chicken strips. Make sure they are all covered. Cover the bowl with plastic wrap. Let it sit for at least 30 minutes. For even more flavor, you can marinate it for up to 2 hours in the fridge.
Mixing Dry Ingredients and Preparing Breadcrumbs
In another shallow dish, mix the flour, garlic powder, onion powder, smoked paprika, salt, black pepper, and cayenne pepper. Whisk it well. In a separate bowl, place the panko breadcrumbs. This is what will give your chicken that crunchy outside.
Coating the Chicken Tenders
After marinating, take the chicken out of the buttermilk. Let the excess drip off. Next, coat each piece in the flour mixture. Make sure each strip is covered. Gently shake off the extra flour. For extra crunch, dip the chicken back into the buttermilk. Then, roll it in the panko breadcrumbs. Press down a bit to help the crumbs stick.
Baking Process
Arrange the coated chicken on the lined baking sheet. Drizzle a little olive oil on top. This helps it get golden brown. Bake the chicken for 20-25 minutes. Check with a meat thermometer. It should reach 165°F (75°C).
Resting and Serving
Once the chicken is baked, take it out of the oven. Let it rest for about 5 minutes. This helps keep the juices in. Finally, garnish with fresh parsley. It adds a nice touch. Serve hot with your favorite sauces.
Tips & Tricks
Achieving Maximum Crispiness
For the crispiest chicken tenders, use panko breadcrumbs. Panko adds a light and airy crunch that regular breadcrumbs can’t match. Their larger flakes create a wonderful texture.
To take it up a notch, use the double-dipping technique. First, coat the chicken in flour, then dip it back into the buttermilk before rolling it in panko. This extra layer of breading will give you an amazing crunch.
Flavor Enhancements
To make your chicken tenders more flavorful, add spices to the breading mix. Garlic powder, onion powder, and smoked paprika all work great. Feel free to adjust the amounts to fit your taste.
You can also try different marinades. A simple mix of lemon juice and herbs can change the flavor profile entirely. Experiment with your favorites to find the perfect taste.
Cooking Alternatives
If you want a healthier option, consider using an air fryer. It cooks the chicken tenders with less oil while still keeping them crispy. Adjust the cooking time to about 12-15 minutes at 400°F (200°C).
Another great tip is to place the chicken tenders on a wire rack. This allows hot air to circulate around the tenders, leading to even cooking and a crispier finish.
Variations
Flavor Variations
You can easily change the flavor of your chicken tenders. Here are two fun ideas:
– Lemon pepper chicken tenders: Add lemon zest and black pepper to the flour mix. This gives a bright and zesty taste that wakes up your meal.
– BBQ chicken tenders: Brush the tenders with your favorite BBQ sauce before baking. This adds a sweet and tangy flavor that kids love.
Dietary Modifications
If you have dietary needs, you can still enjoy these tenders:
– Gluten-free options: Use gluten-free breadcrumbs instead of regular. This way, everyone can enjoy the meal without any worry.
– Low-carb alternatives: Swap regular flour with almond flour or coconut flour. Both options give you a nice crunch while keeping carbs low.
Accompaniments
Pair your chicken tenders with tasty sides and dips:
– Suggested dipping sauces: Try ranch dressing, honey mustard, or spicy sriracha. Each adds a unique kick to your tenders.
– Side dish pairings: Serve them with a fresh salad, crispy fries, or steamed veggies. These sides complete your meal and add more nutrition.
Storage Info
How to Store Leftover Chicken Tenders
To keep your chicken tenders fresh, store them right. First, let the cooked tenders cool. Then, place them in an airtight container. You can store them in the fridge for up to three days. If you want to keep them longer, freezing is a great option.
Recommended Storage Containers
Use containers that seal tightly. Glass or plastic containers work well. If you use plastic wrap, make sure it hugs the tenders closely. This way, they won’t dry out.
Reheating Instructions
When you want to enjoy your leftovers, reheating is key. The best way to keep them crispy is to use the oven. Preheat your oven to 375°F (190°C) and bake for about 10 to 15 minutes. This method makes the chicken hot and crispy again.
You can also use an air fryer. Set it to 375°F (190°C) and heat for about 5 to 7 minutes. This method is quick and gives great results.
Freezing Tips
You can freeze both uncooked and cooked chicken tenders. For uncooked tenders, place them on a baking sheet to freeze individually first. Once they are frozen, transfer them to a freezer bag. This keeps them from sticking together.
For cooked tenders, let them cool, then store them in an airtight container. They can last up to three months in the freezer. When you are ready to eat, just reheat them as mentioned earlier.
FAQs
How long to bake chicken tenders at 425°F?
Bake chicken tenders for 20 to 25 minutes at 425°F. This time gives them a golden color and keeps them juicy. Always check their internal temperature; it should reach 165°F for safety.
Can I make Crispy Baked Chicken Tenders ahead of time?
Yes, you can make these chicken tenders ahead of time. Prepare them fully and store them in the fridge for up to 24 hours. When you’re ready to eat, just pop them in the oven to reheat. This way, you save time while still enjoying a tasty meal.
What can I use instead of buttermilk for marinating?
If you don’t have buttermilk, use regular milk with a splash of vinegar or lemon juice. Let it sit for about five minutes. This method mimics buttermilk’s acidity and helps tenderize the chicken just as well.
How do I know when chicken tenders are fully cooked?
Check chicken tenders with a meat thermometer. They are done when they hit 165°F inside. If you don’t have a thermometer, cut one open. The meat should be white, not pink, and the juices should run clear.
Can I use chicken thighs instead of chicken breasts?
Yes, chicken thighs work well in this recipe. They are more flavorful and juicy than breasts. Just cut them into strips like you would with the chicken breasts. The cooking time may be similar, so keep an eye on them.
Crispy baked chicken tenders are easy and tasty. You start with simple ingredients, like chicken, buttermilk, and spices. The steps are clear, from marinating to baking. I shared tips for extra crunch and tasty flavors.
Finally, you can personalize these tenders with countless variations and sides. Whether it’s for a family dinner or meal prep, these tenders will impress. Enjoy making them and exploring your options!
![- 1 pound boneless, skinless chicken breasts - Marinade: 1 cup buttermilk - Breading elements: 1 cup panko breadcrumbs, 1/2 cup all-purpose flour - Seasonings: 1 teaspoon garlic powder, 1 teaspoon onion powder, 1 teaspoon smoked paprika, 1/2 teaspoon salt, 1/2 teaspoon black pepper, 1/4 teaspoon cayenne pepper (optional) - Cooking oil: 2 tablespoons extra virgin olive oil - Garnish: Fresh parsley, finely chopped I love using fresh, simple ingredients for my crispy baked chicken tenders. The chicken breasts are the star here. I always choose boneless and skinless for easy handling. This keeps them juicy and tender. For the marinade, I use buttermilk. It helps to make the chicken soft and adds great flavor. Soak the chicken for at least 30 minutes. You can go up to two hours for the best taste. Next comes the breading. I prefer panko breadcrumbs because they give the best crunch. The all-purpose flour helps the breadcrumbs stick. Mixing garlic powder, onion powder, smoked paprika, salt, and pepper adds a nice depth of flavor. I add cayenne pepper for those who like a bit of heat. It’s optional, but it gives a great kick. Finally, a drizzle of extra virgin olive oil helps the tenders bake to a golden brown. You can finish with fresh parsley for a pop of color. Want the full recipe? Check out the [Full Recipe]. It’s a delicious way to enjoy chicken! First, set your oven to 425°F (220°C). While it heats up, grab a baking sheet. Line it with parchment paper. This will help the chicken not stick. It also makes cleanup easy. Take a big bowl and pour in the buttermilk. Add the chicken strips. Make sure they are all covered. Cover the bowl with plastic wrap. Let it sit for at least 30 minutes. For even more flavor, you can marinate it for up to 2 hours in the fridge. In another shallow dish, mix the flour, garlic powder, onion powder, smoked paprika, salt, black pepper, and cayenne pepper. Whisk it well. In a separate bowl, place the panko breadcrumbs. This is what will give your chicken that crunchy outside. After marinating, take the chicken out of the buttermilk. Let the excess drip off. Next, coat each piece in the flour mixture. Make sure each strip is covered. Gently shake off the extra flour. For extra crunch, dip the chicken back into the buttermilk. Then, roll it in the panko breadcrumbs. Press down a bit to help the crumbs stick. Arrange the coated chicken on the lined baking sheet. Drizzle a little olive oil on top. This helps it get golden brown. Bake the chicken for 20-25 minutes. Check with a meat thermometer. It should reach 165°F (75°C). Once the chicken is baked, take it out of the oven. Let it rest for about 5 minutes. This helps keep the juices in. Finally, garnish with fresh parsley. It adds a nice touch. Serve hot with your favorite sauces. Don't forget to check the Full Recipe for all the details! For the crispiest chicken tenders, use panko breadcrumbs. Panko adds a light and airy crunch that regular breadcrumbs can't match. Their larger flakes create a wonderful texture. To take it up a notch, use the double-dipping technique. First, coat the chicken in flour, then dip it back into the buttermilk before rolling it in panko. This extra layer of breading will give you an amazing crunch. To make your chicken tenders more flavorful, add spices to the breading mix. Garlic powder, onion powder, and smoked paprika all work great. Feel free to adjust the amounts to fit your taste. You can also try different marinades. A simple mix of lemon juice and herbs can change the flavor profile entirely. Experiment with your favorites to find the perfect taste. If you want a healthier option, consider using an air fryer. It cooks the chicken tenders with less oil while still keeping them crispy. Adjust the cooking time to about 12-15 minutes at 400°F (200°C). Another great tip is to place the chicken tenders on a wire rack. This allows hot air to circulate around the tenders, leading to even cooking and a crispier finish. {{image_4}} You can easily change the flavor of your chicken tenders. Here are two fun ideas: - Lemon pepper chicken tenders: Add lemon zest and black pepper to the flour mix. This gives a bright and zesty taste that wakes up your meal. - BBQ chicken tenders: Brush the tenders with your favorite BBQ sauce before baking. This adds a sweet and tangy flavor that kids love. If you have dietary needs, you can still enjoy these tenders: - Gluten-free options: Use gluten-free breadcrumbs instead of regular. This way, everyone can enjoy the meal without any worry. - Low-carb alternatives: Swap regular flour with almond flour or coconut flour. Both options give you a nice crunch while keeping carbs low. Pair your chicken tenders with tasty sides and dips: - Suggested dipping sauces: Try ranch dressing, honey mustard, or spicy sriracha. Each adds a unique kick to your tenders. - Side dish pairings: Serve them with a fresh salad, crispy fries, or steamed veggies. These sides complete your meal and add more nutrition. For more ideas, check out the Full Recipe to explore different flavors and tips! To keep your chicken tenders fresh, store them right. First, let the cooked tenders cool. Then, place them in an airtight container. You can store them in the fridge for up to three days. If you want to keep them longer, freezing is a great option. Use containers that seal tightly. Glass or plastic containers work well. If you use plastic wrap, make sure it hugs the tenders closely. This way, they won’t dry out. When you want to enjoy your leftovers, reheating is key. The best way to keep them crispy is to use the oven. Preheat your oven to 375°F (190°C) and bake for about 10 to 15 minutes. This method makes the chicken hot and crispy again. You can also use an air fryer. Set it to 375°F (190°C) and heat for about 5 to 7 minutes. This method is quick and gives great results. You can freeze both uncooked and cooked chicken tenders. For uncooked tenders, place them on a baking sheet to freeze individually first. Once they are frozen, transfer them to a freezer bag. This keeps them from sticking together. For cooked tenders, let them cool, then store them in an airtight container. They can last up to three months in the freezer. When you are ready to eat, just reheat them as mentioned earlier. For more detailed cooking methods, check the Full Recipe. Bake chicken tenders for 20 to 25 minutes at 425°F. This time gives them a golden color and keeps them juicy. Always check their internal temperature; it should reach 165°F for safety. Yes, you can make these chicken tenders ahead of time. Prepare them fully and store them in the fridge for up to 24 hours. When you're ready to eat, just pop them in the oven to reheat. This way, you save time while still enjoying a tasty meal. If you don't have buttermilk, use regular milk with a splash of vinegar or lemon juice. Let it sit for about five minutes. This method mimics buttermilk's acidity and helps tenderize the chicken just as well. Check chicken tenders with a meat thermometer. They are done when they hit 165°F inside. If you don’t have a thermometer, cut one open. The meat should be white, not pink, and the juices should run clear. Yes, chicken thighs work well in this recipe. They are more flavorful and juicy than breasts. Just cut them into strips like you would with the chicken breasts. The cooking time may be similar, so keep an eye on them. Crispy baked chicken tenders are easy and tasty. You start with simple ingredients, like chicken, buttermilk, and spices. The steps are clear, from marinating to baking. I shared tips for extra crunch and tasty flavors. Finally, you can personalize these tenders with countless variations and sides. Whether it's for a family dinner or meal prep, these tenders will impress. Enjoy making them and exploring your options!](https://joymealplan.com/wp-content/uploads/2025/06/4bfc5954-182f-42e7-9a90-e67bfbd9568b-300x300.webp)
![- 1 lb boneless, skinless chicken breasts - 2 bell peppers (red and green) - 1 medium yellow onion - Olive oil and spices The main ingredients are simple yet flavorful. I use boneless, skinless chicken breasts because they cook evenly. Bell peppers add color and sweetness, while the onion provides a tasty base. Olive oil helps the spices stick and adds richness. - Chili powder - Ground cumin - Garlic powder - Smoked paprika - Onion powder The seasoning blend makes this dish special. Chili powder gives a nice kick. Ground cumin adds warmth, while garlic and onion powders boost the flavor. Smoked paprika brings depth with its smoky taste. - Flour tortillas - Fresh cilantro - Lime wedges for serving To enjoy the fajitas, I use small flour tortillas that hold the filling well. Fresh cilantro adds a bright touch, and lime wedges bring a zesty finish. These extras make the meal even better. For the full recipe, check out the [Full Recipe]. - Set the oven to 425°F (220°C). - Line a sheet pan with parchment paper. - In a bowl, whisk together olive oil and spices. - Coat the chicken with the marinade well. - Add the sliced bell peppers and onion to the chicken. - Spread the mixture evenly across the sheet pan. - Bake for 20-25 minutes, stirring halfway through. This recipe makes it easy to prepare a tasty meal. You can enjoy it with warm tortillas. For the full recipe, check out the details provided earlier. To make the best sheet pan chicken fajitas, marinate the chicken longer if you can. Letting it soak in flavors for more time makes a big difference. A meat thermometer is also very handy. It helps you check if your chicken is fully cooked. Aim for 165°F (74°C) for safety. A fajita bar is a fun way to serve these. Lay out all the toppings for everyone to enjoy. Think about adding sour cream, salsa, or guacamole. To warm the tortillas, heat them in a dry skillet for about 30 seconds on each side. You can also wrap them in foil and place them in the oven for the last five minutes of cooking. Make your presentation pop with colorful toppings. Fresh avocado, diced tomatoes, and shredded cheese can make your dish look great. Don't forget to garnish with lime wedges and cilantro. These small touches bring out the flavors and make the dish more inviting. Enjoy the full recipe for more details on how to create this tasty meal! {{image_4}} You can switch the chicken for shrimp or tofu. Shrimp cooks fast and adds a nice flavor. Tofu is great for a plant-based option. If you want to use chicken, try different cuts like thighs. Thighs are juicy and full of flavor. If you want a meatless meal, replace chicken with mixed vegetables. Bell peppers, zucchini, and corn work well. Add beans for protein. Black beans or pinto beans add creaminess and taste. This keeps your meal hearty and filling. Want to spice things up? Add jalapeños for heat. They bring a nice kick that many love. You can also mix in different herbs and spices. Try oregano, cilantro, or smoked paprika for variety. Each adds unique flavors to your dish. Explore these options to find your favorite twist on this recipe! For the full recipe, check the link. After you enjoy your sheet pan chicken fajitas, store any leftovers in an airtight container. This keeps the flavors fresh. You can refrigerate them for up to 3 days. Make sure to let them cool before sealing to avoid steam buildup. To freeze the fajita mix, place it in a freezer-safe bag or container. Remove as much air as possible to prevent freezer burn. You can keep it frozen for up to 3 months. For thawing, move it to the fridge overnight. If you're in a hurry, use the microwave's defrost setting. To reheat without drying out your fajitas, use the oven. Preheat it to 350°F (175°C) and warm the fajitas in a covered dish for about 10-15 minutes. You can also use a skillet over low heat, adding a splash of water to create steam. This keeps everything juicy. Get creative with leftovers! Use them in tacos, wraps, or salads for a quick meal. You can even mix them into scrambled eggs for a tasty breakfast. For the full recipe, check it out above. Yes, you can use frozen chicken for this recipe. Just follow these guidelines: - Thawing: Always thaw the chicken before marinating. You can do this overnight in the fridge or use the microwave's defrost setting. - Cooking Time: If you skip thawing and bake from frozen, increase the cooking time by 5-10 minutes. - Check Doneness: Use a meat thermometer to ensure the chicken reaches 165°F (74°C). There are many tasty sides to pair with your fajitas. Here are some great options: - Rice: Cilantro lime rice adds a fresh touch. - Beans: Black beans or refried beans are both hearty and flavorful. - Salad: A simple green salad with lime vinaigrette complements the fajitas well. - Chips and Salsa: Serve with tortilla chips and your favorite salsa for a crunchy side. Want extra heat? Here are some tips to spice up your fajitas: - Add Jalapeños: Sliced fresh jalapeños can give a nice kick. - Use Hot Sauce: Drizzle your favorite hot sauce over the fajitas before serving. - Increase Spice Mix: Add more chili powder or a pinch of cayenne pepper to the marinade for more heat. For the complete recipe, check the Full Recipe section. In this blog post, we covered a tasty sheet pan chicken fajitas recipe. You learned about the key ingredients and how to prepare them. I shared tips to make your fajitas perfect, including variations for different diets. Storing leftovers and reheating them properly helps reduce waste. Remember, these fajitas are easy to customize and fun to serve. Enjoy making them with family or friends, and let your creativity shine. Your next meal can be delicious and simple!](https://joymealplan.com/wp-content/uploads/2025/06/bce38261-6b1a-4600-b2d8-c9c563997242-768x768.webp)