
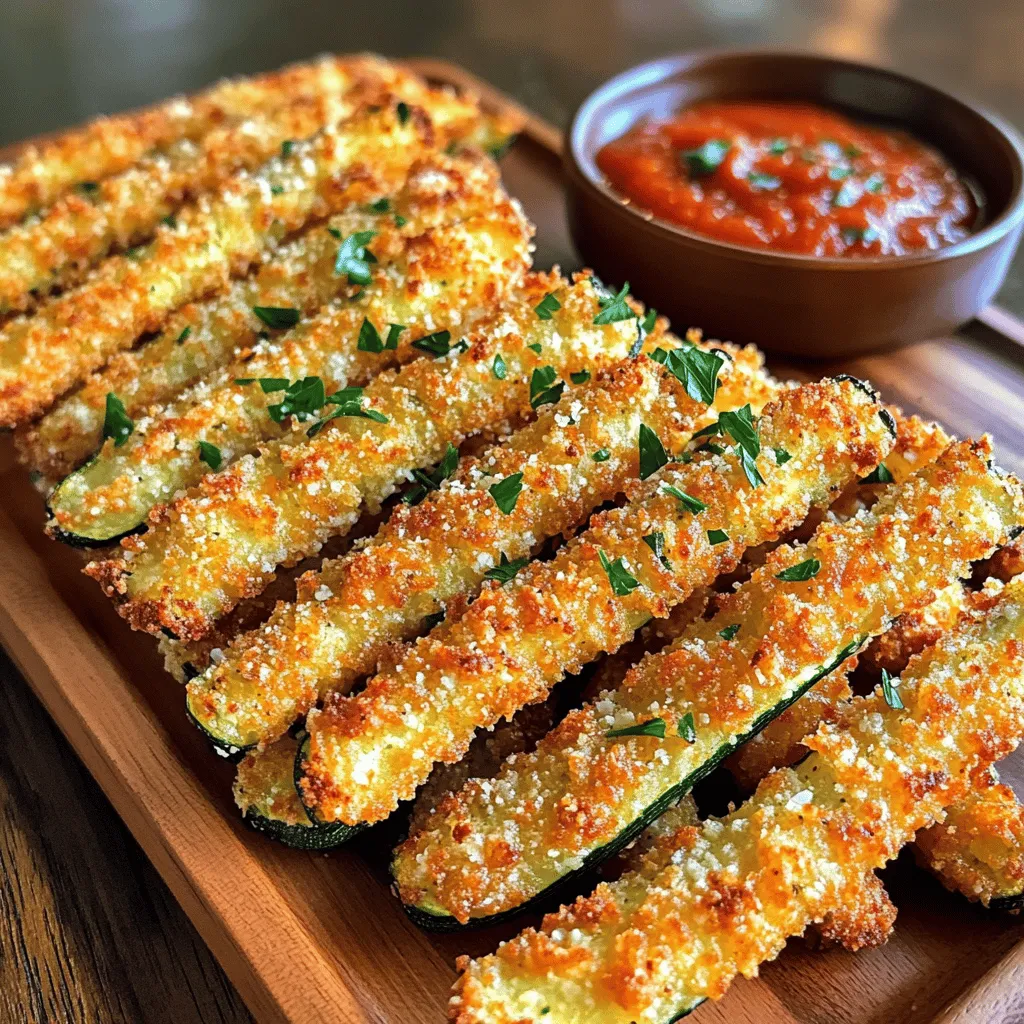
Crispy Parmesan Zucchini Fries Easy and Delicious Snack

Craving a healthy snack that’s easy to make? Crispy Parmesan Zucchini Fries are the answer! These tasty treats are not just simple; they’re packed with flavor and perfect for any time. With just a few fresh ingredients and my easy steps, you’ll have a crunchy, cheesy snack in no time. Let’s dive into how to whip up this delicious dish that everyone will love!
Ingredients
List of Main Ingredients
– 2 medium zucchinis
– 1 cup panko breadcrumbs
– 1/2 cup finely grated Parmesan cheese
– 2 large eggs
Seasoning and Extras
– 1 teaspoon garlic powder
– 1 teaspoon onion powder
– 1 teaspoon dried oregano
– Salt and freshly ground black pepper
– Olive oil spray or extra virgin olive oil
When making crispy Parmesan zucchini fries, the right ingredients matter. Start with two fresh, medium zucchinis. Cut them into quarter-inch thick sticks. This thickness lets them cook evenly and stay crispy. Next, use one cup of panko breadcrumbs. Panko gives a nice crunch that regular breadcrumbs just can’t match.
You also need half a cup of finely grated Parmesan cheese. This cheese adds a salty, rich flavor that pairs well with the zucchini. The two large eggs act as a binder, helping the breadcrumb mix stick to the zucchini.
For seasoning, I recommend adding one teaspoon each of garlic powder, onion powder, and dried oregano. These spices enhance the flavor without overpowering the zucchini. Don’t forget to sprinkle in some salt and freshly ground black pepper for that extra kick.
Lastly, use either an olive oil spray or a drizzle of extra virgin olive oil. This helps the fries get that golden, crispy finish in the oven.Enjoy cooking this easy and delicious snack!
Step-by-Step Instructions
Preparation Steps
– Preheat oven to 425°F (220°C).
– Line a baking sheet with parchment paper.
Coating the Zucchini
– In a shallow bowl, mix panko breadcrumbs, Parmesan, garlic powder, onion powder, oregano, salt, and pepper.
– In another bowl, crack the large eggs and beat them until frothy.
– Dip each zucchini stick into the egg, letting excess drip off.
– Roll the zucchini in the breadcrumb mix, pressing lightly for a good coat.
Baking
– Place the coated zucchini fries on the lined baking sheet.
– If using olive oil, spray or drizzle it over the fries.
– Bake for 20-25 minutes, flipping halfway for even crispiness.
– Let the fries cool for a few minutes before serving.Enjoy your crispy Parmesan zucchini fries!
Tips & Tricks
Achieving Crispy Texture
To get that perfect crunch, use panko breadcrumbs. Panko is lighter and airier than regular breadcrumbs. This helps create a crisp outer layer when baked. Make sure to coat the zucchini sticks evenly. Dip each stick in the egg wash first. Then, roll it in the breadcrumb mix. Press down gently to ensure full coverage. This gives a nice, even texture during baking.
Serving Suggestions
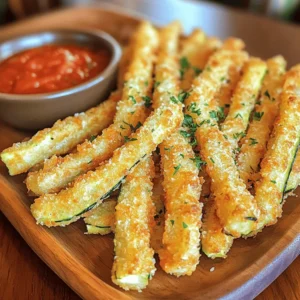
Pair these fries with great dipping sauces. Marinara sauce adds a classic touch. For a twist, try garlic aioli or ranch dressing. These sauces enhance the flavors of the fries. For a pretty presentation, place the fries on a clean platter. Add a small bowl of sauce on the side. To make it pop, sprinkle fresh parsley over the top. This adds color and freshness. Serve warm for the best taste.
Variations
Flavor Additions
You can change the taste of your crispy Parmesan zucchini fries with different spices. Try adding smoked paprika for a bit of heat or cumin for a warm flavor. Fresh herbs like thyme or basil can also give a nice twist. If you want a cheesy kick, use a blend of mozzarella and Parmesan or even nutritional yeast for a vegan option. You can also swap panko for crushed nuts for a nutty crunch.
Alternative Cooking Methods
If you want to switch things up, try making these fries in an air fryer. Set your air fryer to 400°F (200°C) and cook for about 10-15 minutes. Shake the basket halfway to ensure even cooking. If you prefer pan-frying, heat some olive oil in a skillet over medium heat. Fry the zucchini fries until they turn golden brown, about 5 minutes per side. This method gives them a rich flavor and crispy texture.
These variations make the recipe fun and personal, so feel free to experiment!
Storage Info
Storing Leftovers
To keep your crispy Parmesan zucchini fries fresh, store them in an airtight container. Place a paper towel inside to absorb moisture. This helps maintain their crispiness. Refrigerate the container for up to three days.
To reheat, preheat your oven to 400°F (200°C). Spread the fries on a baking sheet in a single layer. Bake for 10-15 minutes until they are hot and crispy again. You can also use an air fryer for a quick reheat.
Freezing Options
If you want to save some fries for later, freezing is a great choice. First, let the fries cool completely. Then, lay them out on a baking sheet in a single layer. Freeze them for about an hour until solid.
Once frozen, transfer the fries to a freezer-safe bag or container. They can last up to three months in the freezer. To cook from frozen, preheat your oven to 425°F (220°C). Bake for about 25-30 minutes, flipping halfway through, until they are golden and crispy. This way, you can enjoy them anytime!
FAQs
How do I make zucchini fries extra crispy?
To make zucchini fries extra crispy, use these key techniques:
– Choose panko breadcrumbs: They provide a better crunch than regular breadcrumbs.
– Coat evenly: Make sure each zucchini stick is covered well with the breadcrumb mix.
– Don’t crowd the baking sheet: This allows hot air to circulate, ensuring crispness.
– Flip halfway: Turn the fries midway through baking to get both sides crispy.
– Use olive oil: A light spray or drizzle helps with browning and crunchiness.
These tips will help you achieve that perfect crunch every time!
Can I substitute ingredients?
Yes, you can substitute ingredients based on your needs:
– Zucchini: Use eggplant or sweet potatoes for a different flavor.
– Panko breadcrumbs: Try crushed cornflakes or gluten-free breadcrumbs for a change.
– Parmesan cheese: Nutritional yeast or cheddar cheese can work well too.
– Eggs: Use flaxseed or chia seed mix for an egg-free option.
These substitutions keep the dish tasty and friendly for various diets.
What dipping sauces pair well with crispy zucchini fries?
Crispy zucchini fries taste amazing with many dipping sauces:
– Marinara sauce: A classic choice that adds a rich flavor.
– Garlic aioli: Creamy and flavorful, it enhances the fries perfectly.
– Ranch dressing: A cool and tangy option for those who love ranch.
– Spicy ketchup: Adds a kick if you like some heat.
Try different sauces to find your favorite pairing!
In this post, we explored making delicious zucchini fries. We covered the main ingredients, including zucchini, breadcrumbs, and seasonings. I outlined the preparation steps, baking tips, and ways to achieve that perfect crispy texture. You also learned about variations, storage options, and answered common questions.
These tasty zucchini fries can fit into many meals. Try different spices or cooking methods for fun twists. Enjoy making and sharing these crunchy treats!
. When making buffalo chicken lettuce wraps, choose your buffalo sauce wisely. Some sauces are mild, while others pack a punch. If you like heat, go for a hotter sauce. If you prefer less spice, choose a milder option. You can also add extra spices. A pinch of cayenne or red pepper flakes boosts the heat without changing the sauce. To make your wraps even better, think about toppings. Shredded carrots add crunch and color. You can also try diced celery for extra freshness. Blue cheese crumbles add a creamy touch. If you want a sauce, ranch or blue cheese dressing pairs well. They balance the heat of the buffalo sauce and add creaminess. Serve your wraps in a fun way. Use a large platter to hold the wraps. Surround them with extra lettuce leaves. This lets guests make their own wraps. Add a small bowl of dressing on the side for dipping. Use bright garnishes, like chopped green onions, to make the dish pop. These tips make your wraps look as good as they taste! {{image_4}} You can switch up the protein in these wraps. Ground chicken or turkey works well. Just cook it in the same way as the diced chicken. For a vegetarian twist, try using plant-based proteins. Crumbled tofu or tempeh can soak up the buffalo sauce nicely. These options keep the wraps healthy and flavorful. If you need gluten-free options, check your buffalo sauce. Many brands are gluten-free. For a dairy-free option, skip the blue cheese. You can use a vegan ranch dressing instead. It brings a nice creaminess without the dairy. These swaps let everyone enjoy the wraps. Pair your wraps with fresh veggies, like carrot sticks or cucumber slices. These sides add crunch and color. You might also serve chips for a fun crunch. For drinks, refreshing iced tea or lemonade works well. These options make a great meal or snack. If you want the full recipe, you can find it here: [Full Recipe] To store your buffalo chicken lettuce wraps, place them in an airtight container. This keeps them fresh and tasty. Try to refrigerate them within two hours after cooking. They will stay good for about 3 to 4 days in the fridge. When reheating, I suggest using the stovetop or microwave. For the stovetop, warm them in a skillet over low heat. This helps keep the wraps from getting soggy. If using a microwave, heat on medium power for short bursts. Do not reheat more than once, as this can affect the flavor and texture. Yes, you can freeze buffalo chicken wraps! To freeze, place the chicken filling in a freezer-safe bag or container. Remove as much air as possible. You can freeze them for up to three months. When ready to eat, thaw the filling overnight in the fridge. Reheat it and serve in fresh lettuce leaves for the best taste. The spice level depends on the buffalo sauce you choose. You can find mild, medium, or hot sauces. If you like heat, pick a hot sauce. For a mild kick, go for a mild sauce. You can also mix sauces to control the heat. If you want to tone down the spice, add extra toppings like ranch dressing or blue cheese. These cool flavors balance the heat well. Yes, you can prepare the chicken and other ingredients in advance. Cook the chicken and store it in the fridge for up to three days. You can also wash and dry the lettuce leaves ahead of time. Keep the chicken and lettuce in separate containers to maintain freshness. When you’re ready to eat, just assemble the wraps. This makes for a quick and healthy snack. If you want an alternative to lettuce, try tortillas or collard greens. Tortillas work well if you prefer a more traditional wrap. Collard greens are sturdy and add a nice flavor. You can also use rice paper for a fun twist. Each option brings its own taste and texture, so choose what you like best. For the complete recipe, check out the Buffalo Bliss Chicken Lettuce Wraps full recipe for easy access. Buffalo chicken lettuce wraps are a fun and tasty dish. We reviewed key ingredients, cooking steps, and tips for customization. You can mix flavors, adjust spice, and even swap proteins to suit your needs. These wraps are great for meals and snacks. Remember to store leftovers properly for later enjoyment. I hope this guide helps you create delicious wraps for friends or family. Enjoy experimenting with your own twists!](https://joymealplan.com/wp-content/uploads/2025/07/5600c779-5454-4d90-be3f-06d6a192c4a1-768x768.webp)


![To make Pickle Ranch Snack Crackers, you need the following ingredients: - 1 cup all-purpose flour - 1/2 cup cornmeal - 1 teaspoon baking powder - 1/2 teaspoon baking soda - 1/2 teaspoon salt - 1 tablespoon ranch seasoning mix - 1/4 cup dill pickle juice - 1/4 cup melted butter (cooled slightly) - 1/2 cup shredded cheddar cheese - 1/4 cup dill pickle slices (finely chopped) You can swap some ingredients if needed. For the all-purpose flour, try using whole wheat flour for added fiber. If you prefer a gluten-free option, use a gluten-free flour blend. Instead of cornmeal, you can use fine breadcrumbs for a different texture. If you want to skip the ranch seasoning, use herbs like dill, garlic powder, or onion powder to create your own flavor. Each serving, which is about two crackers, provides: - Calories: 120 - Total Fat: 8g - Saturated Fat: 4g - Cholesterol: 20mg - Sodium: 150mg - Carbohydrates: 10g - Fiber: 1g - Sugar: 1g - Protein: 3g These crackers are tasty and balanced, making them a fun snack for any occasion. You can enjoy them without guilt! 1. Preheat your oven to 350°F (175°C). This is key for baking. 2. Line a baking sheet with parchment paper. This helps with easy cleanup. 3. In a large bowl, mix the flour, cornmeal, baking powder, baking soda, salt, and ranch seasoning. Use a whisk to mix well. 4. Slowly add the dill pickle juice and melted butter. Stir until a dough forms. 5. Fold in the cheddar cheese and chopped dill pickles. Make sure they spread evenly in the dough. 6. Roll the dough into small balls, about the size of a quarter. Place them on the sheet, leaving space between them. 1. Flatten each ball gently with a fork or your fingers. Aim for even thickness. 2. Bake the crackers for 12-15 minutes. Watch closely for a light golden brown color. 1. Once baked, let the crackers cool on the sheet for a few minutes. 2. Transfer them to a wire rack to cool completely. This makes them crispier. 3. For a fun serving idea, arrange them on a colorful platter. Add fresh dill sprigs or serve with ranch dip for a tasty snack. Enjoy your Pickle Ranch Snack Crackers! You can find the full recipe above for more details. To get the right texture for your Pickle Ranch Snack Crackers, focus on mixing. Combine the dry ingredients well to avoid lumps. When adding the wet ingredients, mix just until combined. Overmixing can make your crackers tough. Roll the dough into small balls. Keep them uniform in size to ensure even baking. Flatten them gently for a crispier edge. To boost flavor, consider adding more ranch seasoning. You could also try garlic powder or onion powder. A pinch of cayenne can add a nice kick if you like spice. Adding herbs like dill or parsley can enhance the pickle flavor. For extra richness, sprinkle some grated Parmesan cheese on top before baking. One common mistake is using hot melted butter. It can change the dough's texture. Be careful not to skip the cooling step after baking. Allowing them to cool helps the crackers firm up. Also, don’t crowd the baking sheet. If they are too close, they may stick together. Check them often while baking to avoid burning. For a full recipe, refer to the complete instructions. {{image_4}} You can add fun twists to Pickle Ranch Snack Crackers. Want some heat? Try adding cayenne pepper or crushed red pepper flakes. Just a pinch will do! For a cheesy version, swap in pepper jack cheese instead of cheddar. Mixing in some garlic powder can also boost flavor. These tweaks keep your snack game exciting! If you need a gluten-free option, use gluten-free all-purpose flour. It works well in this recipe. You can also try almond flour for a nutty taste. Make sure your ranch seasoning is gluten-free too. This way, everyone can enjoy these tasty crackers without worry. These crackers shine when paired with dips. Creamy ranch dip is a favorite, but you can also serve them with hummus or guacamole. For a fun party snack, arrange them on a platter with fresh veggies. They also taste great with cheese slices or charcuterie. Each bite will surprise your guests! Explore the [Full Recipe] to start making your own delicious Pickle Ranch Snack Crackers today! Store your Pickle Ranch Snack Crackers in an airtight container. This keeps them fresh and crisp. You can use a glass jar or a plastic container. Make sure they are completely cool before sealing. If you live in a humid area, consider adding a small bag of rice to absorb moisture. When stored properly, these crackers can last up to one week. They taste best in the first few days. After that, they may lose some crunch. If you want to keep them longer, you can freeze them. Just place them in a freezer-safe bag or container. If your crackers lose their crunch, you can reheat them. Preheat your oven to 300°F (150°C). Spread the crackers on a baking sheet in a single layer. Heat them for about 5-7 minutes. Check often to avoid burning. Let them cool before enjoying again. For the full recipe, refer to the earlier section. Pickle Ranch Snack Crackers are tasty, crunchy treats. They mix the flavors of dill pickles and ranch dressing. These snacks are perfect for parties or game nights. They are easy to make at home with simple ingredients. To make Pickle Ranch Snack Crackers at home, follow these steps: 1. Preheat your oven to 350°F (175°C). 2. Line a baking sheet with parchment paper. 3. Mix flour, cornmeal, baking powder, baking soda, salt, and ranch seasoning in a bowl. 4. Add dill pickle juice and cooled melted butter. Stir to form a dough. 5. Fold in cheddar cheese and chopped pickles. 6. Roll the dough into small balls. Flatten each ball on the baking sheet. 7. Bake for 12-15 minutes until golden. 8. Let them cool on a wire rack. For the full recipe, check the details provided above. Pickle Ranch Snack Crackers can be a fun snack. They contain some healthy ingredients like cheese and pickles. However, they also have butter and flour, which add calories. Enjoy them in moderation as part of a balanced diet. You can find Pickle Ranch Snack Crackers at many grocery stores. Look in the snack aisle or near the crackers. Some stores may also sell them online. Check popular websites for easy shopping options. These crackers pair well with many dips and spreads. Serve them with ranch dressing, creamy dip, or hummus. You can also enjoy them with cheese or fresh veggies. They make a great snack for any gathering. This blog post covers everything about Pickle Ranch Snack Crackers. We discussed the key ingredients, including substitutions, and shared helpful nutritional data. You learned precise steps for preparation and baking, along with cooling tips for best results. I shared easy tricks to get the perfect texture and flavor. You now know various tasty variations to try and how to store them properly. Finally, you have answers to common questions about these delicious snacks. Enjoy making and sharing your own Pickle Ranch Snack Crackers!](https://joymealplan.com/wp-content/uploads/2025/07/696f27ca-dd07-4295-82fd-de9c637e8141-768x768.webp)
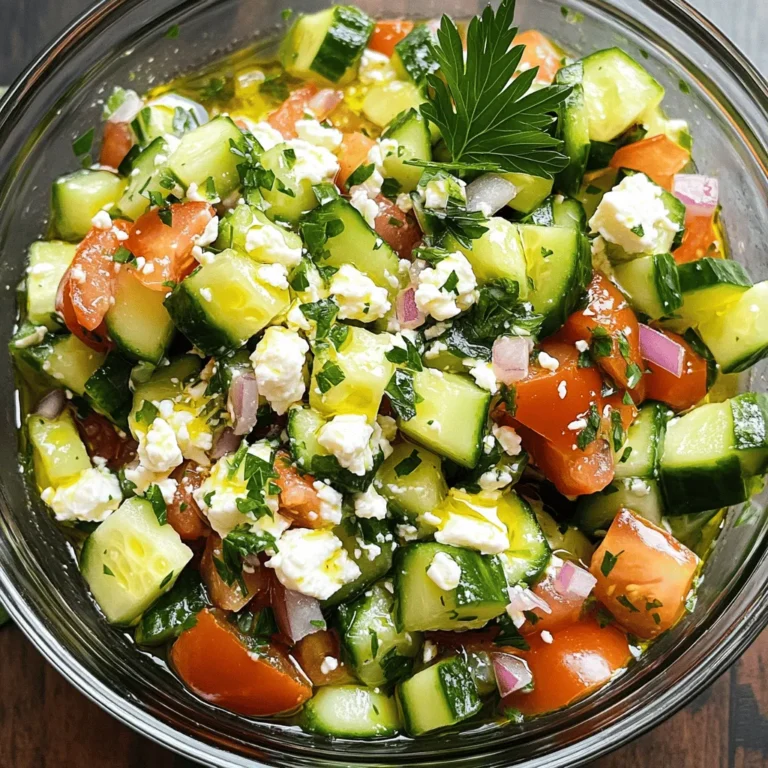
![- 4 large portobello mushrooms, stems removed - 1 cup cooked quinoa - 1 small zucchini, finely diced - 1/2 cup feta cheese, crumbled - 2 cloves garlic, minced - 1 teaspoon dried oregano - 1 red bell pepper, finely diced - 1 small red onion, finely chopped - Fresh parsley, for garnish Using these ingredients, you will create a dish that is both tasty and simple. The portobello mushrooms serve as a perfect base. They have a meaty texture and a rich flavor. You will stuff them with a mix of cooked quinoa and fresh vegetables. The quinoa adds protein and texture, making this dish satisfying. The feta cheese brings a creamy saltiness that balances the flavors. Garlic and oregano add depth. You can also add a red bell pepper and red onion for sweetness and crunch. Finishing with fresh parsley gives a burst of color and freshness. This recipe is easy to follow and uses ingredients you can find at any grocery store. You can even customize it with your favorite veggies or cheese. For a full recipe, check out the [Full Recipe]. - Preheat oven to 375°F (190°C). - Clean portobello mushrooms gently. Use a damp cloth to wipe off dirt. Place them gill-side up on a baking sheet. This helps with the filling later. - Sauté onions and garlic until translucent. Heat olive oil in a skillet over medium heat. - Add zucchini and red bell pepper, sauté until softened. Stir for about five minutes. - Incorporate fresh spinach until wilted. This takes about two minutes. The spinach adds flavor and color. - Mix quinoa and sautéed vegetables in a bowl. This is where the magic happens! - Spoon mixture into the portobello mushrooms. Press down gently with a spoon for even filling. - Bake for 25-30 minutes until golden. The mushrooms will get tender and delicious. Check them often to avoid overcooking. Try this recipe for a tasty meal. For the full recipe, visit the recipe section. To make your stuffed portobello mushrooms really pop, add fresh herbs. Basil and thyme work great. They bring a lovely aroma and zest. You can also try different cheeses. Goat cheese adds tang, while mozzarella offers creaminess. Each cheese gives a unique taste to the dish. When serving your stuffed mushrooms, think about fresh salads. A light, crisp salad pairs well. It balances the rich flavors of the mushrooms. You can also add some dipping sauces. Try a tangy vinaigrette or a garlic aioli. For presentation, place the mushrooms on greens like arugula. A drizzle of balsamic reduction looks fancy and adds flavor. One mistake is overcooking the mushrooms. They should be tender but not mushy. Keep an eye on the time as they bake. Another common error is not seasoning the filling. Adding enough salt and pepper makes a big difference. Taste as you go to find the right balance. Following these tips will help you create perfect stuffed portobello mushrooms. For the full recipe, check out the instructions above. {{image_4}} You can make stuffed Portobello mushrooms even more exciting. Start by using different vegetables in your filling. Try using eggplant, asparagus, or carrots for unique tastes. Each veggie adds its own flavor and texture. You can also switch out quinoa for brown rice or couscous. Brown rice gives a nutty flavor, while couscous offers a fluffy texture. Both options work well in these stuffed mushrooms. If you want to add meat, you have great options. You can include cooked ground meat or sausage in your stuffing. This adds a savory richness that meat lovers will enjoy. Another choice is to use chicken or turkey for a protein boost. Cooked and shredded chicken offers a wonderful taste that pairs well with the mushrooms. For those with dietary needs, there are easy swaps. If you need gluten-free options, make sure to use gluten-free grains. Quinoa is already gluten-free, but you can also use rice. For vegan adaptations, simply omit the cheese. You can replace feta with a nut-based cheese or nutritional yeast for a cheesy flavor without dairy. These changes help everyone enjoy the dish! To keep your stuffed portobello mushrooms fresh, store leftovers in an airtight container. This helps seal in flavors and moisture. Place the container in the fridge. The mushrooms will stay good for about three days. To keep them tasty, don’t stack them too high. This prevents squishing the filling. You can also freeze stuffed mushrooms for future meals. First, allow them to cool completely. Then, wrap each mushroom in plastic wrap and place them in a freezer bag. Make sure to remove as much air as possible. They can last for up to three months in the freezer. When you're ready to eat, thaw them overnight in the fridge. This helps maintain texture. When it’s time to reheat, you have two good options: oven or microwave. For the oven, preheat it to 350°F (175°C). Place the mushrooms on a baking sheet and cover with foil. Heat for about 15 minutes. This ensures they warm evenly without drying out. If you use a microwave, place the mushrooms on a microwave-safe plate. Heat in short bursts of 30 seconds until warm. This method is quick but can make them a bit soggy. Enjoy your stuffed mushrooms just like they were fresh! You can tell stuffed mushrooms are done when they feel tender. The tops should be lightly golden. If you see a nice brown color on top, that's a good sign! The mushrooms will shrink slightly as they cook, so check for softness. Yes, you can prepare stuffed mushrooms ahead of time! Here’s how: Make the filling and stuff the mushrooms. Then, cover them and put them in the fridge. You can keep them there for a day or two. When you’re ready, just bake them as usual. This saves time on busy days! Stuffed Portobello mushrooms go well with many sides. Here are some ideas: - A light salad with mixed greens - Roasted vegetables for extra flavor - Quinoa or rice to match the filling - A glass of white wine or sparkling water Pair these to make your meal even better! For more ideas, check out the Full Recipe for serving tips. Stuffed portobello mushrooms are a tasty and healthy dish. We covered the main ingredients, like quinoa and feta cheese, to create a flavorful filling. I shared step-by-step instructions to guide you through prepping, cooking, and assembling. You also learned tips for enhancing flavor and avoiding common mistakes. Finally, we explored variations for different diets and storage methods. These mushrooms offer endless possibilities. Enjoy making them your way and savor the delicious results.](https://joymealplan.com/wp-content/uploads/2025/06/f2d78041-f354-4b2f-8927-65aa38224e9e-768x768.webp)