
Honey Butter Skillet Corn Flavorful Side Dish Delight
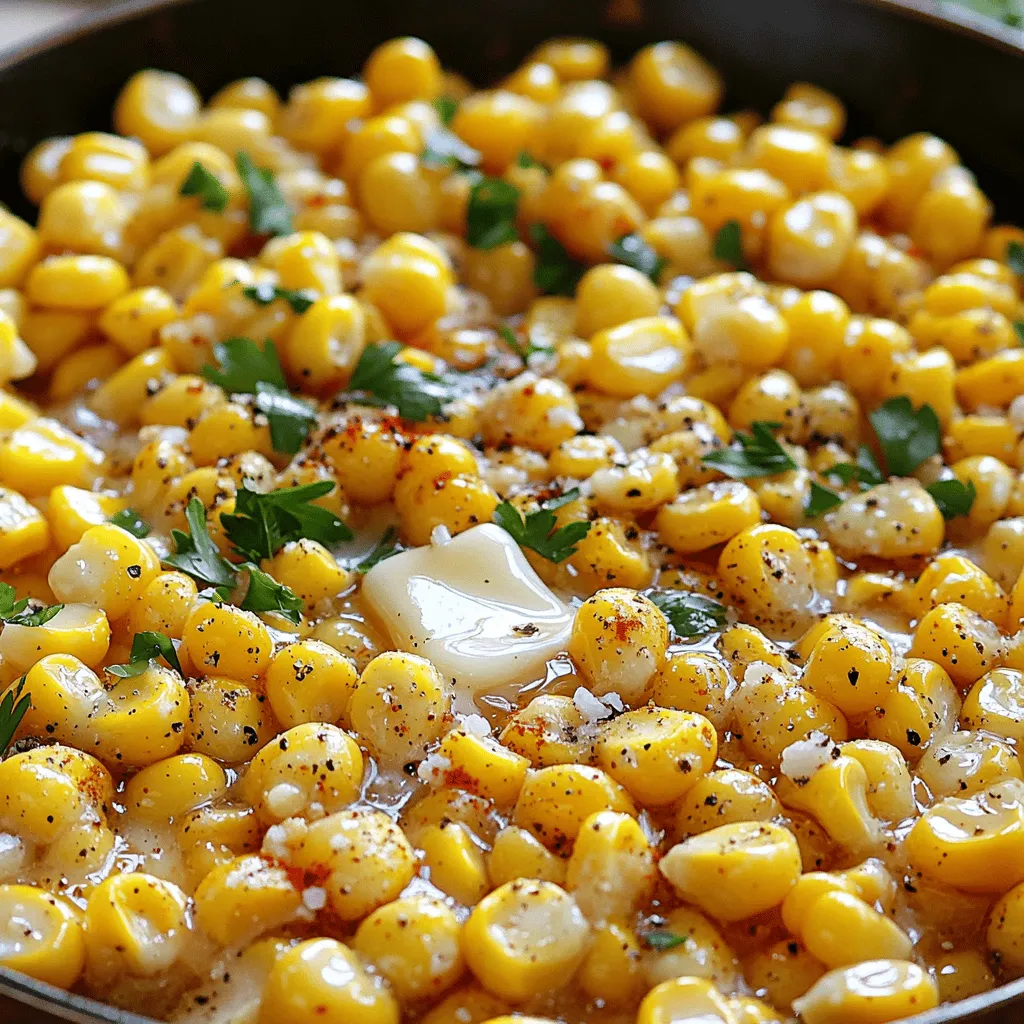
Are you looking for a simple yet flavorful side dish that will impress everyone? Honey Butter Skillet Corn is your answer! This delightful dish combines fresh corn, creamy butter, and sweet honey for an irresistible taste. In this post, I’ll guide you through each step, share tips to enhance the flavor, and suggest delicious variations. Get ready to elevate your meals with this tasty recipe that everyone will love!
Ingredients
Main Ingredients
– 4 cups fresh corn kernels (or frozen)
– 4 tablespoons unsalted butter
– 2 tablespoons honey
– 1/2 teaspoon sea salt
– 1/4 teaspoon black pepper
– 1/4 teaspoon smoked paprika
– 1 tablespoon fresh parsley, finely chopped (for garnish)
I love using fresh corn for this dish. It brings a sweet and crisp taste. If fresh corn is not available, frozen corn works well too. Just make sure to thaw it completely.
I use unsalted butter to control the salt level. It melts nicely and adds a rich flavor. The honey gives a sweet touch that balances the corn’s natural taste.
Sea salt enhances flavor, while black pepper adds a slight kick. Smoked paprika gives a warm, smoky taste. It really makes the dish pop!
Finally, I add fresh parsley for a splash of color and freshness. It makes the dish look great and tastes even better.
Step-by-Step Instructions
Preparation of Corn
To start, you need fresh corn. Grab a sharp knife and cut the kernels off the cobs. Hold the cob upright in a bowl to catch the kernels. Aim for about 4 cups of corn. If you choose frozen corn, just thaw it fully. After thawing, drain any extra moisture to keep the dish from getting soggy.
Melting Butter
Next, it’s time to melt the butter. Place a large skillet on medium heat. Add 4 tablespoons of unsalted butter and let it melt slowly. Keep an eye on it. You want it to bubble gently without turning brown. This step is key for that rich flavor.
Cooking the Corn
Once the butter is melted, add your corn kernels to the skillet. Use a spatula to stir them gently. This helps coat the corn in the melted butter. Now, sprinkle in 1/2 teaspoon of sea salt, 1/4 teaspoon of black pepper, and 1/4 teaspoon of smoked paprika. Mix it all well to ensure every kernel gets seasoned.
Let the corn cook for 8 to 10 minutes. Stir occasionally. You want the corn to heat through and start to caramelize slightly on the edges. This adds a wonderful sweetness and depth of flavor.
After cooking, drizzle the honey over the corn. Stir gently to blend it in without crushing the kernels. This honey butter skillet corn will be a delightful side dish that everyone will love.
Tips & Tricks
Perfecting the Recipe
Smoked paprika gives a nice touch. If you can’t find it, use regular paprika or chili powder. Both add a hint of warmth. For sweetness, honey is key. You can adjust the sweetness by adding more or less honey. Try maple syrup as a fun alternative too.
Enhancing Flavor
To boost flavor, add fresh herbs like thyme or basil. They brighten the dish. You can also try a dash of garlic powder or onion powder for more depth. For the best caramelization, keep the heat steady. Stir often, but let the corn sit for a moment to brown.
Serving Suggestions
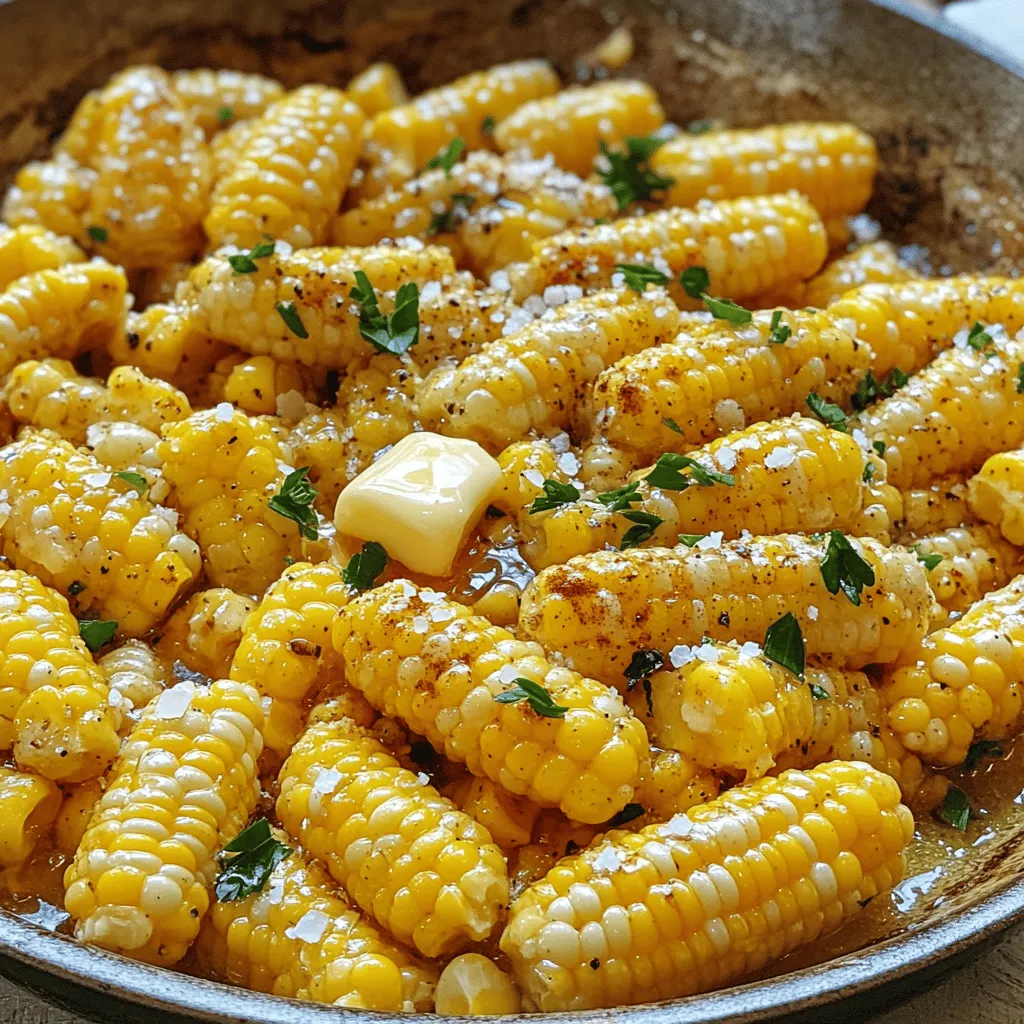
Serve this corn dish warm in a rustic bowl. Pair it with grilled meats or roasted veggies. It also goes well with tacos or barbecued chicken. Drizzle extra honey on top for a sweet finish. A sprig of parsley not only looks nice but adds freshness.
Variations
Ingredient Substitutes
You can switch up sweeteners in this dish. Maple syrup works great if you want a twist. It adds a unique flavor that pairs well with corn. For those who need a dairy-free option, use coconut oil instead of butter. It gives a nice richness and still allows the honey to shine.
Seasonal Variants
You can also add vegetables to make the dish more fun. Bell peppers bring a pop of color and crunch. If you like heat, toss in some jalapeños for a spicy kick. Different corn types can change the taste too. Try using sweet corn or even roasted corn for a smoky flavor.
Cooking Methods
Want to try a different cooking style? You can bake this dish in the oven. Spread it on a baking sheet, drizzle with honey, and roast until golden. Or, grill the corn instead. Grilling gives it a nice char and adds a smoky aroma. Both methods keep the corn sweet and tasty.
Storage Info
Refrigeration
To store leftover Honey Butter Skillet Corn, let it cool first. Use an airtight container. This keeps the corn fresh. You can keep it in the fridge for about 3 to 4 days. If you notice any change in smell or look, it’s best to toss it.
Freezing
If you want to save your corn for later, freezing works well. First, place the cooled corn in a freezer-safe bag. Try to remove as much air as possible. You can freeze it for up to 3 months. When you’re ready to use it, thaw the corn in the fridge overnight. You can also warm it in the microwave if you’re short on time. This way, your Honey Butter Skillet Corn stays tasty for future meals.
FAQs
Can I use frozen corn instead of fresh?
Yes, you can use frozen corn for this dish. Frozen corn has several benefits:
– Convenience: It saves prep time.
– Flavor: Frozen corn is picked at peak ripeness and quickly frozen.
– Availability: You can find it year-round, unlike fresh corn.
How can I make this recipe spicier?
To add spice to Honey Butter Skillet Corn, try these ideas:
– Chili Powder: Add a teaspoon for some heat.
– Cayenne Pepper: A pinch can boost the spice level.
– Jalapeños: Chopped jalapeños add fresh heat and crunch.
Mix these ingredients into the skillet when you add the corn.
Can I double the recipe for a larger gathering?
Yes, you can double this recipe easily. Here are some tips:
– Cooking Time: Keep an eye on the corn. It may need a few extra minutes.
– Skillet Size: Use a larger skillet or cook in batches to avoid overcrowding.
– Serving: This dish is great for sharing, so use a big bowl to serve.
What is the best way to reheat Honey Butter Skillet Corn?
To reheat and keep the flavor, follow these steps:
– Stovetop: Heat in a skillet over low heat. Stir often to prevent sticking.
– Microwave: Place in a bowl, cover with a damp paper towel, and warm in short bursts.
Both methods keep the texture and taste intact.
This blog post covered how to make honey butter skillet corn. We looked at key ingredients, with fresh corn as a star. I shared step-by-step cooking instructions and helpful tips. You learned about variations and how to store leftovers.
For great flavor and fun, try this dish today. It’s easy to make and perfect for many meals. Enjoy the sweetness and savor the taste!


![- 1 lb large shrimp, peeled and deveined - 2 tablespoons Cajun seasoning - 2 tablespoons olive oil, divided - 8 small corn tortillas - 1 cup shredded cabbage (green or purple for color) - 1/2 cup carrots, finely grated - 1/4 cup fresh cilantro, chopped - 1/4 cup mayonnaise - 2 tablespoons fresh lime juice - Salt and pepper to taste - Lime wedges for serving What are some good protein options for tacos? You can use chicken or fish as great swaps. You can also try tofu for a plant-based option. Each brings a unique taste to the dish. Why use fresh ingredients? Fresh ingredients enhance flavor and provide better texture. They also pack more nutrients compared to processed ones. How can I change the spice level? Adjust the Cajun seasoning to suit your taste. More seasoning gives a bold flavor; less gives a milder taste. You can also add a pinch of cayenne for extra heat. For more on making these tacos, check the Full Recipe. To start, combine the shrimp with Cajun seasoning in a medium bowl. Use two tablespoons of seasoning and one tablespoon of olive oil. Toss the shrimp well. This ensures every piece is coated in flavor. Let the shrimp marinate for 15 minutes. This step is key. It allows the spices to soak in, making the shrimp taste amazing. While the shrimp marinates, it’s time for the lime slaw. In another bowl, mix shredded cabbage, grated carrots, chopped cilantro, mayonnaise, lime juice, salt, and pepper. Stir these ingredients until they blend well. Set this aside for a bit. Letting the slaw sit helps the flavors come together. For the best texture, use fresh cabbage and finely grate the carrots. Now, let’s cook the shrimp. Heat the remaining tablespoon of olive oil in a large skillet over medium-high heat. When the oil shimmers, add the marinated shrimp in a single layer. Cook for 2-3 minutes on each side. The shrimp should turn pink and opaque when done. This shows they are cooked through. At the same time, warm the corn tortillas in a separate dry skillet. Heat each tortilla for about 30 seconds on each side. You want them soft and easy to fold. This step makes a big difference in how the tacos feel when you eat them. To assemble the tacos, take a warm tortilla. Lay a few cooked shrimp on it. Then, add a generous spoonful of lime slaw on top. For an extra pop of flavor, sprinkle more cilantro. Present the tacos on a colorful platter. Arrange lime wedges around them for a bright finish. This makes for a beautiful taco setup that is sure to impress. For the full recipe, check out the details above. Enjoy your flavorful creation! To ensure your shrimp are not overcooked, cook them just until they turn pink. This usually takes about 2-3 minutes per side. Overcooked shrimp can become rubbery and tough. Always check for that bright pink color and an opaque center. Temperature control is key when pan-frying. Heat your skillet over medium-high heat, then add olive oil. Wait until the oil shimmers before adding shrimp. This helps them cook evenly and develop a nice sear. Pair your Cajun shrimp tacos with sides like black beans or rice. A fresh salsa or guacamole also adds great flavor. For drinks, consider serving cold beer or a refreshing margarita. These pair well and enhance the taco experience. For a fun twist, create a taco bar. Set out shrimp, lime slaw, and toppings. Let your guests build their own tacos. This makes for a lively meal, perfect for gatherings or family dinners. To make this dish gluten-free, use corn tortillas. They are naturally gluten-free and hold up well. Always check your Cajun seasoning to ensure it is gluten-free. For a vegan version, swap shrimp with grilled vegetables or tofu. Use a vegan mayo for the slaw. You can also add avocado for creaminess and extra flavor. This way, everyone can enjoy these tasty tacos. You can find the Full Recipe to guide you through each step. {{image_4}} To make your Cajun shrimp tacos even more exciting, you can add extra spices. Consider using smoked paprika or cayenne pepper for more heat. A dash of garlic powder or onion powder can also deepen the flavor. You can switch up the slaw, too. Instead of cabbage, try using kale or bok choy for a crunchy texture. You could even add diced apples for a sweet twist. A spoonful of pineapple could bring a tropical vibe to your slaw. Choosing the right tortilla can change your taco game. Corn tortillas are great, but flour tortillas bring a soft, chewy feel. You can even try a whole wheat tortilla for a healthier choice. For a fun twist, use lettuce wraps instead of tortillas. This option is low-carb and fresh. You might also explore taco shells made from sweet potatoes or even jicama for a unique experience. If you want to wow your guests, upscale your tacos for a party. Use large shrimp and serve them on warm taco stands. A colorful platter with garnishes makes for a stunning display. For gatherings, consider setting up a taco bar. Lay out all the toppings and let guests build their own tacos. This not only makes it fun but also allows everyone to customize their meal. To keep your Cajun shrimp tacos fresh, store each component separately. Place the shrimp in an airtight container. They will stay good for about two days in the fridge. For the lime slaw, use a different container. It also lasts up to two days. If you want to keep them longer, you can freeze the shrimp. Just make sure to use a freezer-safe bag. Squeeze out as much air as you can. The slaw, however, does not freeze well. It can become watery when thawed. When it's time to enjoy your leftovers, reheat the shrimp gently. The best method is on the stove. Heat a skillet over low heat. Add the shrimp and cook for a few minutes until warm. You can also use a microwave. Just be careful not to overcook it. For the tortillas, warm them in a dry skillet. This helps restore their texture. Heat each tortilla for about 30 seconds on each side. This way, they stay soft and ready to fold. Enjoy your tasty tacos again with that flavor explosion! How long to marinate shrimp for maximum flavor? I recommend marinating the shrimp for about 15 minutes. This time is perfect for the Cajun seasoning to soak in. If you have more time, you can go up to 30 minutes for a deeper flavor. Can I make the slaw ahead of time? Yes, you can make the slaw ahead of time. I suggest making it a few hours before serving. This way, the flavors blend well, and it saves time when you’re ready to eat. What can I use instead of mayonnaise in the slaw? If you want to skip mayonnaise, try Greek yogurt. It adds creaminess and a bit of tang. You can also use avocado for a richer flavor. How to adjust for different dietary needs? To make it gluten-free, use corn tortillas. If you want a vegan option, replace shrimp with tofu or jackfruit and use vegan mayo for the slaw. Can I grill the shrimp instead of sautéing? Yes, grilling shrimp adds a nice smoky flavor. Just make sure to skewer them to prevent slipping through the grill. Grill each side for about 2-3 minutes until they are pink. What’s the best way to keep tortillas warm while serving? Wrap the warm tortillas in a clean kitchen towel. This keeps them soft and warm for a longer time. You can also use a tortilla warmer if you have one. For the complete recipe, check out the [Full Recipe]. This blog post covers a delicious shrimp taco recipe. We explored flavorful ingredients and their benefits. You learned how to marinate shrimp and prepare tasty lime slaw. We also covered cooking techniques and tips for perfect tacos. Finally, we discussed storage, variations, and common questions. Shrimp tacos can be fun and easy. With fresh ingredients, you can impress your guests. Enjoy trying these tips and creating your version!](https://joymealplan.com/wp-content/uploads/2025/07/f189128f-a0bc-414f-80f3-5521d4a2c85e-768x768.webp)

![- 1 lb boneless, skinless chicken thighs - 4 large whole wheat tortillas or pita bread - 1 cup romaine lettuce, shredded - 1 large tomato, diced - 1 cucumber, diced - 3 tablespoons extra virgin olive oil - 1 tablespoon ground cumin - 1 tablespoon smoked paprika - 1 teaspoon ground turmeric - 1 teaspoon ground coriander - 1 teaspoon garlic powder - 1 teaspoon onion powder - Salt and freshly cracked black pepper, to taste - 1 cup creamy Greek yogurt - 1 tablespoon tahini - 1 tablespoon freshly squeezed lemon juice These ingredients create a rich and tasty chicken shawarma wrap. Chicken thighs are key for their juicy texture. Whole wheat tortillas or pita bread give your wrap a healthy base. Fresh veggies like lettuce, tomato, and cucumber add crunch and flavor. The marinade is full of spices like cumin and paprika that bring warmth and depth. Olive oil helps the spices cling well to the chicken. The sauce made with Greek yogurt, tahini, and lemon juice offers a creamy, tangy kick. For the full recipe, check the section above. Enjoy crafting your easy chicken shawarma wraps! To start, you need to make the marinade. In a bowl, combine: - 3 tablespoons extra virgin olive oil - 1 tablespoon ground cumin - 1 tablespoon smoked paprika - 1 teaspoon ground turmeric - 1 teaspoon ground coriander - 1 teaspoon garlic powder - 1 teaspoon onion powder - Salt and freshly cracked black pepper, to taste Whisk these ingredients together until they mix well. This step adds lots of flavor. Next, take 1 lb of boneless, skinless chicken thighs. Coat the chicken with the marinade, making sure every piece is covered. Cover the bowl with plastic wrap. You should refrigerate it for at least 30 minutes. For the best taste, let it sit for up to 2 hours. Now, it’s time to cook the chicken. Preheat your grill or a heavy skillet over medium-high heat. Once it’s hot, place the marinated chicken thighs on the grill. Cook each side for about 6-7 minutes. You want the chicken to be fully cooked and have a nice char. After cooking, remove the chicken from the heat. Let it rest for a few minutes. This helps keep the juices in. Then, slice the chicken into thin strips. Now, let’s assemble your wraps! Start by spreading sauce on the tortilla. For the sauce, mix 1 cup of creamy Greek yogurt, 1 tablespoon tahini, and 1 tablespoon freshly squeezed lemon juice in a bowl. Add a pinch of salt and pepper to taste. Once the sauce is on the tortilla, layer on the sliced chicken. Next, add a handful of shredded romaine lettuce, diced tomatoes, and diced cucumbers. These veggies add crunch and freshness. To finish, sprinkle with fresh cilantro or parsley. Carefully fold the sides of the tortilla inwards and roll it up tightly. For an extra crispy finish, grill the wrapped shawarma for 1-2 minutes. This makes the outside golden and crispy. Finally, slice the wrap in half diagonally and serve it right away. You can also serve any extra creamy dressing for dipping. Enjoy your Easy Chicken Shawarma Wraps! For the complete recipe, check out the [Full Recipe]. To get the best taste from your chicken shawarma, marinate the chicken for at least 30 minutes. If you have time, aim for 2 hours. This allows the flavors to soak in deeply. Want to spice up your marinade? Add a pinch of cayenne for heat. You can also toss in some smoked paprika for a richer flavor. Fresh herbs like thyme or mint will add a nice twist. Even a splash of vinegar can brighten the taste. When you assemble your wraps, wrap them tightly. Start by laying the chicken and veggies in the center. Fold the sides in, then roll from the bottom. This keeps everything inside. If you like a crispy wrap, grill it after rolling. Heat a skillet over medium heat. Grill each side for 1-2 minutes until golden. This extra step gives you a crunchy texture that contrasts with the juicy filling. {{image_4}} You can easily modify chicken shawarma wraps to fit your diet. If you want a gluten-free option, try using lettuce wraps. Just take large leaves of romaine or butter lettuce. They make a great, crunchy shell for your fillings. For a vegetarian option, consider using falafel or grilled veggies. Falafel adds a nice crunch and flavor. Grilled veggies like zucchini, bell peppers, and eggplant work well too. These options keep the meal tasty and satisfying. To make your wraps even better, think about adding toppings. Chopped olives and crumbled feta cheese can give a salty kick. You could also add sliced radishes for a nice crunch. Alternative sauces can enhance the dish too. Tzatziki sauce made with yogurt, cucumber, and garlic adds a cool and refreshing taste. You can mix it up by trying different sauces like hummus or spicy harissa. These additions help you create a wrap that suits your own taste perfectly. Don't forget to check the Full Recipe for more ideas! To keep your chicken shawarma wraps fresh, store them well. Wrap each shawarma tightly in plastic wrap or foil. This prevents air from getting in and keeps them from drying out. You can also place them in an airtight container. In the fridge, they will stay good for up to three days. After that, the taste and texture might change. When it's time to eat, reheating should keep the wraps tasty. I suggest using a skillet over low heat. This method warms the shawarma without making it soggy. Heat them for about 3-5 minutes on each side. You can also use an oven. Wrap them in foil and heat at 350°F for about 10 minutes. If you have extra chicken, use it in salads or grain bowls. It adds flavor and protein to any meal. The wraps are also great for lunch the next day. Just remember to store them well! For the full recipe, check out the detailed instructions above. You can marinate chicken shawarma for at least 30 minutes. For better flavor, marinate for up to 2 hours. This time allows the spices to soak into the meat. If you have more time, feel free to marinate it overnight. Just remember to keep it in the fridge to stay fresh. Yes, you can use chicken breast. However, thighs have more fat and flavor. This gives shawarma a juicier taste. Breasts may dry out more easily. If you choose breasts, keep an eye on cooking time to avoid overcooking them. Chicken shawarma wraps pair well with many sides. Try serving them with: - Hummus - Pita chips - Tabouli salad - Roasted vegetables - Pickled vegetables These sides add more flavor and texture to your meal. To add heat to your chicken shawarma, try these tips: - Mix in cayenne pepper or red pepper flakes to the marinade. - Add sliced jalapeños when assembling the wraps. - Serve with a spicy sauce like harissa or sriracha. These options will give your wraps a nice kick without overpowering the other flavors. For the full recipe, check out the complete guide. In this post, we covered making delicious chicken shawarma wraps. We started with the main ingredients: chicken thighs, whole wheat tortillas, and fresh veggies. Then, we looked at creating a tasty marinade and sauce. I shared step-by-step cooking and assembly instructions, plus tips for the best flavor. We explored variations, from gluten-free options to flavor additions. Finally, proper storage and reheating tips will keep your leftovers fresh. Now you can enjoy these wraps anytime. Make it your own with different toppings and spices!](https://joymealplan.com/wp-content/uploads/2025/06/27d0fa19-e080-46bc-ad73-80725d86a56a-768x768.webp)