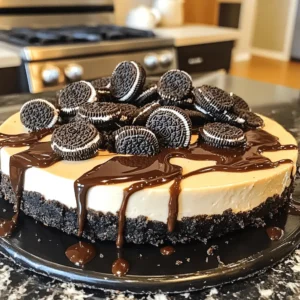
No-Bake Oreo Cheesecake Simple and Tasty Dessert

If you’re craving a dessert that’s both simple and delicious, look no further than No-Bake Oreo Cheesecake. This recipe packs the rich flavor of Oreos into a creamy, dreamy cheesecake—without any baking required! With just a handful of ingredients, you can whip up this treat in no time. Let’s dive into how you can create this mouthwatering dessert that’s perfect for any occasion!
Ingredients
Required Ingredients
– 24 Oreo cookies, finely crushed
– 5 tablespoons unsalted butter, melted
– 16 oz cream cheese, at room temperature
– 1 cup powdered sugar, sifted
– 1 teaspoon pure vanilla extract
– 1 cup heavy whipping cream, chilled
– 8 Oreo cookies, coarsely chopped (for mixing into filling)
– Additional whole Oreo cookies for garnish
Optional Ingredients
– Chocolate syrup for drizzling
– Fresh berries for garnish
Equipment Needed
– 9-inch springform pan
– Medium-sized mixing bowl
– Large mixing bowl
– Electric mixer
– Spatula
To make the no-bake Oreo cheesecake, gather these ingredients first. Each one plays a key role in creating a creamy and delicious dessert. The Oreo cookies give the dessert its classic flavor. The cream cheese provides the rich, smooth texture that makes cheesecakes special.
You can add chocolate syrup or fresh berries for a fun twist. I often use them to enhance the look and taste.
Next, make sure you have the right equipment. A springform pan is best for easy removal. An electric mixer saves time and effort when you need to whip the cream and mix the filling.This dessert is a crowd-pleaser that is fun to make!
Step-by-Step Instructions
Preparing the Crust
To start, I take 24 Oreo cookies and crush them finely. I mix the crushed cookies with 5 tablespoons of melted butter in a medium bowl. This creates a wet crumb mixture. Next, I press this mixture firmly into the bottom of a 9-inch springform pan. I use the flat side of a measuring cup to ensure a solid crust. I then place the crust in the refrigerator to set while I prepare the filling.
Making the Cheesecake Filling
For the filling, I first beat 16 oz of cream cheese in a large bowl until it’s smooth. This takes about 2-3 minutes. Next, I slowly add 1 cup of sifted powdered sugar and 1 teaspoon of pure vanilla extract. I mix this until it becomes fluffy. In another bowl, I whip 1 cup of heavy cream until stiff peaks form. This makes the filling light and airy.
Folding Ingredients Together
Now, I gently fold the whipped cream into the cream cheese mixture using a spatula. It’s important to do this carefully to keep the air in the cream. After that, I fold in 8 coarsely chopped Oreo cookies. This adds those tasty cookie bits throughout the filling.
Assembling the Cheesecake
I then pour the cheesecake filling into the chilled crust. Using a spatula, I smooth the top evenly. It looks so good at this stage!
Chilling the Cheesecake
Next, I cover the cheesecake with plastic wrap. I refrigerate it for at least 4 hours. If I can wait overnight, I know the texture and flavor will be even better.
Serving the Cheesecake
Finally, I carefully remove the cheesecake from the springform pan. I garnish the top with whole Oreo cookies for extra flair. Then, I slice it into 12 equal pieces. It’s a perfect treat for any occasion.
Tips & Tricks
Perfecting the Texture
To get the best texture for your no-bake Oreo cheesecake, start with your cream cheese. Make sure it is at room temperature. This step helps it mix smoothly. Next, whip your heavy cream until it forms stiff peaks. This adds lightness to your cheesecake. These two tips will help you achieve that perfect, creamy texture.
Customizing Flavors
You can have fun with flavors! Try adding melted chocolate or peanut butter to the filling. These options can give your cheesecake a new twist. You can also experiment with toppings. Fresh fruit, chocolate shavings, or even more crushed Oreos can make it even better. Let your taste guide you.
Ensuring Minimal Cracking
Chilling your cheesecake slowly is key. This helps the temperature spread evenly throughout the cheesecake. If you chill it too fast, you might see cracks form on the top. Also, be careful not to over-mix your filling. Gently fold in the whipped cream and other mix-ins. This keeps the airiness intact and helps prevent cracking.

Variations
Oreo Cheesecake with a Twist
You can switch up the classic Oreo cheesecake in fun ways. Here are two tasty ideas:
– Mint Oreo Cheesecake: Use mint-flavored Oreos for a fresh twist. This adds a cool flavor to your dessert.It’s a refreshing change that’s great for summer.
– Peanut Butter Oreo Cheesecake: For peanut butter lovers, mix in creamy peanut butter. Add half a cup of peanut butter to the cream cheese mixture. This will give your cheesecake a rich, nutty flavor. Trust me, it’s a treat you won’t forget!
Ingredient Substitutions
Sometimes, you need to swap ingredients based on your diet or availability. Here are some smart substitutions:
– Dairy-free cream cheese options: If you want a dairy-free dessert, look for brands that offer cream cheese made from nuts or soy. These options taste great and work well in the cheesecake.
– Gluten-free Oreo cookies: If you need gluten-free, use gluten-free Oreos. They taste just as good and keep your dessert safe for everyone to enjoy.
Serving Suggestions
How you serve your cheesecake can add to the fun. Here are a couple of ideas:
– Pair with ice cream or whipped topping: A scoop of vanilla ice cream or a dollop of whipped cream makes this dessert even more delicious. The creaminess complements the rich cheesecake.
– Serve with a side of fresh fruit: Fresh berries or sliced bananas add a nice fruity touch. They brighten up the plate and add a pop of color to your dessert. Plus, the sweetness of the fruit balances the rich cheesecake.
Storage Info
Short-Term Storage
You can keep your no-bake Oreo cheesecake in the fridge for up to 5 days. This dessert stays fresh and tasty when stored properly. Use an airtight container to keep it safe from other fridge odors.
Freezing Instructions
If you want to freeze the cheesecake, wrap it well with plastic wrap and then foil. This prevents freezer burn. You can freeze it for up to 2 months. When ready to eat, take it out and place it in the fridge overnight to thaw. You can also let it sit at room temperature for about 2 hours before serving.
Signs of Spoilage
Check your cheesecake for any changes in smell or color. If it smells sour or looks discolored, it is best to throw it away. Also, if you see any mold, do not eat it. Trust your senses!
FAQs
How do I make No-Bake Oreo Cheesecake?
To make a No-Bake Oreo Cheesecake, follow these steps:
1. Prepare the Crust: Mix 24 crushed Oreo cookies with 5 tablespoons of melted butter. Press this mix into a 9-inch springform pan.
2. Make the Filling: Beat 16 oz of room temperature cream cheese until smooth. Gradually add 1 cup of sifted powdered sugar and 1 teaspoon of vanilla extract. Mix until fluffy.
3. Whip the Cream: In a separate bowl, whip 1 cup of heavy cream until stiff peaks form.
4. Combine: Fold the whipped cream into the cream cheese mix gently. Add 8 coarsely chopped Oreos for more flavor.
5. Fill the Crust: Pour the filling into the crust and smooth the top.
6. Chill: Cover and refrigerate for at least 4 hours. Overnight is best for perfect texture.
Can I use low-fat cream cheese?
Yes, you can use low-fat cream cheese. However, it may change the texture and flavor. The cheesecake might be less creamy and more dense. For a lighter taste, be sure to whip the cream well.
How long can I store No-Bake Oreo Cheesecake?
You can store the cheesecake in the fridge for up to 5 days. Keep it covered to maintain freshness. If you notice any changes in smell or texture, it’s best to discard it.
Can I make this recipe ahead of time?
Yes, this recipe is great to make ahead. Refrigerate it for at least 4 hours, or overnight for the best results. Just remember to cover it tightly so it doesn’t absorb other fridge smells.
This Oreo cheesecake recipe is easy and fun to make. With just a few steps, you combine crushed cookies, cream cheese, and whipped cream for a delicious dessert. Remember, chilling is key for the best texture. You can also customize it with toppings or flavors. Enjoy it fresh, or freeze for later. Your loved ones will love this treat. Make it your own!

. Enjoy mixing these ingredients for an easy and delicious treat! Start by placing the softened cream cheese and cookie butter into a mixing bowl. Use an electric mixer to beat them together on medium speed. You want the mixture to be smooth and creamy. This base creates a rich and tasty dip. Next, add the pumpkin puree to the bowl. Blend everything together on low speed. This helps to combine the flavors well. You should see a uniform texture. Gradually sift in the powdered sugar. Add it in small amounts to avoid lumps. Mix after each addition until fully incorporated. This step ensures your dip is just sweet enough without being overpowering. Now, stir in the vanilla extract, ground cinnamon, nutmeg, ginger powder, and a pinch of salt. Mixing these ingredients together makes the dip fragrant and flavorful. Keep blending until everything is well combined. Taste your dip. If you want it sweeter or spicier, adjust it to your liking. You can add a bit more powdered sugar or spices. Blend again until mixed well. Finally, scoop the dip into a serving bowl. Cover it with plastic wrap. Place it in the fridge for at least 30 minutes. Chilling enhances the flavors and makes it even better. For the full recipe, check out the details provided earlier. Softened cream cheese is key. It makes mixing easy and helps avoid lumps. If your cream cheese is cold, it won’t blend well. Leave it out for about 30 minutes before you start. When you mix, use an electric mixer on medium speed. This helps create a smooth and creamy dip. To prevent lumps, combine the cream cheese and cookie butter first. Mix until the texture is silky. Then, add the pumpkin puree slowly. Mixing on low speed at this stage helps keep the dip smooth. You might want to tweak the sweetness. If you like it sweeter, add more powdered sugar. Remember to mix well each time you add sugar. Taste as you go! Spices can also be adjusted. If you love cinnamon, add a bit more. For a spicy kick, try adding more ginger. Personalizing the flavors makes the dip your own. Serving bowl choice matters. Use a fall-themed bowl to match the season. It makes your dip look festive. For a fun twist, try a bowl with patterns or colors that pop. When arranging dippers, think about color and texture. Place ginger snaps on one side and apple slices on the other. This contrast creates a beautiful display. For a touch of elegance, use the back of a spoon to swirl the dip. This simple detail makes the dip look gourmet. For the complete recipe, check out the Full Recipe. {{image_4}} You can make Cookie Butter Pumpkin Dip even more exciting with different flavors. Adding extra spices can really enhance the taste. Try a dash of allspice or cloves for a warm kick. If you want a sweeter note, a bit of brown sugar will do the trick. You can also add a splash of maple syrup for a rich flavor. Seasonal flavors can change the game too. Consider mixing in some finely chopped cranberries or pecans for texture. These add a nice crunch and a burst of flavor. You can also fold in some caramel sauce for a sweet twist. Each of these suggestions creates a unique dip that is fun to explore. When it comes to dipping, the options are endless! For a healthy twist, try fresh vegetable sticks like carrots or celery. These add a nice crunch and balance the sweet dip. You can also use rice cakes for a low-calorie choice. For sweet pairings, think about using pretzels or graham crackers. Their saltiness pairs well with the dip’s sweetness. You might even enjoy chocolate-covered strawberries for a fun treat. Mixing sweet and savory dippers creates a fun tasting experience. If you have dietary needs, there are great options! For gluten-free dippers, use apple slices or gluten-free cookies. These are tasty and safe for everyone. You can also swap in gluten-free graham crackers for a sweet treat. For a vegan version, use dairy-free cream cheese. Many brands offer great options that taste just as good. You can also use coconut whipped cream instead of regular cream cheese. These swaps keep the dip creamy and delicious, while fitting various diets. For the full recipe, check out the Cookie Butter Pumpkin Dip recipe to create your own delightful version! To store your leftover Cookie Butter Pumpkin Dip, place it in an airtight container. This keeps it fresh and prevents it from absorbing other fridge smells. Use a glass or plastic container with a tight lid for the best results. Make sure to let the dip cool to room temperature before sealing it. This helps avoid condensation inside the container. If you want to save some dip for later, freezing works well. First, scoop the dip into a freezer-safe container. Leave some space at the top, as the dip may expand when frozen. Seal it tightly and label it with the date. To thaw, move it to the fridge for several hours or overnight before you serve it again. Stir well after thawing to restore the smooth texture. In the fridge, your dip can last about four to five days. Look for any changes in color or smell as signs of spoilage. If it has a watery layer on top or smells off, it's best to toss it. Enjoy this dip while it’s fresh for the best taste! Yes, you can make this dip ahead of time. Just prepare the dip and place it in a bowl. Cover it tightly with plastic wrap or a lid. Store it in the fridge for up to two days. This allows the flavors to blend well. It also makes your party prep easier. Just remember to give it a good stir before serving. If you need a substitute for cookie butter, try sunflower seed butter or almond butter. They add a nutty flavor. For a sweet touch, mix in some brown sugar or maple syrup. These options are great for those with nut allergies. Each choice will give the dip a unique twist! You can serve the dip warm if you prefer. To heat it, place the dip in a microwave-safe bowl. Heat it in short bursts, stirring in between. This helps keep the texture smooth. Warm dip pairs well with dippers like pretzels or warm bread. The best dippers include: - Ginger snaps - Apple slices - Graham crackers - Soft pretzels - Carrot sticks These options bring a nice mix of flavors and textures. You can even try cookies or biscotti for a fun twist! This dip is perfect for parties! It serves about 6 to 8 people. You can easily double the recipe for larger gatherings. Guests love the creamy texture and sweet flavor. Arrange the dip with a variety of dippers for a colorful spread. This will please any crowd! For the full recipe, check out the earlier sections. This dip brings great flavors and fun for everyone. By mixing pumpkin, cookie butter, and spices, you create a delicious treat. Remember to chill for the best taste. Get creative with dippers and toppings to impress your guests. Explore variations and alternatives based on your needs. With easy storage tips, you can enjoy this dip later. Now, you're ready to delight friends and family at any gathering!](https://joymealplan.com/wp-content/uploads/2025/07/ca44b838-8d60-4193-b164-21c1eb441ebf-768x768.webp)
![To make these tasty cookies, you need simple ingredients that work well together. Here is what you will need: - 1 cup unsalted butter, softened to room temperature - 1 cup powdered sugar, plus extra for dusting - 1 teaspoon pure vanilla extract - 2 cups all-purpose flour, sifted - 1/2 teaspoon pure almond extract - 1/4 teaspoon sea salt - 1 cup raspberry jam (store-bought or homemade) - 1/2 cup sliced almonds (for topping) These key ingredients create a rich and buttery base for the cookies. The powdered sugar adds sweetness, while the extracts bring depth of flavor. The raspberry jam provides a fruity burst in every bite. You can customize these cookies to suit your taste. Here are some optional ingredients to consider: - Different jams: Swap raspberry jam for strawberry, apricot, or blueberry for new flavors. - Citrus zest: Add a teaspoon of lemon or orange zest for a bright twist. - Chopped nuts: Use pecans or walnuts instead of almonds for a different crunch. These optional ingredients let you make the cookies your own. Feel free to mix and match to create your perfect treat. For the complete details on how to put these ingredients together, check out the Full Recipe. To start, gather your ingredients. You will need butter, powdered sugar, vanilla extract, almond extract, flour, sea salt, raspberry jam, and sliced almonds. First, preheat your oven to 350°F (175°C). Line a baking sheet with parchment paper to avoid sticking. In a large bowl, cream the softened butter and powdered sugar. Use an electric mixer on medium speed for about 3-4 minutes. You want the mixture to be light and fluffy. Next, add in the vanilla and almond extracts. Beat until smooth. In another bowl, mix the sifted flour and sea salt. Gradually add this to the butter mix. Stir gently, just until it forms a dough. Avoid overmixing. With a tablespoon, scoop the dough and roll it into balls. Place them on the baking sheet about 2 inches apart. Now, make a small indentation in each dough ball using your thumb or a spoon. This will hold the jam. Spoon 1/2 teaspoon of raspberry jam into each well. Be careful not to overflow. Next, sprinkle sliced almonds around the jam. Press them lightly into the dough for a nice crunch. Bake in the preheated oven for 15-18 minutes. Look for a light golden brown on the edges. Once baked, let the cookies rest for 5 minutes on the sheet. Then, transfer them to a wire rack to cool completely. When cool, dust them with extra powdered sugar for a nice touch. For a beautiful presentation, arrange the cookies on a decorative plate. Scatter fresh raspberries around them for color. Enjoy your delicious Raspberry Almond Thumbprint Cookies! For the full recipe, refer to the earlier section. To bake the best raspberry almond thumbprint cookies, follow these tips: - Use softened butter: This helps create a creamy texture. - Sift your flour: Sifting aerates the flour, leading to lighter cookies. - Space them out: Place cookies 2 inches apart on the baking sheet. This prevents them from sticking together. - Check the time: Bake until the edges are light golden brown, about 15-18 minutes. Many home bakers face pitfalls while baking. Avoid these common mistakes: - Overmixing the dough: This makes cookies tough. Mix just until combined. - Not measuring flour correctly: Use a spoon to fill the measuring cup, then level it off. - Skipping the cooling time: Let the cookies rest before moving them. This helps them set. You can add extra flavors to your cookies for a twist. Consider these options: - Zest of lemon or orange: A little zest brightens the cookie's taste. - Chopped dark chocolate: Mix in for a rich contrast to the raspberry jam. - Coconut flakes: Add for a tropical touch and added texture. These tips will help you create the perfect batch of raspberry almond thumbprint cookies. For the complete recipe, check the Full Recipe section. {{image_4}} You can use different jam flavors in these cookies. Try strawberry or apricot for a fresh twist. Blueberry jam also works well and adds a nice color. Each jam gives the cookies its own unique taste. Experimenting with flavors keeps things exciting. If you want to change the nuts, you have many choices. Pecans or walnuts add a rich flavor. You can even skip the nuts if you prefer a nut-free cookie. Just remember, the crunch will be lost, but the jam will still shine. To make gluten-free thumbprint cookies, use a gluten-free flour blend. Brands like Bob’s Red Mill or King Arthur Flour work well. Just check that the blend has xanthan gum to bind everything together. This way, everyone can enjoy these tasty treats! Follow the [Full Recipe] for the main steps and enjoy your baking journey! To keep your Raspberry Almond Thumbprint Cookies fresh, store them in an airtight container. This will help keep them soft and tasty. If you stack them, place wax paper between layers. This helps prevent sticking. You can also use a cookie tin for a charming touch. When stored properly, these cookies will last about one week at room temperature. If you place them in the fridge, they may last up to two weeks. However, cold air can dry them out. So, if you want the best taste, enjoy them fresh! Freezing cookies is a great idea for later cravings. Allow the cookies to cool completely first. Then, place them in a single layer on a baking sheet. Freeze them for about an hour. After that, transfer them to a freezer-safe bag. They can last up to three months in the freezer. When ready to eat, thaw them in the fridge overnight or let them sit at room temperature for a few hours. For the full recipe, check out the details above! If you don’t have almond extract, you can use vanilla extract instead. This will still give your cookies great flavor. You can also try hazelnut extract for a unique twist. The cookies will still taste delicious! Yes, you can use other nuts! If you prefer, try pecans, walnuts, or even pistachios. Just chop them finely and use them in place of sliced almonds. Each nut adds a different flavor and texture. To make cookies softer, add an extra tablespoon of butter. This will give them a chewier texture. For firmer cookies, bake them a minute longer. Keep an eye on them to avoid overbaking. Adjusting these small details can really change your cookie experience. Raspberry almond thumbprint cookies are easy and fun to make. You learned about key ingredients, simple steps, and helpful tips to bake them perfectly. We also explored tasty variations and storage methods. If you follow these instructions and suggestions, your cookies will impress. Enjoy sharing this sweet treat with others. Baking can be simple and rewarding. So, gather your ingredients and start creating!](https://joymealplan.com/wp-content/uploads/2025/07/b4014d7b-fb87-49bc-9ed6-2b0ba339c469-768x768.webp)