Loaded Chicken Burrito Bowls Flavorful and Nutritious
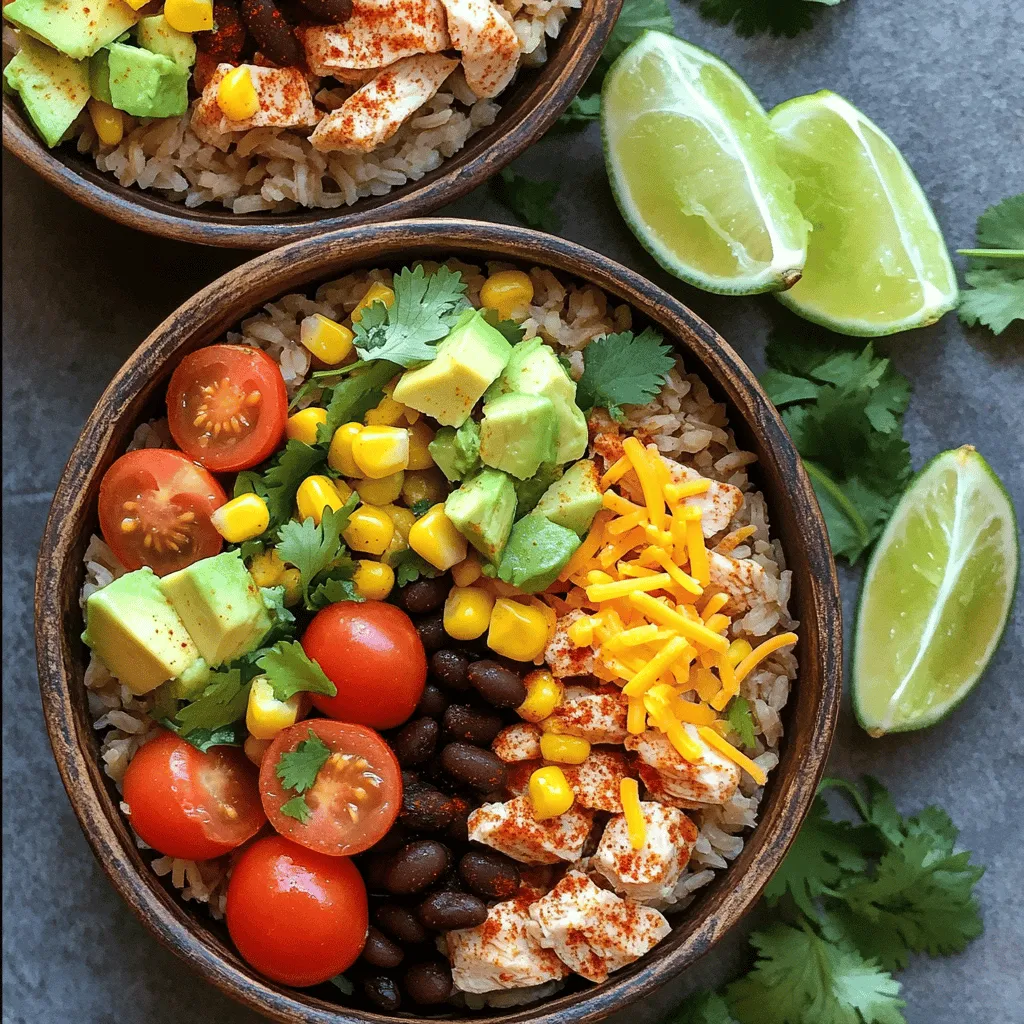
![- 2 cups cooked brown rice - 1 lb boneless, skinless chicken breast, diced - 1 can (15 oz) black beans, rinsed and drained - 1 cup corn (fresh, frozen, or canned) - 1 ripe avocado, diced - 1/2 cup shredded cheddar cheese - 1 tablespoon taco seasoning - Salt and black pepper to taste - Optional toppings: sour cream, salsa, sliced jalapeños For these Loaded Chicken Burrito Bowls, I focus on simple, fresh ingredients. The brown rice serves as a wholesome base. It adds fiber and nutrients. I choose boneless, skinless chicken breast for lean protein. It cooks up juicy and tender. Black beans bring extra protein and a creamy texture. Rinsing them helps remove excess sodium, making them healthier. Corn adds sweetness and a pop of color. You can use fresh, frozen, or canned, based on your preference. Avocado is a delightful addition. It brings creaminess and healthy fats. The shredded cheddar cheese adds richness and flavor. For seasoning, I use taco seasoning. It gives a bold taste without extra effort. I also add salt and black pepper to enhance the flavors. Toppings are where you can get creative. I suggest sour cream for creaminess. Salsa adds zest, and sliced jalapeños bring heat. Feel free to mix and match as you like. You can find the Full Recipe for all these delicious ingredients and how to prepare them. - Heat olive oil in a skillet over medium heat. - Add diced chicken and season with taco seasoning. First, I heat a tablespoon of olive oil in a skillet over medium heat. I want the oil to shimmer before adding the chicken. Once it’s hot, I toss in the diced chicken breast. I sprinkle it with taco seasoning, along with a pinch of salt and black pepper. I cook this for about 6 to 8 minutes. I stir often to ensure even cooking. The chicken should turn a lovely golden brown and reach an internal temperature of 165°F. - Prepare brown rice according to package instructions. - Fluff rice once cooked. While the chicken cooks, I prepare brown rice. I follow the package instructions closely. This step is key for fluffy rice. Once it’s cooked, I use a fork to fluff the rice. Fluffy rice makes a great base for my burrito bowls. - Mix black beans, corn, and tomatoes in a bowl. - Combine with cooked chicken and layer on rice. Next, I grab a large mixing bowl. I combine the rinsed black beans, corn, and halved cherry tomatoes. I gently toss them together until they mix well. Once the chicken is done, I add it to the bowl. I stir everything together to let the flavors blend. Now it's time to build the burrito bowls! I divide the fluffy brown rice into four serving bowls. I spoon the chicken mixture on top of the rice in each bowl. Next, I add diced avocado, shredded cheese, and fresh cilantro. For a zesty finish, I serve lime wedges on the side. You can also add sour cream or salsa if you want. For the full recipe, check the complete instructions and ingredient list. Enjoy making your loaded chicken burrito bowls! How to ensure chicken is cooked thoroughly To cook chicken safely, use a meat thermometer. The internal temperature should reach 165°F. Cook chicken pieces until they are golden brown and no longer pink inside. This ensures it is juicy and safe to eat. Best practices for fluffy rice For fluffy rice, rinse it well before cooking. This removes extra starch that makes it sticky. Cook it with the right water ratio, usually 2 cups of water for every cup of rice. After cooking, fluff it gently with a fork. This keeps the grains separate and light. Colorful arrangement ideas for the toppings To make your burrito bowls pop, layer the toppings by color. Place bright tomatoes, vibrant corn, and green avocado on top. This adds visual interest. You can also create small sections on the bowl for each topping. This way, each bite looks and tastes amazing. Using garnishes to enhance visual appeal Fresh herbs like cilantro can elevate your dish. Sprinkle them on top for a burst of color. Lime wedges can add a zesty touch. Place them artfully around the bowl for that extra flair. Suggestions for extra spices or ingredients to add To boost the flavor, try adding cumin or smoked paprika. These spices add warmth and depth. You can also mix in jalapeños for heat or lime juice for brightness. Freshly chopped garlic can also add a punch of flavor. Alternative cooking methods for chicken If you want to switch it up, grill or bake the chicken instead of pan-frying. Grilling adds a nice smoky flavor. Baking can keep it tender and juicy. You can marinate the chicken beforehand to infuse even more flavor. For the Full Recipe, check the earlier section for all the details! {{image_4}} You can easily make Loaded Chicken Burrito Bowls vegetarian or vegan. To do this, simply replace the chicken with a plant-based protein. Options include lentils, tempeh, or tofu. For a vegan cheese option, try cashew cheese or nutritional yeast. For gluten-free options, make sure to check your taco seasoning. Some brands add gluten. You can also swap brown rice for quinoa or cauliflower rice. If you like heat, add jalapeños or hot sauce to your bowl. This gives a spicy kick that enhances the flavors. You can also try different beans like pinto or kidney beans. Each type adds a unique taste and texture to your dish. Feel free to adjust your ingredients based on what is in season or what you like best. You can swap corn for bell peppers or zucchini for a fresh twist. For cheese, consider using feta or goat cheese for a different flavor. If you want a creamy topping, try Greek yogurt instead of sour cream. These swaps keep your bowls exciting! For the full recipe, check out the complete details in the recipe section. To keep your loaded chicken burrito bowls fresh, store them in airtight containers. This helps preserve flavor and texture. Place all components in separate containers if possible. This way, the rice, chicken, and toppings stay fresh longer. Generally, leftovers last about 3 to 4 days in the fridge. Make sure to check for any signs of spoilage before eating. If the chicken looks or smells off, it's best to toss it. When reheating, use the microwave for quick warmth. Place the food in a microwave-safe bowl, cover it with a damp paper towel, and heat it in 30-second intervals until warm. This method keeps the rice moist and prevents it from drying out. For the best texture, consider reheating in a skillet. Add a splash of water, cover, and cook on low heat until everything is warmed through. This method helps maintain flavor and texture. To freeze components, let them cool completely first. Portion the rice, chicken, and toppings into freezer-safe containers. Label them with the date. This makes it easy to track freshness. You can freeze cooked chicken and rice for up to 3 months. When ready to eat, thaw them overnight in the fridge. Reheat them as mentioned above to enjoy your delicious meal again. You can add many tasty toppings to your burrito bowls. Here are some great ideas: - Sour cream: Adds creaminess and a tangy flavor. - Salsa: Choose your favorite type, from mild to spicy. - Sliced jalapeños: For some heat and crunch. - Chopped green onions: Adds freshness and color. - Lettuce: A nice crunch and extra nutrients. - Black olives: For a salty, savory touch. - Cheese: Try a different cheese like queso fresco or pepper jack. Mix and match these options to find your favorite combination. Each topping can change the flavor and texture of the dish. Yes, you can prepare Loaded Chicken Burrito Bowls ahead of time. Here are some tips for meal prep: - Cook the chicken and rice: You can cook and store these in separate containers in the fridge. - Prep toppings: Chop your vegetables and store them in airtight containers. - Assemble before serving: When ready to eat, layer the rice, chicken, and toppings in a bowl. This keeps everything fresh. When stored properly, the ingredients can last for about 3 to 4 days in the fridge. You can easily customize your burrito bowls to fit your needs. Here are some tips: - Dietary needs: If you're vegetarian, use beans instead of chicken. For vegan, skip cheese and sour cream. - Flavor preferences: Add different spices or sauces to change the flavor. - Vegetable swaps: Use seasonal vegetables, like bell peppers or zucchini. - Grain choices: Try quinoa, cauliflower rice, or even lettuce wraps instead of brown rice. Get creative and make the dish your own! For the complete ingredients and instructions for Loaded Chicken Burrito Bowls, check out the [Full Recipe]. This post shared how to make tasty Loaded Chicken Burrito Bowls. You learned about main and optional ingredients. I explained step-by-step instructions, helpful tips, and fun variations. You can customize the bowls to your liking and store leftovers easily. Making these burrito bowls is fun and flexible. Enjoy your meal and get creative with flavors. The possibilities are endless, so dive in and make it your own!](https://joymealplan.com/wp-content/uploads/2025/07/a2d38b5a-a8a2-4e80-9f96-ef24cf5264b7.webp)
Are you ready to elevate your dinner game? Loaded Chicken Burrito Bowls are the perfect mix of flavor and nutrition. With simple ingredients like chicken, black beans, and brown rice, you can whip up a hearty meal in no time. Plus, they’re easy to customize to fit your tastes. Let’s dive into this delicious recipe that’s sure to impress your family and friends!
Ingredients
Main Ingredients
– 2 cups cooked brown rice
– 1 lb boneless, skinless chicken breast, diced
– 1 can (15 oz) black beans, rinsed and drained
Optional Ingredients
– 1 cup corn (fresh, frozen, or canned)
– 1 ripe avocado, diced
– 1/2 cup shredded cheddar cheese
Seasoning and Toppings
– 1 tablespoon taco seasoning
– Salt and black pepper to taste
– Optional toppings: sour cream, salsa, sliced jalapeños
For these Loaded Chicken Burrito Bowls, I focus on simple, fresh ingredients. The brown rice serves as a wholesome base. It adds fiber and nutrients. I choose boneless, skinless chicken breast for lean protein. It cooks up juicy and tender.
Black beans bring extra protein and a creamy texture. Rinsing them helps remove excess sodium, making them healthier. Corn adds sweetness and a pop of color. You can use fresh, frozen, or canned, based on your preference.
Avocado is a delightful addition. It brings creaminess and healthy fats. The shredded cheddar cheese adds richness and flavor.
For seasoning, I use taco seasoning. It gives a bold taste without extra effort. I also add salt and black pepper to enhance the flavors.
Toppings are where you can get creative. I suggest sour cream for creaminess. Salsa adds zest, and sliced jalapeños bring heat. Feel free to mix and match as you like.
Step-by-Step Instructions
Preparing the Chicken
– Heat olive oil in a skillet over medium heat.
– Add diced chicken and season with taco seasoning.
First, I heat a tablespoon of olive oil in a skillet over medium heat. I want the oil to shimmer before adding the chicken. Once it’s hot, I toss in the diced chicken breast. I sprinkle it with taco seasoning, along with a pinch of salt and black pepper. I cook this for about 6 to 8 minutes. I stir often to ensure even cooking. The chicken should turn a lovely golden brown and reach an internal temperature of 165°F.
Cooking the Rice
– Prepare brown rice according to package instructions.
– Fluff rice once cooked.
While the chicken cooks, I prepare brown rice. I follow the package instructions closely. This step is key for fluffy rice. Once it’s cooked, I use a fork to fluff the rice. Fluffy rice makes a great base for my burrito bowls.
Assembling the Burrito Bowls
– Mix black beans, corn, and tomatoes in a bowl.
– Combine with cooked chicken and layer on rice.
Next, I grab a large mixing bowl. I combine the rinsed black beans, corn, and halved cherry tomatoes. I gently toss them together until they mix well. Once the chicken is done, I add it to the bowl. I stir everything together to let the flavors blend.
Now it’s time to build the burrito bowls! I divide the fluffy brown rice into four serving bowls. I spoon the chicken mixture on top of the rice in each bowl. Next, I add diced avocado, shredded cheese, and fresh cilantro. For a zesty finish, I serve lime wedges on the side. You can also add sour cream or salsa if you want.Enjoy making your loaded chicken burrito bowls!
Tips & Tricks
Cooking Tips
How to ensure chicken is cooked thoroughly
To cook chicken safely, use a meat thermometer. The internal temperature should reach 165°F. Cook chicken pieces until they are golden brown and no longer pink inside. This ensures it is juicy and safe to eat.
Best practices for fluffy rice
For fluffy rice, rinse it well before cooking. This removes extra starch that makes it sticky. Cook it with the right water ratio, usually 2 cups of water for every cup of rice. After cooking, fluff it gently with a fork. This keeps the grains separate and light.
Presentation Tips
Colorful arrangement ideas for the toppings
To make your burrito bowls pop, layer the toppings by color. Place bright tomatoes, vibrant corn, and green avocado on top. This adds visual interest. You can also create small sections on the bowl for each topping. This way, each bite looks and tastes amazing.
Using garnishes to enhance visual appeal
Fresh herbs like cilantro can elevate your dish. Sprinkle them on top for a burst of color. Lime wedges can add a zesty touch. Place them artfully around the bowl for that extra flair.
Flavor Enhancements
Suggestions for extra spices or ingredients to add
To boost the flavor, try adding cumin or smoked paprika. These spices add warmth and depth. You can also mix in jalapeños for heat or lime juice for brightness. Freshly chopped garlic can also add a punch of flavor.
Alternative cooking methods for chicken
If you want to switch it up, grill or bake the chicken instead of pan-frying. Grilling adds a nice smoky flavor. Baking can keep it tender and juicy. You can marinate the chicken beforehand to infuse even more flavor.
Variations
Dietary Modifications
You can easily make Loaded Chicken Burrito Bowls vegetarian or vegan. To do this, simply replace the chicken with a plant-based protein. Options include lentils, tempeh, or tofu. For a vegan cheese option, try cashew cheese or nutritional yeast.
For gluten-free options, make sure to check your taco seasoning. Some brands add gluten. You can also swap brown rice for quinoa or cauliflower rice.
Flavor Variations
If you like heat, add jalapeños or hot sauce to your bowl. This gives a spicy kick that enhances the flavors. You can also try different beans like pinto or kidney beans. Each type adds a unique taste and texture to your dish.
Ingredient Swaps
Feel free to adjust your ingredients based on what is in season or what you like best. You can swap corn for bell peppers or zucchini for a fresh twist.
For cheese, consider using feta or goat cheese for a different flavor. If you want a creamy topping, try Greek yogurt instead of sour cream. These swaps keep your bowls exciting!
Storage Info
Storing Leftovers
To keep your loaded chicken burrito bowls fresh, store them in airtight containers. This helps preserve flavor and texture. Place all components in separate containers if possible. This way, the rice, chicken, and toppings stay fresh longer.
Generally, leftovers last about 3 to 4 days in the fridge. Make sure to check for any signs of spoilage before eating. If the chicken looks or smells off, it’s best to toss it.
Reheating Instructions
When reheating, use the microwave for quick warmth. Place the food in a microwave-safe bowl, cover it with a damp paper towel, and heat it in 30-second intervals until warm. This method keeps the rice moist and prevents it from drying out.
For the best texture, consider reheating in a skillet. Add a splash of water, cover, and cook on low heat until everything is warmed through. This method helps maintain flavor and texture.
Freezing Guidelines
To freeze components, let them cool completely first. Portion the rice, chicken, and toppings into freezer-safe containers. Label them with the date. This makes it easy to track freshness.
You can freeze cooked chicken and rice for up to 3 months. When ready to eat, thaw them overnight in the fridge. Reheat them as mentioned above to enjoy your delicious meal again.
FAQs
What can I add to Loaded Chicken Burrito Bowls?
You can add many tasty toppings to your burrito bowls. Here are some great ideas:
– Sour cream: Adds creaminess and a tangy flavor.
– Salsa: Choose your favorite type, from mild to spicy.
– Sliced jalapeños: For some heat and crunch.
– Chopped green onions: Adds freshness and color.
– Lettuce: A nice crunch and extra nutrients.
– Black olives: For a salty, savory touch.
– Cheese: Try a different cheese like queso fresco or pepper jack.
Mix and match these options to find your favorite combination. Each topping can change the flavor and texture of the dish.
Can I make Loaded Chicken Burrito Bowls ahead of time?
Yes, you can prepare Loaded Chicken Burrito Bowls ahead of time. Here are some tips for meal prep:
– Cook the chicken and rice: You can cook and store these in separate containers in the fridge.
– Prep toppings: Chop your vegetables and store them in airtight containers.
– Assemble before serving: When ready to eat, layer the rice, chicken, and toppings in a bowl. This keeps everything fresh.
When stored properly, the ingredients can last for about 3 to 4 days in the fridge.
How do I customize my Loaded Chicken Burrito Bowls?
You can easily customize your burrito bowls to fit your needs. Here are some tips:
– Dietary needs: If you’re vegetarian, use beans instead of chicken. For vegan, skip cheese and sour cream.
– Flavor preferences: Add different spices or sauces to change the flavor.
– Vegetable swaps: Use seasonal vegetables, like bell peppers or zucchini.
– Grain choices: Try quinoa, cauliflower rice, or even lettuce wraps instead of brown rice.
Get creative and make the dish your own!
This post shared how to make tasty Loaded Chicken Burrito Bowls. You learned about main and optional ingredients. I explained step-by-step instructions, helpful tips, and fun variations. You can customize the bowls to your liking and store leftovers easily.
Making these burrito bowls is fun and flexible. Enjoy your meal and get creative with flavors. The possibilities are endless, so dive in and make it your own!
![- 2 cups cooked brown rice - 1 lb boneless, skinless chicken breast, diced - 1 can (15 oz) black beans, rinsed and drained - 1 cup corn (fresh, frozen, or canned) - 1 ripe avocado, diced - 1/2 cup shredded cheddar cheese - 1 tablespoon taco seasoning - Salt and black pepper to taste - Optional toppings: sour cream, salsa, sliced jalapeños For these Loaded Chicken Burrito Bowls, I focus on simple, fresh ingredients. The brown rice serves as a wholesome base. It adds fiber and nutrients. I choose boneless, skinless chicken breast for lean protein. It cooks up juicy and tender. Black beans bring extra protein and a creamy texture. Rinsing them helps remove excess sodium, making them healthier. Corn adds sweetness and a pop of color. You can use fresh, frozen, or canned, based on your preference. Avocado is a delightful addition. It brings creaminess and healthy fats. The shredded cheddar cheese adds richness and flavor. For seasoning, I use taco seasoning. It gives a bold taste without extra effort. I also add salt and black pepper to enhance the flavors. Toppings are where you can get creative. I suggest sour cream for creaminess. Salsa adds zest, and sliced jalapeños bring heat. Feel free to mix and match as you like. You can find the Full Recipe for all these delicious ingredients and how to prepare them. - Heat olive oil in a skillet over medium heat. - Add diced chicken and season with taco seasoning. First, I heat a tablespoon of olive oil in a skillet over medium heat. I want the oil to shimmer before adding the chicken. Once it’s hot, I toss in the diced chicken breast. I sprinkle it with taco seasoning, along with a pinch of salt and black pepper. I cook this for about 6 to 8 minutes. I stir often to ensure even cooking. The chicken should turn a lovely golden brown and reach an internal temperature of 165°F. - Prepare brown rice according to package instructions. - Fluff rice once cooked. While the chicken cooks, I prepare brown rice. I follow the package instructions closely. This step is key for fluffy rice. Once it’s cooked, I use a fork to fluff the rice. Fluffy rice makes a great base for my burrito bowls. - Mix black beans, corn, and tomatoes in a bowl. - Combine with cooked chicken and layer on rice. Next, I grab a large mixing bowl. I combine the rinsed black beans, corn, and halved cherry tomatoes. I gently toss them together until they mix well. Once the chicken is done, I add it to the bowl. I stir everything together to let the flavors blend. Now it's time to build the burrito bowls! I divide the fluffy brown rice into four serving bowls. I spoon the chicken mixture on top of the rice in each bowl. Next, I add diced avocado, shredded cheese, and fresh cilantro. For a zesty finish, I serve lime wedges on the side. You can also add sour cream or salsa if you want. For the full recipe, check the complete instructions and ingredient list. Enjoy making your loaded chicken burrito bowls! How to ensure chicken is cooked thoroughly To cook chicken safely, use a meat thermometer. The internal temperature should reach 165°F. Cook chicken pieces until they are golden brown and no longer pink inside. This ensures it is juicy and safe to eat. Best practices for fluffy rice For fluffy rice, rinse it well before cooking. This removes extra starch that makes it sticky. Cook it with the right water ratio, usually 2 cups of water for every cup of rice. After cooking, fluff it gently with a fork. This keeps the grains separate and light. Colorful arrangement ideas for the toppings To make your burrito bowls pop, layer the toppings by color. Place bright tomatoes, vibrant corn, and green avocado on top. This adds visual interest. You can also create small sections on the bowl for each topping. This way, each bite looks and tastes amazing. Using garnishes to enhance visual appeal Fresh herbs like cilantro can elevate your dish. Sprinkle them on top for a burst of color. Lime wedges can add a zesty touch. Place them artfully around the bowl for that extra flair. Suggestions for extra spices or ingredients to add To boost the flavor, try adding cumin or smoked paprika. These spices add warmth and depth. You can also mix in jalapeños for heat or lime juice for brightness. Freshly chopped garlic can also add a punch of flavor. Alternative cooking methods for chicken If you want to switch it up, grill or bake the chicken instead of pan-frying. Grilling adds a nice smoky flavor. Baking can keep it tender and juicy. You can marinate the chicken beforehand to infuse even more flavor. For the Full Recipe, check the earlier section for all the details! {{image_4}} You can easily make Loaded Chicken Burrito Bowls vegetarian or vegan. To do this, simply replace the chicken with a plant-based protein. Options include lentils, tempeh, or tofu. For a vegan cheese option, try cashew cheese or nutritional yeast. For gluten-free options, make sure to check your taco seasoning. Some brands add gluten. You can also swap brown rice for quinoa or cauliflower rice. If you like heat, add jalapeños or hot sauce to your bowl. This gives a spicy kick that enhances the flavors. You can also try different beans like pinto or kidney beans. Each type adds a unique taste and texture to your dish. Feel free to adjust your ingredients based on what is in season or what you like best. You can swap corn for bell peppers or zucchini for a fresh twist. For cheese, consider using feta or goat cheese for a different flavor. If you want a creamy topping, try Greek yogurt instead of sour cream. These swaps keep your bowls exciting! For the full recipe, check out the complete details in the recipe section. To keep your loaded chicken burrito bowls fresh, store them in airtight containers. This helps preserve flavor and texture. Place all components in separate containers if possible. This way, the rice, chicken, and toppings stay fresh longer. Generally, leftovers last about 3 to 4 days in the fridge. Make sure to check for any signs of spoilage before eating. If the chicken looks or smells off, it's best to toss it. When reheating, use the microwave for quick warmth. Place the food in a microwave-safe bowl, cover it with a damp paper towel, and heat it in 30-second intervals until warm. This method keeps the rice moist and prevents it from drying out. For the best texture, consider reheating in a skillet. Add a splash of water, cover, and cook on low heat until everything is warmed through. This method helps maintain flavor and texture. To freeze components, let them cool completely first. Portion the rice, chicken, and toppings into freezer-safe containers. Label them with the date. This makes it easy to track freshness. You can freeze cooked chicken and rice for up to 3 months. When ready to eat, thaw them overnight in the fridge. Reheat them as mentioned above to enjoy your delicious meal again. You can add many tasty toppings to your burrito bowls. Here are some great ideas: - Sour cream: Adds creaminess and a tangy flavor. - Salsa: Choose your favorite type, from mild to spicy. - Sliced jalapeños: For some heat and crunch. - Chopped green onions: Adds freshness and color. - Lettuce: A nice crunch and extra nutrients. - Black olives: For a salty, savory touch. - Cheese: Try a different cheese like queso fresco or pepper jack. Mix and match these options to find your favorite combination. Each topping can change the flavor and texture of the dish. Yes, you can prepare Loaded Chicken Burrito Bowls ahead of time. Here are some tips for meal prep: - Cook the chicken and rice: You can cook and store these in separate containers in the fridge. - Prep toppings: Chop your vegetables and store them in airtight containers. - Assemble before serving: When ready to eat, layer the rice, chicken, and toppings in a bowl. This keeps everything fresh. When stored properly, the ingredients can last for about 3 to 4 days in the fridge. You can easily customize your burrito bowls to fit your needs. Here are some tips: - Dietary needs: If you're vegetarian, use beans instead of chicken. For vegan, skip cheese and sour cream. - Flavor preferences: Add different spices or sauces to change the flavor. - Vegetable swaps: Use seasonal vegetables, like bell peppers or zucchini. - Grain choices: Try quinoa, cauliflower rice, or even lettuce wraps instead of brown rice. Get creative and make the dish your own! For the complete ingredients and instructions for Loaded Chicken Burrito Bowls, check out the [Full Recipe]. This post shared how to make tasty Loaded Chicken Burrito Bowls. You learned about main and optional ingredients. I explained step-by-step instructions, helpful tips, and fun variations. You can customize the bowls to your liking and store leftovers easily. Making these burrito bowls is fun and flexible. Enjoy your meal and get creative with flavors. The possibilities are endless, so dive in and make it your own!](https://joymealplan.com/wp-content/uploads/2025/07/a2d38b5a-a8a2-4e80-9f96-ef24cf5264b7-300x300.webp)
![To make the Roasted Sweet Potato Black Bean Salad, you will need these fresh and vibrant ingredients: - 2 medium sweet potatoes, peeled and cut into bite-sized cubes - 1 can (15 oz) black beans, thoroughly rinsed and drained - 1 vibrant red bell pepper, diced - 1 small red onion, finely chopped - 2 cups fresh spinach, roughly chopped - 1 ripe avocado, diced - 3 tablespoons olive oil, divided - 1 teaspoon ground cumin - 1 teaspoon smoked paprika - Salt and freshly ground black pepper to taste - Juice from 1 lime - ¼ cup fresh cilantro, chopped (optional) Each item adds a layer of flavor. Sweet potatoes give a naturally sweet taste. Black beans add protein and creaminess. The red bell pepper brightens the dish with color and crunch. The red onion gives a nice zing. Spinach adds a fresh touch while the avocado brings richness. Olive oil helps blend it all together while the spices create a warm, smoky flavor. Finally, lime juice and cilantro brighten the salad, making it truly special. For the full recipe, check out the complete details to guide you through the cooking process! - Preheat the oven to 425°F (220°C). - Mix sweet potatoes with olive oil and seasonings. Start by preheating your oven. This step is key for getting those sweet potatoes nice and crispy. While the oven heats, grab a large bowl. Toss in your sweet potatoes, olive oil, ground cumin, and smoked paprika. Add a good pinch of salt and pepper. Stir well until every piece is coated in the mix. - Spread sweet potatoes on a baking sheet and roast for 25-30 minutes. Next, spread your sweet potatoes on a baking sheet. Make sure they are in a single layer. This helps them roast evenly. Place the baking sheet in the oven. Roast for 25-30 minutes. Halfway through, give them a quick stir. This way, all sides get that lovely caramelization. - In a bowl, combine black beans, red bell pepper, red onion, and spinach. - Add roasted sweet potatoes and mix with lime juice and remaining oil. - Gently fold in diced avocado and cilantro. While your sweet potatoes roast, take another bowl. Combine the black beans, diced red bell pepper, chopped red onion, and fresh spinach. Mix these ingredients well. Once the sweet potatoes are done, let them cool for just a moment. Then, add them to your bowl. Drizzle lime juice and the last bit of olive oil over the mix. Toss gently until everything is well combined. Finally, fold in your diced avocado and cilantro. Be gentle to keep the avocado nice. For the full recipe, check below! To get sweet potatoes just right, you need a few tricks. First, cut them into even pieces. This ensures they roast at the same time. Use a sharp knife for clean cuts. Next, toss them well with olive oil and spices. The oil helps with caramelization. Spread them out on the baking sheet. Avoid crowding the pan, as this can lead to steaming instead of roasting. Stir them halfway through roasting. This helps them brown evenly. If you see them getting too dark, reduce the oven temperature. Want to boost flavors? Add some extra spices. A pinch of cayenne pepper gives heat. Garlic powder adds depth. Fresh herbs like thyme or oregano can brighten the dish. Experiment with what you like best. Don’t forget about lime juice! It adds brightness and balances sweetness. You can also try a splash of balsamic vinegar for a unique twist. Make your salad pop! Use a large bowl to show off the colors. Layer your ingredients for a beautiful look. Start with greens at the bottom. Then add the roasted sweet potatoes and black beans. Garnish with fresh cilantro and lime wedges. This adds color and extra flavor. A sprinkle of feta cheese can also enhance visual appeal. Serve it chilled or at room temperature for the best experience. For the full recipe, check out the detailed steps to make this vibrant dish! {{image_4}} You can switch up the black beans if you like. Kidney beans or pinto beans work well too. If you want to change the sweet potatoes, try butternut squash for a different taste. If you need more protein, add cooked chicken or quinoa. Both options bring a nice texture and boost the nutrition. You can also toss in cooked lentils for a plant-based protein option. Homemade dressings can really change the flavor of your salad. A simple lime vinaigrette adds brightness. Just mix lime juice, olive oil, and a pinch of salt. For a creamier option, blend avocado with Greek yogurt and lime juice. This gives a rich, smooth texture. You can also try tahini dressing for a nutty flavor that pairs well with the salad. Seasonal veggies are a fun way to change your salad. In spring, add fresh peas or asparagus for a crisp bite. In summer, try ripe cherry tomatoes for sweetness. In fall, consider adding roasted Brussels sprouts or kale for a hearty feel. Fresh herbs like basil or mint can brighten up the dish. They add a lovely aroma and freshness that complements the flavors nicely. To keep your salad fresh, store the components separately. Place the roasted sweet potatoes in one container. Use another container for the black beans, red bell pepper, onion, and spinach. This way, the flavors stay bright, and the textures remain nice. You can mix them when you are ready to eat. This salad stays fresh in the fridge for about three to five days. The sweet potatoes hold well, while the other veggies stay crisp. Just make sure to seal the containers tightly. If you notice any changes in smell or texture, it's best to toss it. When reheating, keep the sweet potatoes and other veggies separate. Use a skillet on medium heat for the sweet potatoes. Stir gently until warm. This keeps them crispy. For the beans and veggies, you can heat them in the microwave for about 30 seconds. Avoid heating too long, so you don’t lose their crunch. Yes, you can make this salad ahead of time. Prepare the sweet potatoes and other ingredients separately. Store them in airtight containers in the fridge. Mix everything together right before serving. This way, the salad stays fresh and tasty. Absolutely! All the ingredients in this salad are gluten-free. Sweet potatoes, black beans, and veggies are safe for those with gluten issues. Always check labels, especially with canned goods, to ensure they are certified gluten-free. This salad pairs well with many dishes. You can serve it with grilled chicken or fish for added protein. It also goes great with quinoa or a warm tortilla. For a light meal, enjoy it with a bowl of soup. You can easily adjust this salad for different diets. For vegan options, skip the cheese and use a vegan dressing. If you're vegetarian, add cheese for extra flavor. For low-carb diets, reduce the sweet potatoes and add more greens or avocado. For the complete detailed recipe for Roasted Sweet Potato Black Bean Salad, check here: [Full Recipe]. This blog covered how to make a delicious roasted sweet potato and black bean salad. We explored the main ingredients, preparation steps, and useful tips to perfect your dish. You learned about variations and storage methods to keep your salad fresh. This salad is not just tasty; it’s also good for you. Try it for a quick meal or as a side. Enjoy customizing it to fit your taste and needs. With these techniques, you can impress anyone at the table.](https://joymealplan.com/wp-content/uploads/2025/07/525cd2b1-78c5-4050-8250-da110bbc1063-768x768.webp)

![- Sirloin steak - Unsalted butter - Garlic - Fresh herbs (rosemary and thyme) - Seasonings (salt, pepper, red pepper flakes) The star of this dish is the sirloin steak. I love using sirloin because it’s tender and flavorful. Cut it into 1-inch cubes for the perfect bite. Next, you need unsalted butter. This adds richness to the dish without being too salty. Garlic is key for that bold flavor; four cloves will do the trick. Fresh herbs like rosemary and thyme elevate the taste. Seasoning is important; use salt, pepper, and red pepper flakes for a bit of heat. - Fresh parsley Garnishing with fresh parsley adds color and freshness. It also brightens the dish visually and taste-wise. - Large skillet - Knife and cutting board - Measuring spoons You will need a large skillet to cook the steak bites evenly. A sharp knife and cutting board help when cutting the steak into cubes. Measuring spoons ensure you get the right amount of butter and spices. For the full recipe, check out the [Full Recipe]. Start by cutting the sirloin steak into 1-inch cubes. Use a sharp knife for clean cuts. Next, season the steak pieces with salt and black pepper. Make sure each piece is well-coated. This step helps enhance the steak’s flavor. Heat a large skillet on medium-high heat. Add 2 tablespoons of unsalted butter. Wait until it sizzles and foams. Once the butter is ready, add the steak cubes in a single layer. Avoid crowding the pan to let them sear well. Cook the steak for 2-3 minutes on each side. Aim for a medium-rare doneness, or cook longer if you prefer it more done. Remove the steak bites from the skillet and set them aside on a plate. In the same skillet, lower the heat to medium. Add the remaining 2 tablespoons of butter and let it melt completely. When the butter melts, add the minced garlic, fresh rosemary, and thyme. Sauté these for 1-2 minutes. Stir constantly to avoid burning the garlic. If it burns, it can taste bitter. Now, return the cooked steak bites to the skillet. Toss them in the garlic butter sauce to coat evenly. If you like heat, sprinkle in red pepper flakes and mix well. This adds a nice kick to the dish. Carefully transfer the garlic butter steak bites to a serving platter. For a nice touch, garnish with freshly chopped parsley. This adds color and freshness to the dish. You can serve these bites with toothpicks for easy eating or pair them with crusty bread. This way, everyone can enjoy the tasty garlic butter sauce. For the full recipe, check the link above. When making garlic butter steak bites, the cut of steak matters. I recommend using sirloin. It is tender and has great flavor. Other cuts like ribeye or filet mignon are good too. Ribeye is rich and juicy, while filet mignon is super tender. Think about your taste and budget when choosing. Garlic butter sauce makes these bites special. First, avoid burnt garlic. Burnt garlic tastes bitter. To keep it nice, cook garlic on medium heat. Watch it closely for about 1-2 minutes. If you want to change the flavor, add fresh herbs. Rosemary and thyme are great, but you can try other herbs too. To get juicy steak bites, searing is key. Heat your skillet until it’s hot. This helps form a nice crust and seals in juices. Cook the steak for about 2-3 minutes per side. After cooking, let the steak rest for a few minutes. This helps keep the juices inside the meat. For the full recipe, check the link. {{image_4}} You can add fun flavors to your garlic butter steak bites by mixing in different spices. Try paprika for a mild smokiness or cumin for a warm twist. These spices enhance the taste without overpowering the garlic. You can also use alternative herbs like oregano or basil. These herbs add a fresh taste and can change the whole vibe of the dish. For a new twist, incorporate soy sauce or Worcestershire sauce into your garlic butter. This gives the dish a savory depth. If you love bright flavors, try adding some lemon zest. The zest adds a nice zing that balances the rich garlic butter. When it comes to sides, think of colorful vegetables like roasted asparagus or sautéed green beans. These add nutrition and color to your meal. You could also serve the steak bites over rice for a filling option. Pair with your favorite sauces or dips, like a creamy ranch or spicy aioli, to elevate the meal even more. For the full experience, check out the Full Recipe. To keep your garlic butter steak bites fresh, store them in an airtight container. Make sure to let the steak bites cool completely before sealing them. They can stay in the fridge for up to three days. This helps preserve their flavor and texture. If you want to keep them longer, freezing is a great option. Place the cooled steak bites in a freezer bag. Remove as much air as possible to prevent freezer burn. They can last up to three months in the freezer. When you’re ready to eat, thaw them in the fridge overnight for best results. To reheat, use a skillet on low heat. This method warms the steak bites evenly. Stir occasionally to avoid hot spots. If you want a crispy outside, sear them for a minute on each side. Avoid the microwave as it can overcook the steak and make it tough. Enjoy your garlic butter steak bites just as delicious as when they were first made! You cook garlic butter steak bites for about 6 to 8 minutes. For medium-rare steak, aim for 2 to 3 minutes per side. If you like it medium, cook for about 3 to 4 minutes per side. Always check the center for your preferred doneness. Yes, you can use frozen steak, but thaw it first. Place the steak in the fridge overnight for best results. If short on time, submerge it in cold water for about an hour. Once thawed, cut and season it as you would fresh steak. Serve garlic butter steak bites with a side of roasted vegetables. Mashed potatoes or a fresh salad also pair well. For drinks, red wine or a cold beer complements the flavors nicely. Yes, this recipe is great for meal prep. Cook the steak bites and store them in airtight containers. They last up to 4 days in the fridge. Reheat them in a skillet for the best taste. To keep steak tender, marinate it for a few hours. Use a mixture of oil, acid, and spices. You can also use a meat tenderizer before cooking. Always slice the steak against the grain for the best texture. You now have a simple, tasty recipe for garlic butter steak bites. Remember the main steps: prepare your steak, cook it well, and make a rich garlic butter sauce. Feel free to customize with new flavors and serve with your favorite sides. Keep your leftovers fresh by following the storage tips. Cooking can be fun! Enjoy this dish and impress others with your skills. Happy cooking!](https://joymealplan.com/wp-content/uploads/2025/06/92db3657-03ac-4854-ae42-b3d18b0eb765-768x768.webp)
![To make garlic butter steak bites, you need a few key ingredients: - 1 pound sirloin steak, cut into bite-sized pieces - 4 tablespoons unsalted butter, divided - 4 cloves garlic, minced - 1 teaspoon smoked paprika - 1 teaspoon salt - 1/2 teaspoon black pepper - 1 tablespoon fresh parsley, finely chopped (for garnish) - Lemon wedges, for serving The sirloin steak is tender and has great flavor. Cut it into small pieces to cook quickly. The unsalted butter adds richness, while garlic gives a wonderful aroma. Smoked paprika adds a nice touch of warmth. Salt and pepper enhance the taste. Fresh parsley brightens the dish, and lemon wedges give a zesty kick. You can add a few optional items to elevate your meal: - Fresh parsley - Lemon wedges - Side dish suggestions Fresh parsley not only looks nice but also adds a fresh taste. Lemon wedges balance the richness of the steak. For sides, consider serving with a salad, rice, or roasted veggies. These add texture and flavor to your plate. You can find the full recipe for garlic butter steak bites to help guide you in creating this dish. First, pat the steak pieces dry with a paper towel. This step helps the steak sear well, giving it a nice crust. Next, cut the steak into bite-sized pieces. Aim for uniform chunks, so they cook evenly. This makes each bite tender and flavorful. Now, let’s melt the butter. In a large skillet, heat 2 tablespoons of unsalted butter over medium-high heat. Wait until it starts to sizzle. This means it's hot enough. Once ready, add the steak bites to the skillet. Spread them in a single layer. Avoid overcrowding; this helps them sear nicely. Next, sprinkle smoked paprika, salt, and black pepper over the steak. These spices add great flavor. Cook the steak bites for about 2-3 minutes on each side. Adjust the time based on how you like your steak. Remove them when they reach your desired doneness. In the same skillet, lower the heat to medium. Add the remaining butter and minced garlic. Sauté for about 30 seconds. Keep stirring until the garlic smells good but doesn't brown. This step creates a rich garlic butter sauce. It’s time to combine the steak and sauce. Return the cooked steak bites to the skillet. Toss them in the garlic butter sauce, coating each piece well. The sauce adds moisture and flavor. To finish, remove the skillet from heat. Garnish the steak bites with finely chopped parsley. This adds color and freshness. Serve them with lemon wedges. The juice from the lemon adds a zesty touch that brightens the dish. Enjoy your delicious garlic butter steak bites! For the detailed recipe, check the Full Recipe section. To get a great sear on your steak bites, space is key. Do not overcrowd the pan. When the pieces are too close, they steam instead of sear. This step makes a big difference in taste. Aim for a single layer in your skillet. For doneness, cook about 2-3 minutes per side for medium-rare. Adjust the time if you like it more or less done. Use a meat thermometer for best results. A medium steak should reach 145°F. If you want to switch things up, try different cuts of steak. Ribeye or tenderloin works well too. Both offer a nice fat content for flavor. You can also use dairy-free butter if you need it. Look for plant-based options that melt well. They give you that creamy taste without dairy. Want to add more flavor? Consider adding a pinch of cayenne pepper or fresh thyme. Both enhance the taste and give an extra kick. For a pretty plate, stack the steak bites neatly. Drizzle some garlic butter sauce over them. Then, add fresh parsley on top. Serve with lemon wedges on the side. The citrus adds a bright burst that pairs nicely with the richness of the steak. This makes your dish both tasty and beautiful. For the full recipe, check out the [Full Recipe]. {{image_4}} You can cook garlic butter steak bites in different ways. Grilling steak bites: Grilling adds a nice smoky flavor. Preheat your grill to medium-high. Thread the steak pieces onto skewers for easy handling. Grill them for about 2-3 minutes on each side. Always check for your desired doneness. The grill marks will make them look great! Air frying steak bites: The air fryer is a quick option. Set it to 400°F. Toss the steak pieces with garlic butter and spices. Place them in the air fryer basket in a single layer. Cook for about 8-10 minutes, shaking halfway. You’ll achieve a crispy outside and tender inside. You can make garlic butter steak bites even better with some fun flavors. Adding herbs and spices: Fresh herbs like thyme or rosemary can bring depth. Add them to the garlic butter while it cooks. A sprinkle of red pepper flakes can add heat if you like spice. Incorporating vegetables: You can add veggies for color and nutrition. Bell peppers or mushrooms work well. Just toss them in the skillet with the steak bites. They soak up that rich garlic butter flavor too. Serving your steak bites can be both fun and creative. Pairing with different sauces: Experiment with sauces like chimichurri or barbecue. A rich steak sauce also complements the bites well. Drizzle the sauce on top or serve it on the side for dipping. Creative side dishes: Think about sides that balance the rich flavor. A fresh salad or roasted veggies can work nicely. For something heartier, serve with mashed potatoes or rice. These will soak up the leftover garlic butter sauce too! For the full recipe, check out the [Full Recipe]. After you make garlic butter steak bites, let them cool to room temperature. Store the leftovers in an airtight container. This helps keep the flavor fresh. You can store them in the fridge for up to three days. To reheat, use a skillet over medium heat. Add a little butter to the pan. This will help bring back the juicy flavor. Heat for about 5 minutes, turning the steak bites occasionally. For meal prep, you can freeze steak bites. First, let them cool completely. Place them in a freezer-safe bag or container. Remove as much air as possible to prevent freezer burn. They can stay fresh in the freezer for about three months. To thaw, move them to the fridge the night before you want to eat them. This keeps them safe and tasty. You can also thaw them in the microwave if you’re in a hurry. Garlic butter steak bites last about three days in the fridge. If you freeze them, they last for about three months. Always check for any off smells or changes in color before eating. This will help ensure you enjoy every bite safely. The best steak for steak bites is sirloin. It has great flavor and is tender. Other good choices include ribeye and tenderloin. Both cuts provide a rich taste. They also remain juicy when cooked. If you can, choose grass-fed steak for better flavor and health. Yes, you can make steak bites without garlic. Try using shallots for a mild onion flavor. You can also use herbs like rosemary or thyme for taste. They add fresh notes to the dish. Consider using lemon zest for brightness in the sauce too. To make garlic butter steak bites low-carb, skip the butter and use olive oil. Focus on fresh herbs and spices for flavor. Serve with low-carb veggies like zucchini or bell peppers. You can also pair it with a salad for a balanced meal. Enjoying this dish without bread or rice keeps it low in carbs. Garlic butter steak bites are simple and delicious. You learned about the best ingredients. I shared tips for cooking and storing them. You can customize with different flavors and sides. These bites shine as a hearty meal or snack. Try various cooking methods to find your favorite. Enjoy making this dish your own!](https://joymealplan.com/wp-content/uploads/2025/06/b02e02a2-a549-4d39-b201-7a4183f1f1f0-768x768.webp)