
Everything Bagel Crusted Salmon Flavorful Easy Recipe
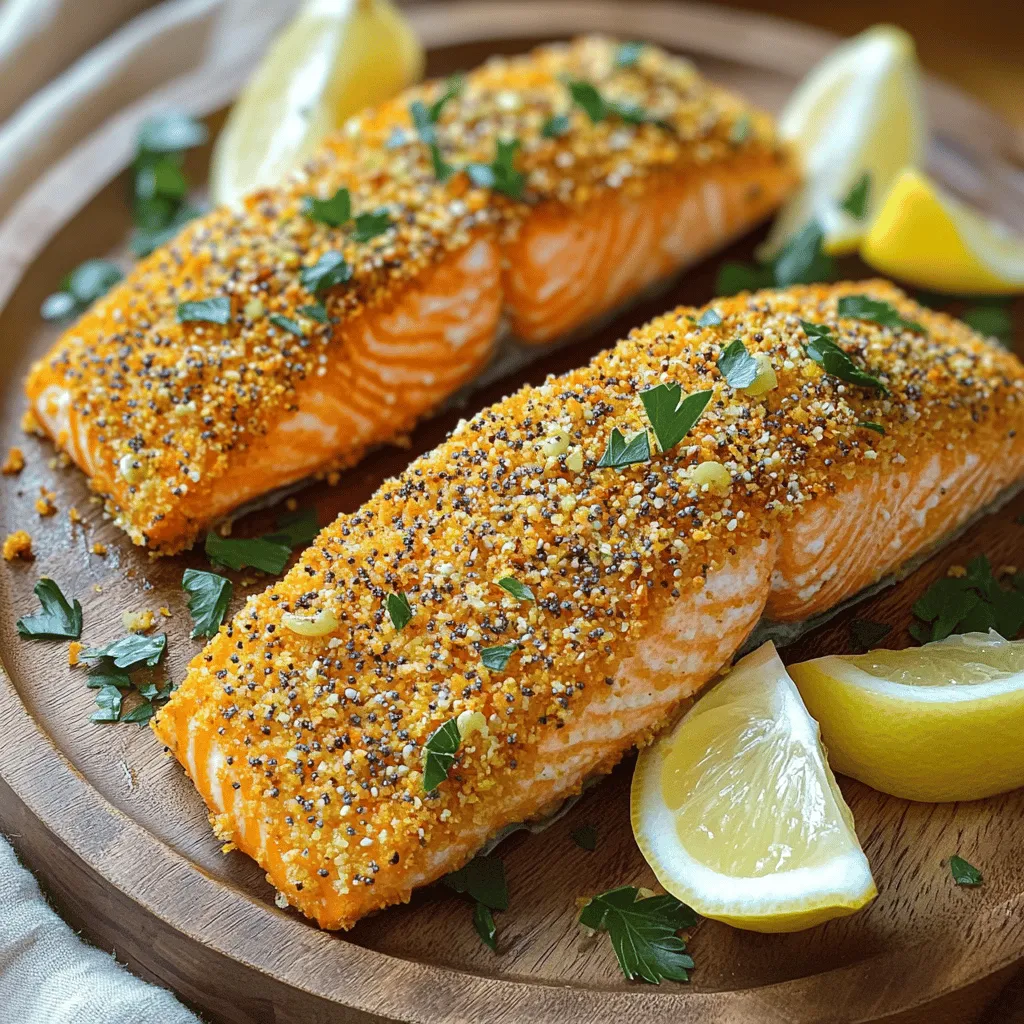
If you love bold flavors and easy meals, you’ll adore this Everything Bagel Crusted Salmon recipe! This dish packs a punch with the savory taste of everything bagel seasoning, complemented by flaky salmon. I’ll guide you through simple steps, perfect for busy weeknights or impressing guests. Ready to make a delightful meal? Let’s dive into the deliciousness and get cooking!
Ingredients
Main Ingredients for Everything Bagel Crusted Salmon
– 4 salmon fillets (approximately 6 oz each)
– 2 tablespoons Dijon mustard
– 1 cup panko breadcrumbs
– 2 tablespoons everything bagel seasoning
Additional Ingredients
– 2 tablespoons fresh parsley, finely chopped
– 1 tablespoon olive oil
– Salt and pepper, to taste
– Lemon wedges, for serving
To make Everything Bagel Crusted Salmon, gather these fresh ingredients. You need salmon fillets for the main protein. Dijon mustard gives a tangy kick that helps the crust stick. Panko breadcrumbs add a nice crunch. The everything bagel seasoning brings a mix of flavors.
You can use fresh parsley to brighten the dish. Olive oil adds richness and helps the Dijon mix well. Don’t forget to season with salt and pepper. Finally, lemon wedges serve as a zesty garnish that enhances the salmon’s taste.
This recipe is simple and fun. You will love how it turns out.
Step-by-Step Instructions
Prepping the Oven and Salmon
– Preheat the oven to 400°F (200°C).
– Pat salmon fillets dry with paper towels and season both sides with salt and pepper. This helps the crust stick and gives you a nice texture.
Making the Mustard Mixture
– Combine 2 tablespoons of Dijon mustard and 1 tablespoon of olive oil in a bowl.
– Whisk until smooth. This mix adds flavor and helps the crust stick to the fish.
Coating the Salmon
– Brush the mustard mixture onto the salmon fillets. Use a pastry brush for even coverage.
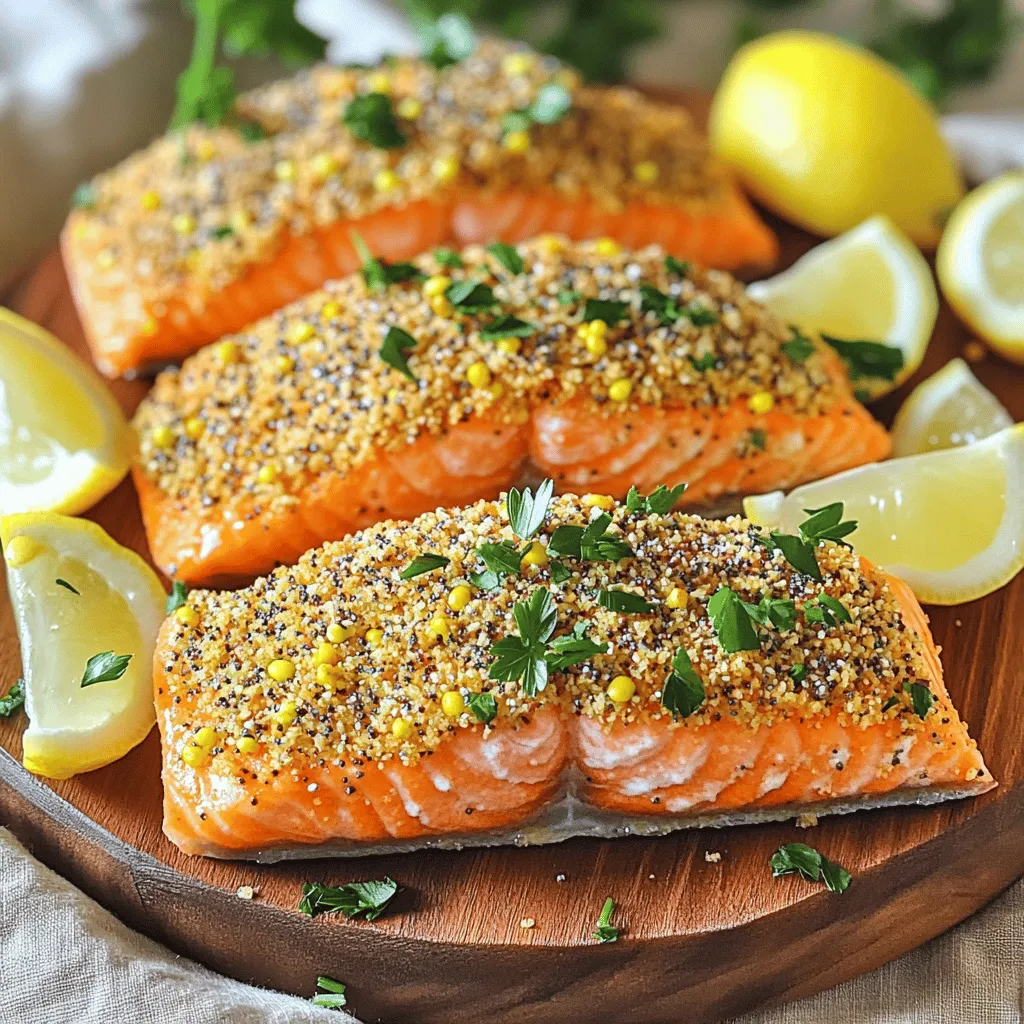
– In another bowl, mix 1 cup of panko breadcrumbs, 2 tablespoons of everything bagel seasoning, and 2 tablespoons of fresh parsley. Press this mixture firmly onto the mustard-coated side of the salmon. This creates a tasty crust.
Baking the Salmon
– Arrange the salmon on a prepared baking sheet lined with parchment paper.
– Bake for 12-15 minutes until the salmon flakes easily with a fork. The crust should turn a golden brown. This method keeps the fish moist inside while giving you a crunchy top.
Enjoy your Everything Bagel Crusted Salmon with a squeeze of fresh lemon for extra zest!
Tips & Tricks
Achieving the Perfect Crust
To get the best crust, start by drying your salmon well. This helps the coating stick. Use paper towels to soak up any extra moisture. This small step makes a big difference. After drying, season your fillets with salt and pepper. Then, brush on the Dijon mustard mix. The mustard acts like glue for the crust.
Cooking Time Adjustments
Cooking time can change based on how thick your fillets are. Thicker pieces may need a few extra minutes. Keep an eye on them as they bake. To check for doneness, gently flake the salmon with a fork. It should come apart easily. If it does, it’s ready to eat!
Presentation Tips
For a great presentation, serve your salmon on a large platter. Add fresh lemon wedges for a pop of color. Squeeze some lemon juice over the salmon before eating. You can also sprinkle extra parsley around the dish. This adds a nice touch and makes it look fancy.
Variations
Different Seasoning Options
You can switch up the flavor by using other bagel seasonings. Try a garlic or onion blend for a twist. You can also mix in herbs like dill or rosemary for extra taste. If you want a different texture, use crushed crackers or cornmeal instead of panko. Each option gives a new feel to the crust.
Substitutions for Salmon
If you want to try a different fish, trout or cod works well. Both have a mild flavor and cook nicely. For a vegetarian choice, eggplant or tofu can be great substitutes. Just slice the eggplant thick and press the crust on. Tofu can be marinated first to add more flavor.
Accompaniments for Serving
Pair your salmon with simple sides like roasted veggies or rice. A fresh salad can also brighten the meal. For dipping, a lemon dill sauce or yogurt sauce works well. These add a nice creaminess that complements the salmon. You can also serve it with a tangy salsa for a fun twist.
Storage Info
Storing Leftovers
After you enjoy your everything bagel crusted salmon, let it cool down. Place the salmon in a shallow container. This helps it cool evenly. Use airtight containers to keep the salmon fresh. Glass or BPA-free plastic works best. Make sure to store it in the fridge. Leftover salmon stays good for up to three days.
Reheating Instructions
To reheat salmon, the oven is your best friend. Preheat it to 275°F (135°C). Place the salmon on a baking dish. Cover it with foil to keep moisture in. Heat for about 15 minutes. This keeps the texture nice and soft. Avoid using the microwave; it can dry out the fish.
Freezing Tips
Yes, you can freeze cooked everything bagel crusted salmon! First, let it cool completely. Wrap each piece tightly in plastic wrap. Then, place them in a freezer bag. This prevents freezer burn. You can freeze the salmon for up to three months. When ready to eat, thaw it in the fridge overnight. Reheat as mentioned above for the best results.
FAQs
What is Everything Bagel Seasoning?
Everything bagel seasoning is a mix of spices. It usually has garlic, onion, sesame seeds, poppy seeds, and salt. This blend gives a savory taste. You can use it on more than just bagels. It works great on salmon too!
Can I use frozen salmon for this recipe?
Yes, you can use frozen salmon! Just make sure to thaw it first. Place the salmon in the fridge overnight or run it under cold water. This helps keep the fish fresh. After thawing, pat it dry. This step is key for a crispy crust.
Is this recipe gluten-free?
Yes, you can make it gluten-free. Use gluten-free panko breadcrumbs instead of regular ones. Also, choose gluten-free Dijon mustard. These swaps will ensure everyone can enjoy this dish.
How can I tell when salmon is done cooking?
You can tell salmon is done when it flakes easily with a fork. The color should change from bright pink to a more opaque shade. Another way is to check the internal temperature. It should reach 145°F (63°C) for safe eating.
In this post, we explored how to make delicious everything bagel crusted salmon. We covered the key ingredients, step-by-step instructions, and helpful tips for the best results. Remember to dry your salmon first to get a nice crust. Don’t hesitate to try different fish or seasoning options for variety. This dish pairs well with fresh sides and adds flavor to your meals. Enjoy experimenting, and happy cooking!

![To make sticky orange chicken, you'll need a few simple yet flavorful items. Here is a complete list of ingredients you'll need for this recipe: - 1.5 lbs boneless, skinless chicken thighs - 1/2 cup cornstarch - 2 tablespoons vegetable oil - 3 cloves garlic, finely minced - 1-inch piece of fresh ginger, grated - 1/4 cup low sodium soy sauce - 1/2 cup freshly squeezed orange juice - Zest of 1 medium orange - 1/4 cup honey - 2 tablespoons rice vinegar - 1/2 teaspoon red pepper flakes (optional) - 2 green onions, finely chopped, for garnish - Sesame seeds, for garnish Using high-quality chicken is key for this dish. Chicken thighs stay juicy and tender. Cornstarch is essential for a crispy texture. Vegetable oil helps with frying and flavor. Fresh garlic and ginger bring bold taste to the sauce. Orange juice and zest create a bright, zesty flavor. Honey adds sweetness that balances the dish. Rice vinegar gives a touch of tang. If you like spice, add red pepper flakes for heat. Don’t forget the green onions and sesame seeds for garnish. They add color and crunch. This recipe is simple yet packed with flavor. You can find the full recipe in earlier sections. Coating with Cornstarch Start by placing the chicken pieces in a big bowl. Pour in the cornstarch. Mix it well with your hands or a spoon. Make sure all chicken pieces are covered. This step is key for a crispy finish. Sautéing the Chicken Pieces Next, heat the vegetable oil in a large skillet or wok on medium-high heat. Once hot, add the chicken in batches. Avoid crowding the pan. Cook for about 5-7 minutes. Stir it often until the chicken turns golden brown. Check that each piece reaches 165°F inside. Remove the chicken and place it on a plate with paper towels to soak up extra oil. Sautéing Garlic and Ginger Lower the heat to medium. In the same skillet, add the minced garlic and grated ginger. Sauté for about 30 seconds. You want to smell the rich aroma of garlic and ginger. This signals it’s time to mix the sauce. Mixing the Sauce Ingredients Pour in the soy sauce, orange juice, orange zest, honey, and rice vinegar. If you like some heat, add the red pepper flakes. Stir it all together. Increase the heat slightly and let it bubble. Allow the sauce to simmer for 3-5 minutes. You want it to thicken and develop a rich flavor. Glazing the Chicken Now, return the cooked chicken to the skillet. Use a spatula to toss the chicken in the sauce. Ensure every piece gets coated. Let it cook for another 2-3 minutes. This will heat the chicken through and make it sticky and flavorful. Garnishing for Serving Take the skillet off the heat. Sprinkle the chopped green onions and sesame seeds over the chicken. These add color and crunch. Serve this dish hot and enjoy the zesty flavors of your sticky orange chicken. Check the Full Recipe for more details! Importance of Cornstarch Coating Coating the chicken in cornstarch is key for a crispy bite. It helps create a crunchy layer when you fry it. The cornstarch seals in moisture, keeping the chicken juicy. You want to ensure every piece is coated well. This simple step makes a big difference in texture and taste. Avoiding Overcrowding the Pan Do not overcrowd the pan when cooking the chicken. If you add too much at once, the chicken will steam instead of fry. This means less crispiness. Cook in batches and give each piece space. This way, you get that golden-brown color you want. Using Fresh Ingredients Using fresh ingredients makes your dish taste better. Fresh garlic and ginger give a bright flavor. Squeeze your own orange juice for the best taste. Fresh zest adds a lovely aroma. These small details make your sticky orange chicken shine. Adjusting Spice Levels If you like heat, add red pepper flakes. Start with a small amount and taste as you go. You can always add more if you want a kick. If you prefer a milder dish, skip the spice. Tailor the recipe to your taste buds. Pairing with Sides This sticky orange chicken goes well with many sides. Serve it over fluffy jasmine rice for a complete meal. Steamed broccoli or green beans also work nicely. These sides balance the sweetness of the chicken. Presentation Ideas Make your dish look as good as it tastes. Use a white plate to make the orange color pop. Drizzle some extra sauce on top. Sprinkle sesame seeds and green onions for a final touch. A pretty plate makes every meal special. For the full recipe, check out the Sticky Orange Chicken Delight. {{image_4}} You can easily switch up the protein in this dish. - Using Chicken Breasts: You can replace chicken thighs with chicken breasts. They are leaner and will still taste great. Just be sure to cook them until they are juicy. - Substituting with Tofu or Tempeh: For a plant-based option, try tofu or tempeh. Cut them into bite-sized pieces and follow the same steps as the chicken. They soak up the sauce well and give a nice texture. Feel free to play with flavors to make this dish your own. - Adding More Citrus: Want more zing? Add lime or lemon juice. A splash at the end brightens the dish and gives it a fresh twist. - Experimenting with Herbs and Spices: You can also try adding fresh herbs like cilantro or basil. A sprinkle of these can add depth and freshness. This recipe can fit many dietary needs. - Gluten-Free Modifications: If you're gluten-free, use tamari instead of soy sauce. This keeps the flavor while making it safe for your diet. - Low-Sugar Alternatives: For a low-sugar version, substitute honey with a sugar-free sweetener. This still gives sweetness without the extra calories. These variations help you enjoy Sticky Orange Chicken in your own way. Check the Full Recipe for more details! After you enjoy your sticky orange chicken, you may have some leftovers. To keep them fresh, store the chicken in an airtight container. Place it in the fridge. It will last for about 3 to 4 days. When reheating, use the microwave or a skillet. Heat it gently to avoid drying it out. A splash of water can help keep it moist. If you want to keep your sticky orange chicken longer, consider freezing it. Allow the chicken to cool completely before freezing. Place it in a freezer-safe bag or container. Remove as much air as possible to prevent freezer burn. It can stay in the freezer for up to 3 months. When you're ready to use it, thaw the chicken overnight in the fridge. For a quicker method, you can use the defrost setting on your microwave. Just be careful not to start cooking it. To maintain the best flavor, always serve your sticky orange chicken fresh. If you prepare it ahead of time, store the sauce separately. This will help keep the chicken crispy. When you are ready to serve, reheat both the chicken and sauce. Toss them together just before serving for that sticky goodness. For more details on how to make this dish, check out the Full Recipe. You can enjoy Sticky Orange Chicken with a few tasty sides. Here are some great options: - Fluffy jasmine rice - Steamed broccoli - Fried rice - Sautéed snap peas - Crisp green salad For drinks, pair it with: - Iced tea - Sparkling water with lemon - A light white wine These sides and drinks will balance the sweet and sticky flavors of the chicken. To kick up the heat in your Sticky Orange Chicken, try these tips: - Adding Heat with Pepper Flakes: Sprinkle red pepper flakes into the sauce. Start with a little and add more if needed. This gives a nice kick without overpowering the dish. - Experimenting with Hot Sauces: Mix in your favorite hot sauce. A few drops can add flavor and heat. Choose a sauce that complements the orange taste. You can adjust the heat to match your taste! Yes, you can prep Sticky Orange Chicken in advance. Here’s how: - Prep Tips for Making in Advance: Marinate the chicken in the sauce for a few hours or overnight. This adds great flavor. You can also chop the garlic and ginger ahead of time. - Adjusting Cooking Times: When cooking, make sure the chicken is heated through. If you make it ahead, just warm it on low heat in the skillet. This keeps it from drying out. These tips help you enjoy a delicious meal even on busy days. For the full recipe, check out the [Full Recipe]. This blog post guided you through making Sticky Orange Chicken, from ingredients to storage tips. Remember to coat the chicken in cornstarch for that perfect crunch. Use fresh ingredients to enhance flavor and feel free to experiment with proteins and spices. With these straightforward steps and variations, you can enjoy a tasty meal that suits your needs. Keep these tips in mind for a delicious outcome every time. Now, it’s time to bring this vibrant dish to your table!](https://joymealplan.com/wp-content/uploads/2025/06/0fb5afb5-059d-4b64-a6dc-9cc9d9794f9b-768x768.webp)

![- 1 pound fresh shrimp, peeled and deveined - 1 tablespoon extra virgin olive oil - 1 teaspoon chili powder - 1 teaspoon ground cumin - 1 clove garlic, finely minced - Juice of 1 lime - 1/2 teaspoon sea salt - 1/4 teaspoon freshly ground black pepper The main ingredients create the base of your dish. Fresh shrimp gives a sweet and juicy taste. Olive oil adds richness and helps with cooking. The spices and seasonings bring the zing. Chili powder and cumin mix well for flavor. Garlic adds depth, while lime juice brightens the dish. - 8 small corn tortillas - 1 cup finely shredded red cabbage - 1/2 cup ripe tomatoes, diced - 1 ripe avocado, sliced into thin wedges - Fresh cilantro leaves, chopped For the tacos, corn tortillas are perfect. They hold all the goodness inside. Red cabbage gives a nice crunch. Diced tomatoes add a fresh touch. Avocado brings creaminess, balancing the flavors. Cilantro adds a bright note, making each bite special. - Lime wedges - Salsa Garnishes add fun and flavor. Squeeze fresh lime over the tacos for more zest. Salsa can give extra taste and a little heat. These choices let you customize each taco just how you like it. You can find the full recipe for Zesty Shrimp Tacos, and enjoy cooking! To start, I prepare the marinade. In a medium bowl, I combine fresh shrimp with olive oil, chili powder, cumin, minced garlic, lime juice, sea salt, and black pepper. I mix everything well so the shrimp get coated evenly. This step is crucial for flavor. I let the shrimp marinate for about 15 minutes. This time allows the flavors to blend and makes the shrimp taste amazing. Next, I heat a non-stick skillet over medium-high heat. Once it's hot, I add the marinated shrimp in a single layer. I make sure not to crowd the pan. I cook the shrimp for about 2-3 minutes on each side. They turn pink and opaque when done. Once cooked, I remove them from the heat and set them aside. While the shrimp cook, I warm the corn tortillas. I have two methods. First, I can use a pan. I heat it over low heat for about 30 seconds on each side. This keeps them soft. The second way is to use the microwave. I place the tortillas on a plate, cover them with a damp paper towel, and microwave them for 15-20 seconds. Soft tortillas are key for great tacos. Now it’s time to assemble the tacos. I take each warm tortilla and place 3-4 shrimp pieces on it. I ensure each taco has enough filling. Then, I top the shrimp with shredded red cabbage, diced tomatoes, and avocado slices. This layering makes each bite full of flavor. For the finishing touch, I sprinkle fresh cilantro leaves on top. If I want, I can add a squeeze of lime juice for extra zest. For the full recipe, check out the detailed instructions. To avoid overcooking shrimp, watch the clock closely. Cook them for only 2-3 minutes per side. Shrimp cooks fast and can turn rubbery if you leave them too long. Look for signs of perfectly cooked shrimp: they should be pink and opaque. The texture should be firm but not tough. Adding extra spices can boost the taste of your shrimp. Try cayenne for heat or smoked paprika for a deeper flavor. Pair your tacos with sauces like spicy crema or zesty salsa. These add layers of flavor and make each bite exciting. When serving, make your tacos look appealing. Use a colorful platter to catch the eye. Arrange lime wedges around the tacos for a bright touch. For gatherings, consider serving with a small bowl of extra toppings. Diced tomatoes or fresh salsa can be fun for guests to add themselves. {{image_4}} You can switch up the protein in your tacos for different tastes. Fish like salmon or tilapia works great instead of shrimp. Just follow the same marinade and cooking steps. Chicken is another option. Use diced chicken breast and cook it until golden. If you want a vegetarian version, try grilled portobello mushrooms or spicy tofu. Both options soak up flavors well and add a hearty bite. Experimenting with marinades can add fun twists to your tacos. Try a mango lime marinade for a sweet and tangy kick. A chipotle marinade gives a smoky, spicy flavor. You can also mix herbs like oregano and basil for a fresh taste. For toppings, get creative! Add sliced radishes for crunch or pickled onions for tang. Feta cheese can also lend a creamy touch. Each of these will make your tacos unique and exciting. To make your meal more complete, serve your tacos with side dishes. Black beans or corn salad pair well. A light cucumber salad can also balance the spice. If you have leftovers, use them in new ways. Toss shrimp in a salad or mix with rice for a bowl. You can also make a shrimp quesadilla using the tortillas left over. There are many ways to enjoy what you have! For the full recipe, check out the [Full Recipe]. To keep leftover shrimp fresh, store them in an airtight container. Make sure to refrigerate them right away. Shrimp can stay good in the fridge for up to three days. If you wait longer, they may spoil. Always check for any bad smell before using leftovers. To keep tortillas fresh, wrap them tightly in foil or plastic wrap. You can also place them in a resealable bag. Store them in the fridge for up to a week. For toppings like avocado and cabbage, use airtight containers. Avocado can turn brown quickly, so add lime juice to slow down this process. Cabbage stays fresh for about five days when stored properly. Yes, you can freeze cooked shrimp. Place them in a single layer on a baking sheet. Once frozen, transfer them to a freezer-safe bag. They can last for up to three months in the freezer. For raw shrimp, store them in a freezer-safe bag with as much air removed as possible. They can also last for up to three months. Always label your bags with the date for easy tracking. You should marinate shrimp for about 15 minutes. This short time lets the flavors soak in. The lime juice adds a nice tang, while the spices enhance the taste. Don't go too long, or the shrimp can become tough. Yes, you can prep some parts in advance. You can marinate the shrimp and store it in the fridge for a few hours. Just cook it when you’re ready. You can also chop veggies early and keep them in airtight containers. If you have shrimp allergies, try chicken or fish. Thinly sliced chicken breast works well. You can also use tofu or tempeh for a plant-based option. Just keep the marinade the same for great flavor. To spice up your tacos, add jalapeños or hot sauce. You can mix in cayenne pepper or chipotle powder with the marinade. Another idea is to top with a spicy salsa. These tweaks will give your tacos an extra kick. For the full recipe, check out the Full Recipe section. In summary, this guide covered how to make zesty shrimp tacos from start to finish. We discussed key ingredients, step-by-step instructions, useful tips, and delicious variations. You learned how to marinate shrimp perfectly, warm tortillas, and assemble the tacos for the best flavor. Remember, customizing your tacos keeps things fresh and fun. Enjoy experimenting with different ingredients and flavors. These tacos can make every meal feel special. Dive in, and happy cooking!](https://joymealplan.com/wp-content/uploads/2025/06/53de0157-3bfc-48aa-976d-e4e7ac7f22a7-768x768.webp)