
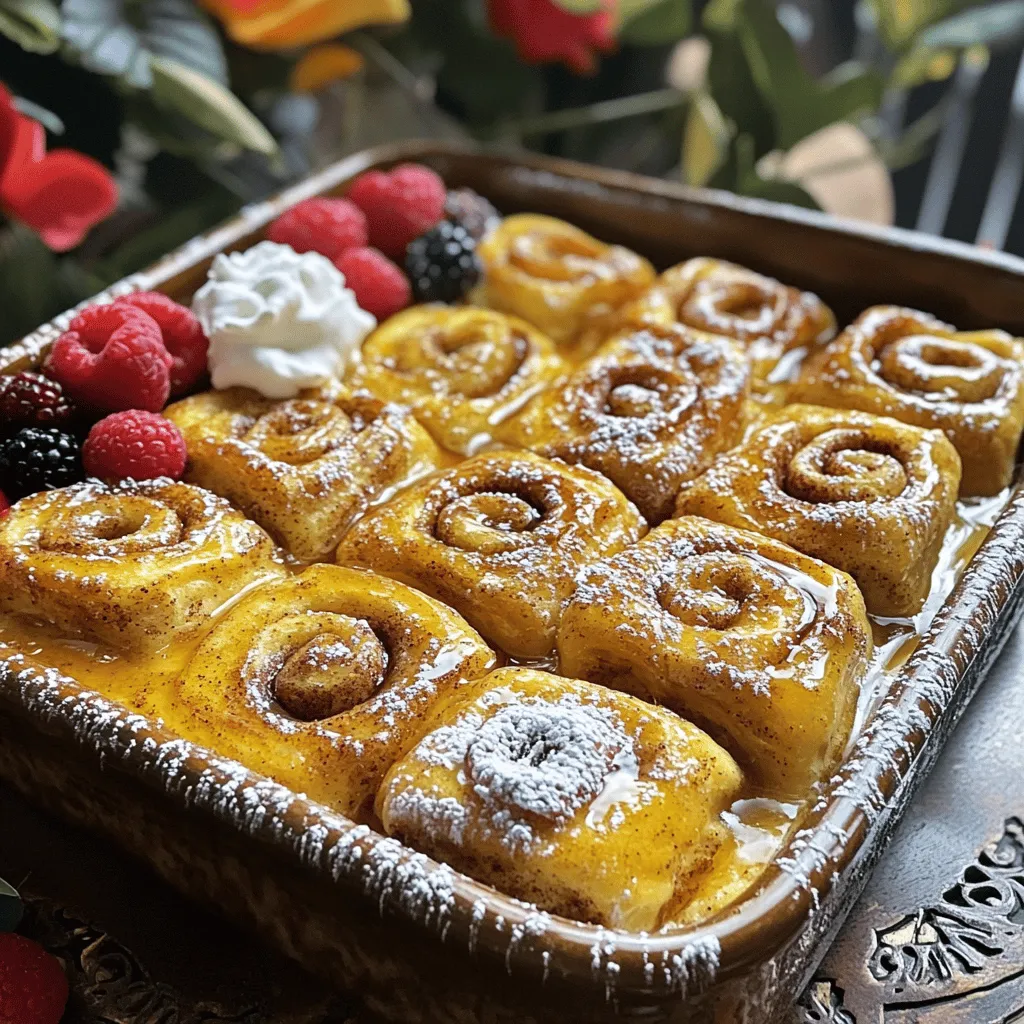
Cinnamon Roll French Toast Bake Easy and Delicious Dish
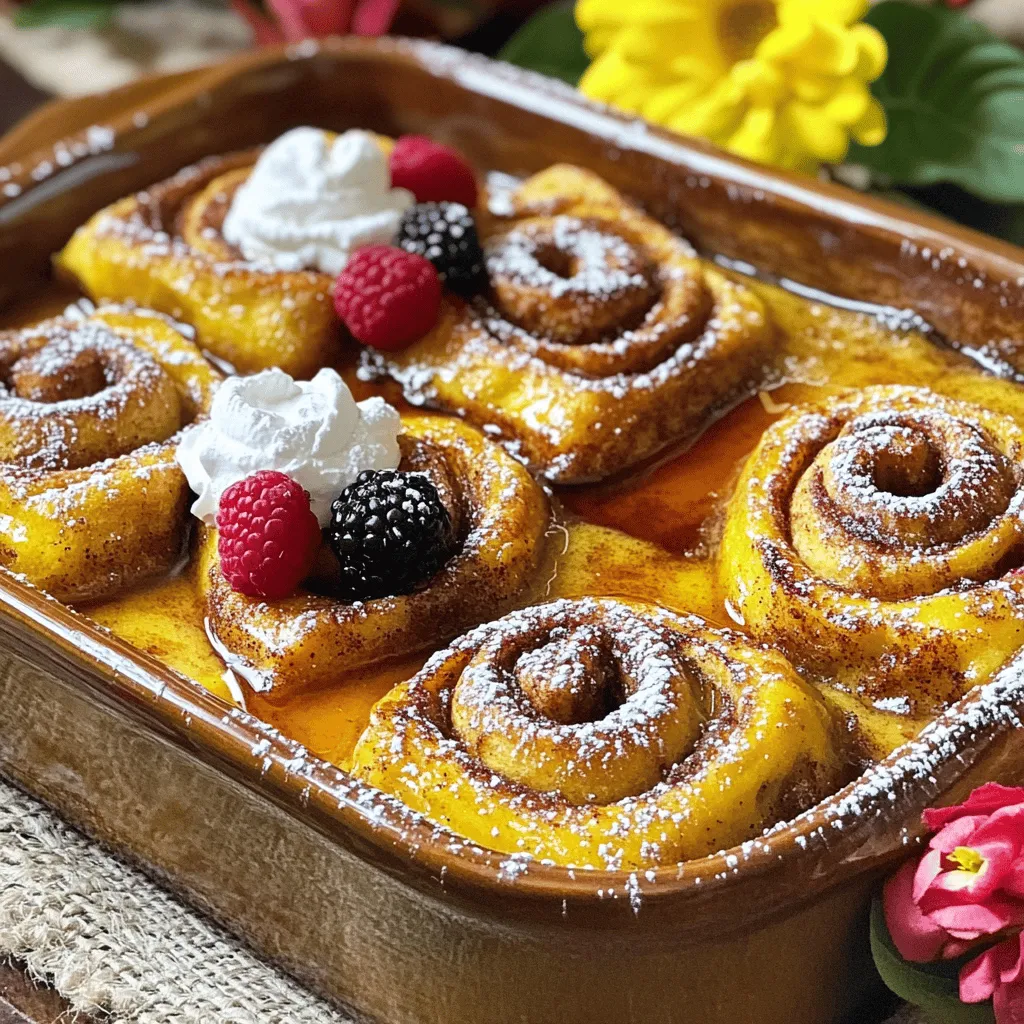
Looking for a simple yet indulgent breakfast idea? This Cinnamon Roll French Toast Bake is your answer! Imagine warm cinnamon rolls soaked in a creamy egg mixture, baked to golden perfection. With minimal prep and easy ingredients, this dish is perfect for any gathering or cozy weekend brunch. Let me guide you through the steps to create this crowd-pleaser. You won’t want to miss out—let’s dive in!
Ingredients
Main Ingredients
– 2 cans of refrigerated cinnamon rolls
– 5 large eggs
– 1 cup milk (whole or 2%)
– 1 teaspoon vanilla extract
– 1 teaspoon ground cinnamon
– ½ cup maple syrup
– 1 tablespoon butter (for greasing the dish)
These main ingredients form the base of your cinnamon roll French toast bake. The refrigerated cinnamon rolls bring a sweet and fluffy texture. Eggs and milk create a custard that soaks into the rolls, making them tender. Vanilla extract and ground cinnamon add warmth and flavor. Maple syrup sweetens the dish, while butter prevents sticking.
Optional Ingredients
– Powdered sugar
– Fresh berries
– Whipped cream
You can elevate your bake with these optional ingredients. Dusting with powdered sugar gives a lovely finish. Fresh berries add a burst of color and freshness. Whipped cream creates a rich and creamy topping. These options let you customize your dish and make it even more special.
Step-by-Step Instructions
Preparation Steps
1. Preheat the oven to 375°F (190°C). This step makes sure your dish cooks evenly.
2. Grease a 9×13 inch baking dish with butter. Spread it on the bottom and sides. This prevents sticking and helps the rolls come out easily.
Mixing the Custard
1. Crack 5 large eggs into a big bowl. Whisk them until they mix well.
2. Add 1 cup of milk, 1 teaspoon of vanilla extract, and 1 teaspoon of ground cinnamon. Whisk until smooth.
3. Pour in ½ cup of maple syrup and mix again. This sweetens the custard and adds flavor.
Assembling the Dish
1. Open 2 cans of refrigerated cinnamon rolls. Use a sharp knife to cut each roll into quarters.
2. Spread the quartered rolls evenly in your greased baking dish. Make sure they do not overlap too much.
3. Pour the custard mixture over the cinnamon rolls. Use a fork to gently press down on each piece. This ensures they soak up the custard well.
4. Optional: Crumble the icing from the cinnamon rolls and sprinkle it on top. This adds a nice sweetness.
Baking Process
1. Place the baking dish in the preheated oven. Bake for 25-30 minutes.
2. Check for doneness by inserting a toothpick in the center. It should come out clean when the bake is ready. The top should be golden brown.
3. Once done, remove the dish from the oven. Let it cool for 5 minutes before serving.
Tips & Tricks
Baking Tips
To ensure even baking, spread the quartered cinnamon rolls out well in the dish. This step helps every piece cook at the same rate. Avoid overcrowding. If the rolls are too close, some may not bake right.
To prevent the rolls from sticking, grease the baking dish with butter before adding the dough. A light coat on the bottom and sides works best. This makes it easy to lift the baked dish out later.
Serving Suggestions
For the best toppings, consider dusting the bake with powdered sugar. This adds a nice, sweet touch to each serving. Drizzling extra maple syrup over the top enhances the flavor too.
Pair this dish with fresh berries or whipped cream for added taste. The berries bring a pop of color and a burst of flavor. Whipped cream adds a creamy, rich element that many enjoy.
Customization Tips
To adjust flavors, think about adding a pinch of nutmeg or cardamom. These spices can give your dish a unique twist. You can also swap the vanilla extract for almond extract for a different taste.
Adding mix-ins is a fun way to customize. Consider nuts like pecans or walnuts for crunch. Chocolate chips can add a sweet surprise. Dried fruit, like raisins or cranberries, works well too.
Variations
Flavor Variations
Using different types of bread can change the taste of your dish. You can try brioche, challah, or even croissants. Each bread adds its own flavor and texture. Try a mix for extra fun!
You can also incorporate seasonal spices. Swap out ground cinnamon for nutmeg or pumpkin spice in the fall. In winter, a hint of cardamom or allspice warms up the dish nicely. These small changes make a big difference.
Dietary Variations
For gluten-free options, use gluten-free bread. Many brands make tasty gluten-free choices. Just check the label to ensure it fits your needs. You will enjoy the same delightful flavors without worry.
If you need dairy-free substitutes, use almond milk or coconut milk. You can also use dairy-free cream cheese for toppings. These swaps keep your dish creamy and delicious without dairy.
Additional Toppings
Cream cheese frosting makes a perfect topping. It adds a sweet, rich layer on top of the warm bake. Simply mix cream cheese with powdered sugar and a splash of milk. Drizzle it over your bake for a tasty finish.
Fruit compote is another great option. You can use fresh berries, apples, or peaches. Cook them down with a little sugar for a warm, fruity topping. It adds a fresh and tangy flavor that pairs well with the sweet cinnamon rolls.
Storage Info
Storing Leftovers
To keep your Cinnamon Roll French Toast Bake fresh, store it in the fridge. Place it in an airtight container or cover it tightly with plastic wrap. This helps to prevent it from drying out. Leftovers can last for about 3 to 4 days in the fridge.
Reheating Instructions
When you’re ready to enjoy leftovers, reheating properly is key. You can use the oven or microwave. For the oven, preheat it to 350°F (175°C). Place the bake in a baking dish, cover it with foil, and heat for about 15-20 minutes. This method keeps it moist. If using a microwave, heat individual pieces for 30 seconds to 1 minute. Make sure they reach a warm and inviting temperature of around 165°F (74°C) before serving.
FAQs
Can I make this dish ahead of time?
Yes, you can prepare this dish ahead of time. Assemble the cinnamon roll bake and cover it. Store it in the fridge overnight. In the morning, bake it as normal. This saves time and makes breakfast easier.
How do I know when the Cinnamon Roll French Toast Bake is done?
To check if the bake is done, look for a golden brown top. Insert a toothpick in the center. If it comes out clean, the dish is ready. Baking usually takes about 25-30 minutes at 375°F.
Can I use homemade cinnamon rolls instead of canned?
Absolutely! Homemade cinnamon rolls add a fresh touch. Just cut them into quarters like you would with canned rolls. Follow the same steps for soaking and baking. The flavor will be amazing!
What can I use as a substitute for eggs?
You can use flaxseed meal as an egg substitute. Mix 1 tablespoon of flaxseed meal with 2.5 tablespoons of water. Let it sit for a few minutes to thicken. This works well for binding in the recipe.
How can I serve Cinnamon Roll French Toast Bake for a crowd?
Serving for a crowd is easy. Cut the bake into squares and serve warm. Add toppings like whipped cream, fresh berries, or a drizzle of syrup. This makes each plate look beautiful and tasty!
This blog post guides you through making a delicious Cinnamon Roll French Toast Bake. You learned about key ingredients, step-by-step preparation, and tips for success. Remember, you can adapt the recipe by changing flavors or adding toppings. Whether you want to bake for a crowd or simply enjoy it at home, this dish is a crowd-pleaser. With easy storage tips and reheating instructions, you can savor leftovers too. So, gather your ingredients and start baking to enjoy this tasty treat with family or friends!


![To make classic banana pudding, you need these key ingredients: - 4 ripe bananas, sliced into rounds - 1 cup heavy cream - 1 cup whole milk - 1/2 cup granulated sugar - 1/4 cup cornstarch - 1/4 teaspoon kosher salt - 1 teaspoon pure vanilla extract - 2 large egg yolks - 1 package (approximately 200g) vanilla wafers - Whipped cream for topping (optional) - Additional banana slices for garnish These ingredients create the creamy base and the delightful layers that make banana pudding so special. The ripe bananas add a natural sweetness. The vanilla wafers provide crunch and texture. You can enhance your banana pudding with a few optional ingredients: - A hint of cinnamon for warmth - Chocolate chips for a sweet twist - A splash of rum extract for depth These additions can give your pudding a unique flavor. Experiment with them to find your favorite mix! If you’re missing a few ingredients, don’t worry. Here are some common substitutions you can use: - Use almond milk instead of whole milk for a dairy-free option. - Substitute coconut cream for heavy cream for a tropical flair. - Replace granulated sugar with honey or maple syrup for sweetness. These substitutions will still give you a tasty result. Just remember to adjust measurements based on taste. For the full recipe, check the [Full Recipe]. To start, gather all your ingredients. You need milk, cream, sugar, cornstarch, salt, and eggs. In a medium saucepan, mix the whole milk, heavy cream, sugar, cornstarch, and salt. Use a whisk to blend everything until smooth. Make sure there are no lumps from the cornstarch. Heat this mix over medium heat. Stir it often with a wooden spoon. You want it to thicken and bubble, which takes about 5 to 7 minutes. Next, crack the two large eggs, separating the yolks into a bowl. Whisk the yolks until they look smooth and pale. To temper the yolks, take a few spoonfuls of the hot mix and whisk them into the yolks. This step keeps the eggs from cooking too fast. After that, pour the yolk mix back into the saucepan. Cook for another 2 to 3 minutes while stirring. The pudding should be thick and creamy when done. Remove it from heat and stir in the vanilla extract. Let it cool for about 10 minutes. Now it’s time to build your pudding layers. Start with a large serving dish or individual cups. Place a layer of vanilla wafers at the bottom. Next, add a layer of sliced bananas. Pour a generous amount of pudding over the bananas and cookies. Repeat this layering until you use all ingredients. Make sure the last layer is pudding. This creates a beautiful top. After layering, cover the dish tightly with plastic wrap. This step helps keep the pudding moist. Next, place it in the fridge for at least 4 hours. This time lets the pudding chill and firm up. When you’re ready to serve, add a dollop of whipped cream on top. You can also garnish with extra banana slices for a nice touch. This dessert looks as good as it tastes! If you'd like to see the complete guide, check out the Full Recipe for more details. To get that smooth, creamy texture, follow these tips: - Whisk well: When mixing the milk and cornstarch, make sure to whisk until there are no lumps. - Stir constantly: While cooking the pudding base, stir it continuously to prevent sticking and burning. - Temper the eggs: Slowly add hot mixture to egg yolks. This helps keep them from cooking too fast. - Cool gradually: Let the pudding cool for about 10 minutes before layering. It will thicken more as it cools. To keep your pudding fresh: - Cover tightly: Use plastic wrap to seal the dish. This keeps moisture out. - Refrigerate: Always store it in the fridge. It stays good for 2-3 days. - Layer with care: If you have leftovers, keep layers separate. This avoids mushy bananas. Want to make your banana pudding even better? Try these ideas: - Add spices: A pinch of cinnamon or nutmeg can add warmth. - Use flavored wafers: Try lemon or chocolate wafers for a fun twist. - Incorporate extracts: Add a drop of almond extract for an extra layer of flavor. - Top it off: Fresh berries or nuts can give a nice crunch and taste contrast. For the full recipe, check out the details above! {{image_4}} To make chocolate banana pudding, simply add cocoa powder. Use 1/3 cup of unsweetened cocoa powder. Mix it into the milk mixture after combining the sugar and cornstarch. This gives your pudding a rich chocolate flavor. Layer it just like the classic recipe. The chocolate pairs well with bananas, creating a great dessert. For a nutty twist, add chopped pecans or walnuts. You can mix in 1/2 cup of nuts into the pudding. You can also sprinkle some on each layer. This adds a delightful crunch to each bite. The nuts contrast nicely with the creamy pudding and soft bananas. To create a vegan version, swap dairy for plant-based options. Use almond or coconut milk instead of whole milk and cream. Replace egg yolks with 1/4 cup of silken tofu blended until smooth. Sweeten with maple syrup or coconut sugar. This makes a tasty, dairy-free pudding that everyone can enjoy. Each of these variations adds a new twist to the classic banana pudding. They keep the spirit of the dessert while offering different flavors and textures. For the full recipe, make sure to check out the details above. Banana pudding has a rich history that dates back to the 19th century. This dish first appeared in American cookbooks in the late 1800s. It gained popularity in the Southern states, where fresh bananas were easy to find. The sweet, creamy dessert combined layers of pudding, bananas, and vanilla wafers. This simple yet delicious treat quickly became a staple at family gatherings and potlucks. Over the years, banana pudding has evolved in many ways. In the 1930s, brands like Nabisco made vanilla wafers popular in homes. Many cooks began using these cookies as a key ingredient. Today, you can find various versions, including chocolate and vegan options. Some recipes even add whipped cream or meringue on top for extra flavor and texture. This evolution shows how versatile and beloved banana pudding truly is. In Southern cuisine, banana pudding holds a special place. It represents comfort and warmth. Families often serve it at holidays, birthdays, and reunions. Many people have fond memories of enjoying this sweet treat with loved ones. This dessert is not just a dish; it’s a tradition passed down through generations. The combination of flavors and textures captures the essence of Southern hospitality, making it a cherished part of the culture. Yes, you can use other types of bananas. While ripe Cavendish bananas are common, you can try red or plantain bananas. Each type brings a unique flavor. Red bananas are sweeter and softer. Plantains are firmer and less sweet. Just remember, the texture and taste will change. To keep bananas from browning, you can use lemon juice. Just squeeze a little juice over the banana slices. This helps slow down oxidation. You can also cover the bananas tightly with plastic wrap. Keeping them chilled also helps. Serve the pudding soon for the best look. If you don’t have vanilla wafers, don’t worry! You can use graham crackers or shortbread cookies. Both options add a nice crunch. You can even use sponge cake for a softer layer. Get creative! The pudding will still taste great, no matter what you use. This blog shows you how to make classic banana pudding. We covered key ingredients, optional add-ins, and substitutions. I also shared simple steps for preparing, layering, and chilling the pudding. You learned tips for perfect texture and storing leftovers. Plus, I explored fun variations like chocolate and vegan options. Finally, we discussed the history and cultural roots of this dish. Banana pudding is more than a dessert; it's a beloved tradition. Enjoy creating your own version and sharing it with friends and family.](https://joymealplan.com/wp-content/uploads/2025/06/2270da16-0b21-4017-a800-73ddf1839134-768x768.webp)
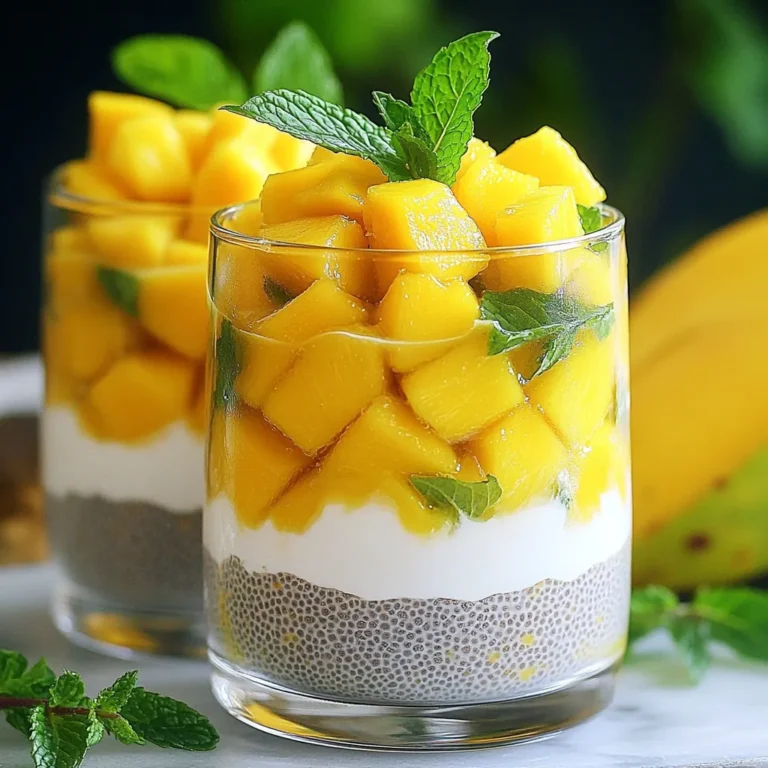
![- 1 cup glutinous (sticky) rice - 1 ½ cups coconut milk - 1 ripe mango, peeled and thinly sliced - ¼ cup granulated sugar - ¼ teaspoon salt Glutinous rice gives Mango Sticky Rice its unique texture. It sticks together and becomes chewy when cooked. The coconut milk adds a rich and creamy flavor to the dish. Using ripe mango is key; its sweetness and juiciness balance the rice. - 1 tablespoon sesame seeds (toasted, optional) - Fresh mint leaves for garnish (optional) Toasted sesame seeds provide a nice crunch. Fresh mint leaves add a pop of color and a refreshing taste. Both are great if you want to elevate your dish. - Calories per Serving: Approximately 300 calories - Key Nutrients: Carbohydrates, fats, fiber, vitamin C, and iron Mango Sticky Rice is a delightful dessert. While it is not low-calorie, it offers some nutrients. The rice provides energy, and mango adds vitamins. Enjoy it as an occasional treat! For the complete recipe, check out the Full Recipe. Rinsing and Soaking the Rice Start by rinsing the sticky rice under cold water. Keep rinsing until the water runs clear. This step removes excess starch. It's key for the right texture. After rinsing, soak the rice in water for 4 hours. If you can, soak it overnight. This helps the rice absorb water and cook better. Steaming Process After soaking, drain the rice. Place it in a steamer lined with cheesecloth or a steaming basket. Steam the rice over simmering water for 25 to 30 minutes. You want it to become translucent and tender. This process makes the rice fluffy and sticky, perfect for the dish. Combining Ingredients While the rice steams, prepare the coconut milk mixture. In a medium saucepan, mix coconut milk, sugar, and salt. Stir the mixture over low to medium heat. Keep stirring until the sugar dissolves. Be careful not to boil it; you want a smooth texture. Cooking Technique Once the sugar is dissolved, take the saucepan off the heat. This step ensures the coconut milk stays creamy. Set it aside until the rice is ready. This coconut milk will add a rich flavor to the sticky rice. Mixing Rice and Coconut Milk When the sticky rice is cooked, transfer it to a large bowl. Gradually pour in about 1 cup of the warm coconut milk mixture. Use a gentle folding motion to mix it in. Make sure every grain of rice is coated. Let it sit for 15 to 20 minutes. This allows the rice to absorb the coconut flavor. Plating Suggestions To serve, scoop a generous amount of sticky rice onto a plate. Arrange thin slices of ripe mango on top. Drizzle some extra coconut milk over it. For added crunch, sprinkle toasted sesame seeds on top. You can also garnish with fresh mint leaves for a pop of color. This makes the dish look as good as it tastes! For the complete method, check the Full Recipe. Appearance and Aroma Indicators When choosing mangoes, look for smooth skin. The color should be bright and rich. A ripe mango feels slightly soft when gently squeezed. It should also have a sweet aroma near the stem. This smell tells you it's ready to eat. Ideal Varieties for the Dish For this dessert, I recommend using the Ataulfo or Haden mango. Ataulfo mangoes have a creamy texture and sweet taste. Haden mangoes are juicy and fragrant, adding great flavor to your dish. Both work well with the sticky rice. Toasting Sticky Rice Option Toasting the sticky rice can bring out a nutty taste. Before soaking, heat it in a pan over low heat. Stir it for a few minutes until it turns golden. This step adds depth to the flavor of your dessert. Alternative Sweeteners While granulated sugar is common, you can try other sweeteners. Honey or agave syrup can add unique flavors. Coconut sugar offers a caramel-like taste. Each option can change the dish’s final taste, so feel free to experiment. Serving Style Variations For a fun twist, try serving the sticky rice in small bowls. You can layer the mango slices on top. This makes each serving look special. You can also use a ring mold to shape the rice for a more elegant look. Creative Garnishing Tips Garnishing can elevate your dessert. Sprinkle toasted sesame seeds for crunch. Add fresh mint leaves for color and flavor. You can also drizzle a bit of coconut milk on top for a beautiful finish. These small touches make your dish more appealing. For the complete recipe, check out the [Full Recipe]. {{image_4}} Mango sticky rice shines in Thai cuisine. Each region has its own twist. In northern Thailand, you might find a version with black sticky rice. This adds a nutty flavor and a stunning dark color. Southern styles often emphasize sweetness with extra coconut milk. Other cuisines influence this dish too. In Vietnam, they serve a similar treat called "xôi xoài." It features a sweeter coconut sauce and often includes mung beans. Exploring these variations lets you enjoy mango sticky rice in new ways. If you want vegan options, just use coconut milk. This recipe is already dairy-free. You can also make it gluten-free, since glutinous rice has no gluten. For low-sugar options, try using a sugar substitute. Many people enjoy using stevia or monk fruit. These keep the sweetness without the added calories. Want to make your mango sticky rice unique? You can add food coloring to the rice. This gives it a fun pop of color. Just a few drops will do! Incorporating fruits and nuts is another way to change up the flavor. Add some chopped mango or berries for extra fruitiness. You could also sprinkle in some toasted coconut or nuts for crunch. This adds texture and makes your dish even more delightful. For the full recipe, check out the Mango Paradise Sticky Rice section. When you have leftover mango sticky rice, you want to keep it fresh. Here are some tips: - Refrigeration Tips: Store the sticky rice in an airtight container. It will stay good in the fridge for about 3 to 4 days. Always let the rice cool to room temperature before sealing it to avoid condensation. - Freezing Sticky Rice: If you want to keep it longer, consider freezing. Wrap the sticky rice tightly in plastic wrap. Then place it in a freezer bag. This way, it can last up to 3 months. You can enjoy your mango sticky rice again with these methods: - Microwave vs. Stovetop: The microwave is quick and easy. Place the rice in a bowl, add a splash of water, and cover it. Heat in short bursts until warm. The stovetop can be better for texture. Add a little coconut milk to a pot, then heat the rice gently over low heat. - Maintaining Texture and Flavor: When reheating, stir the rice often. This helps it warm evenly. Adding coconut milk will also keep it creamy and flavorful. You should know how long your mango sticky rice lasts: - How Long Can You Store It? In the fridge, it lasts 3 to 4 days. In the freezer, it can be good for up to 3 months. - Signs of Spoilage: Check for off smells or a change in color. If you see mold or a strange texture, it’s best to throw it away. Always trust your senses! Mango sticky rice is a sweet dessert from Thailand. It features glutinous rice cooked in creamy coconut milk. This dish is very popular in Thai cuisine, often enjoyed as a treat during festivals or special occasions. The soft, sweet rice pairs perfectly with ripe mango slices. The dish represents a delightful mix of flavors and textures. You should not use regular rice. Regular rice will not give the same sticky texture. Glutinous rice is key to achieving that chewy bite. If you cannot find glutinous rice, look for sushi rice as an alternative. It has a similar texture but may not be as sticky. You can easily change the sweetness of your mango sticky rice. To do this, modify the amount of sugar you use. Start with less sugar and add more to taste. If you want alternatives to granulated sugar, try using honey or maple syrup. These can add unique flavors while still sweetening your dish. Mango sticky rice is a simple, yet delicious dessert. It requires just three main ingredients: sticky rice, coconut milk, and fresh mango. You can add garnishes like sesame seeds or mint for that extra touch. Follow the easy steps for preparation and assembly to create this flavorful dish. Remember to choose ripe mangoes for the best taste. With tips on storage and variations, you can enjoy this treat anytime. Experiment with flavors and enjoy the process. Your mango sticky rice will shine with every bite!](https://joymealplan.com/wp-content/uploads/2025/06/5d335504-2931-49f8-8062-6f7285d5d66d-768x768.webp)