
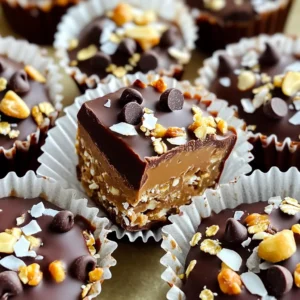
Chocolate Peanut Butter Oat Cups No-Bake Simple Treat

Craving a quick, tasty treat that’s easy to make? Try my Chocolate Peanut Butter Oat Cups! These no-bake delights combine simple ingredients for a sweet snack you can whip up in minutes. You’ll love the rich flavor of chocolate and peanut butter, plus the chewy texture of oats. It’s a treat the whole family can enjoy. Let’s dive into this easy recipe and satisfy that sweet tooth together!
Ingredients
List of Ingredients Required
To make these tasty chocolate peanut butter oat cups, gather these simple ingredients:
– 1 cup rolled oats
– 1/2 cup creamy peanut butter
– 1/4 cup honey or maple syrup
– 1/3 cup unsweetened cocoa powder
– 1/4 cup chocolate chips (dark or semi-sweet)
– 1/2 teaspoon vanilla extract
– A pinch of salt
Ingredient Substitutions
You can easily swap some ingredients. If you want a nut-free option, use sunflower seed butter instead of peanut butter. Maple syrup works well if you prefer a vegan sweetener. If you lack cocoa powder, try carob powder for a different taste. For a more indulgent treat, use white chocolate chips instead of dark or semi-sweet ones.
Optional Toppings
Adding toppings can make these cups even better. Here are some tasty options:
– Crushed nuts like almonds or walnuts
– Shredded coconut for a tropical twist
– Extra chocolate chips for more sweetness
– A sprinkle of sea salt to enhance flavor
Feel free to mix and match these toppings to create your perfect chocolate peanut butter oat cups.
Step-by-Step Instructions
Mixing Dry Ingredients
First, grab a large mixing bowl. Add 1 cup of rolled oats, 1/3 cup of unsweetened cocoa powder, and a pinch of salt. Stir them well until they blend nicely. This step is key for a rich chocolate flavor.
Preparing the Peanut Butter Mixture
Next, take a microwave-safe bowl. Combine 1/2 cup of creamy peanut butter and 1/4 cup of honey or maple syrup. Heat it in the microwave for about 20 to 30 seconds. Make sure it’s warm and easy to mix, but don’t let it get too hot.
Combining and Forming the Cups
Now, pour the warm peanut butter mixture into the bowl with the dry ingredients. Add 1/2 teaspoon of vanilla extract. Mix everything together until you have a sticky dough. Then, gently fold in 1/4 cup of chocolate chips. This will make your oat cups extra tasty.
– Pressing into the Muffin Tin
Prepare a muffin tin by lining it with paper liners or greasing it lightly. Use a spoon or your hands to pack the mixture firmly into each muffin cup. Fill them to the top and press down well. This helps the cups hold their shape.
– Chilling Process
Place the muffin tin into the fridge. Let it chill for about 30 minutes. This helps the oat cups firm up. After chilling, remove the cups. If they stick, run a small knife around the edges to loosen them. Enjoy your homemade treats!
Tips & Tricks
Best Practices for Mixing
When mixing your dry ingredients, make sure to stir gently. This helps to blend everything well. Use a large bowl to give yourself room to mix without spilling. Mixing dry items first helps to prevent clumps. It also ensures an even flavor in each bite.
How to Achieve Perfect Texture
To get the right texture, warm your peanut butter and honey mixture just enough. Heat it for 20 to 30 seconds. This makes it easier to stir and combine with the oats. When mixing, aim for a sticky dough. If it feels too dry, add a touch more peanut butter.
Tips for Easy Removal from Muffin Tin
Once your oat cups chill, they will firm up nicely. If you find them sticking, use a small knife. Gently run it around the edges of each cup. This helps loosen them. For easier removal, you can also line your muffin tin with paper liners. This way, you can peel them off without a struggle.

Variations
Adding Different Nut Butters
You can easily swap peanut butter for other nut butters. Almond butter and cashew butter work well. Each nut butter brings its own taste. Almond butter adds a nutty flavor, while cashew butter is creamy and mild. You should try these options for a fun twist. Just use the same amount as the peanut butter.
Using Alternative Sweeteners
If you want less sugar, use other sweeteners. Agave syrup or coconut sugar are great choices. You can also use stevia or monk fruit sweetener for a low-calorie option. Keep in mind that some sweeteners are sweeter than honey. Adjust the amount to taste. This way, you can enjoy your oat cups without too much sugar.
Flavor Add-Ins (e.g., spices, extracts)
You can spice things up with flavor add-ins. Try adding a dash of cinnamon for warmth. A bit of nutmeg can give a cozy touch too. You might also add a few drops of almond or orange extract. These add unique flavors and make the cups even more special. Get creative and find your perfect mix!
Storage Info
Best Storage Practices
To keep your chocolate peanut butter oat cups fresh, store them in an airtight container. This helps prevent them from drying out. You can place a piece of parchment paper between layers if stacking is required. The cooler and darker your storage area, the better. The fridge works best.
Shelf Life and Freshness Tips
These oat cups can stay fresh for up to one week in the fridge. To check freshness, look for any changes in texture or smell. If they feel sticky or have an off odor, it’s best to toss them. Always use clean utensils when serving to avoid contamination.
Freezing Instructions
You can freeze these oat cups for longer storage. Wrap each cup tightly in plastic wrap or aluminum foil. Place them in a freezer-safe bag or container. They can last for about three months in the freezer. To enjoy, thaw them in the fridge overnight before eating.
FAQs
Can I use quick oats instead of rolled oats?
Yes, you can use quick oats. They will work well in this recipe. Quick oats may make the oat cups a bit softer. Rolled oats give a chewier texture, which many people enjoy. If you prefer a softer cup, feel free to swap them in. Just keep an eye on the mixing to avoid overworking the oats.
How do I make these oat cups vegan?
To make these oat cups vegan, swap honey for maple syrup. Use a plant-based chocolate, like dairy-free chocolate chips. Make sure to check the labels for any animal products. You can also use a nut or seed butter that fits your diet. This way, you can still enjoy the rich taste without any animal ingredients.
What are some good pairings or serving suggestions?
These oat cups are great on their own but pair well with fresh fruit. Slices of banana or strawberries add a nice touch. You can also enjoy them with a dollop of yogurt for added creaminess. If you like a crunch, serve with nuts or granola on the side.
– How to adjust the sweetness level?
To adjust the sweetness, add more or less honey or maple syrup. Start with the original amount, then taste the mixture. If you want more sweetness, add a little at a time. Be careful not to add too much at once, as it can change the texture.
– Can I add protein powder to the recipe?
Yes, you can add protein powder to the mixture. Start with one to two tablespoons. Mix it in with the dry ingredients for even distribution. This will boost the protein content without altering the flavor much. Just ensure you mix well so it blends smoothly with the other ingredients.
You learned about the key ingredients and easy steps to make delicious oat cups. We explored substitutions, optional toppings, and variations for your taste. Tips helped ensure perfect texture and easy removal from muffin tins. Now, you have storage advice to keep your oat cups fresh. Remember, these oat cups are flexible. They can fit your diet and cravings. Enjoy your cooking adventure and savor every bite!
![For a tasty batch of pumpkin spice granola, you need these simple ingredients: - 3 cups rolled oats - 1 cup pumpkin seeds - 1 cup almond slivers - 1/2 cup pure maple syrup - 1/4 cup coconut oil, melted - 1 cup dried cranberries - 1 tablespoon pumpkin pie spice - 1/2 teaspoon pure vanilla extract - 1/4 teaspoon sea salt - Rolled oats: They provide fiber. This helps keep you full longer. - Pumpkin seeds: These are rich in zinc and magnesium. They support heart health. - Almond slivers: They add protein and healthy fats. They also boost your energy. - Pure maple syrup: This natural sweetener has antioxidants. It gives a touch of sweetness. - Coconut oil: It offers healthy fats. This adds flavor and helps with cooking. - Dried cranberries: They are a good source of vitamins. They add a sweet-tart flavor. - Pumpkin pie spice: This mix includes cinnamon and nutmeg. It brings warmth and flavor. - Pure vanilla extract: It enhances the taste. It adds a lovely aroma. - Sea salt: Just a pinch enhances all the flavors. It balances the sweetness. If you want to change things up, try these swaps: - Use honey instead of maple syrup for a different sweetness. - Swap sunflower seeds for pumpkin seeds if you have allergies. - Replace almond slivers with walnut pieces for a different nutty flavor. - Use agave syrup instead of maple syrup for a vegan option. - Try raisins or dried cherries instead of cranberries for a new taste. These choices allow you to customize your granola to fit your taste and dietary needs. Check out the Full Recipe for more details! To make pumpkin spice granola, start by gathering all your ingredients. You need oats, pumpkin seeds, almond slivers, and more. Preheat your oven to 325°F (165°C). This heat helps the granola crisp up nicely. Line a large baking sheet with parchment paper. This makes cleanup easy. In a big bowl, mix the rolled oats, pumpkin seeds, almond slivers, and sea salt. Stir them well so they blend. In another small bowl, whisk together melted coconut oil, pure maple syrup, pumpkin pie spice, and vanilla extract. This mixture adds flavor to your granola. Pour the wet mix over the dry ingredients. Stir well to coat everything. Transfer this mixture to the baking sheet. Spread it out evenly. Bake for 25 to 30 minutes. Stir every 10 minutes to avoid burning. The granola is done when it is golden brown. After baking, let it cool completely on the sheet. This step is key for making it crunchy. Once cool, add in the dried cranberries and mix them in. Store your granola in an airtight container for up to two weeks. To get the best texture, make sure not to skip the stirring. Stirring helps the granola bake evenly. If you want clusters, don’t stir too much. Let it sit in the oven without stirring for the last 10 minutes. Use high-quality maple syrup for better flavor. You can also switch the coconut oil for another oil if you prefer. Just keep the same amount. Adding nuts or seeds can give a nice crunch. Try using sunflower seeds or walnuts too. When making granola, pay attention to the color. A golden brown color means it is ready. If it looks too light, it might need more time. Consistency is also important. You want every piece to be evenly coated. Feel free to take a peek through the oven door, but avoid opening it too much. This helps keep the heat inside. For a fun touch, sprinkle some extra pumpkin pie spice on top before baking. It gives a nice aroma and flavor. Granola can be tricky. Here are some common mistakes to avoid: - Not stirring enough: Stir your mix every 10 minutes while baking. This helps prevent burning. - Using too much wet ingredients: Too much oil or syrup makes granola chewy instead of crunchy. - Not cooling properly: Allow the granola to cool on the baking sheet. This creates those tasty clusters. Want more flavor in your granola? Try these ideas: - Add cinnamon: Sprinkle in extra cinnamon for warmth. - Try nutmeg: A dash of nutmeg adds a cozy kick. - Use ginger: Ground ginger gives a nice zing to your mix. - Experiment with cardamom: This spice brings a unique taste that pairs well with pumpkin. Clusters make granola fun. Here’s how to make them: - Press down the mixture: After spreading the granola on the sheet, press it down firmly. - Bake without stirring: Bake for the first 20 minutes without stirring for bigger clusters. - Cool completely: Let it cool before breaking it apart. This helps form solid chunks. For a full recipe, check out the [Full Recipe]. {{image_4}} You can change your pumpkin spice granola by adding fun mix-ins. Try adding nuts like walnuts or pecans for crunch. You can also mix in seeds like sunflower or chia for extra nutrition. Dried fruits, such as raisins or apricots, add sweetness and chewiness. Want some chocolate? Toss in dark chocolate chips or cocoa nibs. You can create a granola that fits your taste. As fall turns to winter, you can spice up your granola even more. Add cinnamon or nutmeg for a cozy taste. Try incorporating peppermint extract for a fresh twist during the holidays. You can even mix in crushed ginger snaps for a festive crunch. Each season brings new flavors to explore, so feel free to experiment. If you need a gluten-free version, simply swap rolled oats for certified gluten-free oats. Most nuts and seeds are gluten-free, so you’re all set. For a vegan option, ensure your maple syrup is pure. You can also use agave syrup if you prefer. By making these simple swaps, anyone can enjoy your delicious granola. For the full recipe, check out the details above. To keep your pumpkin spice granola fresh, use an airtight container. Glass jars or plastic bins work well. Store it in a cool, dry place. Avoid direct sunlight, as it can make the granola stale. To extend the life of your granola, consider these tips: - Keep it sealed. Always close the lid tightly after each use. - Use small portions. Store in smaller containers for easy access. - Refrigerate if needed. If your kitchen is warm, the fridge can help. Check your granola for these signs to know if it has spoiled: - Odor. If it smells off or rancid, it's best to toss it. - Texture. It should be crunchy, not soggy or chewy. - Taste. If it tastes stale or strange, do not eat it. For the best flavor and crunch, enjoy your pumpkin spice granola within two weeks. You can find the full recipe above to get started on this tasty treat! Homemade pumpkin spice granola lasts for about two weeks. Store it in an airtight container. Keep it at room temperature to maintain its crunch. If you notice it becoming soft, it may not be fresh. Enjoy it while it's at its best! Yes, you can freeze pumpkin spice granola. Place it in a freezer-safe bag or container. It can last for up to three months in the freezer. Just remember to let it thaw before eating. This way, you can enjoy it even longer! You can find pumpkin spice granola at most grocery stores. Look in the snack aisle or the health food section. Many brands offer it, so you have options. You can also check online retailers for more choices. Making pumpkin spice granola at home is easy and rewarding. We covered the ingredients, their benefits, and tips for perfect preparation. I shared common mistakes to avoid and ways to enhance flavor. You also learned about fun variations and storage tips to keep your granola fresh. With these insights, you can create a delicious snack that fits your taste and needs. Enjoy the process and create your own unique recipes!](https://joymealplan.com/wp-content/uploads/2025/07/a68e2ffd-e611-4647-9bbb-589f309bc2c0-768x768.webp)