Go Back
To make these tasty chocolate peanut butter oat cups, gather these simple ingredients: - 1 cup rolled oats - 1/2 cup creamy peanut butter - 1/4 cup honey or maple syrup - 1/3 cup unsweetened cocoa powder - 1/4 cup chocolate chips (dark or semi-sweet) - 1/2 teaspoon vanilla extract - A pinch of salt You can easily swap some ingredients. If you want a nut-free option, use sunflower seed butter instead of peanut butter. Maple syrup works well if you prefer a vegan sweetener. If you lack cocoa powder, try carob powder for a different taste. For a more indulgent treat, use white chocolate chips instead of dark or semi-sweet ones. Adding toppings can make these cups even better. Here are some tasty options: - Crushed nuts like almonds or walnuts - Shredded coconut for a tropical twist - Extra chocolate chips for more sweetness - A sprinkle of sea salt to enhance flavor Feel free to mix and match these toppings to create your perfect chocolate peanut butter oat cups. First, grab a large mixing bowl. Add 1 cup of rolled oats, 1/3 cup of unsweetened cocoa powder, and a pinch of salt. Stir them well until they blend nicely. This step is key for a rich chocolate flavor. Next, take a microwave-safe bowl. Combine 1/2 cup of creamy peanut butter and 1/4 cup of honey or maple syrup. Heat it in the microwave for about 20 to 30 seconds. Make sure it’s warm and easy to mix, but don’t let it get too hot. Now, pour the warm peanut butter mixture into the bowl with the dry ingredients. Add 1/2 teaspoon of vanilla extract. Mix everything together until you have a sticky dough. Then, gently fold in 1/4 cup of chocolate chips. This will make your oat cups extra tasty. - Pressing into the Muffin Tin Prepare a muffin tin by lining it with paper liners or greasing it lightly. Use a spoon or your hands to pack the mixture firmly into each muffin cup. Fill them to the top and press down well. This helps the cups hold their shape. - Chilling Process Place the muffin tin into the fridge. Let it chill for about 30 minutes. This helps the oat cups firm up. After chilling, remove the cups. If they stick, run a small knife around the edges to loosen them. Enjoy your homemade treats! When mixing your dry ingredients, make sure to stir gently. This helps to blend everything well. Use a large bowl to give yourself room to mix without spilling. Mixing dry items first helps to prevent clumps. It also ensures an even flavor in each bite. To get the right texture, warm your peanut butter and honey mixture just enough. Heat it for 20 to 30 seconds. This makes it easier to stir and combine with the oats. When mixing, aim for a sticky dough. If it feels too dry, add a touch more peanut butter. Once your oat cups chill, they will firm up nicely. If you find them sticking, use a small knife. Gently run it around the edges of each cup. This helps loosen them. For easier removal, you can also line your muffin tin with paper liners. This way, you can peel them off without a struggle. {{image_4}} You can easily swap peanut butter for other nut butters. Almond butter and cashew butter work well. Each nut butter brings its own taste. Almond butter adds a nutty flavor, while cashew butter is creamy and mild. You should try these options for a fun twist. Just use the same amount as the peanut butter. If you want less sugar, use other sweeteners. Agave syrup or coconut sugar are great choices. You can also use stevia or monk fruit sweetener for a low-calorie option. Keep in mind that some sweeteners are sweeter than honey. Adjust the amount to taste. This way, you can enjoy your oat cups without too much sugar. You can spice things up with flavor add-ins. Try adding a dash of cinnamon for warmth. A bit of nutmeg can give a cozy touch too. You might also add a few drops of almond or orange extract. These add unique flavors and make the cups even more special. Get creative and find your perfect mix! To keep your chocolate peanut butter oat cups fresh, store them in an airtight container. This helps prevent them from drying out. You can place a piece of parchment paper between layers if stacking is required. The cooler and darker your storage area, the better. The fridge works best. These oat cups can stay fresh for up to one week in the fridge. To check freshness, look for any changes in texture or smell. If they feel sticky or have an off odor, it’s best to toss them. Always use clean utensils when serving to avoid contamination. You can freeze these oat cups for longer storage. Wrap each cup tightly in plastic wrap or aluminum foil. Place them in a freezer-safe bag or container. They can last for about three months in the freezer. To enjoy, thaw them in the fridge overnight before eating. Yes, you can use quick oats. They will work well in this recipe. Quick oats may make the oat cups a bit softer. Rolled oats give a chewier texture, which many people enjoy. If you prefer a softer cup, feel free to swap them in. Just keep an eye on the mixing to avoid overworking the oats. To make these oat cups vegan, swap honey for maple syrup. Use a plant-based chocolate, like dairy-free chocolate chips. Make sure to check the labels for any animal products. You can also use a nut or seed butter that fits your diet. This way, you can still enjoy the rich taste without any animal ingredients. These oat cups are great on their own but pair well with fresh fruit. Slices of banana or strawberries add a nice touch. You can also enjoy them with a dollop of yogurt for added creaminess. If you like a crunch, serve with nuts or granola on the side. - How to adjust the sweetness level? To adjust the sweetness, add more or less honey or maple syrup. Start with the original amount, then taste the mixture. If you want more sweetness, add a little at a time. Be careful not to add too much at once, as it can change the texture. - Can I add protein powder to the recipe? Yes, you can add protein powder to the mixture. Start with one to two tablespoons. Mix it in with the dry ingredients for even distribution. This will boost the protein content without altering the flavor much. Just ensure you mix well so it blends smoothly with the other ingredients. You learned about the key ingredients and easy steps to make delicious oat cups. We explored substitutions, optional toppings, and variations for your taste. Tips helped ensure perfect texture and easy removal from muffin tins. Now, you have storage advice to keep your oat cups fresh. Remember, these oat cups are flexible. They can fit your diet and cravings. Enjoy your cooking adventure and savor every bite!

Chocolate Peanut Butter Oat Cups No-Bake

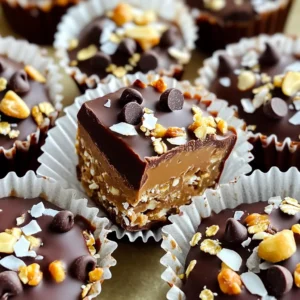
Indulge in the deliciousness of Chocolate Peanut Butter Oat Cups! These easy and healthy snacks combine rolled oats, creamy peanut butter, and rich cocoa powder for a sweet treat perfect any time of day. With just a few simple ingredients, you can whip up a batch in no time. Click through to explore the full recipe and discover how to make these delightful cups that will satisfy your chocolate cravings!

Ingredients
  

1 cup rolled oats

1/2 cup creamy peanut butter

1/4 cup honey or maple syrup

1/3 cup unsweetened cocoa powder

1/4 cup chocolate chips (dark or semi-sweet)

1/2 teaspoon vanilla extract

A pinch of salt

Optional toppings: crushed nuts, shredded coconut, or extra chocolate chips

Instructions
 

In a large mixing bowl, add the rolled oats, cocoa powder, and a pinch of salt. Stir these dry ingredients together until they are evenly mixed.

    In a separate microwave-safe bowl, combine the creamy peanut butter and honey (or maple syrup). Heat this mixture in the microwave for about 20-30 seconds, or until it becomes warm and easy to stir. Make sure not to overheat it.

      Once heated, pour the peanut butter mixture into the bowl with the oats. Add the vanilla extract as well. Mix everything together thoroughly until the ingredients are well incorporated and a sticky dough forms.

        Gently fold in the chocolate chips, ensuring they are evenly distributed throughout the dough.

          Prepare a muffin tin by either lining it with paper liners or lightly greasing the cups with cooking spray. Using a spoon or your hands, pack the mixture firmly into each muffin cup, filling them to the top and pressing down to ensure they hold their shape.

            Place the muffin tin into the refrigerator and allow it to chill for approximately 30 minutes, which will help the oat cups to firm up.

              After 30 minutes, carefully remove the oat cups from the muffin tin. If they are sticking, run a small knife around the edges to help loosen them.

                For an extra touch, consider sprinkling your choice of optional toppings—such as crushed nuts, shredded coconut, or more chocolate chips—on top of each oat cup for added flavor and texture.

                  Store the finished oat cups in an airtight container in the refrigerator, where they will stay fresh for up to one week.

                    Prep Time: 10 minutes | Total Time: 40 minutes | Servings: 12 cups