
Cottage Cheese Bagel Spread High Protein Delight
Looking for a high-protein snack that’s both tasty and easy to make? You’ve come to the right place! My Cottage Cheese Bagel Spread delivers creamy goodness packed with protein. It’s perfect for breakfast or a quick meal. In this post, I’ll walk you through simple steps, tips for the best flavor, and fun variations. Get ready to elevate your bagel game with this wholesome delight!
Ingredients
Cottage Cheese
– 1 cup cottage cheese
Cottage cheese is the star of this dish. You can choose low-fat for a light bite or full-fat for extra creaminess. Both options work well. The cottage cheese gives a nice base for our spread and packs in protein.
Additional Ingredients
– 2 tablespoons Greek yogurt
This adds creaminess and boosts the protein content.
– 1 tablespoon fresh dill, chopped
Dill brings a fresh taste. You can use dried dill if fresh isn’t available.
– 1 tablespoon chives, finely chopped
These herbs add a nice aroma and flavor.
– 1 teaspoon garlic powder
This gives a savory kick to our spread.
– 1 teaspoon fresh lemon juice
Lemon juice brightens the flavor.
– Salt and freshly ground black pepper
These help to season the spread to your liking.
Optional Toppings
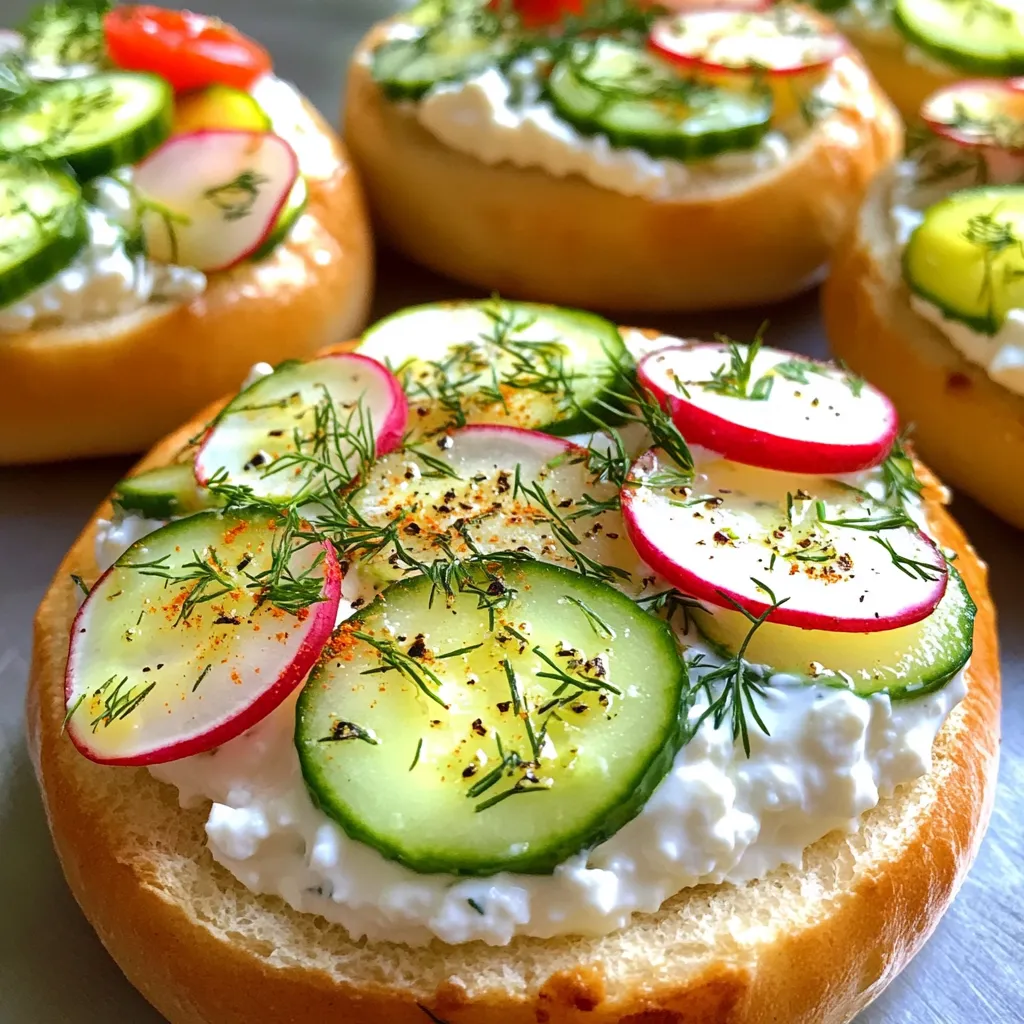
– Sliced cucumber
Cucumber adds a refreshing crunch.
– Radishes
They bring a peppery bite.
– Cherry tomatoes, halved
These add sweetness and color.
Feel free to get creative with your toppings. Mix and match to find your favorite combo!
Step-by-Step Instructions
Preparation of the Cottage Cheese Mixture
To start, grab a medium-sized mixing bowl. Add 1 cup of cottage cheese and 2 tablespoons of Greek yogurt. Use a fork or whisk to mix them well until smooth. This base gives a creamy texture. Next, add 1 tablespoon of chopped fresh dill and 1 tablespoon of finely chopped chives. These herbs will add a burst of flavor. Don’t forget to include 1 teaspoon of garlic powder and 1 teaspoon of fresh lemon juice. These ingredients brighten the taste. Stir everything together until it is well combined. Finally, taste your spread and add salt and freshly ground black pepper as needed.
Toasting the Bagels
Now, take your favorite bagels, whether plain, everything, or sesame. Cut each bagel in half. Toast them lightly in a toaster or under a broiler. You want them to be golden brown and slightly crispy. This step adds a nice crunch to your spread. Keep an eye on them to avoid burning!
Assembling Your Bagel Spread
Once your bagels are toasted, it’s time to spread. Take each bagel half and spread a generous portion of the cottage cheese mixture over the top. Be liberal with your spreading! For added texture and taste, consider garnishing with optional toppings like sliced cucumber, peppery radishes, or halved cherry tomatoes. Enjoy your bagels right away for the best taste. If you prepare in advance, store the spread and bagels separately in the fridge. This will keep them fresh for up to 2 hours.
Tips & Tricks
How to Achieve the Creamiest Texture
To get the smoothest spread, use full-fat cottage cheese. It gives a rich taste. Mix it well with Greek yogurt. This adds creaminess and extra protein. Start with a fork, then switch to a whisk. Whisking helps break down the curds. If you want it even smoother, blend the mixture in a food processor. This will make it super creamy.
Best Storage Practices
Store your spread in a tight container. This keeps it fresh and tasty. It will last in the fridge for up to two days. To keep bagels crispy, store them separately. If you prep in advance, keep the spread and bagels apart until serving. This way, they stay fresh and delicious.
Flavor Enhancements and Adjustments
You can change the flavor to match your taste. Want a spicy kick? Add a pinch of red pepper flakes. For a tangy twist, mix in more lemon juice. Try different herbs like basil or parsley for a fresh taste. If you like a smoky flavor, add some smoked paprika. Get creative with your toppings too! Sliced cucumbers or radishes add crunch. Halved cherry tomatoes bring a burst of flavor. The options are endless!

Variations
Dairy-Free Alternatives
If you want a dairy-free spread, try using silken tofu instead of cottage cheese. Silken tofu has a creamy texture and a mild taste. You can blend it until smooth. Add Greek yogurt made from coconut or almond milk for extra creaminess and protein. These options keep the spread tasty while making it suitable for those with dairy allergies.
Herb & Spice Variations
You can change the herbs and spices to match your taste. For a zesty kick, use fresh basil or parsley instead of dill. Try adding a pinch of smoked paprika for a hint of warmth. If you like heat, mix in some cayenne pepper or a dash of hot sauce. The flavors can take your spread from basic to bold in no time!
Different Flavor Profiles (Savory vs. Sweet)
You can enjoy this spread in both savory and sweet ways. For a savory twist, add chopped sun-dried tomatoes or olives. These will create a rich and delicious flavor. If you crave something sweet, mix in some honey or maple syrup. You can also add cinnamon and diced fruits like apples or berries. This versatility allows you to enjoy your bagel spread any time of day!
Nutritional Information
Protein Content Breakdown
This cottage cheese bagel spread is packed with protein. Each serving has about 14 grams of protein. The cottage cheese provides a major boost. Greek yogurt adds even more protein to the mix. Together, they make this spread a great choice for muscle health.
Caloric Information Per Serving
One serving of this spread is around 120 calories. The main ingredients are low in calories but high in nutrients. Using low-fat cottage cheese and yogurt keeps the calories down. You can enjoy this spread without worrying about extra calories.
Health Benefits of Ingredients
– Cottage cheese: Rich in protein and calcium. Good for your bones and muscles.
– Greek yogurt: Adds probiotics for gut health and extra protein.
– Dill and chives: Packed with vitamins and minerals. They also add flavor without extra calories.
– Lemon juice: Provides vitamin C, which boosts your immune system.
– Garlic powder: Has health benefits, like supporting heart health.
This cottage cheese bagel spread is tasty and good for you!
FAQs
Can I use low-fat cottage cheese?
Yes, you can use low-fat cottage cheese. It keeps the spread light and creamy. If you want more flavor, try full-fat cottage cheese. Both options work well in this recipe.
How long does the spread last in the fridge?
The spread lasts up to two days in the fridge. Just store it in an airtight container. This keeps it fresh and safe to eat.
What bagel flavors work best with this spread?
You can use many bagel flavors. Everything bagels add a nice crunch. Plain bagels let the spread shine. Sesame bagels bring a nutty taste. Choose your favorite or try them all!
This blog post explored how to make a tasty cottage cheese bagel spread. We discussed ingredients, step-by-step instructions, and helpful tips. You learned about variations to fit your taste and the nutritional benefits of each ingredient. You can make this spread creamy and flavorful while adding your favorite toppings. Experiment with dairy-free options or different spices. Enjoy this easy dish that brings great taste and good health. Your bagel spread journey starts now!


![For this crispy air fryer chicken wings recipe, you'll need: - 2 pounds of chicken wings The key to great flavor comes from these seasoning ingredients: - 1 tablespoon baking powder - 1 teaspoon garlic powder - 1 teaspoon onion powder - 1 teaspoon smoked paprika - 1 teaspoon salt - ½ teaspoon black pepper - ½ teaspoon cayenne pepper (adjust to your spice preference) - 1 tablespoon olive oil These spices create a delicious mix. The baking powder helps the skin get crispy. The garlic and onion powders add nice depth. The smoked paprika brings warmth and color. Salt and pepper enhance all the flavors. If you like heat, add more cayenne! To make your wings even more appealing, consider this optional garnish: - Fresh herbs (such as parsley or cilantro) Fresh herbs add color and a burst of freshness. You can sprinkle them on top right before serving. This small touch makes a big difference in presentation. For the full recipe, check out the entire article! Start with fresh chicken wings. You need about 2 pounds for this recipe. Pat them dry with paper towels. This step helps remove moisture. Less moisture means crispier skin. Make sure to get every wing dry. In a large bowl, mix your seasonings. Use 1 tablespoon of baking powder. Add 1 teaspoon each of garlic powder, onion powder, and smoked paprika. Toss in 1 teaspoon of salt, ½ teaspoon of black pepper, and ½ teaspoon of cayenne pepper. Mix well. This blend gives the wings great flavor. Next, place the chicken wings in the bowl with the seasoning. Drizzle 1 tablespoon of olive oil over them. Toss everything together. Make sure each wing is coated well. Preheat your air fryer to 390°F (200°C) for about 5 minutes. Once it's hot, arrange the wings in a single layer in the basket. If your air fryer is small, cook them in batches. Cook the wings for 25-30 minutes. Halfway through, shake the basket gently. This helps them cook evenly and get crispy. For extra crispiness, raise the temperature to 400°F (204°C) for the last 5 minutes. When done, the wings should be golden brown and crispy. Carefully take them out and let them rest for a few minutes. Enjoy your crispy air fryer chicken wings right away! For the full recipe, check the earlier sections. To make your wings extra crispy, ensure they are very dry before cooking. Pat them dry with paper towels to remove moisture. Adding baking powder helps create a crunchy texture. It raises the pH of the skin, allowing it to brown better. For even more crispiness, increase the air fryer temperature to 400°F for the last five minutes. Cooking time can change based on wing size and air fryer model. For small wings, 25 minutes should be enough. Larger wings may need 30 to 35 minutes. Always check for doneness. The internal temperature should reach 165°F for safe eating. You can adjust cooking times slightly for your personal preference on crispiness. Avoid overcrowding the air fryer basket. This helps air circulate around each wing, ensuring even cooking. If you have many wings, cook them in batches. Shaking the basket halfway through cooking promotes even browning. Always preheat your air fryer for better results. Following these steps will help you get the best crispy wings. For the [Full Recipe], refer to the earlier section. {{image_4}} If you love heat, try making spicy Buffalo wings. Start with the base recipe. Before seasoning, toss the wings in hot sauce. You can use your favorite brand. After cooking, toss the wings in more hot sauce for an extra kick. Serve with blue cheese or ranch dressing. This adds a cool contrast to the spice. For a unique twist, go Asian-inspired. Mix soy sauce, ginger, and garlic into the seasoning. Instead of cayenne, use five-spice powder. This will give your wings a sweet and savory taste. After frying, drizzle with sesame oil and sprinkle sesame seeds. This adds a nice crunch and flavor pop. If you prefer fresh flavors, try this herb and lemon zest infusion. Add fresh herbs like thyme or rosemary to the seasoning mix. Zest one lemon and mix it in for brightness. This will make the wings taste light and refreshing. Serve with a lemon wedge for extra zing. These variations make it easy to switch things up. Enjoy your crispy air fryer chicken wings with these fun flavors! For the complete recipe, check out the Full Recipe section above. You can store leftover crispy air fryer chicken wings in the fridge. Place them in an airtight container. They will stay fresh for up to three days. To keep them crispy, avoid stacking them too high. To reheat, use your air fryer. Set it to 350°F (175°C). Heat the wings for about 5-7 minutes. This method will help retain their crispiness. You can also use a microwave, but they may lose some crunch. You can freeze the wings if you have extra. Place them in a freezer-safe bag or container. They can last for up to three months in the freezer. To thaw, move them to the fridge overnight. Reheat them in the air fryer when ready to enjoy again. For the full recipe, check out the section above! To make air fryer chicken wings extra crispy, start by drying them well. Pat them with paper towels to remove moisture. Next, use baking powder in your seasoning mix. This ingredient helps create that crunchy skin. Air fry them at a high temperature, and remember to shake the basket halfway through. For even more crispiness, raise the temperature in the last few minutes. The best temperature for cooking chicken wings in an air fryer is 390°F (200°C). This heat cooks the wings evenly and helps them become crispy. If you want them super crispy, boost the temperature to 400°F (204°C) for the final few minutes. This method ensures delicious, golden brown wings every time. Yes, you can cook frozen chicken wings in the air fryer. It’s easy and a real time-saver. Just add a few extra minutes to the cooking time. Start by cooking them at 400°F (204°C) for about 30-35 minutes. Shake the basket halfway to ensure even cooking. This method gives you crispy wings straight from the freezer! For the full recipe, check out the previous section. In this blog post, we covered how to make tasty air fryer chicken wings. We discussed ingredients, seasoning, and cooking steps. I shared tips to make your wings extra crispy and how to store them. You can even try different flavors like buffalo or Asian-inspired wings. To wrap up, air frying is a fun, easy way to enjoy wings. Now, get cooking and enjoy your delicious wings!](https://joymealplan.com/wp-content/uploads/2025/06/f7d8b647-e810-4c45-9fe8-50cd60d2e295-768x768.webp)

![- 2 large cucumbers, diced into bite-sized cubes - 3 medium tomatoes, diced into equal-sized pieces - 1 red bell pepper, diced Fresh vegetables are the heart of a Greek salad. Cucumbers add crunch and hydration. Tomatoes provide sweetness and color. Red bell peppers add a nice crunch and a touch of sweetness. Together, they make a refreshing mix. - 1 cup Kalamata olives, pitted and halved - 1 red onion, thinly sliced into rings - 1/3 cup feta cheese, crumbled (omit for a vegan version) Next, we have Kalamata olives. They bring a salty, rich flavor to the salad. Red onion adds a sharp bite that balances the sweetness of the other veggies. Feta cheese adds creaminess and a tangy taste. If you prefer a vegan salad, simply leave out the feta. - 1/4 cup extra virgin olive oil - 2 tablespoons red wine vinegar (use apple cider vinegar for a unique flavor twist) - 1 teaspoon dried oregano, preferably Mediterranean The dressing ties everything together. Extra virgin olive oil makes it rich and smooth. Red wine vinegar adds a nice tang. Dried oregano brings a hint of earthiness. This simple dressing enhances the fresh flavors without overpowering them. You can find the full recipe online for detailed steps. Start by washing all your fresh vegetables. Clean them well to remove any dirt. Next, dice the cucumbers and tomatoes into small, even pieces. This helps make each bite enjoyable. Add these diced vegetables to a large mixing bowl. Then, chop the red bell pepper and halve the Kalamata olives. Thinly slice the red onion into rings. Mix all these vibrant ingredients together in the bowl. This colorful blend makes your salad look great! In a small bowl, mix the extra virgin olive oil and red wine vinegar. Whisk them together until they blend well. Add in the dried oregano for that nice Mediterranean flavor. Season your dressing with salt and freshly ground black pepper. This adds taste and balance to the salad. Taste your dressing and adjust the salt if needed. Now, pour the prepared dressing over the bowl of vegetables. Gently toss everything together with a large spoon or salad tongs. Make sure all the vegetables are covered in the dressing. If you want feta cheese, sprinkle the crumbled cheese on top. Toss it lightly again to mix the feta in with the salad. Finally, garnish with chopped fresh parsley for a pop of color. Enjoy your healthy Greek salad! For the complete recipe, see [Full Recipe]. To make your Greek salad shine, start with high-quality olive oil. This oil adds rich taste and depth. Look for extra virgin, as it has the best flavor. A simple drizzle makes a big difference. Next, add a squeeze of fresh lemon juice. This brightens the salad and adds zing. The citrus lifts the flavors and makes each bite refreshing. Use it right before serving for the best taste. When it comes to serving, think about your style. You can serve in a large bowl for a family meal. This lets everyone help themselves. Or, you can serve in individual bowls for a fancy touch. This makes each portion feel special. Garnishes also help with presentation. Fresh herbs like parsley add color. A slice of lemon on the side gives a nice look. These small touches make your salad more inviting. Want to boost the health factor? Add more vegetables. You can include radishes, carrots, or even spinach. Each veggie adds unique nutrients and flavors. More colors mean more vitamins! If you're watching your fat intake, think about cheese options. Use low-fat feta or skip the cheese entirely for a vegan choice. You still get a tasty salad without the extra calories. This way, you can enjoy a healthy Greek salad without worry. For the full recipe, check out the Mediterranean Bliss Greek Salad. {{image_4}} You can easily change the Greek salad to fit your diet. For a vegan version, swap feta cheese with tofu or avocado. Tofu adds protein and a nice texture. Avocado gives a creamy flavor without dairy. Both are great choices. This salad is also gluten-free. All the ingredients are naturally gluten-free. You can enjoy it without worry if you have gluten sensitivities. To add more flavor, think about adding protein. Chickpeas are a great option. They are filling and nutritious. Grilled chicken is another tasty choice if you prefer meat. It adds a smoky taste that pairs well with the salad. You can also introduce different herbs and spices. Fresh dill or mint can brighten the dish. A pinch of red pepper flakes can add a nice kick. Each tweak gives the salad a unique twist. Feel free to switch up the vegetables too. Grape tomatoes are sweeter and add a pop of color. You can also try different colored bell peppers for a vibrant look. Another fun swap is with olives. While Kalamata olives are classic, green olives can give a tangy taste. Each type of olive brings its own flavor, making your salad exciting. For the full recipe, check out the Mediterranean Bliss Greek Salad. To keep your Healthy Greek Salad fresh in the fridge, follow these tips: - Use an airtight container to seal in moisture and flavors. - Place a paper towel inside the container to absorb extra moisture. - Store the salad in the fridge for up to three days. For long-term storage, keep the salad ingredients separate. Here’s how: - Store the vegetables in their own container. This keeps them crisp. - Keep dressing in a small jar or bottle. You can freeze extra dressing for later use. To tell if your salad is no longer fresh, watch for these signs: - Look for wilted greens or soggy vegetables. - Check for an off smell or sour taste. - Discard any ingredients showing mold or discoloration. Proper disposal methods include throwing spoiled food in the trash or composting if safe. Enjoy the Healthy Greek Salad fresh, and savor every bite! For the full recipe, check out the Mediterranean Bliss Greek Salad. Greek salad is full of fresh veggies. These ingredients give many health benefits. Cucumbers keep you hydrated with their high water content. Tomatoes are rich in vitamins A and C, which are good for your skin. Red bell peppers provide antioxidants that help fight disease. Kalamata olives offer healthy fats, which are good for your heart. Feta cheese adds calcium for strong bones, but you can skip it if you prefer vegan options. The dressing made with olive oil is also good for heart health. Eating this salad can help you feel full and satisfied without many calories. Yes, you can prep your Greek salad ahead of time. To keep it fresh, chop the veggies but store them separately from the dressing. This way, they stay crisp and colorful. You can mix the dressing in another bowl. When you are ready to eat, combine everything. This keeps the salad tasting fresh and not soggy. If you want to add feta, do this right before serving, so it stays creamy. Absolutely! This salad is perfect for meal prep. You can easily make a big batch and store it in your fridge. Use airtight containers to keep it fresh. The veggies will stay good for about three days. If you want to eat it later, avoid adding the dressing until just before serving. This keeps the flavors bright and the textures right. Greek salad pairs well with many dishes. You can serve it with grilled chicken for added protein. It also goes great with pita bread or hummus for a light meal. If you are looking for a heartier option, try it with grilled fish. Adding some quinoa or brown rice on the side is also a nice touch. This makes for a balanced meal that is both tasty and healthy. You can find the Full Recipe for a Mediterranean Bliss Greek Salad to try today! In this article, we explored how to make a fresh and healthy Greek salad. I covered the ingredients and steps, plus tips for flavor and presentation. You learned about variations and storage to keep your salad fresh. Remember, this dish is not just tasty but also packed with nutrients. Whether you enjoy it as a side or main dish, its flavors and colors will impress everyone. By adding your twist, you can make it your own. Happy salad making!](https://joymealplan.com/wp-content/uploads/2025/06/c94f07f9-b700-4cfc-a1be-56f301f39c39-768x768.webp)

![- 1 block (14 oz) firm tofu, pressed and drained - 1/2 cup cornstarch - 3 tablespoons vegetable oil - 1/4 cup honey - 2 tablespoons soy sauce - 4 cloves garlic, minced - 1 teaspoon fresh ginger, grated - 1 tablespoon sesame seeds, toasted - 2 green onions, sliced - Salt and pepper to taste To make crispy honey garlic tofu, you need simple ingredients that pack big flavor. Start with firm tofu. It holds its shape well and crisps up nicely. Press and drain it to get rid of excess water. This step is key for crispy tofu. Next, grab some cornstarch. It’s your secret weapon for that crunchy coating. It sticks to the tofu and gets crispy in the hot oil. Vegetable oil helps fry the tofu evenly. Use a good amount, but don’t drown the tofu. For the sauce, honey adds sweetness. Soy sauce brings saltiness, and garlic and ginger give it a warm kick. These flavors blend perfectly. You can adjust the honey and soy sauce to fit your taste. Finally, sesame seeds and sliced green onions are for garnishing. They add a nice crunch and color to your dish. This crispy honey garlic tofu is not just tasty; it's visually appealing too. For the full recipe, check out the detailed steps. - Cut the tofu into 1-inch cubes. - Toss tofu cubes in cornstarch with salt and pepper. Start by cutting your block of firm tofu into 1-inch cubes. Make sure the pieces are even for cooking. Next, take a shallow dish and add cornstarch. Sprinkle in some salt and pepper. Toss those tofu cubes in the cornstarch mixture, coating each piece well. Shake off any extra cornstarch to keep them light and crispy. - Heat vegetable oil in a skillet over medium-high. - Sauté tofu until golden brown and crispy. Now, heat 3 tablespoons of vegetable oil in a skillet over medium-high heat. Wait until the oil is hot. Carefully place the tofu cubes in the skillet in a single layer. Sauté them for about 5 to 7 minutes. Turn the pieces so they cook evenly. You want them to turn golden brown and get nice and crispy. Once done, transfer the tofu to a paper towel-lined plate to absorb excess oil. - Sauté garlic and ginger in the skillet. - Combine honey and soy sauce, allowing to thicken. In the same skillet, lower the heat to medium. Add 4 minced garlic cloves and 1 teaspoon of grated ginger. Sauté these for about 1 minute. You'll know they're ready when they smell great and turn golden. Now, pour in 1/4 cup of honey and 2 tablespoons of soy sauce. Stir well and let it cook for 2 to 3 minutes until it thickens a bit. - Coat crispy tofu in the honey garlic sauce. - Serve with garnishes. Gently place the crispy tofu back into the skillet. Toss it in the honey garlic sauce until every piece is coated. Remove from heat and sprinkle 1 tablespoon of toasted sesame seeds and 2 sliced green onions over the dish. This adds flavor and makes it look nice. For the full recipe, check the details above! - Use firm tofu for best results: Firm tofu holds its shape and crisps up nicely. - Ensure the tofu is properly pressed and drained: Pressing removes excess water. This helps the tofu absorb flavors and get crispy. - Adjust honey and soy sauce ratios to taste: You can make it sweeter or saltier by changing these amounts. - Experiment with adding red pepper flakes for heat: A little spice can really elevate the dish. Add to your liking. - Consider using an air fryer for an even crispier finish: Air frying gives a great crunch without extra oil. - Double-fry method for ultimate crunch: Fry the tofu once, let it rest, and fry again. This makes it super crispy. For more details, check the Full Recipe. {{image_4}} You can switch tofu for other proteins. Tempeh is a great choice. It has a nutty flavor and a firmer texture. Just cut it into cubes like tofu. Cook it the same way for a tasty dish. Seitan is another option. It mimics meat well and offers a chewy texture. It absorbs flavors easily. Use seitan if you're looking for a heartier bite. Want a kick? Add sriracha to the sauce. This gives a spicy twist to the sweet honey. You can also try orange juice or maple syrup. These swaps change the flavor profile. Orange adds a fresh zest, while maple syrup gives a rich taste. Both can make your dish stand out. Crispy honey garlic tofu shines when paired with sides. Steamed vegetables bring color and nutrition. A fresh salad can add crunch. You can also use this tofu in wraps or tacos. Just fill them with your favorite veggies and tofu. It makes for a fun and easy meal. For the full recipe, follow the steps and enjoy your cooking journey! You can keep crispy honey garlic tofu in the fridge. Place it in an airtight container. It will stay fresh for up to 3 days. This way, you can enjoy it later without losing flavor. To reheat your tofu, use the oven or a skillet. This keeps it crispy and tasty. Avoid using the microwave. It makes the tofu soggy, which we want to prevent. You can also freeze cooked tofu. It will last for up to 2 months in the freezer. When you want to eat it, simply thaw it out. After thawing, re-crisp it in a skillet or oven before serving. This method helps regain its crunchy texture. Typically, crispy honey garlic tofu lasts up to 3 days when stored properly. To keep it fresh, place it in an airtight container. Ensure the tofu is cool before sealing. This helps maintain its flavor and texture. Yes, you can make this recipe vegan. Simply replace honey with agave or maple syrup. Both options add sweetness without using animal products. This change keeps the dish plant-based and equally delicious! Crispy honey garlic tofu pairs well with rice, noodles, or a fresh vegetable stir-fry. You can serve it over steamed jasmine rice for a classic combo. Noodles coated in a light sauce also work great. Adding a side of colorful stir-fried veggies brings extra nutrition and flavor. Firm or extra-firm tofu works best for a crispy texture. These types hold their shape and don’t crumble. For the best results, make sure you press and drain the tofu well before cooking. This removes excess moisture, allowing for a delightful crunch. For the full recipe, check out the [Full Recipe]. In this post, we covered how to make crispy honey garlic tofu. You learned about the key ingredients, from firm tofu to the sweet and savory sauce. I shared step-by-step cooking tips and tricks for the perfect texture and flavor. Remember, you can customize the recipe with different proteins or sauces. Store leftovers correctly to enjoy this dish later. Overall, this recipe is fun, flexible, and delicious. Give it a try, and you’ll impress your friends or family!](https://joymealplan.com/wp-content/uploads/2025/07/a62a8118-0118-41a9-8dcd-10793e5e2e73-768x768.webp)