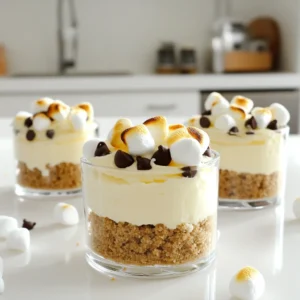
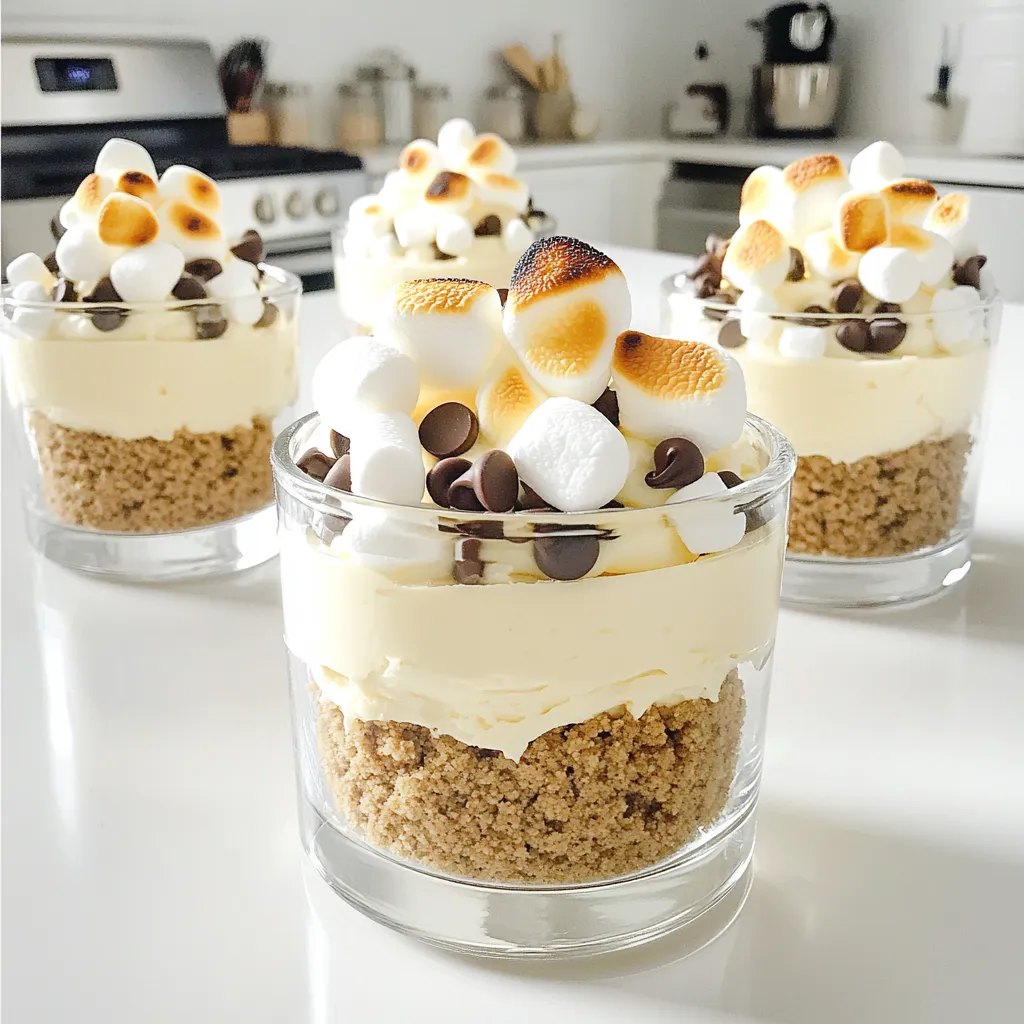
No-Bake S’mores Cheesecake Cups Sweet and Simple Treat

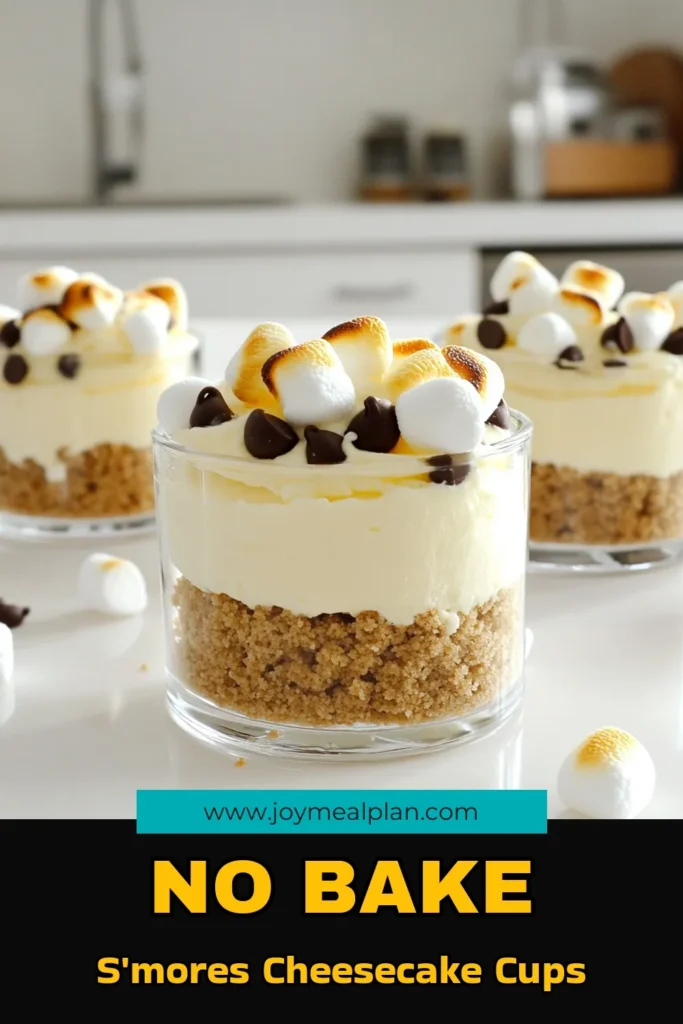
Looking for a sweet treat that’s easy to whip up? You’ll love these No-Bake S’mores Cheesecake Cups! They mix the classic taste of s’mores with creamy cheesecake, all in a fun cup. Imagine a graham cracker crust, fluffy cheesecake filling, and a sprinkle of chocolate and marshmallows. Whether you’re hosting a party or just satisfying your sweet tooth, these cups are sure to wow. Let’s dive into the simple steps to make this delicious dessert!
Ingredients
List of Ingredients
Key ingredients for the crust
– 1 cup graham cracker crumbs
– 4 tablespoons unsalted butter, melted
– 2 tablespoons granulated sugar
The crust is the base of your cheesecake cups. Use graham cracker crumbs for that classic S’mores taste. The melted butter binds the crumbs together. Sugar adds a hint of sweetness.
Components for the cheesecake filling
– 16 oz cream cheese, softened to room temperature
– ½ cup powdered sugar
– 1 teaspoon vanilla extract
– 1 cup heavy whipping cream
The cream cheese gives a rich texture. Powdered sugar sweetens the filling, while vanilla adds flavor. Heavy whipping cream makes the filling light and fluffy.
Toppings and garnish options
– 1 cup mini marshmallows
– ½ cup chocolate chips
– Additional mini marshmallows and chocolate shavings for final topping
Mini marshmallows and chocolate chips create the classic S’mores experience. Toasted mini marshmallows on top add a nice touch. Chocolate shavings make it look fancy and appealing.
Step-by-Step Instructions
Preparing the Graham Cracker Crust
1. In a bowl, combine graham cracker crumbs, melted butter, and sugar. Mix until it looks like wet sand. This step is key for a tasty crust.
2. Divide the crumb mix into 6 cups or jars. Press it down firmly with a spoon. This helps form a solid base for your cheesecake.
3. Chill the crust in the fridge for 15 minutes. This makes it firm and ready for the filling.
Making the Cheesecake Filling
1. In a large bowl, beat softened cream cheese using an electric mixer. Mix until smooth; there should be no lumps.
2. Gradually add powdered sugar and vanilla extract. Keep mixing until it is creamy and well combined.
3. In a separate bowl, pour in heavy cream. Whip it until stiff peaks form, which should take about 2 to 3 minutes. Don’t over-whip; it can get grainy.
4. Gently fold the whipped cream into the cream cheese mix. Use a spatula for this. Keep it light and airy.
5. Carefully mix in mini marshmallows and chocolate chips. Fold them in just enough to spread them evenly.
Assembling and Chilling the Cups
1. Once the crust is chilled, spoon the cheesecake mix into each cup.
2. Use a spatula to smooth the tops. A nice finish helps with presentation.
3. Return the cups to the fridge for at least 2 hours to set. This allows the flavors to meld and the texture to firm up.
Tips & Tricks
Perfecting the Cheesecake Texture
To get the best cheesecake texture, start with room temperature cream cheese. Cold cream cheese will be lumpy and hard to mix. Let it sit on the counter for about 30 minutes. This way, you will have a creamy base.
Next, be careful not to over-whip the cream. When you whip heavy cream, aim for stiff peaks. This should take about 2 to 3 minutes. If you whip too long, the cream can turn grainy and lose its lightness.
Presentation Suggestions
For a stunning presentation, consider garnishing your cheesecake cups. Top each cup with toasted marshmallows and chocolate shavings. This adds a nice touch and makes the dessert even more appealing.
You can serve the cheesecake cups on a decorative tray. Add graham crackers on the side for a complete S’mores experience at your gatherings. It creates a fun and interactive dessert for guests.
Troubleshooting Common Issues
If your whipped cream turns grainy, you can fix it. Gently fold in a bit more fresh cream to smooth it out. Remember to fold carefully to keep the airiness.
If your crust crumbles instead of holding together, try adding a bit more melted butter. This helps the crumbs stick together better. Press the mixture firmly into the cups to create a solid base.
Variations
Flavor Adaptations
You can change up the flavor of your No-Bake S’mores Cheesecake Cups easily. Try adding different extracts. For example, almond extract adds a nice twist. You can also mix in some peanut butter for a rich taste. If you want something fresh, add fruit. Sliced strawberries or bananas can make it fruity and fun.
Dietary Substitutions
Making this dessert gluten-free is simple. Just use gluten-free graham crackers for the crust. You can also swap regular cream cheese for a dairy-free option. Look for brands that are soy or nut-based. For the whipped cream, use coconut cream as a tasty dairy-free substitute. This lets everyone enjoy the treat.
Seasonal Twists
You can change the flavors for different seasons. In fall, add pumpkin spice to the cheesecake mix. For winter, consider crushed peppermint. You can also top the cups with festive candies during the holidays. This adds a fun touch for gatherings and celebrations.
Storage Info
Storing Leftovers
To keep your No-Bake S’mores Cheesecake Cups fresh, use airtight containers. This helps keep the flavors locked in. You can use plastic or glass containers. Just make sure they seal well. Store them in the fridge for up to five days.
To maintain texture, avoid layering toppings too early. Keep extra marshmallows and chocolate shavings separate. Add them just before serving. This keeps your dessert looking and tasting great.
Freezing Options
You can freeze the cheesecake cups for longer storage. To do this, cover each cup with plastic wrap. Then, place them in a freezer-safe container. They will stay fresh for up to three months.
When you’re ready to eat them, move the cups to the fridge. Allow them to thaw overnight. This method keeps the texture smooth and creamy. Avoid microwaving, as it can change the texture. Enjoy your tasty treat anytime!
FAQs
How long do No-Bake S’mores Cheesecake Cups last in the refrigerator?
These cheesecake cups stay fresh for about 3 to 5 days in the fridge. Store them in airtight containers to keep them from drying out. The flavors actually get better over time! Just remember to check for any changes in texture or smell before enjoying.
Can I use regular marshmallows instead of mini ones?
Yes, you can! Regular marshmallows will work, but the texture will change. They might be harder to mix into the filling. If you use them, chop them into smaller pieces. This way, they blend in better with the cheesecake mixture.
What can I use if I don’t have a kitchen torch for toasting marshmallows?
If you lack a kitchen torch, don’t worry! You can use your oven’s broiler. Just place the mini marshmallows on top of the cups and broil them for a few seconds. Keep a close eye; they can burn quickly! Another option is to toast them in a skillet over low heat.
You’ve learned how to make delicious No-Bake S’mores Cheesecake Cups. We covered ingredients, from the graham cracker crust to toppings. You also found tips for perfecting texture and presentation. Plus, you explored fun variations and storage options.
Now, enjoy your creamy, tasty treats. Share these cups with friends, family, or at gatherings. With endless adaptations, you’ll never run out of ideas. Get creative and make these cheesecake cups your own!