
Cheeseburger Pocket Bites Savory and Easy Recipe


Craving a tasty snack that’s fun and easy to make? Try my Cheeseburger Pocket Bites! These savory delights pack all the flavors of a classic cheeseburger into bite-sized pockets. Perfect for parties or a quick dinner, they’re sure to please everyone. In this post, I’ll guide you through simple steps, ingredient swaps, and handy tips to ensure your bites turn out perfectly. Let’s get cooking!
Why I Love This Recipe
- Quick and Easy: This recipe comes together in just 35 minutes, making it perfect for busy weeknights or last-minute gatherings.
- Customizable Filling: The beef mixture can be easily adjusted with your favorite toppings, allowing for endless flavor combinations.
- Fun to Eat: These pocket bites are handheld and perfect for serving at parties, making them a hit with both kids and adults.
- Golden and Delicious: The egg wash gives these bites a beautiful golden color that enhances their appeal, making them irresistible.
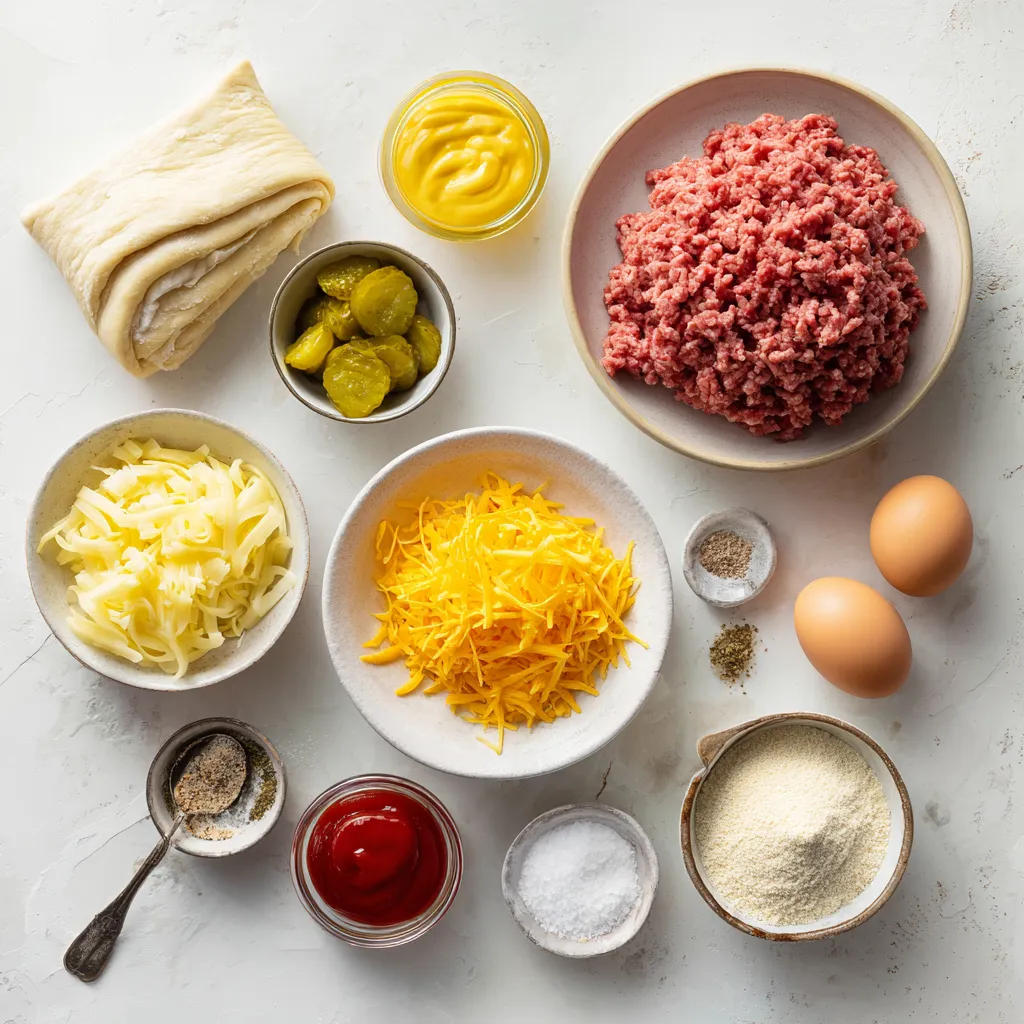
Ingredients
List of Required Ingredients
To make delicious cheeseburger pocket bites, gather these simple ingredients:
– 1 package of refrigerated crescent roll dough
– 1 pound ground beef
– 1 teaspoon onion powder
– 1 teaspoon garlic powder
– Salt and pepper to taste
– 1 cup shredded sharp cheddar cheese
– 1/4 cup dill pickles, finely diced
– 1 tablespoon yellow mustard
– 1 tablespoon ketchup
– 1 egg (for egg wash)
Suggested Ingredient Substitutions
You can swap some ingredients for different flavors. Try these options:
– Ground turkey or chicken instead of beef for a leaner option.
– Use any cheese you like, such as mozzarella or pepper jack.
– Replace dill pickles with sweet pickles for a tangy twist.
– Make it spicy by adding chopped jalapeños or hot sauce.
Cooking Equipment Needed
Having the right tools makes cooking easier. Here’s what you need:
– Large skillet for cooking the meat
– Rolling pin to flatten crescent dough
– Baking sheet lined with parchment paper
– Small bowl for the egg wash
– Knife or pizza cutter for cutting dough squares
– Mixing spoon for combining ingredients
Step-by-Step Instructions
Preparation of the Ground Beef Mixture
To start, heat a large skillet over medium heat. Add 1 pound of ground beef to the skillet. Cook the beef while stirring often. You want it to be browned and crumbly. This should take about 7 to 10 minutes. Once it’s cooked, drain the extra grease. This step stops the bites from being oily. Next, add 1 teaspoon of onion powder and 1 teaspoon of garlic powder. You can also add salt and pepper to taste. Stir everything well and let it cook for one more minute. This helps the flavors mix together. After that, remove the skillet from heat. Mix in 1 cup of shredded sharp cheddar cheese, 1/4 cup of finely diced dill pickles, 1 tablespoon of yellow mustard, and 1 tablespoon of ketchup. Let this mixture cool for a few minutes.
Assembling the Cheeseburger Pocket Bites
Now, prepare your work surface. Lightly flour it to prevent sticking. Roll out the crescent roll dough from the package. Pinch the seams together to make one big sheet. Use a sharp knife or pizza cutter to slice the dough into 4-inch squares. This will help keep the sizes even. Take a tablespoon of the cooled beef mixture and place it in the center of each dough square. Fold each corner of the square over the filling. Press the edges firmly to seal them. Make sure no filling can escape while baking.
Baking Instructions
In a small bowl, beat 1 egg until smooth. Use a brush to coat the tops of each pocket with the egg wash. This gives them a nice golden color. Next, line a baking sheet with parchment paper. Arrange the pocket bites on the sheet, making sure they have space around them. This allows them to puff up while baking. Place the baking sheet in your preheated oven at 375°F (190°C). Bake for 12 to 15 minutes until they are golden brown and puffed up. After baking, let them cool for a few minutes before serving. This keeps you from burning your mouth on the hot filling. Enjoy your delicious cheeseburger pocket bites warm with extra ketchup and mustard for dipping!
Tips & Tricks
Tips for Perfectly Cooked Bites
To make the best cheeseburger pocket bites, follow these tips:
– Use fresh ingredients. This makes a big difference in flavor.
– Don’t rush the browning. Take your time to brown the beef well. This adds depth.
– Seal the edges tightly. A good seal keeps the filling inside during baking.
– Brush with egg wash. This gives a nice golden color and shine to your bites.
Common Mistakes to Avoid
Avoid these common mistakes to ensure your bites turn out great:
– Overcooking the beef. Remove it from the heat as soon as it’s browned.
– Skipping the seasoning. Don’t forget the onion and garlic powders, salt, and pepper.
– Using too much filling. A tablespoon is enough; too much will spill out.
– Not cooling the filling. Let it cool before filling the dough; this helps with sealing.
Suggested Tools for Easier Preparation
Using the right tools makes cooking easier and more fun:
– Sharp knife or pizza cutter. This helps cut the dough easily.
– Rolling pin. To flatten the crescent roll dough smoothly.
– Large skillet. For browning the beef evenly.
– Baking sheet and parchment paper. These help prevent sticking and make cleanup easy.
Pro Tips
- Use Lean Ground Beef: Opt for lean ground beef to reduce grease. This will help keep your pocket bites from becoming too oily while baking.
- Experiment with Cheese: Feel free to mix different types of cheese like mozzarella or pepper jack for added flavor and creativity in your pocket bites.
- Chill the Filling: Allow the beef mixture to cool completely before filling the dough. This helps prevent the dough from becoming too soggy.
- Make Ahead: You can prepare the filling and assemble the pocket bites ahead of time. Just cover and refrigerate them until you’re ready to bake!

Variations
Vegetarian Option Using Meat Alternatives
You can easily make these pocket bites vegetarian. Use meat alternatives like tempeh or lentils. These options provide great flavor and texture. Cook the meat alternative just like you would the beef. Add onion powder, garlic powder, salt, and pepper for taste. Mix in cheese, pickles, mustard, and ketchup as usual. The bites will still be delicious and satisfying without meat.
Cheese Variations
Cheese is the star in cheeseburger pocket bites. While sharp cheddar is a classic choice, other cheeses can work too. Try pepper jack for a spicy kick. Mozzarella offers a gooey texture, while gouda adds a smoky flavor. Mix different cheeses for a fun twist. Just remember to keep the total cheese quantity the same.
Adding Extra Ingredients (e.g., jalapeños, onions)
Feel free to customize your pocket bites with extra ingredients. Chopped jalapeños can add heat and crunch. Finely diced onions give a nice flavor boost. You can also add cooked bacon bits for extra richness. Just keep the total filling amount balanced. This way, the pockets won’t burst while baking. Get creative, and make these bites your own!
Storage Info
How to Store Leftover Pocket Bites
To keep your leftover pocket bites fresh, place them in an airtight container. This helps prevent them from drying out. Store them in the fridge for up to three days. If you want to enjoy them later, freezing is a great option.
Reheating Instructions
When you’re ready to eat your leftovers, preheat your oven to 350°F (175°C). Place the pocket bites on a baking sheet. Heat them for about 10-15 minutes until they are warm and crispy. You can also use the microwave, but they might get a bit soft.
Freezing for Future Enjoyment
To freeze pocket bites, let them cool completely first. Then, place them in a single layer on a baking sheet. Freeze for about an hour. Once they are solid, transfer them to a freezer-safe bag. They will stay good for about three months. When you’re ready to eat, you can bake them straight from the freezer. Just add a few extra minutes to the baking time.
FAQs
Can I make cheeseburger pocket bites ahead of time?
Yes, you can make cheeseburger pocket bites ahead of time. Prepare the filling and assemble the bites. Store them in the fridge for up to 24 hours. Just remember to cover them tightly with plastic wrap to keep them fresh. When you’re ready to bake, take them out and follow the baking instructions as usual. This method saves time and helps you enjoy these tasty bites at a moment’s notice.
What dipping sauces pair well with cheeseburger pocket bites?
Cheeseburger pocket bites taste great with several dipping sauces. Here are some favorites:
– Ketchup
– Yellow mustard
– BBQ sauce
– Ranch dressing
– Hot sauce
Feel free to mix and match sauces for unique flavors. You can even create a fun dipping station for your guests with different options. It adds excitement to your meal and keeps everyone happy.
Can I use different types of cheese?
Absolutely! You can use different types of cheese in your cheeseburger pocket bites. Here are some tasty options:
– Mozzarella for a gooey texture
– Pepper jack for a spicy kick
– Swiss for a nutty flavor
– American for creamy richness
Experimenting with different cheeses can change the flavor and make it more fun. Just remember to choose cheeses that melt well for the best results.
You now have all the tools to make delicious cheeseburger pocket bites. We covered the ingredients, cooking steps, and tips to get it just right. You also learned how to add your own twist and store them for later.
Remember, these bites are fun to make and share. Don’t be afraid to try out new flavors. Enjoy your cooking and happy eatin

Cheeseburger Pocket Bites
Ingredients
- 1 package refrigerated crescent roll dough
- 1 pound ground beef
- 1 teaspoon onion powder
- 1 teaspoon garlic powder
- to taste salt and pepper
- 1 cup shredded sharp cheddar cheese
- 1 4 cup dill pickles, finely diced
- 1 tablespoon yellow mustard
- 1 tablespoon ketchup
- 1 egg for egg wash
Instructions
- Begin by preheating your oven to 375°F (190°C) to ensure it’s hot and ready for baking.
- In a large skillet set over medium heat, add the ground beef. Cook it, stirring occasionally, until it’s thoroughly browned and crumbly. Once cooked, drain any excess grease to keep the bites from being greasy.
- Season the browned beef with onion powder, garlic powder, salt, and pepper. Stir well to combine and allow it to cook for an additional minute to meld the flavors together.
- Remove the skillet from the heat and carefully mix in the shredded sharp cheddar cheese, diced pickles, yellow mustard, and ketchup. Let this savory beef mixture cool for a few minutes.
- On a clean, lightly floured surface, roll out the crescent roll dough. Pinch the seams together to create a single, cohesive sheet. Use a sharp knife or pizza cutter to slice the dough into squares, about 4 inches by 4 inches, ensuring even sizes for uniformity.
- Take a tablespoon of the cooled beef mixture and place it in the center of each square of dough.
- Fold each corner of the dough square over the filling, creating a sealed pocket. Press the edges firmly together, ensuring no filling escapes during baking.
- In a small bowl, beat the egg until smooth. Using a brush, generously coat the tops of each pocket with the egg wash to achieve a beautiful golden color when baked.
- Line a baking sheet with parchment paper and arrange the prepared pocket bites on it, spaced evenly apart to allow for expansion while baking.
- Place the baking sheet in the preheated oven and bake for 12 to 15 minutes, or until the pocket bites are puffed up and golden brown.
- Once baked, remove the pocket bites from the oven and let them cool for a few minutes before serving to avoid burning your mouth on the hot filling.


![To make tasty honey garlic meatballs, you need: - 1 pound ground beef (or a blend of beef and pork for extra flavor) - 1/2 cup fresh breadcrumbs (homemade or store-bought) - 1/4 cup grated Parmesan cheese (for richness) - 1 large egg (to bind the mixture) - 2 cloves garlic, finely minced (for depth) - 1 tablespoon fresh ginger, finely minced (adds warmth) - 1/4 cup chopped green onions (for freshness) - Salt and black pepper to taste These main ingredients create a rich and flavorful base for the meatballs. The garlic and ginger add a nice zing, while the egg helps hold everything together. The honey garlic sauce is where the magic happens. You’ll need: - 1/2 cup honey (natural sweetness) - 1/4 cup soy sauce (for savory flavor) - 1 tablespoon rice vinegar (adds tang) - 1 teaspoon sesame oil (for nuttiness) - 1 teaspoon cornstarch mixed with 1 tablespoon water (to thicken the sauce) This sauce blends sweet and savory flavors. The honey pairs well with soy sauce, creating a perfect glaze for the meatballs. Feel free to customize your meatballs! Here are some ideas: - Use ground turkey instead of beef for a lighter option. - Add chopped herbs like parsley or cilantro for extra freshness. - Swap in breadcrumbs for crushed crackers if you want a different texture. - For a spicy kick, mix in some red pepper flakes. These tweaks can help you make the recipe your own. Enjoy experimenting with flavors! For the complete recipe, check out the Full Recipe link. To make tasty meatballs, start by gathering your ingredients. In a big bowl, combine: - 1 pound ground beef (or beef and pork mix) - 1/2 cup fresh breadcrumbs - 1/4 cup grated Parmesan cheese - 1 large egg - 2 cloves garlic, finely minced - 1 tablespoon fresh ginger, finely minced - 1/4 cup chopped green onions - Salt and black pepper to taste Use your hands or a spatula to mix these well. Be gentle! Overmixing will make the meatballs tough. You want them soft and tender. Now, it’s time to bake. Preheat your oven to 400°F (200°C). This step helps the meatballs cook evenly. Line a baking sheet with parchment paper. This keeps them from sticking and makes cleaning easy. Next, use clean hands to scoop out the meat mixture. Roll it into small balls, about 1 inch wide. Place them on the baking sheet, leaving space between each one. Bake for 15 to 20 minutes. You’ll know they’re done when they turn golden brown and reach an internal temperature of 165°F. While the meatballs bake, prepare the delicious sauce. In a small saucepan, mix: - 1/2 cup honey - 1/4 cup soy sauce - 1 tablespoon rice vinegar - 1 teaspoon sesame oil Heat this mix over medium heat. Stir it gently until it simmers. In a small bowl, mix 1 teaspoon cornstarch with 1 tablespoon water. Stir this into the sauce to thicken it. Cook for 2-3 more minutes until the sauce is shiny and thick. Once the meatballs are ready, take them out of the oven. Place them in a serving dish. Drizzle the warm honey garlic sauce over them. Garnish with extra chopped green onions for a fresh look. Enjoy every bite! For the full recipe, check out the details above. To make tender meatballs, start by mixing the meat gently. Overmixing makes them tough. Add breadcrumbs and egg for moisture. Let the mixture rest for a few minutes before shaping. This helps flavors blend well. Use clean hands to form the meatballs. Aim for about one inch in size for even cooking. For a rich honey garlic sauce, combine honey and soy sauce in a small pan. Heat it slowly to keep the honey from burning. Adding rice vinegar brings a nice tang. Finally, mix cornstarch with a bit of water to thicken it. Stir this mixture into the sauce until it coats the back of a spoon. This step is key for a glossy finish. These honey garlic meatballs shine on their own. Serve them on a platter with toothpicks. Pair them with rice or noodles for a full meal. Fresh veggies, like steamed broccoli or a crisp salad, add color and crunch. For added flair, drizzle extra sauce over the meatballs and sprinkle sesame seeds. This makes for a lovely presentation. Check the [Full Recipe] for more details! {{image_4}} You can use many meats for honey garlic meatballs. Ground beef is classic, but ground pork adds great flavor. You can even mix beef and pork for a tasty twist. Ground turkey is a leaner choice. It still pairs well with honey garlic sauce. Chicken also works great if you prefer a lighter meat. The key is to choose a meat you love. If you want a meat-free option, try using plant-based ground meat. There are many brands available today. You can also make meatballs with lentils or chickpeas. Just mash them up and mix in the same ingredients. For a fun twist, use quinoa or rice as a base. They both add texture and make the dish hearty. You can add fun flavors to your meatballs. Try mixing in some grated carrots or chopped bell peppers for a veggie boost. Fresh herbs, like cilantro or basil, can give a fresh kick. If you like heat, add red pepper flakes or sriracha to the mix. For an Asian twist, toss in some chopped water chestnuts or sesame seeds. These add crunch and make your meatballs stand out. You can find the full recipe to try these variations. After enjoying your honey garlic meatballs, let them cool down. Place them in an airtight container. They will stay fresh in the fridge for about 3 to 4 days. Make sure to separate layers with parchment paper to avoid sticking. To reheat, use the oven for best results. Preheat it to 350°F (175°C). Place the meatballs on a baking sheet. Heat them for about 10 to 15 minutes. This keeps them juicy and warm. You can also use the microwave, but they might get soggy. If you do use the microwave, cover them with a damp paper towel to keep moisture in. For long-term storage, you can freeze the meatballs. First, let them cool completely. Then, place them on a baking sheet in a single layer. Freeze them for a couple of hours until firm. Once frozen, transfer them to a freezer bag. They can last up to 3 months. When ready to eat, thaw them in the fridge overnight before reheating. These steps will help you enjoy your honey garlic meatballs anytime! Check out the Full Recipe for more cooking tips. Yes, you can use ground turkey instead of beef. Ground turkey makes a lighter meatball. It has less fat, so you may want to add a bit more cheese or breadcrumbs. This keeps the meatballs moist and tasty. The flavor will change slightly, but they will still taste great. To check if your meatballs are done, use a meat thermometer. They need to reach 165°F inside. You can also cut one in half. The inside should be no longer pink. Look for a nice golden brown color on the outside. These signs show that your meatballs are safe to eat. Honey garlic meatballs pair well with many sides. Here are some ideas: - Steamed rice - Roasted vegetables - Noodles - Salad - Mashed potatoes These sides balance the sweet and savory flavors. You can mix and match for a fun meal. For more ideas, check out the Full Recipe for serving suggestions. Honey garlic meatballs are simple and tasty. We covered the main ingredients and how to mix them. You learned step-by-step instructions for baking and making the sauce. I shared tips for tender meatballs and perfect sauce. You can also explore meat options and vegetarian choices. Don’t forget about storing leftovers and reheating them. Try the variations for a new twist. Enjoy cooking, and have fun sharing these delightful bites with friends and family!](https://joymealplan.com/wp-content/uploads/2025/05/91b0df71-a0c5-411f-83a7-9789c0a24c3c-768x768.webp)
![To make spicy sautéed okra, gather these fresh and flavorful ingredients: - 1 pound fresh okra, trimmed and sliced into 1/2 inch rounds - 1 red bell pepper, diced - 1 green bell pepper, diced - 1 medium onion, thinly sliced - 3 cloves garlic, minced - 1 teaspoon ground cumin - 1 teaspoon smoked paprika - 1/2 teaspoon cayenne pepper (adjust according to heat preference) - 3 tablespoons olive oil - Salt and freshly cracked black pepper to taste - Fresh cilantro, coarsely chopped (for garnish) This handy recipe combines simple steps for a delicious side dish. The tools you need are: - Large skillet - Cutting board - Chef's knife - Wooden spoon or spatula Now that you have your ingredients and tools ready, let's get cooking! 1. Heat the Oil Start by pouring 3 tablespoons of olive oil into a large skillet. Turn the heat to medium-high. Wait until the oil shimmers. This helps to get the okra nice and crispy. 2. Sauté the Okra Add 1 pound of sliced okra to the hot skillet. Sauté it for about 5 to 7 minutes. Keep stirring occasionally. You want the okra to brown slightly. This step is key to reducing its sliminess. 3. Add the Peppers and Onions When the okra turns light golden, push it to one side of the skillet. On the other side, add 1 sliced onion, 1 diced red bell pepper, and 1 diced green bell pepper. Cook these for about 4 to 5 minutes. You want the onions to become soft and clear. 4. Mix in Garlic Now, stir in 3 cloves of minced garlic. Cook for just 1 minute. It should smell really good, and the garlic will soften quickly. 5. Add Spices Sprinkle 1 teaspoon of ground cumin, 1 teaspoon of smoked paprika, and 1/2 teaspoon of cayenne pepper over the veggies. Add salt and black pepper to taste. Toss everything together. Let it cook for another 2 to 3 minutes. This helps the spices blend well and boosts the flavor. 6. Garnish and Serve Take the skillet off the heat. Add a handful of chopped cilantro on top. This adds a fresh touch. - Heating oil: 1-2 minutes - Sautéing okra: 5-7 minutes - Cooking veggies: 4-5 minutes - Cooking garlic: 1 minute - Mixing in spices: 2-3 minutes - Total: About 20 minutes from start to finish. - Freshness Matters: Use fresh okra for the best texture. - High Heat: Sauté on medium-high heat. This helps to reduce moisture. - Browning: Make sure the okra browns slightly. This change in color cuts down on sliminess. - Less Water: Do not wash the okra right before cooking. The moisture can make it slimy. You can find the full recipe for this dish above. Enjoy your cooking! - Best Heat Settings: Use medium-high heat. This helps the okra cook fast while getting nice and brown. Too low, and it may become slimy. Too high, and it might burn. - Stirring and Timing Recommendations: Stir the okra every couple of minutes. This helps it cook evenly. After adding the other veggies, let them sit for a minute before stirring. This gives them time to soften. - How to Increase or Decrease Heat: To add more spice, increase the cayenne pepper. A little can go a long way! If you want less heat, start with just a pinch. You can always add more later. - Alternative Spices to Use: If you want to change the flavor, try using chili powder or even curry powder. Both add a nice kick and different taste. Use what you love! Check the full recipe for more ideas. {{image_4}} Alternative Vegetables to Add You can mix in other veggies for more flavor. Try adding sliced zucchini or diced tomatoes. These veggies pair well with okra. You can also use corn for a sweet crunch. Spinach adds a nice green touch and cooks quickly. Vegan and Vegetarian Options This dish is vegan-friendly already. If you want a heartier meal, add chickpeas or black beans. These options increase protein and make your dish more filling. You can also serve it over quinoa or brown rice for extra fiber. Adding Proteins To make this dish more filling, add cooked shrimp or chicken. They cook fast and blend well with the spices. For a vegetarian option, try adding tofu. Make sure to press and cube it first. This keeps the tofu firm and tasty. Different Spice Blends Feel free to get creative with your spices. Instead of cumin, try curry powder for a different kick. Or, add smoked chili powder for a deeper flavor. Adjust the cayenne pepper to match your spice level. You can always start small and add more later. For the full recipe, check out the [Full Recipe]. After making spicy sautéed okra, store leftovers in an airtight container. This keeps the dish fresh. Place the container in the fridge. Leftovers stay good for about three to four days. To freeze, let the okra cool first. Then, transfer it to a freezer-safe bag. Remove as much air as you can from the bag. Label it with the date. Frozen okra lasts up to three months. When you're ready to eat, thaw the okra in the fridge overnight. You can also use the microwave for quicker thawing. Once thawed, reheat in a skillet on medium heat. Stir well to warm it up evenly. This way, you can enjoy the spicy sautéed okra again! You can serve spicy sautéed okra with many dishes. It pairs well with rice, especially fluffy jasmine rice. You can also enjoy it with quinoa for a healthy twist. This dish adds color and taste to any meal. Try it with grilled chicken or fish for a complete plate. The flavors blend nicely and make a great combo. Yes, you can use frozen okra. Just remember to thaw it first. Frozen okra can be softer than fresh but still works well in this dish. Drain excess water to avoid extra sliminess. Sauté it in a hot pan to keep it crispy. The taste will be good, and it saves time. Spicy sautéed okra is very healthy. It is low in calories and high in fiber. Okra is full of vitamins like A and C. Using olive oil adds healthy fats. The spices can boost metabolism too. This dish is a great way to enjoy vegetables and keep meals nutritious. You can find the full recipe for this tasty side dish in the earlier sections. This blog post covered everything you need to make spicy sautéed okra. You learned about the ingredients, preparation steps, and useful cooking tips. I also shared variations to suit your taste and storage info for leftovers. Cooking can be easy and fun when you know the basics. Don’t hesitate to experiment with flavors. With this guide, you can cook a fantastic dish every time. Enjoy your cooking journey!](https://joymealplan.com/wp-content/uploads/2025/07/3f11e5a2-627f-4419-8fdc-b0710d28cd51-768x768.webp)