Keto Chicken Skewers with Garlic and Parmesan Delight


Are you ready to elevate your meal game? My Keto Chicken Skewers with Garlic and Parmesan Delight are perfect for lunch or dinner. Packed with flavor and easy to make, these skewers bring joy to every bite. In this post, I’ll share simple steps, tips, and variations to help you nail this dish. Let’s dive in and get cooking some delicious skewers together!
Why I Love This Recipe
- Delicious Flavor Combination: The garlic and Parmesan create a rich and savory taste that elevates the simple chicken to a gourmet level.
- Keto-Friendly: This recipe is perfect for those following a ketogenic diet, as it is low in carbs and high in healthy fats.
- Easy to Prepare: With minimal prep time and straightforward cooking instructions, these skewers are great for both beginners and experienced cooks.
- Perfect for Grilling: Ideal for summer barbecues or quick weeknight dinners, these skewers can be cooked on the grill or grill pan for added smokiness.
Ingredients
List of Ingredients
– 1 lb chicken breast, cut into 1-inch cubes
– 4 tablespoons extra virgin olive oil
– 4 cloves garlic, finely minced
– 1/2 cup freshly grated Parmesan cheese
– 1 teaspoon Italian seasoning blend
– Sea salt and freshly cracked black pepper, to taste
– Skewers (if using wooden skewers, soak them in water for 30 minutes)
– Fresh parsley, chopped (for garnish)
Optional Ingredients
When it comes to Parmesan cheese, fresh is best. Look for cheese with a hard texture and a strong smell. This type has rich flavor and melts perfectly. If you can’t find fresh cheese, pre-grated can work, but it may lack depth.
For Italian seasoning, you can mix your own herbs. Try equal parts dried basil, oregano, and thyme. This blend gives a great flavor. You can even add a pinch of red pepper flakes for some heat!

Step-by-Step Instructions
Marinating the Chicken
1. Whisking the marinade
Start by taking a large mixing bowl. Add 4 tablespoons of extra virgin olive oil. Next, add 4 finely minced cloves of garlic. Then, add 1/2 cup of freshly grated Parmesan cheese. Mix in 1 teaspoon of Italian seasoning blend, sea salt, and black pepper. Whisk everything together until it is well combined.
2. Coating the chicken evenly
Take 1 pound of chicken breast that is cut into 1-inch cubes. Place the chicken cubes into the marinade. Use a spatula or your hands to make sure every piece is coated. You want each cube to soak up all that flavor. Cover the bowl tightly with plastic wrap. Let it sit in the fridge for at least 30 minutes. For a stronger taste, let it marinate for up to 2 hours.
Preparing the Grill
1. Preheating techniques for optimal grilling
While the chicken marinates, it’s time to get your grill ready. Turn on your grill or grill pan and set it to medium-high heat. Let it heat up for about 10-15 minutes. You want it hot enough to sear the chicken.
2. Choosing the right grill type (outdoor vs. indoor)
If you have an outdoor grill, that’s great! You can enjoy the smoky flavor. If not, an indoor grill pan works just as well. Both options give tasty results.
Cooking the Skewers
1. Skewering the chicken pieces
After marinating, take your skewers. If you use wooden skewers, soak them in water for 30 minutes first. Thread the chicken cubes onto the skewers. Leave a little space between each piece. This helps them cook evenly.
2. Grilling times and temperature checks
Place the skewers on the preheated grill. Cook them for about 5-7 minutes on each side. Look for a nice golden char and grill marks. The chicken should be fully cooked. When it’s done, remove the skewers and let them rest for a few minutes. This keeps the chicken juicy.
Tips & Tricks
Perfecting the Marinade
For the best flavor, I suggest marinating the chicken for at least 30 minutes. However, if you have time, go for 2 hours. This longer time really brings out the taste. You can also add spices to the marinade for a twist. Try smoked paprika or a pinch of red pepper flakes for extra flavor.
Achieving the Best Grilling Results
To keep your chicken juicy, avoid overcooking it. Grill the skewers for about 5-7 minutes on each side. Check for doneness by cutting into a piece. The chicken should be white inside, with no pink. If you have a thermometer, aim for 165°F. If not, just cut and check!
Serving Suggestions
Pair your keto chicken skewers with fresh, crunchy sides. Cucumber slices or a simple salad work great. To impress guests, arrange the skewers on a platter. Drizzle leftover marinade on top for added flavor. Add a sprinkle of fresh parsley for color and a nice touch.
Pro Tips
- Marinate for Maximum Flavor: Allow the chicken to marinate for at least 30 minutes, but for an even bolder flavor, marinate for up to 2 hours.
- Soak Wooden Skewers: If using wooden skewers, soak them in water for 30 minutes before grilling to prevent burning on the grill.
- Check for Doneness: Ensure the chicken is fully cooked by checking that it reaches an internal temperature of 165°F (75°C) for safety.
- Rest Before Serving: Let the skewers rest for a few minutes after grilling to allow the juices to redistribute, resulting in juicier chicken.

Variations
Ingredient Swaps
You can change the protein in this recipe easily. Shrimp works well for a quick cook. Beef adds a rich flavor and texture, too. Just remember to adjust cooking times.
For a vegan twist, use tofu or tempeh. These options soak up the marinade nicely. You can also try seitan for a meat-like taste.
Flavor Enhancements
Want to spice it up? Add cayenne pepper or chili flakes to your marinade. This brings a nice heat to the dish. Start with a pinch and taste as you go.
You can also add colorful veggies to your skewers. Bell peppers, cherry tomatoes, or zucchini are great choices. They add crunch and extra nutrition. Just cut them into similar sizes for even cooking.
Storage Info
Storing Leftovers
To store your leftover keto chicken skewers, first let them cool completely. Place the skewers in an airtight container. You can keep them in the fridge for up to three days. For longer storage, consider freezing them. Wrap the skewers tightly in plastic wrap, then place them in a freezer-safe bag. They will stay fresh for up to three months.
Reheating
When it’s time to enjoy your leftovers, reheating is key. You want them to be warm but not overcooked. The best way to reheat is in the oven. Preheat your oven to 350°F (175°C). Place the skewers on a baking sheet and cover them with foil. Heat for about 10-15 minutes or until warmed through. This method keeps them juicy and avoids drying out. You can also reheat them in a microwave, but be careful. Use a lower power setting and heat in short bursts to keep them moist.
FAQs
How long should I marinate the chicken?
Marinating chicken is key for flavor. I recommend marinating for at least 30 minutes. This time allows the chicken to soak up the garlic and Parmesan taste. If you have more time, let it sit for up to 2 hours. This longer marination gives a stronger flavor. Just remember, don’t marinate too long, as the acid can change the chicken’s texture.
Can I use wooden skewers without soaking?
You should soak wooden skewers before using them. Soaking helps prevent the skewers from burning on the grill. If you skip this step, the skewers may catch fire and ruin your meal. Soak them in water for 30 minutes. This simple step makes a big difference when cooking.
How do I know when the chicken is done cooking?
Look for a few signs to know when your chicken is done. First, the chicken should have a nice golden brown color. Check that it has clear juices running out. If the juices are pink, give it more time. The best way is to use a meat thermometer. The chicken needs to reach 165°F (75°C) to be safe to eat.
Is this recipe suitable for meal prep?
Yes, this recipe is great for meal prep! You can marinate the chicken ahead of time and store it in the fridge. Cooked skewers can also be kept in the fridge for up to 4 days. Just make sure to store them in an airtight container. When you’re ready to eat, you can quickly reheat them. This makes for a tasty and easy meal any day!
This blog post explored a delicious recipe for Keto Chicken Skewers. We covered essential ingredients like chicken, garlic, and Parmesan. Marinating tips and grilling techniques were discussed to ensure juicy chicken. Variations included swaps for proteins and flavors. Lastly, we shared storage tips for leftovers.
In conclusion, these skewers are a tasty and flexible meal option. With a few tweaks, you can make them your own. Enjoy grilling and impressing your guest
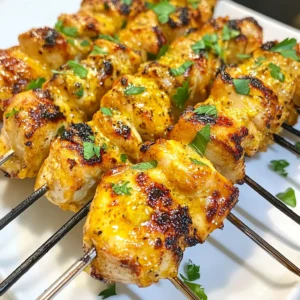
Keto Chicken Skewers with Garlic and Parmesan
Ingredients
- 1 lb chicken breast, cut into 1-inch cubes
- 4 tablespoons extra virgin olive oil
- 4 cloves garlic, finely minced
- 0.5 cup freshly grated Parmesan cheese
- 1 teaspoon Italian seasoning blend
- to taste sea salt and freshly cracked black pepper
- as needed skewers (if using wooden skewers, soak them in water for 30 minutes)
- for garnish fresh parsley, chopped
Instructions
- In a spacious mixing bowl, whisk together the olive oil, minced garlic, grated Parmesan cheese, Italian seasoning, sea salt, and black pepper until a cohesive marinade forms.
- Add the cubed chicken pieces into the marinade, using a spatula or your hands to ensure each cube is thoroughly coated with the flavorful mixture.
- Cover the bowl tightly with plastic wrap and allow the chicken to marinate in the refrigerator for at least 30 minutes to enhance the flavor (you can marinate for up to 2 hours for an even bolder taste).
- While the chicken marinates, preheat your grill or grill pan over medium-high heat until hot and ready for grilling.
- After marinating, thread the chicken cubes onto the skewers, ensuring a small gap between each piece to allow even cooking.
- Carefully place the skewers on the preheated grill, cooking them for approximately 5-7 minutes on each side. Look for the chicken to be fully cooked with a nice golden char and grill marks.
- Once the chicken skewers are cooked through and juicy, remove them from the grill and let them rest on a plate for a few minutes. This helps retain their moisture.
- Before serving, sprinkle the skewers with fresh parsley for a pop of color and added freshness.
. In this blog post, we explored how to make delicious garlic butter steak bites. We discussed the key ingredients, from sirloin steak to fresh herbs. You learned step-by-step cooking tips for perfect doneness. We also covered variations, presentation ideas, and storage methods for leftovers. By following these tips, you can create a tasty dish your friends and family will love. With a little practice, you can master this recipe and impress everyone at your next meal.](https://joymealplan.com/wp-content/uploads/2025/06/dbdd8f16-fd7f-4bf6-8b38-aa3e7b5cdfe5-768x768.webp)
![For this crispy air fryer chicken wings recipe, you'll need: - 2 pounds of chicken wings The key to great flavor comes from these seasoning ingredients: - 1 tablespoon baking powder - 1 teaspoon garlic powder - 1 teaspoon onion powder - 1 teaspoon smoked paprika - 1 teaspoon salt - ½ teaspoon black pepper - ½ teaspoon cayenne pepper (adjust to your spice preference) - 1 tablespoon olive oil These spices create a delicious mix. The baking powder helps the skin get crispy. The garlic and onion powders add nice depth. The smoked paprika brings warmth and color. Salt and pepper enhance all the flavors. If you like heat, add more cayenne! To make your wings even more appealing, consider this optional garnish: - Fresh herbs (such as parsley or cilantro) Fresh herbs add color and a burst of freshness. You can sprinkle them on top right before serving. This small touch makes a big difference in presentation. For the full recipe, check out the entire article! Start with fresh chicken wings. You need about 2 pounds for this recipe. Pat them dry with paper towels. This step helps remove moisture. Less moisture means crispier skin. Make sure to get every wing dry. In a large bowl, mix your seasonings. Use 1 tablespoon of baking powder. Add 1 teaspoon each of garlic powder, onion powder, and smoked paprika. Toss in 1 teaspoon of salt, ½ teaspoon of black pepper, and ½ teaspoon of cayenne pepper. Mix well. This blend gives the wings great flavor. Next, place the chicken wings in the bowl with the seasoning. Drizzle 1 tablespoon of olive oil over them. Toss everything together. Make sure each wing is coated well. Preheat your air fryer to 390°F (200°C) for about 5 minutes. Once it's hot, arrange the wings in a single layer in the basket. If your air fryer is small, cook them in batches. Cook the wings for 25-30 minutes. Halfway through, shake the basket gently. This helps them cook evenly and get crispy. For extra crispiness, raise the temperature to 400°F (204°C) for the last 5 minutes. When done, the wings should be golden brown and crispy. Carefully take them out and let them rest for a few minutes. Enjoy your crispy air fryer chicken wings right away! For the full recipe, check the earlier sections. To make your wings extra crispy, ensure they are very dry before cooking. Pat them dry with paper towels to remove moisture. Adding baking powder helps create a crunchy texture. It raises the pH of the skin, allowing it to brown better. For even more crispiness, increase the air fryer temperature to 400°F for the last five minutes. Cooking time can change based on wing size and air fryer model. For small wings, 25 minutes should be enough. Larger wings may need 30 to 35 minutes. Always check for doneness. The internal temperature should reach 165°F for safe eating. You can adjust cooking times slightly for your personal preference on crispiness. Avoid overcrowding the air fryer basket. This helps air circulate around each wing, ensuring even cooking. If you have many wings, cook them in batches. Shaking the basket halfway through cooking promotes even browning. Always preheat your air fryer for better results. Following these steps will help you get the best crispy wings. For the [Full Recipe], refer to the earlier section. {{image_4}} If you love heat, try making spicy Buffalo wings. Start with the base recipe. Before seasoning, toss the wings in hot sauce. You can use your favorite brand. After cooking, toss the wings in more hot sauce for an extra kick. Serve with blue cheese or ranch dressing. This adds a cool contrast to the spice. For a unique twist, go Asian-inspired. Mix soy sauce, ginger, and garlic into the seasoning. Instead of cayenne, use five-spice powder. This will give your wings a sweet and savory taste. After frying, drizzle with sesame oil and sprinkle sesame seeds. This adds a nice crunch and flavor pop. If you prefer fresh flavors, try this herb and lemon zest infusion. Add fresh herbs like thyme or rosemary to the seasoning mix. Zest one lemon and mix it in for brightness. This will make the wings taste light and refreshing. Serve with a lemon wedge for extra zing. These variations make it easy to switch things up. Enjoy your crispy air fryer chicken wings with these fun flavors! For the complete recipe, check out the Full Recipe section above. You can store leftover crispy air fryer chicken wings in the fridge. Place them in an airtight container. They will stay fresh for up to three days. To keep them crispy, avoid stacking them too high. To reheat, use your air fryer. Set it to 350°F (175°C). Heat the wings for about 5-7 minutes. This method will help retain their crispiness. You can also use a microwave, but they may lose some crunch. You can freeze the wings if you have extra. Place them in a freezer-safe bag or container. They can last for up to three months in the freezer. To thaw, move them to the fridge overnight. Reheat them in the air fryer when ready to enjoy again. For the full recipe, check out the section above! To make air fryer chicken wings extra crispy, start by drying them well. Pat them with paper towels to remove moisture. Next, use baking powder in your seasoning mix. This ingredient helps create that crunchy skin. Air fry them at a high temperature, and remember to shake the basket halfway through. For even more crispiness, raise the temperature in the last few minutes. The best temperature for cooking chicken wings in an air fryer is 390°F (200°C). This heat cooks the wings evenly and helps them become crispy. If you want them super crispy, boost the temperature to 400°F (204°C) for the final few minutes. This method ensures delicious, golden brown wings every time. Yes, you can cook frozen chicken wings in the air fryer. It’s easy and a real time-saver. Just add a few extra minutes to the cooking time. Start by cooking them at 400°F (204°C) for about 30-35 minutes. Shake the basket halfway to ensure even cooking. This method gives you crispy wings straight from the freezer! For the full recipe, check out the previous section. In this blog post, we covered how to make tasty air fryer chicken wings. We discussed ingredients, seasoning, and cooking steps. I shared tips to make your wings extra crispy and how to store them. You can even try different flavors like buffalo or Asian-inspired wings. To wrap up, air frying is a fun, easy way to enjoy wings. Now, get cooking and enjoy your delicious wings!](https://joymealplan.com/wp-content/uploads/2025/06/f7d8b647-e810-4c45-9fe8-50cd60d2e295-768x768.webp)