
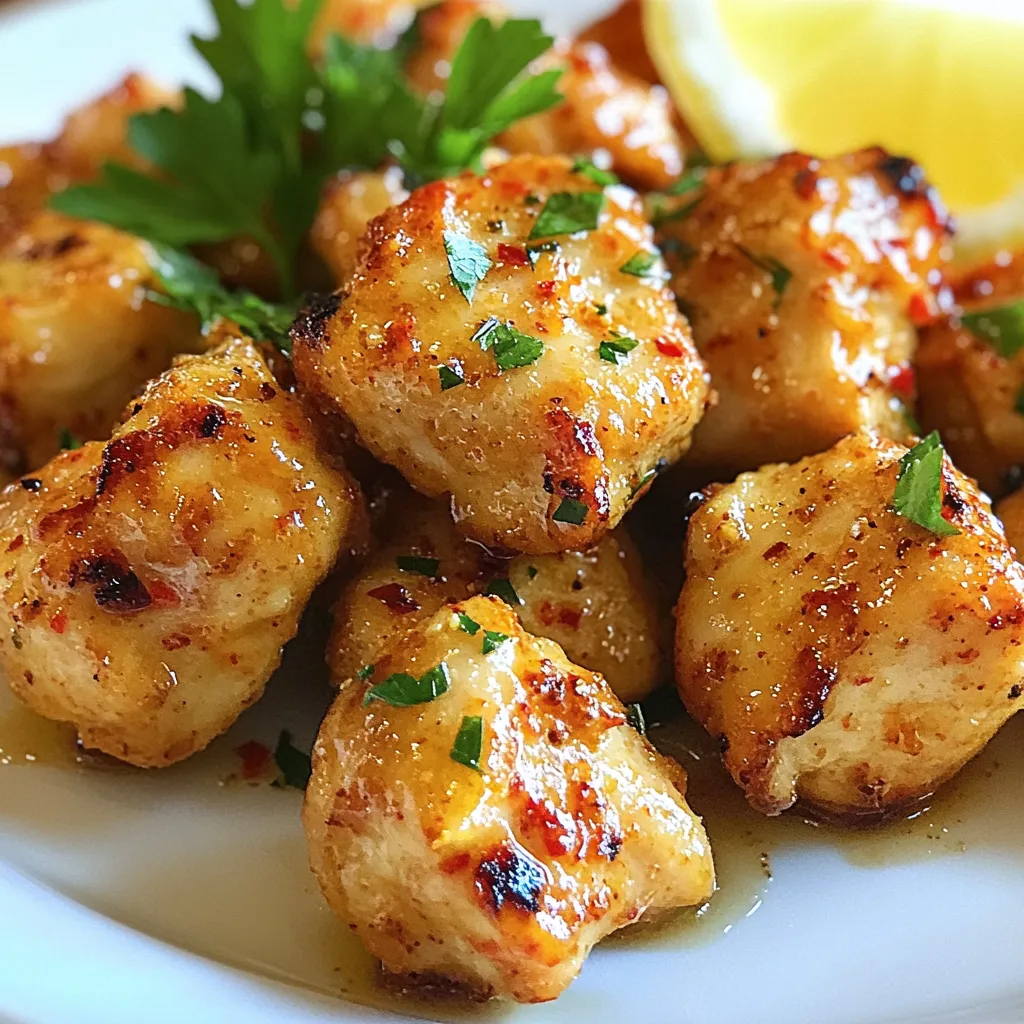
Garlic Butter Chicken Bites Savory and Simple Dish


Are you ready to whip up a quick and tasty dish? Garlic Butter Chicken Bites is a savory recipe that requires just a few ingredients. With tender chicken cooked in rich garlic butter, this dish is pure comfort food. You’ll love how simple it is to prepare and how amazing it tastes. Let’s get started on making a meal that will impress your family and friends!
Why I Love This Recipe
- Quick and Easy: This recipe comes together in just 20 minutes, making it perfect for busy weeknights.
- Flavorful Garlic Butter: The combination of garlic and butter creates a rich, savory flavor that elevates the chicken bites.
- Versatile Dish: These chicken bites can be served as an appetizer, over rice, or alongside vegetables for a complete meal.
- Kid-Friendly: With a mild flavor profile, these chicken bites are sure to please even the pickiest eaters at the table.
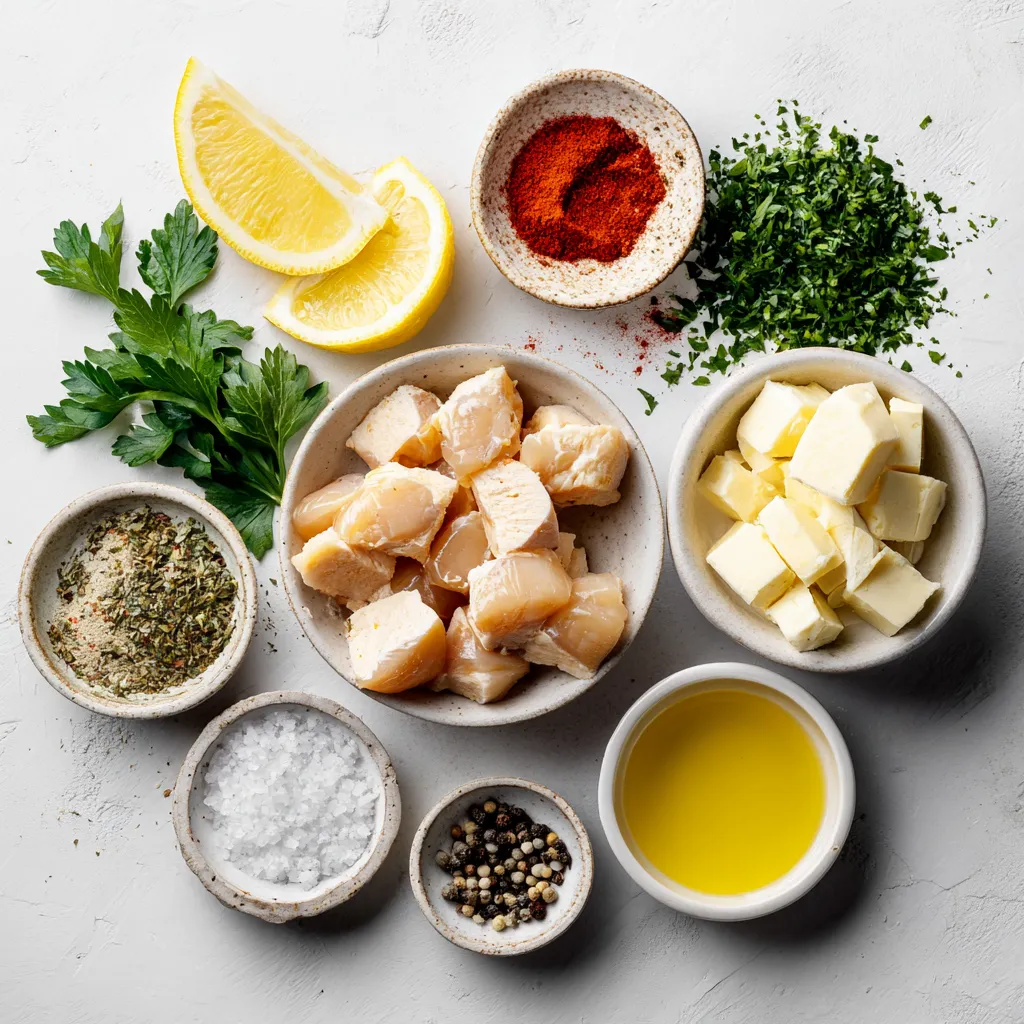
Ingredients
Main Ingredients
– 1 pound boneless, skinless chicken breasts, cut into bite-sized pieces
– 4 tablespoons unsalted butter
– 5 cloves garlic, finely minced
Seasonings and Garnish
– 1 teaspoon smoked paprika
– 1 teaspoon Italian seasoning blend
– Salt and freshly ground black pepper, to taste
– 2 tablespoons fresh parsley, finely chopped (for garnish)
– Juice of 1 medium lemon
Suggested Serving Size
This recipe makes enough for four servings. Each serving is about one cup of chicken bites. To make meal prep easy, divide the chicken into four equal portions. You can also adjust the size based on your needs. Serve these bites as an appetizer or a main dish alongside rice or veggies. Enjoy the flavor with friends or family!
Step-by-Step Instructions
Preparation Steps
Start by heating a large skillet on medium-high heat. Add four tablespoons of unsalted butter. Let the butter melt until it foams. Be careful not to let it brown.
Cooking the Chicken
Once the butter is foamy, add five cloves of finely minced garlic. Sauté the garlic for about 30 seconds. Stir it to avoid burning. When the garlic smells great, add one pound of bite-sized chicken pieces. Season with one teaspoon of smoked paprika, one teaspoon of Italian seasoning, salt, and freshly ground black pepper. Stir well to coat all the chicken pieces with the garlic and spices. Cook the chicken for 8 to 10 minutes. Stir occasionally until it turns golden brown. Use a meat thermometer to check the chicken. It should reach at least 165°F (75°C).
Finishing Touches
After the chicken is cooked, squeeze the juice of one medium lemon over the chicken bites. Stir the mixture to combine. Let it sit for one more minute. Remove the skillet from heat. Garnish the chicken with two tablespoons of finely chopped fresh parsley. This adds a nice color and flavor boost.
Tips & Tricks
Perfecting the Chicken
To make your chicken golden and fully cooked, start with a hot skillet. Heat it over medium-high heat. Add butter, and let it melt until it foams. This step is key. Once the butter is ready, quickly add minced garlic. Stir it for about 30 seconds until it smells great. Then, add the chicken pieces. Make sure they are all coated in spices. Stir them often. Cook until they are golden brown. Use a meat thermometer to check the chicken. It should reach 165°F (75°C) for safety.
Flavor Enhancements
You can boost the flavors of your chicken bites with more spices. Consider adding chili powder for heat. It adds a nice kick. You could also sprinkle in some onion powder for depth. Fresh herbs like thyme or oregano can bring freshness. Feel free to experiment! Every change can create a new taste. Just remember to balance strong flavors with the garlic butter base.
Presentation Suggestions
Serving your chicken bites well makes a difference. Use a pretty platter to show them off. Drizzle the leftover garlic butter from the skillet over the top for shine. This adds flavor too! For an extra touch, sprinkle chopped parsley over the bites. It adds a pop of green. Pair them with colorful veggies or rice for a full meal. This makes your dish look inviting and delicious.
Pro Tips
- Use Fresh Ingredients: Fresh garlic and herbs elevate the flavor of the dish significantly compared to dried alternatives.
- Don’t Overcrowd the Pan: Ensure there’s enough space between chicken pieces in the skillet for even cooking and browning.
- Adjust Lemon Juice to Taste: Start with half the lemon juice and adjust to your preference for acidity and brightness in the dish.
- Serve Immediately: Garlic butter chicken bites are best enjoyed fresh off the stove for maximum flavor and texture.
Variations
Alternative Proteins
If you want to swap chicken, try shrimp or tofu. Both options work well.
– Shrimp: Use peeled and deveined shrimp. Cook them in the same garlic butter sauce. Shrimp cooks fast, so watch them closely. They only need about 3-5 minutes to turn pink.
– Tofu: Choose firm tofu for the best texture. Press it to remove extra water. Cut it into bite-sized pieces. Sauté the tofu in the garlic butter until it’s golden brown and crispy.
This gives you a tasty dish that can fit different diets or preferences.
Flavor Profiles
You can change the taste by using different spices and herbs. Here are some fun ideas:
– Cajun Seasoning: Add a kick with Cajun spices. This mix gives a bold and zesty flavor.
– Lemon Pepper: Use lemon pepper seasoning for a bright and tangy taste. It pairs well with the garlic.
– Herbs de Provence: This mix of herbs adds a lovely depth. It works well with the butter and garlic.
Feel free to mix and match these blends. Create a flavor you love!
Healthy Versions
You can make garlic butter chicken bites healthier. Here’s how:
– Use Olive Oil: Instead of butter, use olive oil. It’s lower in saturated fat and packed with healthy fats.
– Lean Chicken: Choose chicken thighs or even turkey for a leaner option.
– Add Veggies: Toss in bell peppers, broccoli, or zucchini. This adds nutrition and color to your dish.
With these swaps, you can enjoy a delicious meal while sticking to your health goals.
Storage Info
Refrigeration
To store leftovers safely, let the chicken bites cool first. Once cooled, place them in an airtight container. Make sure to seal it tight to keep the chicken fresh. Store the container in the fridge. Your garlic butter chicken bites will stay good for about three to four days in the refrigerator.
Freezing and Reheating
If you want to freeze the chicken bites, that’s easy too! Place them in a freezer-safe bag. Remove as much air as you can before sealing. Label the bag with the date. You can freeze them for up to three months. When you’re ready to eat, thaw the bites in the fridge overnight. Reheat them in a skillet over low heat. This way, they will stay juicy and flavorful.
Shelf Life
When stored properly, your garlic butter chicken bites can last a good while. In the fridge, they last three to four days. If frozen, they can stay tasty for about three months. Just remember, the sooner you eat them, the better they will taste!
FAQs
Can I use frozen chicken?
Yes, you can use frozen chicken for this recipe. Here are some tips:
– Thaw the chicken first: Always thaw your chicken in the fridge overnight or use the defrost setting on your microwave.
– Adjust cooking time: Frozen chicken takes longer to cook. You may need to add 5-10 minutes to ensure it reaches 165°F (75°C).
– Check for doneness: Use a meat thermometer to be sure the chicken is fully cooked and safe to eat.
What can I serve with garlic butter chicken bites?
You can pair garlic butter chicken bites with several sides. Here are a few great options:
– Steamed vegetables: Broccoli, green beans, or carrots work well.
– Rice or quinoa: These grains soak up the garlic butter sauce nicely.
– Salad: A fresh green salad adds a nice crunch and balance.
– Mashed potatoes: Creamy potatoes complement the savory chicken bites perfectly.
How do I make this dish spicy?
To add some heat to your garlic butter chicken bites, consider these options:
– Add red pepper flakes: Sprinkle in some red pepper flakes while cooking.
– Use spicy paprika: Swap smoked paprika for spicy paprika for a kick.
– Hot sauce: Drizzle your favorite hot sauce over the chicken before serving.
– Jalapeños: Sauté sliced jalapeños with the garlic for extra spice.
In this blog post, we explored how to make delicious garlic butter chicken bites. We discussed the key ingredients, important cooking steps, and helpful tips to get it just right. You can easily customize this dish to fit your taste too. With variations for proteins and health-conscious swaps, everyone can enjoy it. Proper storage ensures your leftovers stay fresh. Try these ideas, and enjoy delicious meals any night. Cooking can be fun and simpl

Garlic Butter Chicken Bites
Ingredients
- 1 pound boneless, skinless chicken breasts, cut into bite-sized pieces
- 4 tablespoons unsalted butter
- 5 cloves garlic, finely minced
- 1 teaspoon smoked paprika
- 1 teaspoon Italian seasoning blend
- to taste Salt and freshly ground black pepper
- 2 tablespoons fresh parsley, finely chopped (for garnish)
- 1 medium lemon, juiced
Instructions
- Begin by heating a large skillet over medium-high heat. Add the unsalted butter, allowing it to melt until it starts to foam but avoiding browning.
- Once the butter is foamy, introduce the minced garlic into the skillet. Sauté the garlic for approximately 30 seconds, stirring continuously, until it becomes fragrant and golden—be sure to watch closely to prevent burning.
- Next, add the bite-sized pieces of chicken to the skillet. Sprinkle them generously with smoked paprika, Italian seasoning, salt, and freshly ground black pepper. Stir the mixture thoroughly to ensure even coating of all chicken pieces with the spices and aromatic garlic.
- Cook the chicken, stirring occasionally, for 8-10 minutes until it turns golden brown and is fully cooked. Use a meat thermometer to check for doneness; the internal temperature should reach at least 165°F (75°C).
- Once the chicken is cooked, squeeze the juice of one medium lemon over the chicken bites. Stir the mixture to combine, allowing the flavors to meld together for an additional minute.
- Remove the skillet from heat. Before serving, garnish the chicken with freshly chopped parsley for a burst of color and flavor.

. To make great sesame garlic green beans, avoid burnt garlic. Burnt garlic tastes bitter. Keep the heat at medium when you sauté it. Stir it often for about 30 seconds until it smells good. This way, you get all the flavor without the bad taste. For even flavor, coat every green bean with the oil and garlic. Toss them well in the skillet. This helps each bean absorb the yummy sauce. The right mix makes each bite tasty. Serving your green beans in colorful dishes makes them pop! Use a bright bowl to show off the green color. It makes the dish inviting and fun. You can add extra garnishes for flair. Try more sesame seeds or a drizzle of sesame oil on top. Fresh green onions also add a nice touch. These small details can make your dish look special. Prepping your ingredients in advance saves time. Trim the green beans and chop the garlic ahead of time. This way, you can cook quickly when you’re ready. Using frozen green beans is another great option. They are quick to cook and still taste good. Just follow the same steps as with fresh beans for a tasty dish. For the full recipe, check out the detailed steps and enjoy! {{image_4}} If you need to avoid nuts, sesame oil can be swapped. Try using olive oil or avocado oil. Both oils add a nice flavor without nuts. This makes the dish safe for those with nut allergies. To boost the taste, add crushed red pepper. It gives a spicy kick that many enjoy. You can also add other veggies. Carrots or bell peppers work well. They add color and extra nutrients. For a healthier option, consider coconut aminos. This sauce is lower in sodium than soy sauce. It works great in this recipe. You can also use a low-calorie sweetener instead of honey. This keeps the dish sweet without extra calories. For the full recipe, check out the [Full Recipe]. To store leftover sesame garlic green beans, let them cool first. Place them in an airtight container. You can refrigerate them for up to three days. This keeps the flavors fresh and tasty. When you're ready to eat, reheat the green beans carefully. I suggest using a skillet. Heat it over medium-low heat. Add a splash of water to keep them moist. Stir gently for about five minutes. This method helps maintain their crispness. You can also microwave them in short bursts. Cover the dish to keep the moisture in. If you want to freeze the green beans, do this before adding the sauce. Prepare as usual, then freeze them in a single layer on a baking sheet. Once they are frozen, transfer them to a zip-top bag. This way, they won’t clump together. To thaw, place the bag in the fridge overnight. When ready to use, sauté them with the sauce. Enjoy the fresh flavors from your freezer. For the full recipe, check out the details above. You can make this dish vegan by removing honey. Instead, use agave syrup. This keeps the sweetness while keeping it plant-based. Agave syrup is a great substitute and works well in this recipe. Yes, you can use canned green beans. However, fresh beans taste better. Canned beans save time, but they can be softer. If you use canned, rinse them well to remove extra sodium. Fresh beans will have a crunch that makes this dish shine. These green beans pair well with many dishes. Try serving them with grilled chicken or tofu. They also go great with rice or quinoa. For a full meal, add a side salad for fresh flavors. Yes, this dish can be gluten-free. Use tamari instead of soy sauce. Tamari is a gluten-free soy sauce that gives a rich taste. Always check labels to ensure your ingredients are gluten-free. Adding protein is easy! You can toss in cubed tofu or grilled chicken. Shrimp also works well. Just sauté them before adding the green beans. This will create a well-rounded meal, full of flavor and nutrients. For the full recipe, check out the details above. This post explored how to make tasty Sesame Garlic Green Beans. We covered key ingredients like fresh green beans, sesame oil, and garlic. You learned step-by-step instructions, tips for sautéing, and how to present your dish beautifully. We also discussed variations, storage methods, and common FAQs. These green beans are not just a side dish; they can shine on any table. With the skills you now have, feel confident to create this dish and impress your friends and family. Enjoy cooking!](https://joymealplan.com/wp-content/uploads/2025/07/aeac6747-6887-42be-b9f7-ffc1813a8658-768x768.webp)
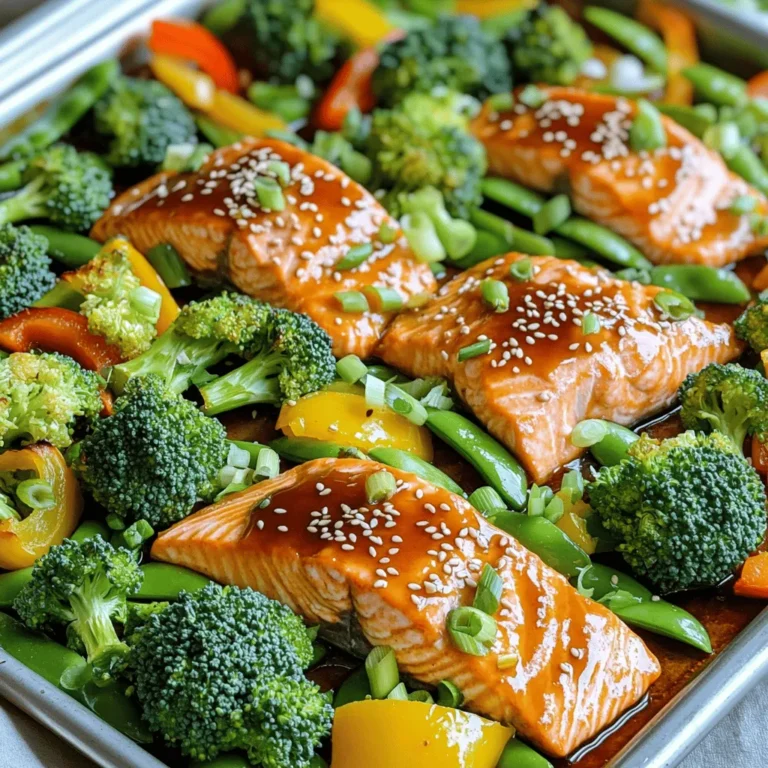
![- 1 lb boneless, skinless chicken thighs, cut into bite-sized chunks - 2 tablespoons olive oil - 1 cup broccoli florets, washed and trimmed - 1 red bell pepper, sliced into thin strips - 1 cup snap peas, ends trimmed - 1 small carrot, julienned - 3 green onions, finely chopped - 2 cloves garlic, minced - 1 tablespoon fresh ginger, grated - 1/4 cup low-sodium soy sauce - 2 tablespoons honey - 1 tablespoon rice vinegar - 1 teaspoon sesame oil - Salt and freshly ground black pepper to taste - Toasted sesame seeds for garnish The chicken is the star here. I use boneless, skinless thighs for juiciness. They cook quickly and stay tender. For veggies, I choose bright broccoli, sweet bell pepper, crisp snap peas, and a touch of carrot for color. Fresh garlic and ginger add a zing. The sauce blends soy sauce, honey, rice vinegar, and sesame oil for a sweet and savory mix. - Other protein options: shrimp, beef, or tofu - Additional veggies: zucchini, mushrooms, or bell peppers - Garnishes and toppings: cilantro, green onions, or chili flakes You can swap chicken for shrimp, beef, or even tofu for a vegetarian twist. Feel free to add other veggies like zucchini or mushrooms. They all taste great! Top with fresh cilantro or chili flakes for extra flavor. This dish is fun to customize based on what you have at home. For more details, you can check the Full Recipe. To start, gather your teriyaki sauce ingredients. You need low-sodium soy sauce, honey, rice vinegar, sesame oil, garlic, and ginger. In a small bowl, mix these ingredients well. A whisk works great here. This sauce adds a sweet and savory taste to your dish. Next, heat olive oil in a large skillet or wok. Use medium-high heat for the best results. When the oil shimmers, add the chicken chunks. Sprinkle a pinch of salt and black pepper over it. Cook for about 5-7 minutes. Turn the chicken often until it is brown and cooked through. Remove the chicken and set it aside on a plate. In the same skillet, add your vegetables: broccoli, bell pepper, snap peas, and carrot. Stir them for 3-4 minutes. You want the veggies to stay bright and start to soften. This keeps them crunchy and full of flavor. Now, return the cooked chicken to the skillet. Pour the teriyaki sauce over everything. Toss gently to coat the chicken and veggies evenly. Cook for another 2-3 minutes. This allows the flavors to meld nicely. Finally, remove the skillet from the heat. Stir in finely chopped green onions. This adds a fresh taste. To serve, spoon the stir fry onto plates. Sprinkle toasted sesame seeds on top for a nice finish. You can serve it over jasmine rice or alongside quinoa. This makes a complete meal. Enjoy the vibrant colors and flavors! - Overcooking the chicken: Overcooked chicken turns dry and tough. Cook it just until it's no longer pink inside. This usually takes about 5-7 minutes on medium-high heat. - Vegetable texture issues: If you overcook the veggies, they lose their crispness. Stir fry them for about 3-4 minutes. They should be bright and tender but still crunchy. - Flavor tweaks: Want more heat? Add chili flakes or sriracha to your teriyaki sauce. Prefer a sweeter taste? Mix in more honey or brown sugar. Adjust the sauce to match your taste. - Alternative vegetables: You can swap out the veggies based on what you have. Try bell peppers, zucchini, or even bok choy. Mix and match for fun flavors and colors. - Sweetness adjustments: If the sauce is too sweet, add a splash of soy sauce. If it’s not sweet enough, add more honey. Taste as you go to get it just right. - Thickness options: To thicken your sauce, simmer it longer in the pan. For a thinner sauce, add a bit of water or broth. This helps you control the sauce for your liking. By following these tips, you'll create a teriyaki chicken stir fry that's both delicious and fun to make. If you're ready to dive in, check out the Full Recipe for all the details! {{image_4}} You can easily make this dish fit your diet. - Low-Carb Options: Swap the chicken for shrimp or tofu. Use cauliflower rice instead of white rice. This keeps the flavor but cuts carbs. - Vegetarian or Vegan Swaps: For a plant-based dish, use tofu or tempeh. You can also add more veggies like bell peppers or mushrooms. You can give your stir fry a twist. - Different Sauce Options: Try a hoisin sauce or sweet chili sauce for a different taste. You can even add peanut butter for a creamy texture. - Cultural Twists on Stir Fry: Add spices like curry powder for an Indian flavor. Or use a teriyaki sauce recipe from Japan. Each culture adds its unique flair. Using seasonal produce can enhance your dish. - Best Vegetables to Use Per Season: In spring, use asparagus and snap peas. In summer, add zucchini and bell peppers. Fall is great for carrots and squash. Winter brings hearty greens like kale. - Sustainable Sourcing Tips: Shop local farmers' markets. This supports local farms and gets you fresh ingredients. You can also look for organic labels to ensure quality. Explore these options to make your teriyaki chicken stir fry even more special! To store your teriyaki chicken stir fry, first let it cool down. Place it in an airtight container. This helps keep the flavors fresh. You can refrigerate it for up to three days. If you want to keep it longer, freezing is a good option. Use a freezer-safe container or bag. It can last up to three months in the freezer. When you're ready to eat your leftovers, reheating is easy. For the microwave, place the stir fry in a bowl. Cover it with a microwave-safe lid. Heat it for one to two minutes, stirring halfway. This ensures even heating. If you prefer a skillet, heat a small amount of oil over medium heat. Add the stir fry and stir until warm, about three to five minutes. In the fridge, your teriyaki chicken stir fry lasts about three days. Be sure to check for signs of spoilage before eating. If you see any mold or if it smells off, it's best to throw it away. When frozen, the stir fry can sit for up to three months. After that, the taste may not be as good. Always trust your senses when it comes to food safety. You can serve teriyaki chicken stir fry with rice or noodles. Here are some great options: - Jasmine rice: This fluffy rice pairs well with teriyaki sauce. - Brown rice: A healthier option with more fiber. - Egg noodles: These add a nice chew to your meal. - Quinoa: A protein-rich choice that adds texture. - Side salad: A fresh salad can balance the flavors. Try pairing your stir fry with steamed or sautéed vegetables. Broccoli, bok choy, and carrots work well. You can also serve it with a light soup for a complete meal. Yes, you can make teriyaki chicken stir fry in advance. Here are some tips: - Cook and cool: Prepare the dish fully, then cool it quickly. - Store properly: Place it in an airtight container in the fridge. - Reheat gently: When ready to eat, heat it on the stove or in the microwave. Meal prep makes busy nights easier. You can also chop veggies ahead of time. This saves time and lets you enjoy a fresh meal. Teriyaki chicken stir fry is tasty and nutritious. Here are the key facts: - Caloric content: One serving has about 350 calories. - Protein: It has around 30 grams of protein from chicken. - Carbohydrates: Expect about 30 grams, mostly from veggies and sauce. - Fat: It contains about 10 grams, mostly healthy fats from olive oil. This dish is rich in vitamins and minerals, thanks to the colorful veggies. Broccoli offers vitamin C, while carrots are high in beta-carotene. Enjoy this dish for a balanced meal! For the complete instructions and ingredient list, check out the [Full Recipe]. Teriyaki chicken stir fry is a simple dish to make at home. You learned key ingredients, how to prepare the sauce, and tips for cooking. Avoid common mistakes like overcooking chicken. Customize your stir fry with different veggies or proteins to suit your taste. Remember, fresh ingredients make a big difference. Whether you serve it fresh or store leftovers, this dish is delicious. Enjoy creating your own unique stir fry!](https://joymealplan.com/wp-content/uploads/2025/06/4a36c5e3-194c-4011-88f6-f3f1f5f34a05-768x768.webp)

![To make a hearty Sweet Potato Black Bean Chili, you will need: - 2 medium sweet potatoes, peeled and cut into ½-inch cubes - 1 can (15 oz) black beans, thoroughly drained and rinsed - 1 large onion, finely diced - 2 cloves garlic, finely minced - 1 red bell pepper, chopped into small pieces - 1 can (14.5 oz) diced tomatoes with their juices - 2 cups vegetable broth (preferably low-sodium) - 1 tablespoon chili powder - 1 teaspoon ground cumin - 1 teaspoon smoked paprika - ½ teaspoon cayenne pepper (adjust according to your spice preference) - Sea salt and freshly cracked black pepper, to taste - 2 tablespoons olive oil Adding toppings can enhance the chili's flavor and look. Here are some tasty options: - Diced avocado for creaminess - Fresh cilantro leaves for a pop of color - Lime wedges for a zesty touch Each ingredient brings unique health benefits: - Sweet potatoes are rich in vitamins A and C. They provide fiber and antioxidants. - Black beans are a great source of protein and fiber. They help keep you full longer. - Onions contain antioxidants and may help reduce inflammation. - Garlic has immune-boosting properties and adds flavor. - Bell peppers are high in vitamin C and help with skin health. This chili is not just filling; it also packs a nutritious punch, making it a well-rounded meal for any day. For the full recipe, check out the recipe section above. Start with a large pot. Heat 2 tablespoons of olive oil over medium heat. Wait until the oil shimmers. Add 1 finely diced onion and 1 chopped red bell pepper. Sauté for about 5 minutes. Stir often until the onion is soft and clear. Next, add 2 minced garlic cloves. Sauté for 1 more minute, just enough to let the garlic smell good. Now, it’s time for the sweet potatoes. Add 2 medium sweet potatoes, cut into ½-inch cubes. Sprinkle in 1 tablespoon chili powder, 1 teaspoon ground cumin, 1 teaspoon smoked paprika, and ½ teaspoon cayenne pepper. Don’t forget salt and pepper to taste! Stir well to coat the sweet potatoes in the spices. Pour in 1 can of diced tomatoes with juices and 2 cups of vegetable broth. Mix everything together and bring it to a boil. Once boiling, lower the heat. Cover the pot and let the chili simmer for 25 to 30 minutes. The sweet potatoes should be soft but not mushy when you poke them with a fork. After the sweet potatoes cook, stir in 1 can of black beans, drained and rinsed. Heat through for another 5 minutes. This gives the beans time to warm up. Taste the chili and add more salt or pepper if you want. - Sauté onion and bell pepper: 5 minutes - Sauté garlic: 1 minute - Simmer chili: 25 to 30 minutes - Heat black beans: 5 minutes - Cut sweet potatoes into even pieces for uniform cooking. - Stir the chili occasionally to prevent sticking. - Adjust the spice levels based on your taste. - Let the chili sit for a few minutes before serving; this helps the flavors blend. For the full recipe, check out [Full Recipe]. Enjoy creating this hearty dish! Many people rush the cooking. Take your time to sauté the onion and pepper. This step builds flavor. If you skip it, your chili may taste flat. Another mistake is adding too much spice at once. Start small, then adjust to your taste. Remember to drain the black beans well. This avoids a watery chili. Use fresh herbs like cilantro or parsley for a burst of freshness. A squeeze of lime juice adds brightness. You can also try adding a splash of soy sauce for depth. If you want more heat, add diced jalapeños or a dash of hot sauce. Lastly, consider a drizzle of olive oil before serving. This adds richness and a nice finish. For this chili, you need a sturdy large pot. A good pot helps with even cooking. A sharp knife and cutting board make prep easy. You also need measuring spoons for spices and a can opener for the beans and tomatoes. A wooden spoon works best for stirring. Having these tools ready will make your cooking smooth and fun. For the full recipe, refer back to the main article. {{image_4}} You can switch up beans in this chili. Try using kidney beans or pinto beans. Both add a different flavor and texture. If you want a creamier chili, use cannellini beans. Mixing beans can make your dish more fun and unique. Feel free to add more veggies. Corn adds sweetness and crunch. Zucchini or carrots can boost nutrition and color. For a protein boost, add cooked quinoa or lentils. You can even throw in some chopped kale or spinach for added greens. These additions can change your chili into a new dish each time. Want more heat? Add extra cayenne pepper or diced jalapeños. For a milder taste, reduce the cayenne or skip it altogether. You can also add a dash of hot sauce when serving for those who like it spicy. If you love smoky flavors, try adding chipotle peppers in adobo sauce. Adjust the spices to fit your taste and make it your own. For the full recipe, check out the Sweet Potato Black Bean Chili section above. To keep your Sweet Potato Black Bean Chili fresh, let it cool first. Once cool, transfer it to an airtight container. It’s best to refrigerate the chili within two hours of cooking. When stored correctly, it lasts in the fridge for about 4 to 5 days. Be sure to label the container with the date. This helps you track how long it has been stored. If you want to keep your chili for a longer time, consider freezing it. First, let the chili cool completely. Then, pour it into freezer-safe bags or containers. Make sure to leave some space for expansion. Seal them tightly to prevent freezer burn. You can freeze the chili for up to 3 months. When you’re ready to enjoy it, just thaw it overnight in the fridge. To reheat your chili, you have a few options. The microwave is quick, but it can heat unevenly. Stir the chili halfway through heating. For the stove, pour the chili into a pot and heat it over medium heat. Stir often until it’s hot. This method helps maintain flavor and texture. If it seems thick, add a splash of vegetable broth or water. Enjoy your chili just like the first time you made it! For the full recipe, check out the details above. You can use pinto beans or kidney beans instead of black beans. They have a similar texture and flavor. If you want a different taste, try chickpeas. They add a nutty flavor and work well in this chili. Just make sure to drain and rinse them, just like you do with black beans. Yes, you can make this chili in a slow cooker! Start by sautéing the onion, garlic, and bell pepper on the stove. Then, add all ingredients to the slow cooker. Cook on low for 6 to 8 hours or on high for 3 to 4 hours. This method lets the flavors blend over time. Leftovers can stay fresh in the fridge for about 4 to 5 days. Make sure to store the chili in an airtight container. This helps keep it flavorful and safe to eat. If you want to keep it longer, you can freeze it! Yes, this chili is perfect for vegans! All ingredients are plant-based and wholesome. You can enjoy it without any worries. It’s full of flavor and nutrients, making it a great choice for everyone. You can find the full recipe [here](#). In this blog post, we explored how to make Sweet Potato Black Bean Chili. We covered the full list of ingredients, cooking steps, and essential tips to avoid common mistakes. Remember to experiment with toppings and variations to make it your own. Proper storage ensures your leftovers stay tasty. This chili is not only delicious but also packed with nutrients. Enjoy this easy recipe that fits many diets, including vegan. Cooking it can be fun and rewarding. Try it out, and discover your new favorite dish!](https://joymealplan.com/wp-content/uploads/2025/07/8ade8b74-c48b-4df7-852e-5be035604d83-768x768.webp)